Other interesting ideas from scrap materials
Let's look at a few more ideas for making figurines for garden decoration from simple scrap materials.
Pebble figurines
All you need is pebbles and paints. Select stones of different sizes, degrease them and coat them with paint, following the color scheme of the ladybug - in a black and red palette. The designs can be anything from cats to entire paintings: such stones always look stylish and appropriate.
Vegetable sculptures for Halloween
The most short-lived, but such a bright and seasonal option for decorating your own garden.
It’s a good idea to spend part of the pumpkin harvest preparing for Halloween and carving fancy creatures out of them. The most popular figure is the Jack-O-Lantern. What you need: pumpkin, knife, candle.
Instructions:
- Wash the pumpkin thoroughly and rub with a soft cloth until shiny.
- Cut off the top and remove the seeds with pulp. Don't throw away the hat with the ponytail - it will come in handy.
- Using a marker, draw holes - mouth, nose, eyes.
- Use a knife to cut holes along the outline.
- Place the candle inside the pumpkin, set it on fire and cover the melon with a “lid”. Jack Lantern is ready!
You can create absolutely any face from a pumpkin.
Ice sculptures
During the cold season, it’s easy to decorate your yard with more than just a snowman! Make spectacular ice balls.
You need balloons, empty bottles, water, a funnel, food coloring (experienced craftsmen suggest gouache) ... well, you need frost. If you have a freezer, freeze in it, and when there are severe frosts outside the window, about -20, feel free to use natural temperatures.
It is better to make balls with a diameter of 10-15 cm per 1.5 liters, because large 3-liter balls may not withstand frost and burst (although then you will get hemispheres, which are also useful).
Manufacturing process:
- Dissolve a standard jar of gouache from a regular children's paint set in 0.5 liters of water. This way you will get a bright concentrate.
- Pour the solution through the funnel into the ball “to the brim.”
- Place the ball on the water tap and get the required amount of water if there is not enough water.
- Tie the ball and freeze it. If there are a lot of balls, it is better to freeze them in their natural environment - by spreading the balls in the snow.
- Leave it overnight. In the morning, remove the “wrapper” and decorate the area with balloons!
If there are no paints, then inside the balls you can put glitter, New Year's tinsel, dried flower petals, berries and fruit slices, spruce branches and small cones, and grain. Fill the balloons with water and freeze. You can also use medical gloves, silicone muffin tins, plastic cups, etc. instead of balls.
Handkerchief doll or Vyatka doll - how to make
As we have already said, there is a small tight twist in the Handkerchief’s head. Otherwise, the process of making it is no different from other scarf dolls, such as Feeder and Cabbage. To create a Vyatka doll you will need several square scraps of the same size and a few more details. Just in case, let’s repeat the sequence again:
- we make a knot out of a white square, placing a small tight roll of fabric in the center of the flap - this is the head;
- from the two opposite ends of this knot we make hands with palms;
- for the chest we take two colored squares - these are ordinary knots with rags inside;
- we fix the chest;
- We fold the rest of the scarves like an airplane, apply them evenly from the back and sides and secure them with a thread at the waist;
- further - an apron with a belt and a warrior with a scarf.
Handkerchief doll view from the back
This is the basic design of the doll. After this, you can decorate the details with embroidery, braid, beads and other decorative elements. Just pay attention to the moderation of decorations and their appropriateness, otherwise sometimes they will make a Christmas tree instead of a doll...
Please note that the number of flaps involved in imitation clothing must be odd - from five or more. There are seven of them on our Shawl, Veselina said that they were just right.
There are several more ways to make a Vyatka play doll, in one of them the arms are made from small handkerchiefs and attached to the side, in the other even the legs are made from the same flap as the arms. When such dolls come to live in the city, we will definitely show them to you.
Veselina went to show the Handkerchief her new home, and I will say goodbye. Thank you for your attention, good luck everyone, bye.
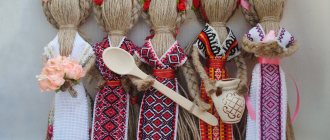
Making a rag doll Vyatka Platochnitsa
Today I want to introduce you to an unusual rag doll. This young lady's name is Platochnitsa. The Vyatka region is considered the birthplace of the doll, which is why you can find the name Vyatka Shawl. What makes this rag beauty unique? The answer lies in the name, because the doll's skirt consists of several scarves.
According to some sources, the Handkerchief was considered a female amulet, but such dolls were made by young girls, so it is quite possible that the Handkerchief is a play doll. Girls received a box-chest as a gift from their father or grandfather, where they kept beautiful scraps of fabric, which were used to make rag dolls.
There is a beautiful version that the mother gave the Handkerchief to her daughter on her wedding day and gave instructions to “pour out” all the sorrows and tears to the doll. And when my mother came to visit, she asked to see the doll. If the Handkerchief was like new, then the daughter lives happily.
We won’t reveal the essence of the doll; our task is to make this beauty with our own hands. The complexity of production is low, so girls can also be involved in the work. Perhaps it is with this doll that the passion for and introduction to original folk art will begin.
To work we will need:
1. Colored cotton fabric - 4 squares 19 x 19 cm for a skirt. Squares can be taken from fabric with different prints.
2. Plain light colored fabric (cotton, linen) for the head and arms, square 19 x 19 cm.
3. A strip of dense fabric for filling the head, 5 x 30 cm. (We will make a roller from it)
4. A triangle of colored fabric 30 x 20 x 20 cm, for a headscarf.
5. Fabric for the apron 6 X 7 cm.
6. A piece of lace for decorating an apron, braid for a headdress.
7. Natural red threads.
8. Vata.
To get started, take a long strip of fabric 5 x 30 cm, fold it in half lengthwise, and then bend it in half along the transverse line.
We twist the resulting strip into a tight roller, starting from the cuts. We tie the roller with a thread in the middle. Thus we made the filling for the doll's head.
Next, take a square of light fabric and place a roller in the center. Place it so that it lies diagonally.
We bend the square diagonally, the roller is inside.
We lower the corners of the resulting triangle down and tie the fabric around the roller with thread. This is how we formed the head. We will try to bandage it so that no wrinkles form on the doll’s face.
Let's straighten the side corners to the sides - these will be the arms, the central ones down - this will be the torso of the doll..
At the hands, bend the corner and cuts inward by 0.5 cm.
Let's shape the palms of the hands; to do this, tie the hands with a thread, stepping back from the edge of the corner 0.5 cm.
We tie it with a thread along the chest (under the arms) and cross to cross along the chest.
Let's start making the chest and skirt. The front of the skirt and the chest are shaped at the same time. We take two squares of colored fabric, place them wrong side up, and place small cotton balls in the center.
We gather the fabric around the cotton ball in a box and tie it with thread. We leave one end of the thread free, 5 cm long. We straighten the corners beautifully.
We will do the same with the other square, then we will tie them together with the free ends of the thread.
We tie the resulting blank to the doll along the chest line (under the arms) with the free ends of the thread.
The doll has a chest and a skirt in front. But there is no skirt at the back yet.
Let's start designing the back panel of the skirt. Take the remaining squares of fabric and fold them diagonally twice. Place the resulting triangles on the table with the angle up and the cuts down. Place the folds on the left, and bend the upper right corners to the center.
Let's put the doll face down, and put the resulting triangles on top, so that the upper corner is at the level of the neck and tie it under the chest with thread. Let's straighten the triangles so that they lie flat.
Let's put an apron on the doll. I decorated mine with lace. Place the apron on the doll's face, inside out, and tie it under the chest with thread.
Let's straighten the apron down.
All that remains is to put the headdress on the doll. First, the headband. To do this, take a piece of braid (width 1.5 - 2 cm). We measure the length according to the circumference of the head plus 3cm. We wrap the braid around the head and tie it at the back with bobbin thread, thus securing it to the head.
We tie a scarf on our head, tying the ends at the back.
So the Vyatka Handkerchief is ready.
I hope everything worked out for you!
Creative success!
Figures made of concrete and plaster
From the most popular materials you can create a huge number of diverse, interesting and stylish figures that will become a wonderful decoration for your garden plot. Detailed step-by-step instructions for making several figures will also come in handy.
Concrete leaves
The easiest option for creating a figurine for the garden is concrete leaves, which even an inexperienced craftsman can make from cement mortar and burdock leaves.
From such leaves, in turn, you can build anything, even a waterfall. A garden path made of leaves looks no less impressive. Concrete leaves make a great base for water from a downspout. The original “stone flower” and at the same time a birdbath are made from the same leaves. Cute giant “leaf mushrooms” are another fun idea.
Everything you need for work:
- large burdock leaves;
- Portland cement;
- sand;
- water.
Proceed like this:
- Pick the most beautiful large leaves without cracks or damage, wash them from dirt, and dry them.
- Mix cement and sand in a ratio of 1/3, adding water. The consistency of the curd mass should be obtained.
- To create a depression in the finished sculpture, place the sheet on a bag of sand.
- Fill the top of the sheet with cement.
- Wait for the solution to dry completely. Then peel off the sheet.
- Transform finished leaves into tall or short sculptures, birdbaths, planters, and more.
How to make a large sheet of cement is shown in the video below:
Garden mushrooms made of gypsum
You will need for work:
- gypsum (can be diluted with PVA glue);
- cap container;
- a log (or a “pipe” from a plastic bottle) as a leg.
Manufacturing instructions:
- Coat the log with plaster and send it to dry.
- Take a deep plate of suitable size and cover it with polyethylene. If there is no suitable container, you can make a depression in the sand and cover it with burdock.
- Fill the container with plaster.
- When the product is dry, sand it with sandpaper.
- Paint and glue the two parts of the figurine, and “plant” it in the flowerbed.
How to make a mushroom from plaster is shown in the following master class:
Which topic should I choose?
But with the theme there is a huge scope for flights of fancy. The most popular topic is fairy-tale heroes . Russian folk tales, foreign or your own - you choose.
We recommend watching a master class that shows how to make 4 types of cartoon garden figurines:
An easy-to-execute option is a magic forest . “Living” stumps, water stumps or goblin stumps - all this can be made literally from old snags.
Another option for making figurines in the “living forest” style is painting stones. Large smooth boulders easily turn into Cheshire cats, turtles, and gnomes. Pebbles also make very beautiful houses.
Do you dream of organizing a garden in a marine style , but the climate does not allow you to grow palm trees? You can simply place marine attributes around the site: barrels and chests, a steering wheel and an anchor, a lighthouse and a mooring rope, seagulls and albatrosses, corals and other details of the seabed.
And lighthouses are built from old flower pots. If you put a lantern on top, it will also be a functional design. How to make a garden beacon with your own hands is shown in the master class below:
Build the “Secret” from the book “Scarlet Sails” by Alexander Greene or the pirate schooner “Black Pearl”, like Jack Sparrow.
There are other improvised options using improvised means.
Very skillful dolls for the garden
Our gardens are beautiful, cozy, well-groomed and... as a rule, too serious. Sometimes you just want to add some fun touch. For example, place homemade funny dolls in it.
Marina Kuzmina, author of books on gardening and handicrafts
We decided to make the dolls with our own hands, and began making them from what we had on the farm. We ourselves didn’t notice how carried away we were, so over time we formed a whole “puppet theater.”
We dressed up our “actresses” and sent them “for a walk” to the most beautiful corners of the garden. Now we carefully look after these people: when it rains, we cover them with film or umbrellas, and those who are lighter, we bring them into the house or under a canopy, and hide them in the house for the winter.
Malvina child of the bouquet
Malvina was created using seemingly completely waste items: packaging from flower bouquets left over from one of the family anniversaries. The elegant bags made of corrugated paper, trimmed with foil, surprisingly resembled fluffy women's skirts with frills, which, in fact, decided their fate.
Making such a doll is actually not difficult. The main thing is to accumulate 15 multi-colored flower bags and prepare a stable stand for the doll’s body. We do it like this: we insert a wooden stick 120-150 cm high into the cross of the New Year tree and secure it firmly. The stand can also be attached to an old car steering wheel.
1. We string flower packages onto the stand, starting with the largest ones. They need to be positioned with the wide part down, each attached with a thin wire - this will create a multi-tiered skirt.
2. At the shoulders, we attach a couple of smart bags with the wide part up, and bend the edges down, as if we were “sewing on” a wide collar.
3. Next we make the head. Take a piece of foam rubber measuring 35x50 cm and 1.5 cm thick. Sew the shorter sides together. Fill the resulting pipe, 35 cm long, with padding polyester or cotton wool, and pull a flesh-colored elastic stocking over it. Next, we tie it in a knot above the crown, and under the stocking in the face area we place a piece of elongated foam rubber.
4. We fix the head “on the neck”. We take a wooden rod 25-30 cm long (with a diameter of at least 3 cm) and insert it into the open part of the foam pipe - to its middle. We pull the bottom of the stocking tightly and fasten it to the rod. The free part of the rod is the neck.
5. Now you can do your face. We sew the base of the nose with small stitches, grabbing the stocking and the foam rubber with the needle at the same time. Attach the plastic eyes using universal glue or use large buttons. You can buy ready-made lips for a doll, but you can also make them yourself. Cover a piece of oval-shaped foam rubber with red knitwear and stitch it in the middle with red thread, forming sponges. We sew them to the doll's face at the corners.
6. The finished head remains to be screwed with wire behind the neck to the stand, covering the attachment point with a lush bow or scarf. Of course, you can’t do without a wig, which is also sewn to the head. Well, the final touch - you need to brown your cheeks with pink powder. Here you have Malvina - in all her glory.
Cheerful gardener
1. We decided to make a tall, stately female figure using a plywood mannequin. For such a torso, it is convenient to use clothes from your own wardrobe, “composing” an outfit from old things.
2. First, we prepared a human-sized “torso”. To do this, we cut out the outline of a mannequin from a piece of hardboard with the following dimensions: an oval head 25 cm high and 20-25 cm wide; neck 10 cm long; shoulders 50 cm wide; torso to waist height 65 cm. Then the hardboard was strengthened on a wooden rod 75 cm long and inserted into a wooden cross. We put a long-sleeved blouse, an underskirt and a sundress on the mannequin. To give the lady a natural rounded shape, we put a bust on the mannequin and put plastic cups into it (you can use the bottoms of plastic bottles).
3. Made a face. You needed: foam rubber 2 cm thick; flesh-colored elastic stocking; wig; doll eyes and lips (can be cut from felt). A circle was cut out of foam rubber to the size of the hardboard “head” and glued to the mannequin. The wide part of the stocking was pulled over the top (the excess was cut off). Eyes and lips were glued on. They put on a wig and tied a large scarf around their head, disguising their neck.
4. The sleeves of the blouse were stuffed not very tightly with padding polyester and the ends were tied on the handle of a basket of apples. From afar, our garden dolls look like real country ladies slowly walking around the garden. It happened that our guests mistook them for unfamiliar summer residents and greeted them politely. But to be honest, we ourselves, who created these dolls, sometimes forget ourselves and also mistake them for our many guests.
You might be interested in:
Decorating a well at the dacha
Stump in landscape design
Coniferous plants for the garden
We are decorating the winter garden for the New Year...