Layout "Lake Baikal"
Tatiana Kozlova
Layout "Lake Baikal"
2. Activate and enrich children’s vocabulary, broaden their horizons.
3. To instill in children a humane and caring attitude towards the nature of our Siberian region.
The water there is clear and clean.
The most picturesque mountains, hills in the open air.
Our whole great country is proud of him.
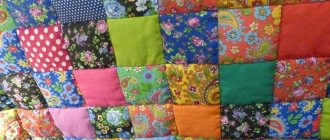
Together with the parents of the middle group, “ Lake Baikal model .
With the help of this model , children of the middle group got acquainted with the flora and fauna of Lake Baikal .
The children learned how unique and amazing Baikal water is .
The children saw with their own eyes that Lake Baikal is surrounded on almost all sides by the most picturesque mountains and hills of extinct volcanoes.
With the help of this layout , children learn to write descriptive stories about the flora and fauna of Lake Baikal .
Environmental project “Baikal - the pearl of Siberia” Municipal budgetary preschool educational institution kindergarten No. 3 Guslyakova Galina Vladimirovna Project “Baikal.
Presentation “Flora and fauna of Lake Baikal” Relevance. We live in a region where one of the wonders of the world is located - Lake Baikal. He is known all over the world and is our pride. I converted.
Photo sketch “Beautiful Baikal” I had a great desire to publish a series of photo sketches on the topic: “Nature of Russia”. And the first work will be on the topic: “The most beautiful. Summary of an integrated lesson in the preparatory group “Geography of Friendship. The Republic of Buryatia. Lake Baikal" Integration of educational areas: cognition, speech development, artistic and aesthetic development, social and communicative development.
Scenario for the play “Swan Lake” Swan Lake. For younger and middle ages Characters: Leading Prince Queen Mother King Father Heralds Swan Girls Swan Princess.
Lapbook “Lake Baikal” Good day, dear colleagues! We present to your attention the laptop “Lake Baikal”. From the outside it looks like this: From the inside.
Plan-summary of the lesson “Lake Baikal” for children of the second junior group Plan-summary of the lesson “Lake Baikal” for children of the second junior group Purpose: to introduce children to Lake Baikal. Objectives: 1. Expand ideas.
Source
DIY Projects
There are a great many options for manufacturing furnaces for mining. They are made from metal blanks or used containers (cylinders), with pyrolysis and turbo burners, with drip feed or blowing. We will focus on two popular models that are more suitable for independent design and assembly.
Sheet metal model
In garages and nearby areas you can often find unnecessary metal parts, cast iron plates, steel sheets, and pipes. Among them there will probably be several items suitable for welding a stove.
For example, to make a simple model you will need the following material:
- old steel sheet 3.5 mm thick;
- a piece of steel pipe with a wall thickness of 4.5 mm;
- tin pipe for chimney with a diameter of 110 mm.
In addition, you will need a tool that any garage owner usually has available: a welding machine with electrodes, a circular saw with cutting and grinding discs, a hammer, and pliers. A set of working protective clothing for welding work with goggles and gloves is required.
Before the welding process, we prepare some of the parts.
When some of the parts are prepared, we begin welding work, but we don’t put the circular saw far away - it can be useful for cutting out or cutting off individual fragments.
To prevent precipitation and debris from entering the chimney, we secure the cap at the end with self-tapping screws. The safe height of the chimney is about 4 m. Combustion products discharged above the roof will quickly dissipate in the atmosphere and will not harm people or plants.
After complete completion of the assembly and installation work, it is necessary to carry out testing and, if flaws are found in the work, try to correct them. We check the combustion quality in the following order.
During the design and welding process, the following errors may be identified:
- too thin walls of chambers and pipes (rapid wear, inability to retain heat for a long time);
- the hole is not large enough to fill oil and adjust the combustion force;
- poorly chosen location for installing the stove;
- different diameters of the stove pipe and chimney (you will have to use an adapter for connection);
- inaccurately adjusted dimensions of parts for welding (the seams will be loose and will not last long);
- ignition with gasoline - an explosion is possible, it is better to use solvents (White spirit and the like).
How to make a stove from a gas cylinder?
The second option, which has become popular thanks to a successful assembly scheme, is a stove made from a regular gas cylinder, empty of contents.
You can connect a heat exchanger with a homemade air swirler and a fan to the body from the cylinder, and use a freon cylinder as a container for oil
First we draw up a diagram of the furnace.
Construction details: 1 – base of the body; 2 – perforated pipe; 3 – heat exchanger pipe; 4 – partition; 5 – visor; 6 – evaporator for oil; 7 – coupling; 8 and 10 – tube for feeding waste; 9 – ball valve; 11 – mining tank; 12 – swirler; 13 – fan
Cylinder volume – 50 l. The wall thickness of metal pipes is 4-5 mm, internal cross-section is 100 mm. To create a partition between the two chambers and make a visor, it is better to use pieces of metal sheet with a thickness of at least 4 mm. A brake disc is used as a reservoir for oil from which evaporation occurs.
The oil enters the evaporator through a ½ inch pipe. The part of the pipeline above the ball valve can be flexible to ensure ease of installation. A ball valve is installed so that it is always possible to shut off the fuel supply in an emergency. To manufacture the swirler, a pair of metal corners welded together was selected.
Next, we’ll look at how to make a compact waste oil stove for a utility room or garage.
In order for heated air to circulate throughout the room, it is necessary to install a heat exchanger. This is a steel pipe with a diameter of 100 mm. The most suitable place is inside the housing, between the burner and the flue pipe. To hold the flame, we weld a metal platform cut from a 4 mm sheet to the top of the heat exchanger.
We organize forced air supply using a duct fan. It can be made automatic by using a thermal relay. To better preserve heat, we place a swirler inside the pipe - a structure of two welded metal corners, the shelves of which are cut and deployed in the form of blades.
Then, from a freon cylinder, we make a tank for storing and supplying waste. The advantage of a tank of this design is a needle valve, convenient for adjusting the fuel supply
It remains to make two doors, each of which has nuances. The upper mandatory part is a strong lock that ensures reliable closure while the oven is operating. We make a gap at the bottom of the second door so that air can freely flow inside the housing and support the combustion of the oil.
After manufacturing the furnace, we carry out testing. Pour a little oil into the pan, then place a small piece of sponge soaked in solvent there. Set fire to the sponge. The oil heats up, begins to evaporate, and a flame appears in the burner.
We gradually feed the oil into the evaporator through the tube. If it is necessary to stop the combustion, shut off the exhaust flow (close both valves). As soon as the residues in the pan are burned, the combustion process will stop.
Schemes and rules for making a stove for mining from a pipe are given here. We recommend that you read the useful information.
Presentation “Making a model of “Lake Baikal” using the plasticineography technique”
Snezhana Kochetkova
Presentation “Making a model of “Lake Baikal” using the plasticineography technique”
Modern education pays great attention to the study of the nature of their native land, a regional component, which allows children to interact with nature without harming it.
Children develop knowledge about the diversity of nature, children get acquainted with the animal and plant world. They learn to establish relationships between organisms and learn about the adaptability of animals to their environment.
When getting acquainted with nature, the child realizes the importance of the world around him, his horizons expand. The vocabulary is also enriched, and this helps make the child’s speech varied, expressive, teaches him to construct sentences correctly, and freely express his thoughts. Helps to awaken an emotional and sensual attitude towards the surrounding nature. Children develop an interest in cognitive activity and observation, and this in turn encourages children to ask a lot of questions and look for answers to them with interest.
the material presented in the presentation when working with children . this layout with children of different age groups from 3 to 6 years old
Attached files:
Photo report “Doves of Peace in Children's Art” using the technique of “plasticineography”, “application” and design Dear friends and respected colleagues, good day!
I bring to your attention a photo report of children's creativity “Doves of Peace”, completed. Photo report. Making a game model “Teremok” There is a teremok-teremok in the field, It is not low, not high, not high. I bring to your attention a game model based on the fairy tale “Teremok”. For development. Making a model “Inhabitants of the underwater kingdom” (photo report) Photo report Making a model “Inhabitants of the underwater kingdom” Purpose: Consolidating children’s knowledge about the diversity of the inhabitants of the underwater world and. Making the “Underwater World” model Goal: creating a social situation of development in the process of joint activity of “Underwater World” modeling. Objectives: create conditions for.
Summary of an integrated lesson in the preparatory group “Geography of Friendship. The Republic of Buryatia. Lake Baikal" Integration of educational areas: cognition, speech development, artistic and aesthetic development, social and communicative development. Plasticineography as a type of non-traditional modeling technique for the development of a child Plasticineography is a new direction of creativity in the visual arts. One of the varieties of non-traditional plasticine drawing technique. Virtual trip to Lake Baikal with a master class We also received a parcel from distant Buryatia from my colleague on the Maam.ru website. Lana Cherkashina. And in it were: So beautiful.
Source
What is oil waste?
Waste oil or used oil is the product that remains as a result of the operation of a car engine. Motor, transmission or other industrial oil accumulates in large quantities at service stations, in automobile workshops, as well as among ordinary car owners.
During use, the oil loses its beneficial qualities, accumulates salts, slags, resins, and tiny particles of metal, but people have found use for such an illiquid product.
It is forbidden to dump the waste into the ground, since the most dangerous product for nature completely destroys all living things. An alternative is to deliver waste material to special collection points for further processing.
In small quantities it is used for household needs:
- lubricate working tools (for example, chainsaws);
- impregnate wood (sleepers for railway lines);
- lubricate rubbing parts of light vehicles (scooters, bicycles);
- used as a fire starter;
- cover surfaces filled with bitumen.
As at the end of the last century, waste is used as fuel for furnaces installed in semi-residential premises - garages, utility rooms, workshops. If you build a stove yourself, then with constantly replenished supplies of used oil, heating the room will be practically free.
How to make a DIY lake for crafts
Probably one of the many pleasant activities is watching water.
It doesn’t matter what it is - a stream, a pond, a sea or an ocean. The works of many artists try to convey all the power, beauty and romance at the same time, to capture a certain moment in time. It is this moment that remains in our memory and makes us remember it many, many times.
For this reason, a diorama allows you to create a composition that will delight you for a long time. In addition to composition and artistry, realism plays a vital role in a diorama. In this article we will tell you how you can simulate water for your dioramas in bench modeling.
Lake Baikal model | Country of Masters
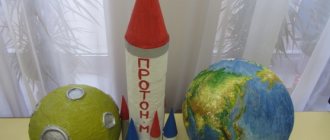
Here is a lake surrounded by mountains.
Trees ready for planting.
The taiga on the banks is “growing up”
Southern Baikal, source of the Angara...
and Northern Baikal, the flowing Upper Angara... Seals on ice floes..
Well, the end result
Layout for kindergarten. Polystyrene foam base. The surface of the lake is a printout on paper... Sprinkled with sand and all sorts of special sprinkles for layouts that imitate grass, etc. Trees - birch branches, crowns made of paper.
Materials and methods
All simulation methods can be divided into 2 groups:
Simulation of water thickness (volume)
This technique is used when it is necessary to convey the “actions” inside the water, to show transparency. For such purposes, polyurethane and epoxy resins are usually used.
Epoxy resin is a yellow-brown or transparent substance that hardens with a hardener.
Polyurethane resin is a modern replacement for epoxy resin. Unlike epoxy, it has better fluidity and transparency. For this reason, it is better suited for simulating objects submerged in water. Shrinkage is present, but not significant. The time until complete drying can be up to 48 hours.
If you need to create a water surface of great thickness and do not need water transparency, the “old fashioned method” - gypsum - will do.
Gypsum is an inexpensive, odorless material with significant hardness. The mixture should not be very liquid, but at the same time not thick. After drying (1-2 hours) the surface can be painted. For these purposes, both the most inexpensive paints - gouache, and more expensive water-soluble acrylic paints - are quite suitable.
Imitation of water surface
Sometimes it happens that in a diorama, only surface effects are enough, for example: puddles, ponds, and other small bodies of water. Although there are exceptions - the surface of the sea. Here are the main methods.
Silicone sealant (transparent) is the most common sealant that is packaged in tubes. Ideal for simulating rough water. Dries from air moisture. After application, it is advisable to immerse the work under a hood. Liquid nails (transparent) are also a familiar glue to us. It is a white, odorless, non-toxic substance. It has a transparent base that can be tinted with acrylic paints. The transparency of the layer appears only after complete drying. A thick layer takes a very long time to dry, so it is recommended to pour glue no more than 5-6 mm thick. and make wavelengths up to 1 cm.
Source
Why are waste oil furnaces popular?
The main reason for people's love for homemade stoves is the low (or zero) cost of the unit itself and the fuel for it. Some home-grown craftsmen make such heating devices as an experiment and at the same time a useful device.
With the advent of a homemade waste oil stove, the issue of “attaching” recyclable materials no longer exists.
For especially advanced craftsmen, the production of garage furnaces for working out has become another business option. They build custom models and sell them to interested but less skilled garage owners.
To start the process, it is necessary to evaporate the fuel, then heat the resulting vapor to a temperature of about +300-400 ºС, after which combustion will occur spontaneously. All you have to do is wait for the fuel to burn completely.
There are 2 schemes that are used when making stoves independently:
- filling the tank with oil and setting it on fire, as a result of which the vapors evaporate and begin to burn;
- the use of a burner in which three zones (pyrolysis, ignition and afterburning) are combined and make the combustion process more efficient, controllable and safe.
The second scheme is more complex, requiring serious modification of the fuel and manufacturing precision, so we will consider simpler models from the first group.
Diagram of the design of a simple model of a furnace in production. The air necessary to support the combustion process enters through the neck with a damper. The same damper can partially regulate the combustion force
Advantages of using an oil-based garage stove:
- ease of design and maintenance of the device;
- fuel economy - about 1.5-2 liters per hour;
- absence of soot and soot;
- safety of storage of mining reserves;
- it is possible to connect an air or water heating circuit;
The compactness of the unit is also extremely important for small spaces.
There are also disadvantages:
- the need for regular cleaning of the stove and chimney;
- a mandatory element is a vertical chimney with a height of at least 4 m;
- for furnaces with nozzles, only purified oil should be used (the approximate cost of a filtered product is 8-12 rubles/l);
- One of the conditions for storing mining is above-zero temperature, that is, you need either a room heated in winter or a tank buried in the ground.
Before manufacturing/purchasing a finished furnace or boiler for testing, it is necessary to consider all the pros and cons of home-made devices, and then make a final decision.