Bobbins
It’s very simple, but I still don’t know where to find such a ring. Can be replaced with a carbine
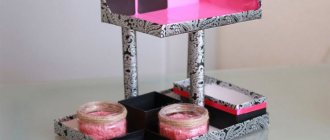
The transparent box allows you to see the entire arsenal of bobbins
I recently bought a box like this through Aliexpress. The set also included 25 different colored bobbins. They fit my Janome machine perfectly, I don’t see any difference with the original branded ones. The reviews say that the owners of the Brother machine were also satisfied with the purchase.
Of course, I wrote that the minimum sewing kit should include 3-5 bobbins. But I wind a full bobbin of every thread I have - to save time.
To prevent the threads from the bobbins from getting tangled, put small elastic bands on them.
Did you also notice that these are ice molds?
Each bobbin will have its own place in the medicine boxes
I really liked this idea: especially when you have 50 shades of white thread in your arsenal. But it seems that then the skeins will take up too much space.
Reel storage
Spools of thread should be stored so that thin threads do not unravel or become tangled. If sewing is your favorite hobby, then you undoubtedly have a lot of such material. In this case, you can use the drawers of your bedside table or chest of drawers, which are equipped with special inserts with pins on which the coils are placed.
The palette of threads for machine embroidery, for example, can have a fairly large number of shades of the same color. In this case, transparent plastic buckets will help you store the coils, in which you can put the coils according to a certain color.
Seven daily habits of happy people
The star of the series “Sultan of My Heart” spoke about the choice of his future wife
25 children of a childless man: an extraordinary reunion
You can sew a convenient and practical organizer for spools with your own hands - add a piece of thick fabric with loops made of regular underwear elastic, under which the spools will be tucked.
You can also set a goal in a craft store to find a convenient option for storing spools of thread. For example, in the form of a transparent rotating barrel on a stand.
DIY skein holder and craft chair
Good afternoon, craftswomen!
I want to share my (and a little someone else’s) experience with you.
Previously, I knitted by putting a ball (or 2-3) in a basket, but this is not always convenient, and so I was puzzled by purchasing a yarn holder. Buying is a bit expensive. From the means at hand - a long knitting needle, stretched into the handles of the basket. It seems good, but it’s also not very convenient. I asked my dad to cut a couple of circles out of wood, and I went to the hardware store to get a pin. Not entirely successful. What they have available does not suit the idea. I put this idea aside for now.
And then I accidentally saw a bamboo paper towel holder in one store. This is what you need! The central rod is quite high and of sufficient width. I'll take it! Two! I now use one for yarn, the other as a stand for a pattern.
and this is my favorite handmade chair with my favorite handmade lamp. Here I embroider, knit, read, and watch films.
It's me
Everything seems to be fine, but I would like the holder to spin - no problem, YouTube will teach you everything! This requires a bearing. Or - spinner
We remove one “cap” from the spinner, sharpen the remaining one (I did this with a nail file), marked a place on the stand with a pencil, applied glue to the “cap” (I have Moment-plastic), pressed the spinner “cap” firmly to the stand - everything is ready !
Source
How to store sewing thread
The most convenient and beautiful ways to store sewing threads are in our selection!
Last time we discussed various ways to store fabrics for sewing, and today we’ll talk about another “headache” for thousands of needlewomen. Endless coils are trying to scatter throughout the house, if you just get distracted for a second! If you are still looking for the perfect way to store sewing threads, you will surely find it in our selection.
How to Store Sewing and Craft Fabrics
In transparent jars, the coils look impressive, although one cannot help but admit that a note of chaos still remains in this storage option.
By the way, for many needlewomen this method has become the starting point for decorating... lamps!
Shoe box
You can use a cardboard box, such as a shoe box, or packaging from other products. Its surface is covered with wallpaper, colored paper or fabric. And the interior is designed similarly to the previous version. If space allows, you can make cardboard partitions so that there is room for other sewing accessories in your DIY thread organizer.
Storing yarn and floss
Embroiderers and knitters treat even small pieces of yarn or floss with care. And such leftovers need to be stored wisely so that the threads do not get tangled and they can be easily found. One of the simple ways to save leftover threads is to wind them on a regular clothespin - the ends of the thread will be clamped in the jaws of the clothespin, they will not unravel, and the necessary remnant can be found immediately.
A broken nail is no problem: tips for treating nails at home
When toothpaste is harmful to children: permissible age doses
From athletes to Hollywood stars: men Naomi Campbell
You can also use transparent jars with screw caps to store small balls. The jars can be equipped with magnets and hung from the underside of the shelf above the desktop, where a magnetic or metal strip has been previously secured.
If you have a special place in the room for work, then on one of its walls you can make a panel organizer where skeins of yarn will be placed.
Multi-color knitting is difficult because the balls get tangled, the threads intertwine, and you have to unravel them all the time. You can make this knitting process easier by using ordinary containers in which you can make holes for threads. The balls need to be lowered into the container, pulling the tail through the hole, close the container with a lid - and you can safely knit.
Balls, skeins or skeins can be stored in an organizer with transparent pockets - this way they will be clearly visible, and the organizer itself, hung on the wall, will not get in the way.
I hope that you will use at least one of the proposed options for storing needlework threads, which will undoubtedly help you in your creativity.
Knitting process
This device is suitable for knitting socks and mitts. To secure the loop, you must move clockwise. The tail of the thread is held in the left hand, and a turn is made on the button with the right hand. Having made a full move, perform another row. And in the third row, the previous loops (loops of the first row) are thrown over the loops of the second row. To do this, use a hook or hand to lift the loop of the bottom row, slightly pull it up and drop it from the paperclip. Row after row of yarn knitted together lengthens. Knitting using this technique is loose but elastic. Due to this, you don’t have to knit the heel on the toes - the fabric will sit comfortably on your leg.
Knit this way until the sock or mitt reaches the required length (to the big toe or heel). To decrease the loops, they make gaps in knitting - they throw the yarn not on each axis, but through one.
Anyone can make an unusual but useful knitting device for themselves. The main thing is to understand what is needed - convenience, functionality, increased speed. A device for knitting mitts, socks, and scarves can be designed to suit the needs of the craftsman.
Wall organizer
Those who sew professionally and have dozens of skeins available can make a wall organizer for spools of thread with their own hands. To do this you will need a sheet of plywood, a hammer, long nails, a baguette for decorating the frame, and paint.
The size depends on the number of threads. Cut a rectangle out of plywood, make markings on it, drawing a grid with cells whose size is slightly larger than the diameter of the coil. Using an awl or nail, make notches at the intersections of the lines, where the nails will subsequently be driven in. Make a frame from foam ceiling fillets or a baguette and insert a plywood blank into it.
Paint or decorate in any other way. You can decoupage or burn a picture. After this, drive in the nails. For best results, they should be positioned slightly at an angle to the base. In this case, the coils will not slip off and will be clearly visible.
At the back you need to attach a hook for hanging or other fastening system.
Cookie box organizer
You can decorate a cookie tin as the basis for a DIY thread storage organizer. Its height allows the coils to be inserted vertically. And thanks to the fact that the box is closed with a lid, all its contents will be protected from dust. This accessory can be easily carried.
To work, you will need a tin can, a piece of foam equal to the diameter of the bottom, and wooden skewers. Manufacturing procedure:
- First, you need to cut a circle from polystyrene foam 1.5 cm wide that matches the bottom of the jar.
- You can take sheets of tin, only in this case you need to make 3 layers. Or use a laminate backing.
- Divide the wooden skewers into pieces slightly smaller than the height of the box. If necessary, clean the cut areas with sandpaper.
- Place foam plastic on the bottom of the box, insert sticks into it in a circle so that the coils can easily be put on them. You can glue a piece of foam rubber to the center, which will be used as a pincushion.
Ideas for choosing storage space
Today you can find many interesting and convenient devices on sale that allow you to store threads and other tools. It is also quite possible to make them yourself.
Jar
In transparent containers, colored coils look very interesting. However, certain notes of chaos still remain when choosing this method.
Organizer box
Thread in spools or skeins for knitting are often stored in shoe boxes. To do this, you should use cloves. Regular toothpicks will also work.
Cookie box
Almost everyone can find a round tin of cookies in their household. Many people prefer to keep hooks, buttons, and beads in such containers. It can be used to make a comfortable thread organizer.
Hanging organizer
Stores sell many affordable organizers that are designed for closets or garages. They are made from plastic or textiles. Typically, such devices are used to store shoes. You can keep useful little things or tools in them. Organizer pockets can be used for threads.
Lockers
Not every needlewoman can buy an expensive organizer cabinet for storing sewing threads. However, it is perfectly acceptable to add internal compartments to existing cabinets. However, it is not at all necessary to use wood for this. Such partitions are made of cardboard.
Doors
Cabinet doors should be used as a convenient device for storing sewing supplies. However, this will require woodworking. To do this, it is worth measuring the door and determining the location of the slats. It is recommended to be extremely careful, since the cabinet must close well. The position of the holes can be easily marked on the slats.
Wall organizer
This is one of the most time-consuming options. At the same time, it needs enough space on the wall. The advantage of such an organizer is its spectacular appearance and amazing convenience.
Dummy
This device is often used by needlewomen. It can be adapted for threads. You can also hang a measuring tape, scissors, pins and other equipment required for sewing on the mannequin.
Magnetic boxes
Magnetic boxes are used for metal fixtures. To do this, it is recommended to glue a small magnet to a suitable container. This is done with ordinary superglue. The advantage of such a device is the ability to store various pins and needles that will not fly around the room.
Disc boxes
Such organizers are suitable for storing threads and needles. To do this, remove the cover and place the cases with needles inside. As a result, you will be able to get a comfortable transparent organizer. The advantage of such packaging is that all the devices are in plain sight. It is recommended to put information on the contents of the container on top. CD cases take up little space.
They are worth putting on a bookshelf. Thanks to this, you can quickly find the necessary tools. It is permissible to put inside not only needles, but also ribbons, buttons, and hooks. Separately, it is recommended to make containers for threads.
Using Surfaces
It is permissible to store threads in different pieces of furniture. Tables, cabinets and even doors are suitable for this.
Table
It is recommended to fix various organizers under the sewing table that can be used to store threads. These include plastic containers or textile pockets. This will allow you to keep everything you need at hand.
Interior doors
To store threads, you should use special organizers that are hung from the interior door. You can place everything you need in them. The extra surface helps save space.
Rotating organizer
It is recommended to make an organizer from a round tin cookie box. It is very easy to make. Thanks to this, the coils can be placed in a visible place.
Pocket hoops
To make original pockets, you should stretch them onto an ordinary embroidery hoop. In addition to threads, it is recommended to place pencils and scissors in the resulting pockets. They also contain other tools. Such pockets will harmoniously fit into the interior.
Case for scissors
Craftswomen who like to use pockets for various sewing items will be able to make successful scissor covers. For this you will need cardboard, textiles, and glue. For decoration, it is permissible to use ribbon and lace.
Boxes are often used for sewing accessories. In addition to threads, you can hold needles and other sewing items in them.
Grandma's chest → Knitting accessories
Knitting tools and accessories
Surely many of you have seen various knitting accessories.
Today in our stores you can find a huge variety of knitting devices. A wide variety of colors and shapes.
Let's try to make sense of all this abundance
1. Templates for knitting needles are a special ruler with holes of a certain diameter that corresponds to the diameter of the knitting needles. It is very difficult to visually determine what number (diameter) the knitting needles have, but with such a ruler everything is very simple - you select a hole with a suitable diameter for the knitting needle and read the hole diameter on the ruler.
2. Ruler for determining the density of knitting.
Organization and storage of embroidery needles
It is important for needlewomen to organize and store needles - these irreplaceable helpers. As you know, embroidery needles come with both blunt and sharp tips.
A variety of needle beds are perfect for storing them, including improvised ones, as in the photo below:
And also branded and homemade, magnetic or just magnets.
Magnetic pincushion and magnet
Handmade needle beds
Each needlewoman should have several needle cases: for general storage and separately for embroidery processes.
MASTER CLASSES ON CREATING NEEDLE CASES WITH YOUR OWN HANDS
A variety of crooked pincushions are also great as handmade pincushions.
It is worth special mentioning the branded magnetic needle beds-tubes, which are especially indispensable for the embroidery process on the road.
Some needlewomen make similar needle cases in empty lipstick cases.
Pincushion tubes with magnet and rotating body from Prym
And here's an example of how you can organize and store spare needles.
A small organizer-container was used as a basis, the needles were sorted by size and labeled, stuck into cells with material from the packaging of computer components. Needles are also stored here in branded packaging.
How to care for needles
There are many ways and possibilities to keep needles suitable for work for a long time.
Devices for sharpening and polishing needles and special needle beds will help you cope with cleaning needles.
The tomato is a pincushion filled with soft material, and the berry is intended for cleaning and polishing the needles and is filled with the appropriate filler.
“Pomodoro” and “medallion” for polishing and cleaning needles
The well-known GOI paste (invented at the State Optical Institute, where it got its name) will also serve you as a good grinder and needle polisher.
A piece of GOI paste
Some needlewomen recommend using more inexpensive household items, such as old polishing nail files, to clean needles. Or regular dishwashing sponges (use the hard side of the sponge).
By organizing your floss threads and embroidery needles in one or more of the ways listed above, or in any other option convenient for you, you will not only put things in order in your needlework corner, but you can also easily maintain it in an attractive, neat aesthetic appearance and - most importantly - you will save your time more than once when searching for the right materials for your embroidery processes
The author of the article and photographs is Tatyana Pozhidaeva (Podsolnushek)
Bobbins for floss
Small but necessary helpers in organizing and storing floss are bobbins. It is on them that you need to rewind the threads for storage in container organizers.
Cardboard bobbins are significantly inferior in quality and durability to plastic ones, so they are best used for infrequent use, or as a one-time use for one separate embroidery process, or for storing leftover threads on them.
One bobbin is intended for one standard (8 m) skein of floss. A bobbin with thread from two skeins will take up more space in the organizer and is not so convenient to use: when pulling it out of the box or, conversely, placing it in a container, the “extra” threads cling to adjacent bobbins and slide off.
Plastic bobbins with thread from two skeins (8 m DMS floss and 20 m PNK floss)
From the video from Lelya Lee you will learn how to make exclusive bobbins in the form of pinkies with your own hands.
Oksana Dereza in her video gives a detailed comparison and review of organizers-containers and bobbins for floss from different manufacturers, indicating their advantages and disadvantages.
Device for winding floss onto bobbins
A bobbin thread winder is a great addition to your craft accessories. Using this device, threads are wound onto bobbins easily, quickly and accurately. These special devices are produced by different manufacturers and are relatively inexpensive, and their help is quite significant, including in the form of significant savings in precious time spent on rewinding threads from a skein.
Device for rewinding floss onto bobbins
The floss rewinder is easy to use, but let’s take a closer look at some of its operating points.
It is most convenient to mount the device on the side wall of a free cell of a container for storing floss.
The gap between the wall of the box and the device is somewhat large, so for the stability of the winder it is necessary to fill the space, for example, with a piece of cardboard, paper folded in several layers, or by placing three cardboard bobbins for floss there.
Having prepared the winder in this way, we insert a bobbin into a special hole, having previously pasted on it or signed by hand the number of the thread that we will wind, secure the bobbin with a pin, fasten the beginning of the thread in special slots on the bobbin and with pleasure, easily and quickly, rewind the threads from the skein onto the bobbin, we also fasten the end of the thread into the slot.
It happens that when winding quickly, the pin falls out of the hole, so it is recommended to initially insert it all the way and press it harder with your finger, as if securing it in place.
When winding floss onto a bobbin, it is more convenient if the skein of thread hangs from the table, unwinding under its own weight, guide the thread by hand and, if necessary, straighten the paste.
We do not pull the thread onto the bobbin tightly to avoid strong creases, although during the embroidery process with threads stored wound on bobbins, all creases on the floss are smoothed out.
If you want to show your imagination and immerse yourself in creativity, you can make a similar universal device with your own hands and an interesting video from Dunyasha Cross-stitch will help you with this.
https://youtube.com/watch?v=-4nTjZb1fVg
Stickers with thread numbers
Indicating the floss number is fundamentally important for proper storage and use. Everything here is extremely simple: some people prefer to use special branded stickers, others sign by hand, while others find it more convenient to use numbers from the skein labels cut out and glued to the reels.
One working moment on branded stickers. VHI in sets with such stickers, in addition to the square stickers with the indicated floss numbers, has blank sticker squares.
Stickers with numbers and blank squares
What are the blank sticker squares used for? You can write the numbers you need on them yourself!
Lockers
Not everyone has the opportunity to purchase expensive sewing thread organizer cabinets, but adding compartments inside the cabinets you already have is actually not that difficult. Moreover, it is absolutely not necessary to use wood; partitions can also be made from cardboard.
Cabinet doors can easily be turned into a convenient organizer, but for this you will have to work with wood.
Measure your door and determine the position of the slats: be extremely careful as your door needs to close tightly. Mark the position of the holes on the slats.
Drill holes using a drill and drive in pegs.
Paint it the color you want and glue it to the doors.
Specific devices
Experts offer this type of device as a ceramic knitting bowl. Similar knitting devices are made by craftsmen who work with clay. However, a similar design can be made from a plastic shampoo container or bottle. To do this, 2/3 of the neck of the container is cut off. The remaining part is placed on its side and the slot line is marked with a marker. It should be a twisted line that curves downwards. Due to the shape of the coil, a thread falling into it will not try to escape, but will get inside and will not slip off.
It is better to treat the edges of such a device - paste it with tape or colored adhesive paper. If you have a heat gun, then a layer of glue applied in two or three approaches will perfectly cover sharp cuts. The slot should not be too shallow. As a rule, 0.5-0.7 mm is enough for even thick yarn to fit perfectly in the container.
Tips for an embroiderer
All the options described above concerned bobbin threads. But embroiderers use floss, which is sold in skeins. If they are stored haphazardly, they get mixed up, which complicates the work. There are several ways to make a floss thread organizer with your own hands.
Plastic bobbins are one of the common options. You can buy them or make them yourself by cutting out blanks from plastic. Used shampoo bottles, thick packaging plastic or bottles can be used. Use scissors or a soldering iron to cut out the shape of the workpiece. This could be a 6 x 8 rectangle with rounded edges.
You can make it in the form of a “bone” or choose any other shape. It is necessary to make notches into which the ends of the threads will be inserted, this will prevent unwinding. Floss is wound onto such bobbins, and a label with the manufacturer's number or brand is pasted for organization.
Such reels can be made from thick cardboard, but they will not be as durable as plastic.
Another option is a thread holder. It is a strip with rows of holes cut along the edge. A different color is inserted into each hole. Such holders are convenient for work, so you don’t have to look for the right shades - they are always at hand.
You can make them from thick cardboard by cutting out a rectangle measuring 15 x 10 cm. You need to make holes along the long edge using a hole punch, retreating 1.5 cm. A skein of floss must be straightened along the length, folded in half and inserted into the hole with the fold. You need to thread the ends into the resulting loop and tighten it, you get a “fringe” of floss. You can write the color number above the holes with a pen or felt-tip pen.
In order for the cardboard to last until the end of the work, it is recommended to laminate it with tape on both sides. And after that insert the threads.
Shelf for threads
You can make a thread organizer with your own hands in the form of a shelf. To make it you will need planks or slats 2-4 cm wide. You can use wooden boxes for vegetables. Using screws or nails you need to assemble the frame. Place several thread poles on it. The distance between them should be 2 times the length of the coil so that they can be taken and put in place without any problems. Drive several nails vertically into each perch at equal distances. These will serve as pins for the coils. Secure the perches to the frame.
This DIY thread organizer can be hung on the wall or placed on the table.
You can decorate it in any way so that it is not just a working tool, but also a decoration for your workplace. Instead of nails, you can use other fasteners: screws, pegs and even pencils or writing pens.
Organizers for storing floss
Container for household items with supplies for needlework
The same container with floss
Advantages of storing floss in a container
- In organizer-containers, floss threads are stored compactly, do not become disheveled and do not gather dust.
- All thread numbers and colors are visible.
- Bobbins with threads wound on them can be arranged in any order convenient for you.
- Containers from DMS have an insert for keeping track of the threads in them. However, it is worth noting that needlewomen, as a rule, do not have enough time to use it constantly)
Sheet for recording floss in a container
Some needlewomen store data on the presence of threads on the computer, creating for this purpose files with special tables with a list of thread numbers they have by company.
How to arrange threads in a container
You can store threads in any order convenient for you, both in store-bought boxes and in home-made boxes and organizers.
By numbers or colors
Store threads separately by floss manufacturer, organizing them by number or color.
Until recently, Kirov floss was produced without numbers, so it makes more sense to store them by color
PNK threads in a container for household items
The bobbins fit the height of the cells and do not press or bend under the lid.
Closed container
Organizer with floss packed in ascending numbers
By thread composition
You can sort the floss according to the composition of the threads (cotton, metallized, silk, melange, etc.)
Organizer with silk and metallic threads
Threads for one large process
Larger containers can store materials for each individual large embroidery process or several smaller processes.
It is convenient to use an organizer box for the current process, placing in it not only the necessary floss, but also other necessary things: in one of the cells we put an improvised needle bed with additional needles and a thread take-up, in the other - scissors, colored pencils or markers for marks on the diagram, a magnet for quickly finding a suddenly lost needle and anything else you think is necessary.
Container organizer and special organizer from Pako for working needles with materials for one large process
And here is an organizer-container with materials for several small processes.
Please note: the thread columns for each individual process are signed!
Threads for a small process
Materials for each small process can also be stored in a separate, small container or in a homemade organizer box. This is also true for embroidery that you take with you on the road.
If all your organizers are labeled, you will be able to find the necessary strings very quickly. On the container boxes themselves, we do this using stickers on three sides (except for the back - with the lid attached): no matter which side you put the box for storage, you will always see the inscription with its contents.
Containers with the numbers of incoming threads indicated on stickers
Organizers are also stored compactly, conveniently and neatly on a shelf in a closet, chest of drawers or drawers.