Photo: grandisconti.ru Photographs are the guardians of the most valuable moments in life, so they often decorate our homes, evoking pleasant memories. How much more attractive will a photo look if you put it in an original frame made by yourself! Today we will tell you 14 ways to make a photo frame with your own hands, which will become a real interior decoration or a unique creative gift.
Cardboard photo frame
The simplest and at the same time not devoid of originality photo frame can be made from cardboard. Even a child can handle this kind of work!
On one sheet of cardboard, cut out a rectangular center, which should be slightly smaller than the photo. Separately, prepare a cardboard rectangle larger than the photograph. If you plan to put the photo frame on a leg, prepare it too using the template. For a wall item, don’t forget to glue the string.
Then everything is simple - we put a photo on the back side of the “window” and fix it with a rectangle greased with glue, attach the leg.
Such a frame in itself will not have decorative value, so it needs to be decorated. Use colored paper, magazine clippings or gift wrapping.
Photo: c-deco.ru Photo: masterfibre03.ru
Frame of branches
You can create a wonderful eco-style photo frame if you use thin twigs and twigs to make it. It is noteworthy that the material is easy to collect simply by leaving the house. Also prepare cardboard for the base, a glue gun, varnish and additional decor in the form of flowers, beads, cones or ribbons.
Form a rectangular blank from dark-colored cardboard or paint it (the main thing is that it does not remain white). Dry twigs need to be lightly peeled, freed from excess bark, and cut to the same length to fit the sides of the frame.
Now you can start gluing the twigs, slightly intertwining their ends in the corners. Finally, glue on the decorative ornaments and varnish the craft.
Photo: stroychik.ru Photo: vse-otoplenie.ru Photo: et.diy-site.com
Green friends
If there are a large number of potted plants in the house, then over time the question of using special stands for them will arise.
Firstly, in this form the plants will look attractive, which will add whists to the overall design picture. And secondly, this will free up the area of the apartment (to use it for something else).
A design of this type can be purchased at a construction hypermarket, or you can go further and try to make a flower stand with your own hands.
For example, here is the most common example:
- take several strong wooden boards of the same shape and size;
- We carry out preventive maintenance (clean with sandpaper, varnish and paint);
- We drill small holes on the sides and insert iron rods into them;
- inside each board we make holes corresponding to the diameter of the pot;
- place the plants (if desired, add wire holders)
In this case, the handmade product will be organically combined with the surrounding design, because it is the person who will determine the size, color and style of the product.
In general, using improvised means, a person can make such types of plant stands as:
- wall flower stands;
- option using small wheels to create support;
- hanging flower stands;
- window sill stands;
- floor stands;
- corner option.
When working on a product, you must be careful and do not count on the fact that a large flower will be able to hide imperfections.
Photo frame made of seashells
Any family with children will probably find some seashells lying around. The tireless child is ready to collect tons of this material, without finding any use for it. Take this opportunity and decorate your photo frame with shells!
The basis can be a regular wooden or plastic frame. Select whole shells, rinse thoroughly, dry and start gluing. When the composition is finished, open the shell frame with varnish or paint.
Photo: infantilcolebeethoven.blogspot.com Photo: alexgrim.ru
Denim photo frame
A creative youth photo frame can be made from old jeans. As a base, take a thick sheet of plywood or a rectangular wooden board. Draw the outlines of the future photo on it.
Prepare the decor - cut denim ribbons of the same width, but different lengths, so that the finished rounds are of different sizes. Lubricate each tape with glue on one side and twist it. When you have collected a lot of these “details”, cover the frame with them.
After complete drying, it is necessary to carefully trim the bottoms of the outer rounds from the inside, as well as the sides of the cardboard protruding from the sides. Now you can place your favorite photo here!
Photo: kukolnik-shop.ru
Photo: kukolnik-shop.ru
Photo: mebel-mart32.ru Photo: kukolnik-shop.ru
Wall-mounted key holder for the hallway: 10 beautiful ideas
Elegant photo stand
Fans of unconventional solutions will certainly like photo stands made of perforated MDF panels. Cut panels 260 x 100 cm (sold in stores) according to the required dimensions. To ensure rigidity, a frame made of bars with a cross section of 30 x 19 mm is used; the frame is made of aluminum corners.
Elegant photo stand
The overall impression of the gallery depends not only on the selected subjects, but also on the shape of the photo frames and their mounting. Small wooden stands are good because you can even place photos in oval frames on them - they will not turn over.
Perforated panel is unfinished or white-painted 3mm thick high-density fibreboard panels with holes punched (usually at 3 or 5cm intervals). With the help of appropriate accessories (hooks or pegs), they are used for convenient and visible storage of the tool. They can also be used as partitions. Since perforated panels are sensitive to impact, their edges must be protected.
Shown here is a perforated panel (rear view) with a frame of slats that gives the structure stability. The position of the fastening hooks depends on the pitch of the holes in the panel.
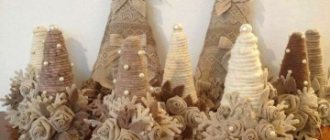
Country style frame made of yarn
To make a cute frame in which a family or children's photo will look great, you can use knitting threads. You will need 70-80g of yarn of one or more colors (at your discretion) and two cardboard frames.
Each of the bases must be tightly wrapped with thread, passing twice so that there are no voids left. Now cover the photograph with two of these wrapped frames and once again pass the thread through the entire product, fixing it in this way.
During the winding process, you can string multi-colored beads, buttons onto threads, or decorate a ready-made photo frame with artificial flowers.
Photo: pinterest.ru Photo: elihome.ru
Photo: pinterest.ru Photo: thecraftedlife.com
Making a photo stand
| 1. To ensure that the holes in the vertical posts and MDF boards run parallel, make marks using a corner. | |
| 2. The holes in the uprights must be very precise. Drill them with a 6mm wood drill bit. | |
| 3. Using glue and 80mm Phillips screws, assemble the board and stand together. | |
| 4. Support strips for photographs are made of two strips (thickness 6 x 2 and 4 x 2 cm), which are glued end to end. Secure them with clamps. | |
| 5. For the screw-in hinges that the aluminum rods slide into, use a 2mm wood drill bit to drill holes in the post strip. When all the parts are assembled, paint the shelf. | |
| 6. After the paint has dried, screw in the hinges for the aluminum rods. |
Mosaic frame made of disks
Iridescent DVDs are an excellent material for making a high-tech photo frame with your own hands. Take a few old, unwanted disks and break them into small fragments.
Prepare a cardboard base and start gluing pieces that can be placed in a chaotic manner. After finishing the work, let the frame dry for several hours.
Now you need to process the gaps - use acrylic compounds in tubes or paints for stained glass painting. Don't forget about the edges of the frame!
Photo: teknolojioku.com Photo: liveinternet.ru Photo: liveinternet.ru Photo: liveinternet.ru Photo: liveinternet.ru Photo: liveinternet.ru
Home photos
Sometimes we want family photos to make us happy every day. But where to place them? I would like it in a very visible place, but they can’t float in the air!
In this case, it is best to go online and find a photo of a stand made by yourself.
To give yourself such a nice gift, you need to have the necessary materials and tools on hand. These include:
- wooden plank;
- spray paint;
- sandpaper;
- primer;
- masking tape;
- wooden clothespin;
- good and strong glue.
Work should begin by preparing the wooden board (sand it with sandpaper and, if necessary, prime it). To get straight lines when applying paint products, cover the board with masking tape.
Next, apply the paint and wait until it dries (one day will be enough). On the back side we attach a clothespin with glue (it will serve as a support for the stand).
- Cake decor - master class on original design and decoration methods (75 photos and videos)
- Do-it-yourself decoupage - manufacturing technique, master class and step-by-step instructions for drawing (105 photos)
Original do-it-yourself decor: master class on making decorative elements with your own hands (110 photos and videos)
That's all, now a photograph of the closest people will delight a person every day.
Cook photo frame
A reliable and original design of a photo frame can even be made from salt dough. Creating it is quite simple: pour a glass of flour and half a glass of salt into a bowl, add 100 ml of water (if you want the frame to be colored, dilute the water with food coloring). Knead the dough and season it with 50 ml of vegetable oil.
The dough should “rest” for two hours, after which you can begin modeling. Place the finished product in a preheated oven and bake for two hours, remembering to turn it over.
If you do not color the dough initially, you can paint the finished product after it has completely cooled. A dough photo frame will last longer if you open it with a layer of varnish.
Photo: copytsvet.rf Photo: shop-myhobby.ru Photo: mebel-miru.ru Photo: mamadochka.ru Photo: mamadochka.ru
Frame using decoupage technique
The name of the drawing technique sounds rather pompous, but in reality it is a simple re-gluing. To make a stylish photo frame, you will need napkins with a pattern, PVA glue, a wooden or plastic base frame and varnish.
Disassemble the old frame and paint the front surface with white acrylic paint (for convenience, it is better to use a sponge), wait for it to dry. Apply a napkin, dip the brush in glue and work the canvas, smoothing out any air bubbles that may have formed.
When the product has dried thoroughly, you need to cut out the middle for the photo and glue the edges inward. Now you can assemble the photo frame and varnish it.
Photo: str-mebel.ru Photo: kukolnik-shop.ru Photo: elihome.ru
Photo: copytsvet.rf Photo: mebel-miru.ru
Making a camera tripod with your own hands
Share this article:
Stabilizing the camera at the time of shooting is the key to obtaining sharp or clear photographs; your hand will not tremble when you press the button and will not spoil the frame. For long exposures, a tripod is a necessity; without it, you won’t get the right picture at all. Static objects located at a distance from the photographer may turn out blurry when zoomed in without a stable camera position. All such situations require a tripod.
The content of the article:
The cost of a good tripod ranges around 7-10 thousand rubles for a standard camera; for heavy optics, increased stabilization will be required, here the price will be even higher. It is not always possible to purchase a store-bought version, especially if nature has not deprived you of dexterity and ingenuity. Then you can make a tripod with your own hands, using almost improvised materials. The cost of materials will be several times less, the time will take a couple of days, and for advanced users who can deftly handle tools - several hours. In what cases might you need a tripod:
- Long exposure shooting – 100% requires hard stabilization;
- Shooting at night, in addition to a tripod, a device for remote shutter release may also be useful;
- Sports competitions or working with fast moving objects;
- Shooting with background blur;
- Photography at high magnification (zooming), including macro photography;
- Portrait and studio photography require camera stabilization to take professional, clear photos;
- Photographing architecture and landscapes and many other options.
A tripod is an excellent option for a large company, when one person always remains behind the scenes in the group photos. Stabilizing the camera at the desired height and using a remote control will help bring the whole group together in the photo.
Types of tripods
In addition to the standard three-legged stand, there are many different tripods for different purposes and situations. The most popular is the tripod; it is used in all types of filming, except extreme ones. Depending on the type of camera mounting or mounting on a surface, tripods are:
- Monopods are used to mount a camera and mobile phone to increase the distance from the camera to the subject. Most often used for selfie photos;
- A tripod is a professional equipment with a camera mount, has 3 legs or stands. You can adjust the height, tilt, and other parameters;
- A multipod is a collapsible tripod, which when untwisted turns into a monopod. Travel version of the equipment;
- Mini tripods , or tabletop ones, are used less frequently, but are quite convenient and inexpensive. Height approximately 30-40 cm when unfolded.
- Belt mount
- Tripods -clamps are attached to tables and other surfaces that are inconvenient for on-site filming;
- Tripods-clothespins are similar to the previous version, but are secured with a clamping mechanism and a screw;
- Flexible tripods are models with rubberized legs consisting of movable elements. By changing the shape of the legs, the height is adjusted. Compact and convenient models allow you to mount cameras on almost any surface.
A professional photographer working in different genres and in any conditions may have a set of tripod mounts. But in most cases, they are used quite rarely and are not an essential item for filming walking photo shoots, love stories, weddings and birthdays, and this is exactly what the average photographer does 95% of the time.
Tools needed to create a tripod
If you decide to make a tripod with your own hands, then you will need the following tools:
- Drill and drill bits of different diameters;
- Saw or hacksaw;
- Sandpaper of different grain sizes;
- Screwdrivers, pliers, wire cutters (in some cases);
- Vices and clamps (in some cases);
- Glue and necessary materials.
It is better to carry out all work outside or in a special room with good ventilation. Glue and paint have an unpleasant odor, and sawdust and shavings are best left outside the house.
DIY tripod made from a razor
The easiest tripod to assemble and make will require a couple of hours of your time, a piece of board, glue and 3 razors, regular or with floating heads. The main thing is that they are the same. The base is cut triangular, processed with sandpaper, a hole is cut in the center and a bolt is screwed in and securely fastened with glue. Screw the nut onto the bolt and place a rubber seal so as not to damage the camera body when attaching it. The razors are glued to the side surfaces or edges of the wooden triangle with a blade to the stand.
The budget tabletop tripod is ready. We needed:
- A piece of board or plywood;
- Bolt of suitable diameter for mounting the camera;
- Drill and drill bit with a bolt diameter;
- Nut for bolt;
- Seal;
- Sandpaper;
- Glue;
- Paint, if desired;
- 3 razors.
With a little patience, your small camera tripod is ready to go.
Option for assembling a tripod from a tennis ball
Another budget option is a mini tabletop tripod made from a tennis ball. To do this you need a knife, glue, a bolt and a nut. The ball is cut in such a way that most of it is stable on the table; to compact the surface, we glue the area under the camera with a second layer from the remaining piece. A hole is made in the center and a bolt is glued. Then you can paint the structure or leave it as is. You can put a seal under the camera, and if you take a longer bolt, you can slightly increase the stand upwards. For this tripod we needed:
- Tennis ball;
- Knife;
- Bolt with a diameter for mounting on the camera;
- Nut and seal for bolt;
- Glue and an hour of time.
This option is not suitable for a serious event, but it is quite suitable for home use with a small camera; it certainly will not hold heavy optics.
Tripod made from a plastic bottle
The easiest option to implement is to use an empty plastic bottle to create a tripod. A hole of the required diameter is drilled in the cover, a bolt is inserted, secured with a nut, and screwed into the chamber thread. The bottle is weighted with sand or pebbles and screwed on with a prepared cap. The tripod is ready for use; in field conditions, it can significantly save nerves and time, working just as well as a purchased one.
DIY camera tripod made from ski poles
A more complex option will require you to have some skills in using scissors or a hacksaw, a file, a drill, as well as time. The aluminum tube is cut into 3 parts with “ears” for fastening, the parts are processed with a file, and holes for the bolts are drilled.
We cut the ski poles into 4 equal parts, they will be the legs of the tripod. For the base, take a square piece of board or thick plywood, approximately 10 x 10 cm in size, and drill a hole in one for a steel tube. We make screw holes in the 3 fasteners and the “legs” of the tripod at the desired angle so that they are in the desired position when the structure is assembled.
From the second panel we assemble a mount for the camera.
We connect both parts, install the camera on the screw, the tripod is ready for use.
Thus, we needed to manufacture this design:
- 2 ski poles;
- steel tube;
- 2 pieces of board or plywood;
- a small piece of aluminum flattened tube;
- self-tapping screws, or screws, a bolt for the camera;
- file, pliers, hacksaw, screwdriver, drill.
It will take at least a couple of hours to make such a design, provided you have the skills to work with tools. Suitable even for a medium-heavy camera; check the load in advance so that there are no unexpected incidents at the event.
PVC tubes for tripod
Another material for creating a holding device for the camera is metal-plastic tubes, used in construction for laying water supplies. They bend quite well, but keep their shape perfectly. You can fasten them together with plastic corners, self-tapping screws, bolts or screws. We assemble the base from pieces of pipe and corner fittings, and attach the vertical tube with an adapter. At the upper end we attach a platform for the camera.
Monopod (selfie stick) made from scrap materials
If you urgently need to take a selfie, but you don’t have a monopod or selfie stick at hand, then you can use any available means to secure the phone. This could be a stick, a branch or a piece of thick wire. It is impossible to create a system for pressing a button in such conditions; we use the delay start function for 2-3 seconds. During this time, we line up the frame and get great pictures without buying a tripod.
Phone adapter stand
From scrap materials you can also assemble an adapter from any camera tripod for a phone mount. To do this, you will need a piece of plastic, for example, a plinth for finishing plastic windows. A part is cut off, slightly shorter than the phone, and holes are drilled in the required places (corresponding to the fastenings on the clamp). The adapter is attached to the tripod with nuts, the structure is ready for use.
Other materials for making tripods
The listed options for homemade camera tripods do not require special skills and knowledge; almost anyone can make them without much effort. In addition to these materials, you can use wooden slats and bars, metal tubes, and plastic. But this will require specialized tools and certain knowledge.
Camera tripod requirements
Regardless of the material and design, the tripod must meet certain requirements and perform functions.
Working height. Each tripod has a minimum and maximum height, depending on the design of the device. Tripods have the widest range and are therefore the most popular among photographers. Choose the right tripod according to your height; it should be slightly higher so that you can shoot from above. Weight and dimensions. The most important parameter for “field” filming. Professional equipment weighs a lot and is quite difficult to carry around for a long time. Therefore, lightweight models are chosen for outdoor photo shoots. The same applies to folded sizes; bulky tripods remain in the photo studio, and compact and easy-to-carry ones are taken when traveling.
Maximum load. This parameter depends on many nuances: material, fastenings, design features. For a photographer, the workload is more important - you need to be guided by it when choosing a model for the weight of the camera. Thread. There are 2 main standard threads for attaching the camera to a tripod – 1/4” and 1/8”, the first option is intended for compact models, including point-and-shoot cameras. To work with larger cameras, a 1/8 thread is used. TVs, powerful lenses, heavy cameras are mounted at 3/8, it can withstand heavy loads. All this should be taken into account when choosing a tripod for filming.
Afterword
Whether to make a lens with your own hands or spend a certain amount on equipment is up to each photographer to decide for himself. But there are several important points:
- If homemade equipment were better than professional equipment, they would have stopped producing it;
- Experienced photographers with expensive optics will not rely on a “homemade” tripod and will purchase one that is suitable in weight and material for the safety of the equipment;
- For daily shooting you need a good tripod; from available means, the option is for 1 time;
- You will still have to spend a certain amount on materials, and you will also have to spend time on making a tripod;
- Homemade tripods are inconvenient when moving frequently, they are not compact and it is problematic to carry them with you.
Based on these points, the conclusion follows that it is better to purchase professional specialized equipment for work. There is no need to skimp on the safety of your camera and optics. But for home or very infrequent use, you can assemble a tripod with your own hands.
Share this article:
I liked the article
Discuss the article
Window frame photo frame
Yes, you are reading absolutely correctly - you can make a unique panel in the shabby chic style from an ordinary window frame. To do this, of course, you will need an old window frame, which you don’t even need to paint - cracked paint and chips will become the “highlight” of the product.
The frame needs to be disassembled, one large photograph or several small ones must be inserted, depending on the number of windows. The photographs must first be glued onto a sheet of cardboard or thick paper. It is better to choose black and white photos - they will look harmonious with your “antique” luxurious frame.
Now all that remains is to assemble the product and find it a worthy place on the shelf of the living room or bedroom.
Photo: novamett.ru
Photo: novamett.ru
How to hang a photo or painting on the wall
In order to securely and beautifully hang a photograph or a light picture on a painted or wallpapered wall, it is not necessary to drill it. You can get by with an ordinary tailor's pin, a paper clip or a postal nail.
Fastening with a pin
I decided to experimentally test the load capacity of such a fastening. I pierced the wallpaper and stuck a pin behind it from top to bottom, two-thirds of the way through, pressing it against the surface of the wall as it was inserted.
If the wallpaper is very thin and smooth, then for greater load-bearing capacity of the pin, you must first stick a square of tape or thick paper on the wallpaper at the puncture site.
Next, I hung a weight weighing one kilogram on a thread. The weight of the weight and the pin withstood it for 24 hours. It became obvious that, taking into account the thickness of the wallpaper and the quality of the adhesive, this type of fastening can be safely used for photographs and pictures weighing up to 500 grams.
If the wall is painted, then you can also attach a photograph or picture to it. It is enough to first stick on the wall with Moment glue, PVA or silicone a piece of thick paper measuring at least 5x5 cm, depending on the weight of the photo or picture. Before pinning the pin, the glue should be allowed to dry thoroughly, preferably for a day.
If you don’t have a pin at hand, you can successfully use a paper clip by biting off a part of it and sharpening the ends. A paperclip is secured in the same way as a pin. It also successfully withstood a kilogram of weight during testing.
A more difficult case is if the wallpaper at the attachment point turns out to be poorly glued. Then you need to cut out the required square of thick paper, attach it to the wall, trace it with a pencil and remove the wallpaper from this place. Next, use PVA glue, it is best suited for these purposes, since if the wall is covered with chalk-based plaster, then any other glue will not stick to it, glue the paper blank in place of the cut wallpaper. The pin can be threaded straight through. In a day, the mount will be ready for hanging items.
This small picture depicting a wonderful bouquet of wildflowers, weighing 300 grams, has been successfully hanging on a pin for many years.
Using a pin stuck into the wallpaper, you can successfully attach small souvenirs, soft toys and much more to the wall.
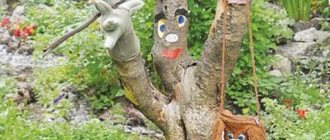
The dragonfly in the photo was made entirely of wood by one of my friends and successfully perched on the wallpaper using a pin on a very thin nylon thread, almost invisible.
Mounting a picture on a board or a picture in a frame on the wall
If the wall is made of soft materials such as plasterboard, wood, chalk plaster, then in order to hang a small picture weighing up to 500 grams on it, you just need to hammer in a post nail.
The base of the picture shown in the photograph is a wooden board measuring 14x16 cm. In order to hang such a picture, it is enough to drill a hole in the board with a simple drill, with a diameter slightly larger than the head of a nail to a depth of half the board. You can also hang a picture in a frame by drilling a hole in the frame itself.
To attach a painting weighing more than a kilogram to the wall, you need a more serious fastening; you will need to drill the wall and screw a self-tapping screw into the dowel. Large paintings are fastened with twine attached to two loops or brackets to the frame a little higher, in the middle of the painting.
To prevent the string from slipping, you need to choose a self-tapping screw with a hemispherical head with a press washer. A pair of self-tapping screws and dowels is selected from the tables given based on the weight of the painting. If the picture is large and very heavy, then you need to weigh it on two fastening points by twisting it along a horizontal line, with two self-tapping screws at a distance of half the width of the picture. The photo shows a painting measuring 50x65 cm and weighing six kilograms.
After renovating an apartment, the task is to create a cozy interior, in which one of the main roles is played by the choice of paintings and their correct placement on the walls. Not every art lover can afford to buy paintings by famous artists. But a painting on canvas reproduced using modern digital technology is quite suitable as a replacement for any masterpiece.
How to make a loop for hanging a picture in a frame
When attaching small pictures to the wall, you may encounter the absence of a loop or other device for securing the picture to the frame. There are special metal and plastic hardware on sale, but you can make a loop with your own hands from scrap material.
The easiest way is to fasten it with a thread. You can secure the thread to the frame using Moment glue or, if the picture has fastening nails, by tying the thread to them.
The fastening element for a picture with a wooden frame can be made from a safety pin or paper clip. The photo shows a safety pin.
The safety pin is opened and bent using pliers as shown in the photo. To ensure that the picture hangs vertically, use a ruler to locate and mark the middle of the top rail of the frame.
In the next step, the ends of the pin are cut off to length using side cutters so that they go to the depth of half the frame. The ends of the pin are sharpened on sandpaper.
All that remains is to make two holes in the frame with an awl, insert the ends of a pin into them and weakly hit it with a hammer.
A photograph of my granddaughter hung on a postal nail in the wall hangs securely, beautifully, and pleases the eye. Since glass is inserted into the frame to protect the photo, a more reliable fastening method was chosen compared to fastening with a thread.
How to hang a decorative plate on the wall
The industry produces a large assortment of all kinds of holders, stands, Velcro and other devices designed for hanging plates on the wall.
But you can hang a decorative plate made of earthenware, porcelain or ceramics on the wall without extra costs, using what you have on hand.
To ensure reliable adhesion of the glue to the surface of the plate, use medium-grain sandpaper to remove the glaze from its surface in the place where the loop is glued.
Since I have a mini drill with an abrasive disc in my tool kit, I decided to make grooves for the loop in the rim of the bottom of the plate to secure the fastening.
Next, a loop was made from a paper clip, as in the photo. If the fastening is carried out without grooves, then the paper clip will need to be shaped accordingly.
To secure the loop on the plate, the place where it was installed and the loop itself were greased with Moment glue. Silicone, epoxy resin, liquid nails and any other glue designed for gluing ceramics are also suitable.
How to hang a plaster souvenir on the wall
A friend asked me to attach a loop to a souvenir plaster plate for mounting on the wall.
The souvenir was purchased with a fabric loop, which came off after a while.
First of all, the hinge installation site was cleaned of old glue and dirt using sandpaper.
The edge of the plaster plate was thick enough to drill two 1mm diameter holes 5mm deep.
Next, a bracket with curved ends was bent from a paper clip, as in the photograph.
The bent ends of the bracket were smeared with Moment glue and inserted into the holes of the plate.
After a while, the glue hardened, and the result was a reliable and beautiful fastening. All that remains is to hang the souvenir on the wall.
Photo frame made of buttons
It's no secret that many housewives, when sending old clothes to a landfill, cut off buttons from them in the hope that they will come in handy someday. Well, their time has come - decorate a photo frame with multi-colored buttons!
Choose buttons of different sizes - this will make it easier for you to create a composition. Place the large buttons on the frame first, and then fill in the gaps with small ones. If you are satisfied with the result, start gluing, fixing each button one by one.
If you make a frame-backing yourself from cardboard, it is better to first cover it with colored paper, because the gaps, one way or another, will be visible.
Photo: 1000000diy.ru Photo: 2020-2020.ru
Paper stand
Agree that in a work mess there is absolutely no room for a lot of pieces of paper with notes that might come in handy someday. You always put them in one place, but they end up scattered all over the table. This was the case for me, until I decided to make a stand for papers using the cardboard technique and a master class at the same time. The stand, of course, also serves to store clean paper. It's amazing what useful things you can create with cardboard, fabric and glue. The manufacturing technique is simple, you just need to be patient and careful.
Cut out the cardboard blanks to the required size using a stationery knife.
First, let's assemble three sides measuring 9x9 cm (two walls and the bottom of the stand), applying glue to the edges of the bottom. To ensure that the wall is at a right angle, you can adjust it by supporting it with a corner.
Glue the back wall of the stand.
We take any round object and trace it on the blanks for the small front walls so that we get a beveled corner.
Glue the small parts by applying glue to the edges of the walls and bottom.
This is what the glued corners of the stand should look like.
Masking tape is needed to secure the entire structure. We seal all the joints inside and outside the stand with it. Using a stack, smooth out the tape so that there are no wrinkles.
We iron a piece of fabric measuring 39x13 cm. We will glue the fabric to the walls of the stand, as if wrapping it around it. Apply a very thin layer of glue to the first wall. If you apply too much, the glue may penetrate the fabric and leave marks, or the cardboard may become deformed.
We glue this wall to the fabric. We make sure that the wall lies exactly in the center and there are indentations.
We glue all three walls, carefully adding small ones. We smooth the surface with a stack so that there are no blisters on the fabric.
We cut the corners at an acute angle at the bottom of the stand. We seal the indents. First you need to make cuts on the fabric in the places where the small walls end. We do not cut off the excess fabric; we will use it to seal the inside of the walls.
In the same way, we cut and glue the corners of the upper part of the stand of the rear and side walls.
Now let's prepare the fabric in the front part to beautifully cover the small walls.
At the bottom, we evenly cut off the excess fabric to the level of the upper part of the bottom.
We make cuts accordingly.
First, glue the top corner, braiding it around the perimeter of the rounded part. If excess folds appear, you can make small cuts by gluing them on top of each other. Let's bend and glue a piece of fabric that remains superfluous, but just serves the purpose so that the edges of the fabric are not visible. We carefully glue the last part, forming a flat surface and corners with a stack.
We cut out a square from whatman paper that fits the size of the bottom and a fabric with allowances for it.
We glue whatman paper onto the ironed fabric. We cut the corners at an acute angle.
We leave the piece unsealed and glue it to the top of the bottom.
Glue the bottom, folding the loose fabric up.
Level the surface with a stack.
Let's cut out four blanks from whatman paper for the inside of the stand. They will be several millimeters smaller than the walls. It is better to first attach each piece and make sure that it fits freely and has another millimeter in reserve, because the fabric will also take up space. We cover all the blanks with fabric.
We paste the blanks over the inside of the stand, pressing well and leveling the surface with a stack.
The paper stand is ready! Now there will always be order on the table!
Source
Original frame made of cereals
A simple and affordable option for making a photo frame with your own hands is to make it using cereals or grains. You will also need thick cardboard, some paper, glue and paint.
Create a frame from cardboard or plywood, and cover the edges with paper for beauty. Paint the workpiece. Now you can start decorating.
Place the frame on the support so that it is in a horizontal position. Thickly coat the surface with glue to form a decent layer and sprinkle cereal on top. The miracle frame is ready! To make it last longer, coat it with additional protective varnish.
Photo: str-mebel.ru Photo: drova-darom.ru Photo: mebel-miru.ru
DIY photo frames made from simple materials: 14 fashionable ideas
Cool fashionable photo frames are an integral element of any interior. DIY photo frames can not only become a unique accessory for your home, but also serve as an excellent gift for family and friends.
In this post, Lobsta.ru made a selection of 14 cool ideas on how to make a photo frame with your own hands from simple materials, many of which can be found even at hand.
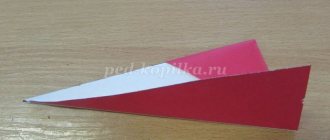
Frame of dry twigs
This option is suitable for creativity with children; they will willingly help you first collect sticks in the forest, and then happily break them into short pieces. What you will need: a wide-brim frame, a glue gun, sticks
Source
Frame from an old rustic window frame
Source
Photo frame from an old book
An unusual frame made from an old book is a great example of a photo frame made from materials you have on hand. Suitable for a small but very sweet photo. Step-by-step instructions in the pictures below:
Source
Frames made from cardboard tubes and toilet paper rolls
This creative panel is suitable for some kind of photo story, for example, about your last trip. What you will need: toilet paper rolls and any other cardboard tubes of different diameters, scissors, glue, paper knife, pencil. Step-by-step instructions in pictures below: Source
Large panel with metal mesh
What you will need: How to do it: Attach the metal mesh with a stapler to the frame on the reverse side. Use clothespins to attach the photos to the grid. Source
Dry moss frame
A stunningly vibrant photo frame made of real moss is a sophisticated decoration for your home. What you will need: an old wooden photo frame, dry moss (can be ordered here ), glue. How to do it: Just glue the moss around the perimeter. Decorating will take no more than 30 minutes and will bring a lot of fun.