Do-it-yourself brownie Kuzya
We are all a cartoon about a world-famous brownie named Kuzya. This funny character was a favorite not only of children, but also of adults. You can make such a toy yourself.
To create a brownie you will need the following materials:
- Strings of different colors;
- Brown wool threads;
- Leg-split;
- Scissors;
- Foam rubber;
- Artificial flowers (small);
- Ready-made eyes (they can be purchased at specialized craft stores);
- Foam rubber;
- Acorns;
- Kinder;
- Capron.
This presence of consumables may scare away beginners, but only at first glance does the craft seem complicated. In fact, it’s easy to make, the main thing is accuracy, patience and free time and you will definitely succeed.
Features and components of the suit
The basis for creating a brownie costume is the image of little Kuzi, the main character of a Soviet cartoon about the adventures of a house keeper in a big city and a city apartment.
It's quite easy to create a New Year's look. The following things are needed:
- Shirt made of red calico with a pattern of large polka dots, without buttons, with wide sleeves. It is difficult to find such a thing among ready-made items, but those who know a needle and thread (even at an entry level) can sew it with their own hands according to a pattern.
- Pants with patches.
- Bast shoes with supports or fabric-covered shoes with fringes.
When creating a New Year's brownie costume, you need to remember that the cartoon Kuzya was very economical. That’s why his clothes are not new, slightly faded, with patches of different fabrics, and a little big.
Progress
Let's start with the face of our fairy-tale hero. To do this, take nylon and a sponge. We will make a spout from foam rubber. Its size should be 15x15.
After the nose is ready, we begin to shape Kuzi’s face. We cut the foam into an oval and place it in a stocking, tying it tightly at the top with a tourniquet. To be sure, you can flash the collection point. We cut off the excess.
Salt dough figurine
Figures from salt dough are made using the same technology as from plasticine. The difference is that the amulet made from dough will need to be painted by hand.
To prepare the material for modeling you will need:
- flour (1 cup);
- water (1 glass);
- salt (half a glass).
The dough should be elastic and elastic.
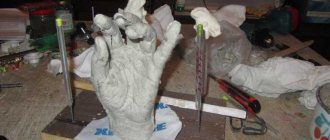
If you are planning a three-dimensional figurine of a brownie, then first you need to make the parts that will be the basis of the composition.
In order to make small facial features or clothing details, they should be cut out with a knife and not sculpted.
To attach the bast shoes you need to use glue.
After the work is completed, the product must be thoroughly dried and painted. When the paint dries, the figure should be coated with colorless varnish. This will give it shine.
Photos of crafts brownie
Do-it-yourself brownie Kuzya
Making a textile doll is not the fastest process, but if you follow the instructions strictly, you can complete it in a couple of days.
Author - Alesya Pustova How to make Kuzi's girlfriend - Housewife - we tell you in this article: Master class: Housewife from nylon
For our work we will need:
- cotton fabric - calico, for example, white;
- filler (sintepon, synthetic fluff);
- colored fabric for shirts and dark ones for pants;
- light yarn for hair;
- knitting needles;
- leg-split;
- pastel crayons;
- brushes;
- pencil;
- acrylic paints;
- sewing machine and everything you need for sewing.
Brownie Kuzya - doll with your own hands:
- You need to start with a pattern, which will be printed on A-4 sheets. Cut out all the details.
- Fold the main fabric in half, since the cut will go along the lobar, then with the exception of the details of the head, this is exactly what is taken into account. But the details of the head are cut on the bias, and each detail is cut separately. For the head wedges, an allowance of 5 mm should be made. For the legs you should take a white cloth, but you can make the whole character white, and then tint the top with a solution of tea or coffee.
- After transferring the pattern onto the fabric, the parts should be cut out and then fastened in pairs with pins.
- Using a sewing machine, set the stitch length to 1.5 and slowly sew the elements along the contour.
- When sewing the head, we will leave an opening to turn the fabric inside out. We make cuts in the allowance to make the head smoother. Or you can cut out the elements with zigzag scissors.
- It is convenient to turn the sewn inside out with a stick or knitting needle.
- We stuff the limbs and torso, not particularly tightly. Leave a little space, it will be more convenient to sew.
- You need to attach the limbs to the body with pins. Sew it on.
- We make a spout, gather it around the edges, stuff it and tighten the thread.
- We sew the nose to the head.
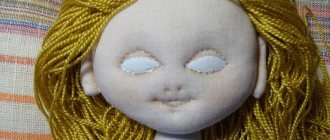
- Next, it’s better to take a break before the important stage, face painting. The outlines are made with a pencil, and then the face is painted with acrylic paints, as in the sample.
- Now we make clothes for Kuza: everything is according to the sample, unless, of course, you act impromptu. The fabric can also be found authentic, like in a cartoon.
- The finished panties are sewn to the body - as in the photo, from below and from above.
- The brownie needs to knit bast shoes from twine so that they look like real ones. This is not very difficult to do - follow the sample, try to get the same “slippers”.
- A shirt is put on, sandals are put on, and the head can be sewn on. This is done with a hidden seam.
- Hair is made like this: the yarn is wound on a not very thick book, and in this form it is carefully removed onto a white sheet. A machine stitch is placed in the middle, and then a couple more stitches in the same place, for strength. The line is also laid in the middle of one of the halves, also twice. And one more line, exactly like in the photo.
- If you remove the paper, you will get several fragments of the hairstyle. They need to be sewn on in several layers, as in the photo.
The brownie amulet is ready!
For those who want to sew a brownie, but prefer the video format of master classes:
Making house dolls with your own hands is a fun and useful activity. After all, they not only decorate the house, but also “look after” it.
Brownie amulet: which one to choose and where to place it
The brownie-amulet will help the house in which it is placed to find well-being, prosperity, and financial stability. It also protects against magical influences, various dangers and theft.
There are many types of domovyat figurines: cheerful old men, smiling boys or girls
An important detail is what object the brownie is holding in his hands - they all have a special meaning:
- Broom.
A brownie with a broom will protect your home from dark forces. A brownie with a broom will protect the house from adversity and evil spirits - A bag of cereal.
Such a detail in the hand of a brownie will allow money to enter the house, which will gradually improve. A brownie with a bag will improve well-being in the home - Spoon.
It is also a sign of prosperity. A brownie with a spoon will use a spoon to scoop wealth and good luck into the house - A house drawn on a bag carried by a brownie, or simply present next to the brownie, symbolizes comfort and happiness in the family.
A brownie in a house will bring happiness and prosperity to the family - A banknote or coin will bring wealth into the house.
A brownie with money will bring wealth to the house - Bast shoes or a bagel will help restore comfort and peace in your home.
A brownie with bagels will save family relationships
It is also important where the brownie-amulet will be placed:
- It is better to hang a brownie with a spoon in the kitchen. It will protect your home from “times of hunger.” Food prepared under the gaze of such a brownie will nourish a person not only on the physical, but also on the energetic level.
- A talisman with a broom or broom is placed in the hallway, opposite the front door. The brownie will keep an eye on everyone who enters the house, and if a person comes with bad intentions, he will “sweep” him out of the home.
- Figurines with money or bags are placed in the living room or office. The brownie will monitor your financial situation and, if necessary, help.
- Brownies with bast shoes, houses or bagels will take the right place next to the front door. They will help strengthen family relationships and prevent love from leaving the house.
Little house girls (domovikhi) are most often depicted with spoons in their hands, so they should be placed in the kitchen. They are suitable for housewives, single women and will become good helpers in household chores. Boy or old amulets are appropriate for placement in the apartments of single people and families.
Housewife helps women in housekeeping
How to sew Brownie Kuzya
To make this Brownie Kuzi, a piece of jersey knitwear measuring 30 x 40 cm was used. Despite the fact that this material is quite densely woven, it was previously reinforced with non-woven fabric (ironed with a hot iron).
Fold the fabric in half with right sides inward and transfer the pattern.
Each “body part” should have two parts, except for the nose. It is recommended not to cut them out immediately, but to first stitch them along the contour.
During stitching, do not forget to leave small open sections (1-1.5 cm each) for subsequent turning and stuffing.
We unfold the edges of the toe parts at the legs and grind them down.
In places with bends, we make small cuts, or use zig-zag scissors when cutting.
Turn the pieces right side out. This is convenient to do with sushi chopsticks or long tweezers. We fill the blanks with any soft filler - padding polyester, holofiber, padding polyester, etc.
The padding should be very tight. If you want to shape your fingers, then the padding in the toe part and on the handles should be weaker. We sew up open sections on the arms, legs and torso. We fix the head on the neck with pins, and then sew it with a hidden seam.
The legs can be immediately sewn to the body. It is advisable to use a button-thread fastening. Thanks to this method, the doll’s legs will be movable, which means Little Brownie Kuzya will be able to stand and sit.
Next, we dress the toy. The shirt for this master class is not removable, so it is very easy to sew. We cut out a rectangle from the fabric, process the top and bottom, and sew down the vertical seam.
We put this “oval” on Kuzya and tighten the upper edge around his neck.
We place the handles on a piece of fabric folded in half. We trace along the contour of the handles, cut out the blanks with an allowance of 5 mm from the contour. We sew and turn the sleeves inside out, put them on the arms, and sew them in the area of the shoulders through the body.
Now let's start making pants.
We measure the waist circumference and divide this value in half. We draw a line on paper, step back from it downwards at a distance equal to the height of the future panties. Draw a parallel line that is slightly longer than the top one. Draw step cuts. Using this pattern, we cut out two parts from the fabric. First we sew down the middle seams of the panties, then the step seams.
Next, you need to process the top and bottom edges. We put the finished product on the brownie and tighten it at the waist. If the pants are removable, then insert a hat elastic into the top hem.
At the next stage we create Kuze’s “hair”. Yarn used in this master class is micropolyester. We wrap it around a book and cut it at both ends.
We straighten the segments, mark the middle on them, put thin paper (for example, toilet paper) underneath, and stitch them. We remove the paper.
Such yarn strands can be glued or sewn onto the head.
The first tres is attached across the crown.
The subsequent ones are horizontal “from ear to ear.”
After all the hairs are sewn on, we straighten them and trim them.
At the next stage, we begin making bast shoes. To do this you will need thin jute twine.
We crochet five air loops and connect the first and last. We knit 3 rows in a circle, adding every other loop.
We knit the fourth row in half, turn in the opposite direction, and again knit half the circle.
We make three such straight rows, this will be the insole. Then we make five air loops. We connect the latter with a loop on the other edge of the insole. We knit in a circle, removing one loop at a time. This way we close the heel.
We leave a tail of twine for tying bast shoes on Kuzi’s legs.
We make a nose on the face. We sweep the round blank along the edge of the circle, tighten it into a bag, into which we put a button or soft filling.
Sew the nose to the muzzle with a hidden seam.
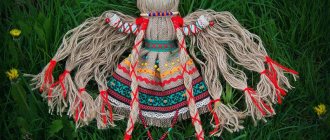
The little brownie is dressed and wearing shoes, all that remains is to draw his eyes and mouth and give him some accessory. It could be a spoon, bagels, a cone, a musical instrument, etc. In this master class, Kuza was given a bag “with happiness” in his hands.
It was sewn from a rectangular piece of fabric, filled with padding polyester, and tied along the top edge with twine. In this image, Brownie Kuzya will be an excellent gift for a housewarming, birthday or wedding.
What if you put such a character in your home, or give him as a souvenir.
This master class will help you sew such a toy-amulet with your own hands.
Brownie from a jar
There are probably empty coffee or tea cans in your house. Don't throw them away, they make great decorations for your kitchen!
In addition, a talisman in the form of a brownie, made with your own hands, will bring you prosperity and well-being.
- To start, you will need a tin can.
- Then take flax hemp, which will need to be wrapped around this jar.
- Treat the edges of the hemp with a heat gun so that the product is durable and does not unravel.
- Now take the wool threads and make a tassel out of them, the ends should be long.
- Tie the top of the hand to create a nose.
- The edges are the beard of a brownie, they need to be fluffed up.
- Attach the resulting element to the decorated jar.
- Now add the eyes by gluing the finished plastic hell nose.
- Now take the lid and wrap it with twine made from colored yarn.
- This will give you a brownie hat.
You can decorate it with an artificial flower on the side. This product can be used as a box.
Do-it-yourself Brownie Kuzya: master class
Many people associate such a doll with the brownie Kuzya from everyone’s favorite cartoon. Cartoon Kuzya became so popular that the production of toys and amulets for this doll was launched. But, buying a standard mass-produced toy and making it yourself are two big differences. Only a brownie that you have made yourself, in which you have invested your soul, thoughts and feelings, can become both a children’s favorite toy and a talisman at home.
Do-it-yourself brownie Kuzya
The master class that we offer you is not the simplest: a rather complex pattern is used, to draw a face you need to have basic skills in fine arts, and to make paws you need the ability to knit. However, the result is worth it, and such a brownie Kuzya will surprise both you and your loved ones with its originality.
Unwashed brownie Kuzya
Brownie molded from plasticine
An educational and exciting activity for a child.
Minimum materials:
- Plastic plate,
- Board and plasticine.
Take pink plasticine, parts of the brownie's body will be molded from it.
- Now you can move on to the boots - they are made of black plasticine.
- Move on to the face - make the nose, as well as the eyes and beard.
- The plate will serve to draw any background on it, and then place the brownie on it.
A beautiful composition is ready!
Brownie Kuzya: materials and devices needed
You probably already realized that this brownie Kuzya is made of fabric. For sewing, it is better to choose beige cotton fabric . If you take stretchy fabric, it will not bulge at the seams. Cotton is better suited than synthetics, because paints and blush, which are needed to draw a face, adhere better to it. So, to make a brownie with your own hands you will need:
- Beige fabric
- Colorful fabric for a shirt and dark fabric for trousers
- Sintepon or synthetic padding for stuffing
- Twine rope for tying bast shoes and knitting needles
- Hair yarn
- Acrylic paints and brush
- Colored crayons or blush with shadows to add color to your face
- Large shirt button
- Spoon, key or other accessories as you wish
- Threads, needles and other standard sewing supplies
Materials and equipment needed to sew the brownie Kuzya
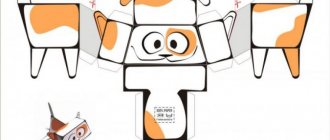
The pattern for the brownie Kuzya is shown in the figure below. Using a printer, it can be transferred to paper.
- The head will be sewn from wedges, so it will be voluminous
- The patterns for the remaining parts are simple, without undercuts.
- We transfer the pattern to the fabric, cut and sew the blanks
- We turn the blanks inside out and stuff them with padding polyester.
- Now you can draw eyes and a mouth on the head, sew on hair
- The ball-shaped nose is sewn on after the paint has dried.
- We sew all the parts of the doll, dress them in a shirt, pants and bast shoes.
- Kuzya is ready!
Pattern for brownie Kuzya Pattern for shirt and pants for brownie Kuzya
- To sew clothes for the brownie we need one more pattern
- We also print it out and cut it out with scissors.
- The shirt and pants will fit loosely, so they are slightly larger in size than the brownie itself
- In the cartoon, Kuzya appears in an unwashed and clean form. You can make one or the other version of the toy
Do-it-yourself grimy brownie Kuzya
Manufacturing technique
The first thing you need to start with is drawing and cutting out models to create patterns. These are two parts for the future shirt, four from which you will sew the brownie’s arms, four parts for the panties, one for the nose, five for the head, two parts for sewing the brownie’s body and, finally, four for making the legs.
Once you have cut out the pieces from the paper, trace them onto the back of the folded fabric. Cut out as many pieces as you need for the job. After sewing the elements along their contours, turn the resulting pieces inside out.
Stuff the body parts of the future brownie with cotton wool, especially filling the head with it so that it is even. Gather the pieces and sew them together by hand. The circle that is cut out for the nose is gathered around the edge, filled with a small piece of cotton wool and pulled together, and then sewn to the head.
How to make a brownie from threads and cardboard with your own hands?
- If you sew eyes, ears, arms and legs to a pom-pom from knitting threads, you can get an original brownie toy
- Any thread is suitable: plain, multi-colored or variegated
- The eyes can be decorated with buttons, and the arms and legs can be cut out of colored cardboard or plastic bottles
A pom-pom made from knitting threads.
If you take a lot of threads, the brownie will turn out to be voluminous, and it can be placed as an independent toy. If you wind long threads on cardboard in 2-3 layers, you will get a fairly flat brownie, which will need to be glued to a cardboard base. A detailed master class on how to make an applique with a brownie in the video below.
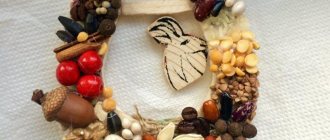
Beautiful craft made from natural materials
There are many original ideas for creating amulets dolls. For example, with your own hands you can create a cheerful brownie Kuzya from natural materials. Prepare everything you need:
- a cookie box for the base;
- colored fabric for the background;
- birch bark;
- tinder fungus;
- small sunflower flower;
- dried aspen and lily of the valley leaves;
- Jerusalem artichoke flower;
- leaf-shaped sequins;
- colored gouache and brushes;
- glue;
- needle and thread;
- scissors and stapler.
Execution technique
- Staple the colored fabric to the bottom of the box. Sew along the length so that it does not sag when the box is placed on its side.
- Take birch bark and cut out arms and legs from it. Additionally, make bast shoes from white birch bark.
- Make a hole in the left handle and insert Jerusalem artichoke into it.
- Attach bast shoes to each leg so that they can move.
- Cut out the facial elements from paper: mouth, nose and eyes. Attach them inside the sunflower flower.
- Sew the arms and legs to the fabric base. Then attach the tinder body. Sew the head on top.
- Our fairy-tale hero must be dressed in a shirt. To do this, paint over the body with red gouache. Make the trouser legs blue and the oxen yellow. The shirt can be decorated with large white polka dots.
- Cover the edges of the hut with logs made of colored paper.
- On the front side, use dry leaves and decorative sequins for decoration.
- Cover the reverse side with paper of any color to hide the seams.
Now you can create your own amulet that will take care of the safety of your home and the health of your household. Such dolls will not only be an original decorative element, but also a good toy for your children. We wish you creative success!
What crafts can you make yourself?
Domovyats are different in image, style and method of production. Each interior style has its own type of fairytale guest. Today we will get acquainted with several types of brownies, we will analyze the main methods and techniques for creating crafts.
Here is a list of the schemes we will work on today:
- Brownie made of burlap and filling.
- A figurine made of burlap on a jar base.
- Cardboard craft.
- Brownie made of plasticine (we couldn’t omit this option, since our kids should also take part in creating a new collection of crafts).
- Kuzya made of threads (we use the traditional name, as is customary in Russia).
Brownies from jars
Tools and materials
- banks;
- glue;
- craft threads;
- cardboard;
- scissors;
- threads;
- ruler;
- sackcloth;
- eyes and decor for house pets.
Step by step training
- Lubricate the jars with glue. We begin to wind the threads around the perimeter from above, pressing them tightly against each other.
- Glue on the eyes.
- We make a spout from threads or use any decorative spout blank.
- Cut out handles from cardboard or felt and glue them on.
- We make hair from threads. Glue them on the top.
- From burlap we cut out a circle in the shape of the lid. We glue the edge with a pigtail or ribbon.
- Glue the burlap to the jar and screw the jar. We decorate the hat with any decor you wish.
Master classes on making crafts with step-by-step instructions
We begin consistent training in working with crafts. These instructions will give you an overview of the process of creating a brownie. But don’t forget that you and your imagination can create much more!
Preparing a brownie from burlap and stuffing
The most common version of the brownie among souvenirs on the Russian market is a round figurine made of coarse fabric.
But, you see, it’s much nicer when this figure is made with your own hands - diligently and with love.
For work we will need:
- The main material is burlap.
- Threads and needles.
- Glue and scissors.
- Twine or other strong rope.
- Filler.
- Decorative elements (eyes from soft toys, a brownie hat, a scarf).
Step-by-step diagram-instructions for the master:
- Draw a fairly large circle on a piece of burlap.
- We sew a row of seams in a circle using large stitches.
- We place filler on the inner surface of the stitched material.
- Now you need to pull the stitches towards you so that the workpiece takes the shape of a bag.
- We straighten the bag with our hands, loosening the filling. Now our product has taken the shape of a ball.
- Excess pieces of burlap can be safely trimmed or left.
- We hem the hat on top (this way we will hide the remaining fabric).
- We put the eyes on glue.
- We sew a large bead button in the center of our ball, forming a nose. You can glue or sew fluffy knitting threads around the nose.
- All that remains is to make the legs.
- To do this, cut out two legs from cardboard and glue them under the bottom of the brownie.
Our defender of the family hearth and well-being is ready!
Making a brownie from burlap and cans
This method is as simple as the previous instructions. The only thing is that instead of a filler, a coffee or tea can will serve as the inner base.
To work you need to prepare:
- Coffee tin.
- Sackcloth.
- Glue.
- Decorative elements (hat, mustache threads, button).
- Scissors, threads, needles.
Step-by-step diagram-instructions for the master:
- Place the prepared jar on the unfolded piece of burlap. Estimate how much fabric you will need to completely wrap the base.
- Cut off excess material.
- Wrap the burlap around the jar, tying a knot at the top with strong threads.
- For strength, you can glue the connection of the fabric to the base in places, but this is not necessary.
- We'll glue eyes on our little brownie's face and sew on a button-nose. We'll put a hat on our head.
- Add a mustache using fluffy threads or a stiffer material.
- We also precisely cut out the legs from cardboard and glue them under the bottom.
This brownie will be more stable thanks to the flat surface of the bottom.
Brownie made of cardboard: bulky crafts
This craft model will most likely be useful to those who want to do independent work with kids. Bright and colorful characters from Russian fairy tales will serve as a reminder to your child of interesting activities with his parents.
You need to prepare the following materials:
- Templates.
- Colored cardboard.
- Scissors, glue.
Step-by-step instructions:
- Let's prepare the templates. You can find ready-made samples on the Internet and in craft guides. But, in any case, you should know how many and what parts you will need for the job. Therefore, prepare: arms, ears, legs and eyes - 2 parts each, torso - 1 part, hat - 1 element. If desired, you can add 1 tongue.
- Using the templates, we draw and cut out blanks from colored cardboard.
- For the base, prepare a small sheet of cardboard.
- Glue the parts to the base.
- We complete the pupils using a black felt-tip pen.
The brownie – simple and easy to make – is ready.
Brownie made of plasticine
This method is also the main one for conducting joint activities with children. You can also create a beautiful applique on a base plate to display your work in a kindergarten display.
To work you need to prepare:
- Plasticine of different colors.
- Knife for working with plasticine.
- Board for work.
- Base (plastic plate or foam).
Step-by-step instructions:
- We sculpt the head of our brownie from pink plasticine.
- Roll red plasticine into an oval shape - this will be the body.
- Your feet can be “shod” in boots made of black material.
- The hat can also be molded, but you can use a straw toy hat.
- Attach eyes, nose and mouth to the face.
- If you want to create a full-fledged applique, paint the base plate green, or draw (if possible) the decor.
- Place the brownie figurine at the base. Next, create the shapes that come to your mind.
The method of working with applications significantly helps parents in developing their children's role-playing skills. By consistently creating characters, you can tell a whole fairy tale or fable.
Features of making a Slavic amulet
Traditional amulets depicting house spirits are made from natural materials. The attributes with which the doll is decorated should correspond to the family’s home activities.
If the owners keep livestock, then bird feathers or wool can be used.
When creating a talisman, it is important to adhere to the following rules:
- The souvenir is made during daylight hours, being in a good mood.
- You cannot make a talisman in bad weather, Friday, Sunday and holidays.
- You need to sew a doll in 24 hours, without putting off work until tomorrow.
- Natural materials are used. It is prohibited to use fabric from the clothing of sick or deceased people.
- The best period for making is the phase of the full or waxing moon.
To prevent an evil spirit from possessing the toy, you should not draw eyes and mouth on it. If the goal is to create a traditional Slavic amulet, then instead of a face, a mustache and beard will give the figurine a resemblance to a brownie.
Photo ideas for homemade brownies
Sources
- https://podelki.pro/podelka-domovenok/
- https://masteridelo.ru/shkola-masterstva/master-klassy/igrushki-kukly/kukla-domovoj-kak-svoimi-rukami-sshit.html
- https://podelki-doma.ru/rukodelie/shite/domovenok-kuzya-shite
- https://igrad.su/vse-zapisi/domovenok-svoimi-rukami-iz-tkani-s-vykrojkami-domovyonok-kuzya-master-klass.html
- https://heaclub.ru/podelka-domovoj-svoimi-rukami-master-klass-kukla-obereg-domovoj-svoimi-rukami-iz-kolgotok-meshkoviny-nitok-i-kartona
- https://gidrukodeliya.ru/podelka-domovechok