The benefits of homemade crafts for the garden
Of course, garden figurines and decorations for gardens and vegetable gardens can be bought in the store.
But a lot of things are easy to do on your own. This way you can have a great time in the winter, remembering the summer days, or find something to do during a quick rain, spend time with your children, showing them the basics of needlework. Making your own decorations for the garden will help you get rid of trash that you don’t dare throw away, and free up balconies, garages, sheds, and rooms in your country house. The material at hand can be anything. Most often they use plastic bottles, tires, remnants of boards, hemp, old toys, kitchen utensils and anything else that the zealous owner (or housewife) has caught the eye of.
Very often, neighbors also become infected with the desire to do something unusual, so soon the entire gardening community is pleasing the eye with cute little things that lift their spirits.
And lastly: original crafts highlight the area and make it an excellent place to relax, becoming a stylish place where relatives and friends come with pleasure.
Preparing for work
Before you start sculpting, you need to fulfill a number of simple requirements. First, wash your hands well. Secondly, prepare the workplace. It is best to purchase a special board for working with modeling mass . It is convenient to cut pieces of the required sizes, roll them out and fashion them. While working, keep a damp cloth or wet cloth at hand. Some types of plasticine can leave marks on your hands.
For young children, it is advisable to purchase safe special modeling materials. They are designed so that the baby can taste it. The special composition of such plasticine is absolutely harmless. However, when working with young children, it is advisable to monitor and avoid such incidents if possible.
Old furniture
Unnecessary or very shabby furniture can serve once again as an unusual flower bed. You can remove the doors of your grandmother’s old dressing table, take out half the drawers and install a flowerpot with flowers there, or arrange a doll’s house inside. Pots can also be placed on the top surface, and the existing mirror can be painted with cute patterns.
The only thing you have to take care of is to protect the tree from rain and other moisture. To do this, cover the piece of furniture with a thick layer of paint, stain or varnish. Or we can do it all together. Such a thing can even be placed on the veranda if it is on the illuminated side.
Such a novelty to the exterior of the site will make the dacha a very attractive and unusual place.
As such a flower bed you can use an old table, chair, ladder, construction pallets leaning against the wall.
The benefits of modeling
In addition to plasticine, there are many alternative materials. Cold porcelain is considered one of the best materials for modeling. It is easy to prepare at home. You can use polymer clay, which subsequently hardens. Some types of clay require heat treatment.
Activities such as making various crafts are very useful for developing mental abilities in children, as well as for improving their psycho-emotional state. Modeling from plasticine provides many advantages:
- The development of fine motor skills of the hands has a beneficial effect on the development of speech skills and diction. Therefore, it is very useful to engage in modeling with plasticine, making paper crafts, and handicrafts with children of primary school age.
- Making a globe from plasticine with your own hands will help give children basic knowledge about the structure of the world, namely the basics of geology and geography. They will become familiar with concepts such as the planet, the location of continents and oceans, mountain systems and plains on the surface of the Earth.
- The process of working with plasticine activates creativity.
- Working with crafts helps develop qualities such as perseverance, attentiveness, accuracy and concentration. Children learn to concentrate on one activity.
- By creating new shapes from standard blocks, spatial, abstract and figurative thinking is activated.
- When a child kneads and rolls a ball between his palms with both hands, both hemispheres of his brain are involved. Interhemispheric connections are strengthened, which contributes to the harmonious development of the baby in all directions.
- The process of sculpting various figures and forms according to a model develops memory and the ability to compare the proposed option with one’s own work.
- If the baby sculpts, inventing his own images and shapes, this helps develop imagination and creativity.
- Making crafts teaches children to set simple goals and achieve them, bringing the job they start to completion.
- Engaging in such types of creativity that require prolonged concentration and perseverance has a beneficial effect on the health of the human nervous system. His psycho-emotional state improves.
- Regular quiet games help reduce excessive activity, irritability and hyperexcitability. Such children are less likely to suffer from attention deficit disorder. In addition, their sleep becomes normal.
- If your child manages to make a few crafts on his own, it will help boost his self-esteem and give him inspiration for further achievements in the arts and sciences.
The educational process, which is carried out in a playful and relaxed atmosphere, is most effective. A small child gradually learns new things through the language accessible to him. This awakens interest and stimulates the desire to learn in the future.
A model of the Earth is a fairly common souvenir. There are many varieties: globes made of crystal or natural stones, wooden crafts, models with a bar hidden inside, floor-standing, levitating, held in the air by a magnet, and many others. Plasticine crafts complement this range of unusual souvenirs.
Unnecessary household items
Old kettles and buckets can, of course, be scrapped, or you can make fun flower beds out of them.
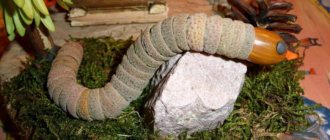
To make a “campfire” you will need only three sticks (they can be easily found in the nearest forest). Two of them should have spears, on which a third stick with a hanging pot, kettle, bucket, and mayonnaise bucket is hung. The container is filled with earth and hanging plants are planted there.
The fire itself is surrounded by fairly large stones, logs or cones are placed inside, and small red or orange flowers are planted. Scarlet scraps of fabric can also act as tongues of flame.
Unusual flower beds can be made even from unnecessary women's handbags or suitcases.
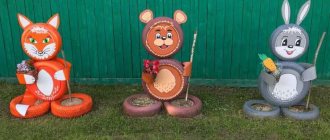
Old unused barrels can be painted in the form of nesting dolls or fashionable minions, patterns or colors. Anyone who is comfortable with brushes and paints paints entire pictures on such surfaces. If the Creator did not give such a talent, you can simply paint the barrel with multi-colored stripes horizontally, vertically or at an angle, creating a rainbow.
Such beautiful objects can be used as a warehouse for inventory (everything will be in sight) or trash cans for large garbage. Or take it out into the garden and use it as a high flower bed.
Even old water gutters are used. They can be used as a frame for paths or hanging flower beds on the walls of houses and gazebos or on tree branches, secured with strong ropes or chains.
Old shoes will wonderfully turn into fun flower beds. It is enough to paint it (bright rubber boots can be left without painting), fill it with soil and plant undemanding flowers. Such flower beds decorate garden paths, places along the fence or any free space in the garden.
From several pairs of old shoes you can make a funny dog or a cheerful giraffe that will greet residents and guests coming to the site. Cracked flower or kitchen pots can be laid on the ground and made into a flower river.
House
Fairytale little houses always touch and attract attention. And in this master class we will make such a fabulous house from natural materials. It is not difficult to do. And the process itself is very exciting. Therefore, you can make a house together with your child.
To make a house we will need:
- Twigs;
- Wire cutters;
- Glue;
- Plasticine;
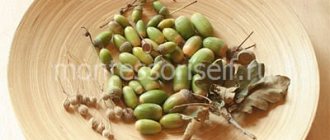
- Cones;
- Berries;
- Mushrooms;
- Grass;
- Any decorative elements.
The house will be round. Take a block of green plasticine and knead it. We make a ball from plasticine and flatten it to make a circle.
This is the basis for "construction". At the same time, plasticine serves as both a foundation and greenery.
Then use pliers to cut the branches to equal lengths. From 7 to 10 cm. The branches should not be too thick. Otherwise it will be difficult to cut them.
We place branches along the contour of the plasticine circle. We stick them into plasticine. This is the basis for the house.
Let's take another twig and cut it into 3 parts. We will fasten them together with glue. You can also fasten it with plasticine, if that’s more convenient. And we attach this blank to the house as a door.
Roll a sausage out of brown plasticine and bend it around the door of the house.
Now you need to make a roof and secure the walls on top.
To do this, take plasticine again (you can take any color).
Roll out the plasticine into the same circle as the “foundation”. And attach it on top above the branches. The branches need to be inserted into this. We also form a cone-shaped roof from plasticine on top.
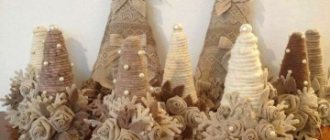
To make tiles, we will disassemble a large cone into scales. We attach these scales in a circle along the bottom of the plasticine, slightly pressing their upper part into the plasticine in order to secure them well.
Then we lay the second row of tiles. Then the third and so on until the roof is completely ready.
This is what the finished roof of our cozy house looks like.
Let's start decorating the house.
Glue a small mushroom onto the roof. You can also attach a couple of mushrooms to the left of the door and then glue a sprig of bright berries here.
On the right side of the door we attach a small green bump to the plasticine. It will be here as a tree.
The plasticine from below can be covered with grass. And hang a clock under the roof. But if there is no such decorative element, then you can leave the house without a clock.
A cozy fairytale house made from natural materials is ready! You can put it on a shelf and admire it at any time.
Tree
This material will help decorate your summer cottage in the most unusual way.
The remains of the boards go to consciousness:
- decorative mill;
- a nice well;
- a funny house for a gnome;
- a bridge over a flowerbed or a dry stream;
- cars, carts or trains with flowers;
- a large cart with boxes of herbs;
- feeder or birdhouse.
You can decorate even an old stump beautifully if you make a hole inside for planting flowers.
Thin stumps can be transformed into cheerful fly agarics by simply attaching the bottoms of plastic bottles painted red with white spots on top. This idea will help you quickly and funly transform your garden into a lovely relaxation spot.
Children's globe
You will need: a balloon, blue paint, a brush, newspapers, a glue stick, felt-tip pens.
Master Class
- Inflate the balloon.
- Cover the ball with pieces of newspaper in several layers.
- Paint with blue paint and wait until dry.
- Print out the continents, color them with markers, then cut them out.
- Glue the continents onto the ball.
The children's globe is ready!
Plastic bottles
A huge number of crafts are made from such containers with your own hands. This:
- funny bumblebees and dragonflies;
- piglets and kittens with flowers;
- funny hedgehogs;
- swans, frogs, water lilies;
- hanging flowerpots;
- horses, donkeys, giraffes;
- exotic palms.
This is a good material for creating fences along flower beds and paths.
Plastic bottles are used to create ottomans for working in the garden, decorating a gazebo or country house, coffee tables or armchairs. To do this, they are made into blocks using strong glue or tape and covered with fabric.
Different types of crafts
There are several types of plasticine crafts. The choice of option depends on the availability and quantity of materials, the age of the children and the goals set.
If the main task is to give a small child basic knowledge about the planet, you can start by creating a simple model. Older children can be offered a more detailed study of geography by placing neatly cut plasticine continents and islands on a ball.
The simplest option
Creating a simple model of the Earth from plasticine is the best way to introduce preschool children to the basics of geography and geology. For such a craft you will need a minimum set of materials. You can limit yourself to three colors of plastic mass. We need blue, green and white.
Work process:
Roll a small ball from the blue mass.- Take a small piece of green and roll out a flat cake no more than 2 mm thick.
- Now you need a geographical atlas. Using a plastic knife, carefully cut out continents, archipelagos and islands, trying to get closer to the original image.
- Roll out a thin layer of white mass and apply an image of Greenland, Antarctica and the islands located at the poles to the ball.
Car tires
Also an excellent material for decorating a garden plot. The easiest way is to create round flower beds from them, filling the center with soil. Or you can beautifully paint them in all the colors of the rainbow, lay them out with a path or ladder, or make hanging vertical or horizontal flower beds.
Tire halves look good as borders near paths or playgrounds.
And the playground itself can be made using such items. It can be:
- sandboxes;
- bungees;
- obstacle courses;
- swings and rocking chairs;
- funny animal figures.
An unusual idea would be to create a small pond from a large tire and thick polyethylene. And it will be decorated with large stones or pebbles, decorative or herbs, and wooden bridges.
Photos of similar crafts will help you choose the simplest or funniest creation and start decorating your dacha.
From paper
Making a house from paper is even easier than from cardboard. This is due to the fact that in this case it is absolutely not necessary to cut out every single detail, because the paper bends well.
Initially, you need to draw a scan on paper. It should be a square or rectangle in the center, and from each side there should also be a square or rectangle of the same height, with a small allowance for ease of gluing.
Next, you need to cut out the development and bend the walls. Using a pre-created allowance, you need to glue the sides together.
All that remains is to make the roof, which can also be done by slightly unraveling it. If it is a sloping roof, you need to draw a rectangle and draw a transverse line in the middle that will divide it into 2 parts. From each piece there should be a smaller triangle with a slight allowance on both sides.
Having cut out the roof profile, it must be bent and also glued. As a result, you will get a finished model of the house, but you need to give it a more presentable look.
You can use paints as decoration, but they must be applied carefully and in a thin layer. In order not to paint, you can initially use colored paper, choosing the color of the canvas according to your idea.
To add bulges to the house, you need to use thin cardboard; you can use it to make window frames, a door, and a chimney.
If desired, you can make an opening door. To do this, at the stage of drawing the development, it is necessary to mark the opening for the door.
After the layout is assembled, you need to make a door. It is done quite simply, a door made of colored paper or cardboard is glued to a toothpick, 2 paper loops are made inside the layout, inside which the door will be located.
The photo of the house crafts shows that in some cases it makes sense to work on the functional elements of the layout, such as the door and windows. This gives the product realism, and the child will definitely receive high marks for an interesting idea.
Country furniture made from scrap materials
The benefits and aesthetic advantages of such crafts for landscape design are undeniable. A sofa, assembled from many plastic bottles, allows you not only to take a break from righteous labors, but also has a unique massage effect due to the bottom bulges that form the seat.
A table set made from car tires is not only an impressive piece of crafts for landscape design, but also a place for pleasant family tea parties and gatherings with friends. Tin barrels and tanks, complemented by tabletops and seats, also fit well into the picture of country life.
Old rake as an organizer
It's easy to turn an old rake into a garden organizer. The tool is used to store work equipment. You don't have to do anything complicated with the rake. The instrument is raised with its teeth upward. The shaft is stuck into the ground to ensure the stability of the structure. The existing equipment is distributed between the teeth.
Before using the organizer, it is recommended to paint the metal part. This will prevent rust from spreading to working tools.
How to make a house out of a box
Take any box of a suitable size, preferably made of thick cardboard. We don't need the box lid, so we cut off the unnecessary parts. We place the box on its side, with the open part towards us, then the bottom of the box will be the back wall of the house. From two strips of cardboard, bending the edges, we will assemble a “roof”.
Depending on the growth of the doll, we will glue the “overlap” between the first and second floors at the required height, cutting out a strip of cardboard corresponding to the length and width of our box. To give the structure greater rigidity, we will put “walls” on the first and second floors.
The walls can be either strictly above each other or offset. It is convenient to use masking (paper) tape, because when further decorating our house, unlike ordinary tape, it will not interfere with the gluing of future wallpaper.
In advance we will cut through and lower the “stairs” in the “floors”, and in the “interior partitions” we will cut through and open the “doors”. We will cut out one or more windows in each room. They can be covered with paper tape to create the appearance of window openings.
Once the structure of the house is ready, you can begin decorating. Here you will only need technical assistance, because there is a creator in every child. Use leftover wallpaper, magazine clippings, and colored paper to cover the walls.
Pieces of organza or any other fabric will turn into curtains, and scraps of felt will turn into carpets. If doll furniture is not enough, make it from scrap materials.
And, most importantly, remember that the most precious thing in our lives is the time spent with our loved ones.
Papier mache
The French technique of making copies of objects has found its niche in needlework. Take:
- Balloon.
- Old newspapers, any other thin paper.
- Paste.
- Drawing set.
Instructions:
- Cook the paste. The recipe can be easily found on the Internet.
- Tear newspaper sheets into small pieces of paper in large quantities.
- Dip individual pieces of newspaper into glue and glue them layered onto the ball.
- Let dry. Air drying will take a lot of time. It is allowed to use the oven at low heat.
- When gluing, uneven surfaces will form, do not try to smooth them out. They will form excellent three-dimensional elements of the planet’s exterior.
- Pierce the inside of the ball with a point and use the gap made to remove the remainder.
Next, cut the pages into small squares. Stack them to form craters. Carefully glue the edges of the funnel to the lunar surface. Dry again. If you make a buttonhole from wire, you will get a hanging Moon.
Homemade tools and devices
A lot has been written on the Internet about how to make a summer house with your own hands. And we won't repeat ourselves.
Together with this, we would like to bring to your attention interesting ideas on how to make various useful tools, equipment and devices with your own hands that will make work in your summer cottage easier.
For example, for convenient watering of vegetable beds and fruit trees, we recommend using a mobile reel for an irrigation hose. Summer residents will appreciate this device.
When working in the garden, you often have to dig holes to plant new trees or to install posts.
This work takes a lot of time manually. We bring to your attention an alternative option - a hole drill made from a saw blade with a gas drive, which you can make yourself.
And during construction work, a folding cart can be used for convenient transportation of various bulk materials.
What mushrooms can you pick in the forest in winter?
Picking mushrooms in winter is even more convenient than in summer. In a leafless, snow-covered forest, they can be seen from afar, especially since they usually grow high on trunks or fallen trees. There are several types of mushrooms that can be collected throughout the winter. These are winter honey fungus, sulphurous honey fungus and oyster mushroom.
In addition, winter is the most convenient time to collect birch chaga. This inedible mushroom has excellent healing properties, so it is widely used in folk and official medicine. And lovers of original crafts will be pleased with the variety of tinder fungi, from which various compositions, figurines, flower pots, etc. are made.
Polypore Photo: V. Rogoza, personal archive
At the beginning of winter, especially if the frosty days came early, you can find the usual autumn mushrooms in the forest - several types of row mushrooms, autumn honey fungus, sulfur-yellow and scaly tinder fungi. But they can only be collected before the first thaw, since after thawing and subsequent frosts they begin to lose their quality. Winter mushrooms, on the contrary, are not afraid of thawing, but use this time to continue growing.
The easiest way to collect late oyster mushrooms in the winter forest. They are practically no different in appearance from those grown in greenhouses and sold in markets or stores. Oyster mushroom is difficult to confuse with other mushrooms; its stem is on the side, smoothly turning into a cap, which sometimes reaches 10 centimeters. Young mushrooms look like shells, which is why oyster mushrooms are sometimes called shell or oyster mushrooms.
Table made from an old reel
It’s enough to look through pictures of homemade items for your dacha to find a suitable idea for yourself. Many people do not see the beauty of ordinary garbage without seeing the realized possibilities of its transformation. For example, a wooden cable spool makes an excellent table.
You don't have to make any special efforts to complete the task. The item is almost ready for its new role. All that remains is to treat the surface, making it more aesthetically pleasing and safe.
You can also build a table from pallets. It will be possible to make a product of any scale. In the garden by the pool or sun lounger, a low coffee table will come in handy.
A thing with standard dimensions will replace a dining table. An item with additional internal shelves, ideal for a workshop or garage.
Note!
DIY garden decorations: 150 photos of original ideas and new products. Instructions with step-by-step guidance, diagrams and drawings
Fast-growing climbing plants for the fence and garden ☘️. Review of perennial and annual plants. Photo + instructions with description
- DIY barbecue: TOP 120 photos of the best examples of work. Master class on making at home + simple diagrams and drawings
Bench made of wooden blocks
Making a bench with your own hands is a simple task. You can use an old stump that you don’t want to uproot as a basis. Just nail the board on top and the product is ready.
Note!
- How to level an area - instructions on how to do it yourself. Photos of finished works, reviews, secrets + review of simple and complex options
Alpine slide (rock garden) ☘️ — 150 photos of ideas, new items, design, instructions, diagrams, how to make it yourself
- Veranda attached to the house: review of the best projects (140 photo ideas). Instructions on how to do the construction yourself
A simple bench can be supplemented with a backrest and armrests. To do this, a simple frame is supplemented with crossbars made of ordinary bars. If there is no ready-made support, and you don’t want to dig in pillars, then you can build a light bench with legs.
When choosing a material, be sure to take into account the weight of the intended users. In a similar way, you can make a compact chair for working in the garden.
Which tinder fungi can be eaten
There are many varieties of tinder fungi. They are divided into inedible, conditionally edible, medicinal and edible.
The following varieties can be used for preparation:
- Sulfur yellow. It belongs to the category of conditionally edible, since only young specimens that do not have dark spots can be eaten.
- Scaly. Used in medicine, dried, pickled and added to sauces and soups. This species grows primarily on elms.
- Liverwort. It grows on oak trees, young mushrooms are pickled or pickled.
- Umbrella. Resembling large bouquets, this variety of mushrooms is popular in China as a main dish.
- Winter. Grows on the trunks of alder, birch or willow. The pulp is suitable for consumption.
- Sheep. The only variety that is similar in appearance to a “normal” mushroom. Used as a basis for water and alcohol infusions. It can also be dried, pickled or salted.
Scaly tinder fungus can be dried, pickled and added to sauces and first courses
Important! Before going into the forest, you need to carefully study photographs of tinder fungi so as not to confuse an edible species with a poisonous one.
Fence at the dacha
Arrangement of a summer cottage includes the construction of a fence. It is necessary not only to protect private property and define its boundaries, but also to relax peacefully in the country, without being embarrassed by prying eyes.
Fences that protect from the outside world can be built from stone or brick. By the way, you will probably be interested in learning how to install a pole in your dacha with your own hands.
You can also use corrugated sheets or ordinary boards to cover the fence, which you can then simply paint or draw some interesting design on them.
Also, small fences can be erected directly on the site itself - in this case they perform two functions: dividing and decorative.
Such fences are most often built of brick. And although they look simple, they are, to some extent, original.
A partition made of brick allows you to divide a summer cottage or garden into separate zones, which is very convenient.
Be inspired by our country house ideas and bring to life the ideas that you like the most. Good luck to you and inexhaustible creative mood!
Chenille wire fence
Initially, such fluffy wire was used exclusively for cleaning smoking pipes, but very quickly craftsmen realized how such an interesting little thing could be used in creative works. Chenille wire gets its name from the French word chenille, which translates as “caterpillar.” Indeed, the material is fluffy, like some types of caterpillars.
By bending such wire, you can create a variety of crafts. Now you can buy this material in a variety of colors. Children love working with chenille wire, as it is quite easy to make crafts from it. It is enough to create any object from wire, for example, flowers or a butterfly, and you don’t need to do anything else. The work will look finished.
The craftsmen also paid attention to the production of a fence for crafts from chenille wire. For the base of such work, a sheet of foam plastic is best suited. The wire itself is sold in 30 cm pieces, so to make a small fence it will have to be cut into smaller pieces. Each stick needs to be bent in an arc and simply pressed into the foam. The next piece of fence is inserted starting from the middle of the previous one, then the arcs of chenille wire overlap one another, making up a solid fence. If the fence still pops out of the foam sheet, then on the back side simply bend the edges of the wire into loops.
Play space for children
Having arrived at the dacha with their heirs, parents are often faced with the need to keep their offspring occupied with something during the time devoted to chores in the garden. Now, of course, stores offer many forms of entertainment: swimming pools, mini-trampolines, rocking toys, etc. But all this can be done with your own hands.
So, from half a tire, a wooden or plastic seat and a bicycle or scooter handlebar you will get a wonderful rocking chair. From a plastic seat, tires and a car steering wheel, a real race car will emerge, in which your little son can feel like a brave racer.
Using the same tires, you can make swings and sports equipment, sandboxes, obstacle courses and labyrinths - the child will spend the weekend usefully and will not distract adults.
However, it would not be the worst option to involve your child in dacha creativity: handmade crafts for the dacha will not only please, but will also become a contribution to the common cause, show the importance and significance of him as a family member, teach him hard work, patience and perseverance and, of course, will allow the rich childhood imagination to unfold.
Making beds
A beautiful vegetable garden is not a luxury, but a means of obtaining aesthetic pleasure. With the help of plastic bottles, painted in different colors, dug into the ground along the border of the ridges, you can not only divide and fix the sown areas, but also turn your garden into a beautiful tapestry consisting of intricate or strictly geometric patterns.
Crafts for the garden can perform not only a decorative, but also a security function, protecting your crops from birds. These can be small figures made from bottles, cans, plastic bags, CDs, polyurethane foam, flower pots and combinations of various materials (it’s good if the design contains movable rustling elements, for example, characters’ hair, plumage or fur), or and large scarecrows - stationary or movable - towering above the garden bed, usually made from a bag filled with straw and old clothes and shoes.
Design ideas can be suggested by the imagination and sense of humor of a summer resident: someone puts a cheerful Scarecrow on a pole, someone puts a figure in the form of a summer resident busy weeding, and someone uses a terrifying “Scream” mask and a black raincoat with wire threaded through the sleeves , attached to a bicycle handlebar fixed on a pole, leaves a Dementor on guard.
Any option is good. The main thing is that it is to the liking of the owner of the site and fits into the overall picture, pleasing to the eye.