The main purpose of dolls has always been to entertain children. Since ancient times, people have occupied their little ones with such toys so that they do not interfere with their parents’ housekeeping and work. But today the doll acquires new functions and becomes an object of art! Entire collections are created, and handmade products are especially valued.
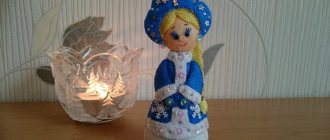
Today we will sew a chef doll for a themed collection.
Master class on flat applique from colored paper “Cook”
Oksana Seitmedova
Master class on flat appliqué from colored paper “Cook”
Master class on flat applique from colored paper “Cook”
Author: Oksana Seitievna Seitmedova, teacher, GBOU School No. 1503
Description of the material: This material will be useful for educators, additional education teachers, parents, and is intended for an audience of 4 years and older.
Goal: Creating a flat applique from colored paper.
Tasks:
1. Develop the skills and abilities of creating planar appliqué from colored paper.
2. Develop the child’s fine motor skills.
3. Develop the child’s creative abilities through the creation of applications.
4. Strengthen the technical skills of cutting and gluing parts.
5. Instill the skills of perseverance and accuracy.
Sanitary and hygienic requirements
1. The light source should be on the left.
2. Every 1 – 1.5 hours, the eyes need a 30-minute rest.
Taking a break and relaxing is necessary to restore eye function.
3. To maintain health while working, it is useful to warm up your arms, eyes and back.
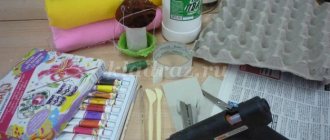
For work we will need:
Cut out a head from beige paper.
Draw hair with a black felt-tip pen.
We draw eyes with a black felt-tip pen, draw a mouth with a red felt-tip pen, and draw blush on the cheeks with a red wax pencil.
Cut out a cap from white paper.
Cut out a shirt and sleeves from white paper.
Cut out black circles from black paper and glue them to the shirt; these will be buttons.
Cut out a ladle from black paper.
Draw dots with white paint.
Let's put together our composition.
We glue the cap to the head.
Afterwards we glue the shirt, sleeves, arms, ladle.
Cut out a tie from red paper and glue it to the shirt.
Master class on flat applique from colored paper “Aquarium” Master class on flat applique from colored paper “Aquarium” Author: Oksana Seitievna Seitmedova, teacher, GBOU School No. 1503 Description. Master class on flat applique from colored paper “Cheburashka” Master class on flat applique from colored paper “Cheburashka”. Author: Oksana Seitievna Seitmedova, teacher, GBOU School No. 1503. Master class on flat applique from colored paper “Flower” Master class on flat applique from colored paper “Flower” Author: Oksana Seitievna Seitmedova, teacher, GBOU School No. 1503 Description. Master class on flat applique from colored paper “Rainbow Fish” Master class on flat applique from colored paper “Rainbow Fish” Author: Oksana Seitievna Seitmedova, teacher, GBOU School No. 1503. Master class on flat applique from colored paper “Mermaid” Master class on flat applique from colored paper “Mermaid”. Author: Oksana Seitievna Seitmedova, teacher, GBOU School No. 1503 Description. Master class on flat applique made of colored paper “Fish in an aquarium” Master class on flat appliqué made from colored paper “Fish in an aquarium” Author: Oksana Seitievna Seitmedova, teacher, GBOU School.
Source
Edible Christmas crafts
A decorated Christmas tree, the smell of tangerines, food for the festive table waiting in the refrigerator - what else do you need to get into the New Year's mood? If there are small children in the family or you yourself want a New Year's fairy tale, this is not enough. You also need to think about sweet gifts and surprises for guests and all your family and friends. You can, of course, go to the store and buy ready-made gift sets with sweets, but this is so boring. It’s much more interesting to prepare gifts and sweets for the New Year’s table with your own hands. And how happy everyone will be when, instead of the usual sweets, they receive edible New Year’s crafts from you as a gift! “Culinary Eden” has collected for you several ideas and recipes with which even a novice pastry chef can surprise his family and friends with cute New Year’s sweets of his own making.
The simplest thing you can prepare for the New Year's table is to bake cookies. Go to a kitchenware store and find cookie cutters in the shape of stars, snowflakes, Christmas trees, Snow Maidens, deer, horses and other figures associated with winter and the New Year. If there are molds of different sizes, take them all - small molds are convenient for making holes inside large ones. Don't forget to grab a cornet (pastry bag) with different attachments. This is one of the most important tools for decorating sweets. You can prepare and decorate cookies a few days before the holiday.
New Year's gingerbread cookies
Ingredients:
400 g flour, 200 g sugar, 100 g butter, 75 ml milk, 0.5 tsp. soda or baking powder, 1 tsp. ground ginger, 1 tsp. ground cinnamon, 1 yolk.
Preparation:
Boil syrup from milk and sugar, cool.
Beat the softened butter with a mixer, add syrup, mix and gradually add sifted flour with spices and soda. Form the dough into a ball, roll it out on a floured table to the desired thickness and cut out shapes using molds. Place the cookies on a baking sheet, brush with yolk and water and bake at 200°C for 10-15 minutes. If you do not plan to decorate the cookies with cream, sprinkle them with powdered sugar. Dessert recipes for the New Year
Gingerbread cookies for Christmas
Tangerines in New Year's caramel
Christmas log
Even more dessert recipes for the New Year
Buttercream for decoration
Ingredients:
125 g butter, 60 g powdered sugar, 50 g condensed milk, 1 tbsp. cognac or rum.
Preparation:
Beat the butter and powdered sugar until white, add condensed milk little by little, continuing to beat. Place the cream in a cornet with the narrowest nozzle and paint the cookies.
Protein glaze
Ingredients:
1 protein, 200 g powdered sugar.
Preparation:
Beat the egg whites into a stiff foam at the fastest speed of the mixer. Add half the sifted powder, beat well, add the rest of the powder, beat again and put the glaze in a bag or cornet.
It’s easy to make Christmas trees from cookies in the shape of stars of different sizes - arrange cookies smeared with cream in a pyramid and paint with protein icing, sprinkle with colored sugar or decorate with bright sugar balls.
For those who fast on New Year's Day, you can prepare rye cookies with honey and decorate them with simple sugar, lemon, berry or fruit glaze.
New Year's Lenten cookies
Ingredients:
1 cup rye flour, 1 tbsp. honey, 2 tbsp. vegetable oil, salt, spices - to taste.
Preparation:
Mix sifted flour, salt and spices, pour in butter and liquid honey. Grind, adding warm water little by little, until you get a thick, non-sticky dough. Roll out the dough into a layer, cut out the cookies, place on a greased baking sheet and bake for 10-15 minutes at 180°C.
Berry glaze
Ingredients:
50 g fresh or frozen berries, 150 g powdered sugar.
Preparation:
Throw thawed or fresh berries in a food processor and rub through a sieve to remove the seeds. Mix the puree with sifted powdered sugar and immediately apply to the cooled cookies. Depending on the berries, the glaze will turn out red, soft pink or lilac.
Instead of berries, you can take 4 tbsp. cocoa powder and 50-60 ml of water - you get chocolate glaze. And for white lemon glaze, mix the zest and juice of 1 lemon with powdered sugar.
If cookies are too easy for you, make these cute gingerbread crescents with nut filling. They require more time and skill, but the result is worth it.
Gingerbread Crescents
Ingredients:
200 g flour, 100 g butter, 3 tbsp. warm water, a pinch of salt. For the filling: 200 g almonds or hazelnuts, 100 g sugar, 30 g melted butter, 1 tbsp. orange liqueur, 1 tsp. ground cinnamon, powdered sugar for decoration.
Preparation:
To make the dough, combine flour, salt, water and melted butter in a food processor. Knead well, gather into a ball and leave at room temperature. Grind the nuts in a food processor along with sugar, add cinnamon, liqueur and melted butter and mix thoroughly. With wet hands, form the filling into small sausages, scooping it out with a teaspoon. Divide the dough into the same number of pieces and roll out very thin. Place filling on each piece of dough, roll and shape into a crescent. Place the gingerbread cookies on a baking sheet and bake for 15 minutes at 150°C. The finished gingerbread cookies should remain light in color. Sprinkle them with powdered sugar.
Perhaps the most winter dessert is meringue. It is easy to prepare and pleasant to give. And if you use different attachments and dyes, you can make a lot of cute colored New Year's sweets.
Meringue
Ingredients:
5 proteins, 300 g sugar, 1 bag of vanilla sugar, Colorings - optional.
Preparation:
Beat the whites into a strong foam, gradually add sugar and beat until a dense mass is obtained. Put it in a root and plant droplets of the same size. Bake at 120°C for about an hour. You can check the readiness of the meringues by knocking on them - the sound should be dry and rustling. You can color the meringue by adding beet or berry juice, syrup or artificial coloring to the whites.
If you don't want to fire up the oven, make homemade sweets. They will be able to compete in taste with candies from the store, and if you put them in a beautiful box and decorate them with icing or cream, homemade sweets will bring more joy than banal assorted store-bought ones. There are many recipes for homemade sweets: based on Potato cake, from halawa, from ground dates, dried fruits and nuts. We offer to prepare delicious chocolate truffles for the New Year.
Truffles
Ingredients:
200 g dark chocolate (75% cocoa), 200 g heavy cream (35% fat), 25 g butter, 2 tbsp. orange liqueur or rum, cocoa powder, ground nuts, powdered sugar for dusting.
Preparation:
Boil the cream, pour it onto the broken chocolate in small pieces, stir until the chocolate melts and a smooth mass is obtained. Add finely chopped butter, stir again until it dissolves, pour in alcohol, cool to room temperature and refrigerate for 8-10 hours. Scoop the cold chocolate mixture with a cold teaspoon, form into balls and coat in cocoa powder, nuts or powdered sugar. This is convenient to do with latex gloves. It's even easier to make cube-shaped truffles. To do this, pour the warm chocolate mixture into a rectangular pan lined with parchment, place in the refrigerator, then cut with a thin cold knife and roll in cocoa.
Truffles can be decorated with chocolate icing. To do this, place a finely chopped bar of milk or white chocolate in a bowl, add 50 g of butter, melt in the microwave or in a water bath, stir and pour over the candies.
If you care about the health of your family and guests, give them a double gift: delicious and very healthy sweets in the form of granola. Granola bars are very quick to prepare, you just need to replenish your stock of nuts and dried fruits. For New Year's granola, try to find bright red dried fruits: dried cranberries, cherries or strawberries.
New Year's granola
Ingredients:
50 g butter, 3 tbsp. dark sugar, 3 tbsp. honey or maple syrup, 2 cups instant oats, 1 cup nuts, 1 cup dried cranberries, cherries, strawberries, raisins, 1 tbsp. pumpkin or sunflower seeds, 3 tbsp. sesame seeds, ground cinnamon, ginger, vanilla - to taste.
Preparation:
Pre-fry nuts and seeds in a dry frying pan. Make syrup from butter, sugar and honey. Mix nuts, seeds, dried fruits and spices, pour in syrup and mix thoroughly. Cover a baking sheet with parchment, lay out the granola, level it to a thickness of 1 cm and bake for 10 minutes at 170°C. Make dents in the layer where you will break the bars, and bake for another 15-20 minutes. Cool, break into strips.
Marmalade is one of the healthy sweets that you can surprise your guests with. Everyone would be pleased to receive as a gift aromatic and tasty marmalade, prepared with their own hands from natural ingredients. For New Year's souvenirs, we recommend stocking up on homemade orange marmalades in advance.
Orange marmalade
Ingredients:
1.5 kg of oranges, 1 kg of sugar, 1 glass of water.
Preparation:
Remove the zest from several fruits. Peel the oranges, remove the films from the segments, process the oranges in a blender, add sugar and zest, add water if necessary and cook until thickened. Divide the mixture into molds and cool. Roll the finished marmalade in sugar or coconut flakes.
Little cute delicacies prepared with love are what will make your family's holiday special. They are very pleasant to give and receive, and especially the successful things are so sad to eat that you want to save them until the next New Year. If you prepare in advance, edible New Year's crafts will not take up much of your time and will not interfere with the preparation of the main treat.
Olga Borodina
DIY toilet paper roll cook
Master class “Cook”
Paper crafts for children of senior and preparatory groups
Author of the master class: Ekaterina Anatolyevna Kupricheva, teacher, kindergarten No. 2444, Moscow
Purpose of the master class : used in the design of a kindergarten, in introducing the profession, in theatrical activities. This master class is useful for teachers of senior and preparatory groups when teaching children aged 5-7 years how to model from cardboard.
Goal : We consolidate the children’s acquired knowledge about the profession of a cook. Teach children to model chefs out of cardboard. Strengthen the skill: folding, cutting, gluing parts. Develop: sense of shape, proportions, eye, fine motor skills, imagination, creativity. Evoke an emotional response to the crafts created (your own and other children’s)
Materials: toilet paper roll, white and colored paper, a piece of cotton wool, glue, scissors, a rag, colored pencils. (Fig. 1)
Progress of the master class:
I want to share an interesting idea for modeling from a toilet paper roll. This craft is not very difficult to do. I work as a kindergarten teacher and love to please my students with something unusual. By making crafts from material that is often simply thrown away, without thinking, you can use it in your creativity. That's why I offer you my master class.
Walks around in a white cap
With a ladle in hand.
He cooks us lunch:
Porridge, cabbage soup and vinaigrette.
1. Before starting work, you need to measure your roll, since the thickness of the base of a toilet paper roll varies.
2. Cover the roll with colored paper. To do this, take green paper (or the child’s choice) and twist it around the roll until the ends join, marking the length of our roll, and the width is slightly more than half, and paste over the bottom of our tube. We cover the top part with pink color. Make sure that there are no wrinkles when gluing; to do this, use a cloth to smooth them out (take your time when gluing).
3. Take a white rectangle and fold it in half, holding it by the fold and cutting out a square in the upper right corner
We unfold and glue the resulting apron in front, add ribbons to it like a real apron.
4. Next we make our chef’s hands. For this we need cardboard or thick paper. We cut out two identical rectangles from it. We round it on one side at the base, depicting hands. Afterwards we also paste them with the chosen color. Let it dry.
5. Glue the arms to the body
6. Next, we make our chef’s cap. To do this, take a white strip of paper and glue the edge along the length and glue it on top of the pink one.
Next, take a piece of cotton wool and a white circle (5 mm larger than the roll), glue a piece of cotton wool on all sides and glue it to the white circle and insert it into our roll. Let it dry.
Source
We sew a bag Cook M.K. | Country of Masters
Content
Dear craftswomen, let’s make a Chef like this!!! It's always nice when a man works in the kitchen)))))
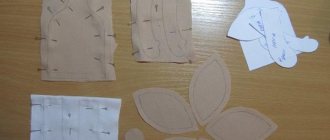
What do we need for this? Of course the pattern
My pattern. Print and cut
The fabric is 4 colors, I chose the most “masculine” colors, I don’t have many of them, mostly everything is pink)))))
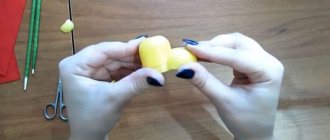
Estimating how much fabric you need for the torso
And how much fabric do you need for your head?
sew these two pieces and trace the pattern
Sew, cut, turn inside out
Here are the details you get:
Cut out the sleeves. Two rectangles of fabric (mine measure 13 by 20) with a fold of 13 by 10
Sew the sleeves. We cut out and sew together the “skirt” in which the packages will be stored (mine is 45cm long and 74cm wide) with a fold of 45 by 37
This time I inserted the wire into my hands, I had never done this before, and in vain, I did not regret it! I liked it very much
We stuff our hands with filler and stitch our fingers
We also fill the head and stitch the ears, literally two stitches
fill the whole carcass and collect it on a thread at the bottom
We tighten the thread and sew up the hole, tucking the ends inward
That's it, done!
We take the top of the “skirt”. We lay two opposing folds, one in the center of the seam (this will be the back) and the other in front and fasten it with a zig-zag seam. This is a photo from the inside out
Like this on the face, the face of the fabric is inside us, because... Now we will sew on the Chef's body
I mark the place of the seam with something, more or less evenly
And I lower our cook’s head down, let him be patient)))) I combine and cut off the centers with needles: the front and back on the sides I fold the loose fabric into folds
I stitch with double thread, more often
Here are the folds on the side, also counter pleats
Let's turn it inside out!! Here is the “skirt” sewn on
It turned out 4 opposing folds: in front, behind and on the sides
I sew the bottom of the skirt with a zig-zag seam, leaving a hole for the elastic
We sew a loop, I used the same fabric as on the head, you can sew a ready-made braid
fix it like this first
then like this
We tighten the bottom of the sleeves with thread
and sew it to the hand
Now fill it with filler
we also tighten the top of the sleeves with thread, tuck the ends inward and sew up the hole
Without tearing off the thread, pierce below
and tighten the sleeve, thus
we fix
Side view. It turned out slightly at an angle, this is necessary so that the sewn hole from photo 32 is not visible when we sew on the sleeves
Two hands with sleeves ready
Cut out and sew on the collar and cuffs. I first measured the length of the collar and cuffs with a centimeter and then cut them out. (my sizes are 18 by 9 collar and 11 by 5 cuffs)
turn it inside out and iron it. Finished: 17 by 4 collar, and 10.5 by 2 cuffs
Sew on the arms and cut off the collar
Let's take the apron. I made it a little longer than the pattern
We make notches on the rounded areas and iron them. Pocket too - iron the folded edges
Attach the pocket and stitch along the edge. The finished apron is 27 cm long
We make a strap for the apron and ties, and sew them with buttons to the apron
We just tie it at the back, loosely. Don’t forget that the “skirt” should be filled with bags
We thread the elastic through the bottom of the skirt. Do not tighten too much; your hand should be easy to take out and insert the bags. Packages will not fall out through such a hole, I assure you
Let's make a nose! cut out a small circle, fill it with padding polyester, tighten it and sew it up
The spout is ready
sew, just below the center of the face
fasten the collar with thread
We cut out the hair and mustache (I used a piece of fleece), you can also make it from yarn. We sew buttons to the cuffs - these are the parts that we need to glue
Hot glue the cuffs
collar (I only dropped it where it was fastened with thread) the collar is not glued anywhere else
hair...we leave the bald spot...it will be covered with a cap)))))
glue on eyebrows and mustache
Let's sew a chef's hat! Since I create in the kitchen, this is the first round object that caught my eye
diameter of the circle is 20 cm, you can make it larger
bend and iron a strip of fabric onto the bottom of the cap, having previously measured the head with a centimeter
we spend
..I almost forgot... bend the circle in four and mark the folds with a pencil or make a cut,
Likewise, the bottom should be divided into 4 parts and marked. This makes it easier to connect these two parts later.
We pull the top of the cap, facing inward. We insert the lower part of the cap with needles, connect the marks and tighten the thread, distributing the folds evenly
We stitch and the cap is ready!
Draw the eyes, blush a little
We put on the cap and……. Buon giorno signore!!
They asked me where they get the packages from... I’ll show you... they get them and put them there
I’m experimenting with my hands... it’s so cool when the wire is inside, you can come up with so many things...
and with a towel….like (this is a handkerchief)
your fingers bend so well...
holds the spoon himself! it's not glued
You can hang it from the loop, it can hold many bags
from the side
and behind
This is the man in the kitchen. Italian chef!! And my first Assistant Cook is here https://stranamasterov.ru/node/876281
stranamasterov.ru
Capron
The technique of sewing toys from nylon tights is very popular among craftswomen. Basic materials and tools that will be needed for this work:
Please note: choose a bottle that tapers in the top third and then expands again. The narrowing point will serve as the neck of the future doll, and the spherical expansion at the neck will serve as the head.
When everything you need is at hand, you can begin. A cook doll made of nylon is made according to the following algorithm:
The body is ready, but the cook needs the limbs! Hands are made of nylon and padding polyester:
The wire base of the hands will allow you to later place a ladle or toy into the doll’s hands.
All that remains is to dress the doll in a distinctive chef's outfit. The apron is made according to the finished pattern, and so is the hat. You just need to find a diagram, “adjust” it to the size of your craft, cut out the parts and sew.
The nylon chef doll is ready!
From nylon tights you can sew a pop doll dressed as a cook.
Fruit fantasies
It does not suit these gifts of nature to lag behind vegetables. But they didn’t even intend to!
Here's a bear cub and a school of funny fish made from lemons, here's a banana dolphin, here's an apple caterpillar, here's a melon ball and a watermelon stroller.
Stick plasticine horns, eyes, arms and legs to an orange - you will get Losyash, the hero of the popular animated series “Smeshariki”. Using the same method, you can make his other characters from other round fruits.
How cute is the pear mouse! To make it you will need two fruits and clove seeds:
- From one of the pears, cut two round pieces of the same size so that one side remains covered with the peel.
- Turn the second pear towards you with the narrow end, remove the stick and stick a clove in its place.
- Clove seeds can also be used to make eyes. But you can also use small berries or beads.
- Mark the places where the ears are attached, make small triangular slits there.
- Insert round pieces into them and secure them with pins or toothpicks.
- The tail can be made from a piece of rope, lace, twine or a green onion arrow.
Combined crafts, including both vegetables and fruits, can be listed endlessly!
Bag holder
The chef doll is actually useful in the kitchen. How? You can trust a textile chef to store bags!
Sewing such a product requires all the sewing accessories, as well as fabric in four colors:
Below are instructions on how to make such an assistant with your own hands:
A bag doll cannot do without the “working” part:
All that remains is to decorate the doll:
The bag of bags is a relic of the past. But the cook doll is a convenient organizer that will become a stylish addition to the kitchen interior and will bring great benefits to its owners.
Autumn Festival – a celebration of creativity
Creating any crafts with your own hands is a process that activates the development of many important qualities: imagination, associative thinking, fine motor skills, attention, perseverance, accuracy.
The beauty of crafts made from vegetables and fruits is that many of them can later be eaten. Unless, of course, harmful materials were used in the manufacturing process.
Every year, exhibitions and fairs presenting the creativity of kindergarten or school students and their parents remind us of the generosity and abundance not only of gardens and vegetable gardens, but also of people’s imagination.
Marveling at the skill of others, set new goals for yourself and conquer new heights of mastery. Your work will make the world and life brighter, more colorful and more interesting.
Potato crafts
Even ordinary potatoes can become an interesting tool for children's creativity. These minions can be made from potatoes - they can be dressed in overalls made from black eggplants. The minions themselves can be painted with yellow gouache paint. Glasses can be cut from round carrots (cut the carrot into a circle and cut a round hole in the circle).
The very shape of the potato can give you an idea for a craft - in the photo above we see that the potato in the shape of panties suggested the idea of creating a girl in shorts. You can also look for interesting shapes in a bag of potatoes - for example, in the form of Peppa Pig's head, you very often come across them.
Crafts from peppers and other vegetables
Sweet and hot peppers can be a source of inspiration. Their smooth, shiny shape guarantees the beauty of the final craft. This kind of motorcycle can be Thread citrus wheels onto toothpicks as well.
Roosters and overseas birds can be made from peppers of a bizarre curved shape. You can look for these in a store, or better yet, at the market or at your dacha.
But crabs and crayfish... They are made from several pepper vegetables. And to be honest, Photoshop still worked here (they removed what was unnecessary and added what was not needed) - but the idea is still worth trying to implement it for real.
But here, in the photo below with the dragon, everything No photoshop – only the skillful hands of a master and the eye of an artist. Bean pods (whiskers and horns), corn stalks (ears and tail), apple (for the muzzle), carrots (paws and spinal teeth), toothpicks (claws and fasteners).
It is important to be able to look at fruits and vegetables with just such an artist’s eye, squint, blur your eyes and suddenly, in this foggy haze, see a future sculpture in a pile of vegetables.
Pumpkin crafts
Flesh carving
Crafts made from pumpkin pulp. Even pumpkin pulp can become a source of beautiful crafts. The pumpkin is soft enough to cut out whatever your heart desires. For example, these majestic pink flamingos.
Birds can also be cut from regular carrots . You can make a simple sculpture from the whole side of a pumpkin - for example, the face of a donkey.
Pumpkins are a very interesting product for creativity. You can talk about it for a long time and with photo examples.
Crafts from zucchini and other vegetables
Here's a zucchini penguin bird - with a sweet red pepper bow and orange eyes. It’s very easy and accessible to make with your own hands, even for children.
And here is another bird with a tomato head and a green crest and green pepper wings. The belly is a white zucchini.
You can make human or animal heads from squash crops.
If the fruit has a pointed shape, then you can play it like the face of a puppy or mouse.
You can also make a sculptural dragon craft from zucchini halves. But this is a real challenge to our creativity. The most important thing here is the head - if you have the muzzle, then you can continue and make the body.
Using the same principle, you can create similar composite sculptures from oranges.
Vegetable crafts
We'll start with vegetable children's crafts... and then we'll move on to sweet fruit sculptures. You will see that you can make a chipmunk out of an ordinary onion. And cut roses from radishes, which will bloom on their own if you put them in a glass of water. What am I telling you... now you will see everything for yourself.
Onion crafts for school and garden
You can make many interesting sculptures from vegetables as well as from fruits. Here are the onion chickens. We take the young onion out of the garden right along with the stem, and cut the stem-stem into feathers - we move them apart, this “broom” we place on a carrot base post.
Here's another craft made from red onions. A chipmunk with white stripes and a fluffy tail made of onion feathers. I will tell you in detail how to make it with your own hands...
We take two red onions of a suitable size and shape (it is better to take fresh onions, straight from the garden - they are then even in color and elastic). And we immediately make white stripes on them - to do this, you need to cut the top skin of the onion with a blade and then carefully remove it (like shavings) so that you get a white “bald patch” in this place.
We form a body - take a long wooden skewer or a toothpick and stick it into the tummy bulb in the area of the future neck. And stick an onion head onto the protruding end.
We make a tail - we bend the green feathers of the onion in the shape of a tail, we tie the lower part of the tail with a thread or an elastic band into a bun.. And in a saucepan we cook tablespoons of sugar + half a teaspoon of water) - when the sugar melts and cooks, coat it with this sticky sweet glue onion feathers (so that they stick together into a single tail) - dry it all. And then we pierce the lower and middle part of the tail-bun with toothpicks and stick it into the back of the onion-butt.
The paws are cuts on the belly bulb. To make the paws detach and protrude from the tummy, you can place pieces of plasticine under them. The ears are small slices from another onion - we stick them into the slits on the chipmunk’s head. The eyes are olives (you can use raisins, or pieces of black eggplant skin). The tendrils are also white cuts on the colored skin of the onion.
You can paste over a rectangular box (of tea or cookies) with onion feathers and make a vegetable tape recorder or radio from such a blank! Vegetable buttons are pricked with toothpicks or glued to sugar syrup (see recipe in Onion Chipmunk).
Crafts from white and pink radish vegetables
You can also cut beautiful parrots from white radishes White radish - resembles a huge white carrot. It can be cut perfectly with a knife into any shape. And the wings don’t have to be made from radishes either. You can take hard stalks from BEIJING CABBAGE. A beautiful and simple vegetable craft for kindergarten and school. The jury will really like it.
And here is a craft made from red radishes... Also a very cute family of pink birds in a nest made of tops, pods or onion feathers.
And a gorgeous bouquet of vegetable roses. Here are photo instructions on how to do it. We cut the radishes with a knife into shavings - in a checkerboard pattern (like cabbage leaves on a stalk). Then we put such a cut radish in water - and under the influence of water it swells and opens its petals. We string the buds onto wooden skewers - and so that the stems are green, we insert each skewer inside an onion feather.
Black eggplants. Vegetable crafts for the garden
The black color of the eggplant tells us the creation of black and white animals that live on our planet - and these are ZEBRAS, WHALES, PENGUINS, AND KOALAS. (I didn’t find koalas among the photos of crafts - but it’s a good idea).
Eggplant can act as an insert element in crafts made from other vegetables (see photo below with a rooster and monkey).