Rate this post
Hi all!
On Victory Day, everyone around rejoices, laughs, remembers their loved ones who died in the war and pays tribute to them to the memory of a grateful generation. And of course, on this day a solemn atmosphere reigns everywhere.
One of the permanent attributes of the May 9 holiday is the St. George Ribbon. It is tied on arms, pinned to clothes, backpacks, depicted in posters... But why not add a little variety to the generally accepted traditions and make this symbol even more elegant?
I have put together master classes for you showing how you can make beautiful brooches or jewelry from an ordinary St. George’s ribbon in different ways. The techniques presented in this article range from the simplest to more complex ones that children will find difficult to implement without adult help. Remember that, among other things, you can make other crafts in this topic.
Therefore, all ideas are great for family creativity and will not only be an excellent way to show your attention on May 9, but will also give you an opportunity to once again spend time with your closest people.
DIY New Year's garlands for a paper Christmas tree: diagram, template
- The simplest garland that even a child can handle is a chain of paper rings . To make it you will need multi-colored paper (3-4 colors or with a pattern), scissors, and glue.
- Cut the paper into thin strips (1-1.5 cm wide and 8-12 cm long). You can use a figured hole punch to create “lace” rings.
- Roll the first strip into a ring and glue it together. Glue all subsequent strips into a ring, threading them into the previous one.
- You can decorate a Christmas tree or room with such a garland, and you can also use this idea not only for the New Year, but also to create a festive mood on any other special day.
Garland of rings
For a chain of links you will only need a pencil, scissors and colored paper.
- Trace the half garland link template onto construction paper or cardboard and cut it out.
- Cut the colored paper into appropriately sized squares or rectangles and fold each in half.
- Place the template along the fold side, trace and cut out - there should be quite a lot of links.
- Assemble the chain by threading each subsequent link into the previous one.
Garland made of paper links
A garland made of paper strips looks very elegant.
- Cut strips of thick colored paper 2-2.5 cm wide.
- Arrange all the elements on the table in the correct order by color.
- Sew the strips down the center, leaving a small space between them - do this by hand or use a sewing machine.
Garland of stripes
- As elements you can use not only stripes, but also circles, stars, flags, hearts, men or other shapes of various sizes.
- It is better to hang such a decoration vertically, adding a weighting agent (a large bead, button or a piece of colored plasticine) at the bottom of the garland.
DIY garland of circles and beads
Popular in European countries, Advent calendars bring a lot of joy to children in anticipation of Christmas and New Year. The meaning of such calendars lies in small daily surprises (sweets, small toys, stationery), which are hidden in bags, boxes or windows.
You can make a similar calendar for your children in the form of a garland, which will be both a decoration for the children’s room and a symbol of the approaching miracle.
- Take 31 matchboxes (you can use homemade paper boxes).
- Put a little surprise in each box - all mothers know perfectly well what will please the baby.
- Wrap each box in multi-colored corrugated paper, tie it with a ribbon, glue a circle with a number from 1 to 31 and connect it into one garland.
Garland calendar
- Together with the boxes, you can use small bags in the form of Santa caps, mittens or socks. Such a garland looks simply fabulous, as if the heroes of New Year’s magic hung their clothes on a rope to dry.
- Don’t forget to prepare this garland in advance and start opening surprises on December 1st - then every day of the month will bring new joy to your child.
Garland of socks and mittens
For a snake garland you will need corrugated paper, which must be cut into long strips 5-6 cm wide.
- Glue the strips together by connecting the corners perpendicular to each other.
- Fold each strip alternately, one on top of the other.
- Glue the ends of the strips and straighten the garland.
Snake garland
Together with an older child, you can make a more complex volumetric paper decoration .
- Using one of the templates, cut out the garland elements (3-4 pieces for each fragment) from colored or white paper.
- Glue all the elements together using double-sided tape or cut one from the top to the middle, and the other from the bottom and insert one into the other.
- You can hang these decorations one at a time or combine them into a large garland.
Herringbone cutting template
Cutting template “Snowman” Cutting template “Bells”
How to make a beautiful Kanzashi St. George ribbon: step-by-step master classes
A DIY St. George ribbon made from ribbons is beautiful, elegant and laconic; any craftsman, even a beginner, will enjoy the manufacturing process. Having learned how to make basic blank parts, such as petals from ribbons, you can get creative and create your own kanzashi masterpieces.
- Cut the blanks for the petals into squares of three sizes. Large - 6 black and 6 orange, medium (0.3 mm smaller than large) - 6 black and 6 orange. Small (0.3 mm smaller than medium) - 6 black and 6 orange. To fill a small flower with additional leaves, even smaller pieces are cut. The edges of each square are scorched. Fold them diagonally and seal both sides over the candle.
- The triangle is folded a second and third time so that the opposite corners are connected. As a result, petals are obtained, the edges of which are trimmed and, holding with tweezers, set on fire.
- First, the largest petals are collected into the flower. To do this, they are inserted into each other, secured with glue, and then stitched or glued together.
- The middle petals are combined into a flower and glued on top of the large flower so that the large leaves are visible. Using the same principle, a small flower is collected and attached to the main structure. An 8 cm long St. George ribbon is cut lengthwise into equal halves. The ends are cut with a zigzag on one side, singed and placed on glue on the back side of the flower. The brooch blank or pin is attached last, when the product is completely ready.
Simple St. George's ribbon kanzashi
There are many options for crafts made from the St. George ribbon for Victory Day, and the simplest is kanzashi with a flower from the same ribbon. Add only a small decoration to the center of the flower.
Prepare blanks for brooches in the amount of 7 pieces, size – 2.5x5 cm. Treat the edges with a lighter. The corners are folded towards the center, and the resulting triangle is folded in half, while the strip of edges remains inside.
Holding the part, turn the folds and the main corner up, then direct the lower corners on both sides towards the fold. All edges folded on one side are connected by processing over fire.
Make seven sheets and straighten them to reveal the contents.
Using glue, assemble the parts into a flower.
Any suitable decoration is glued to the middle of the inflorescence. The flower is attached to a ribbon folded in a loop.
St. George ribbon kanzashi with tricolor
It’s not difficult to make St. George’s ribbons with your own hands, especially if you use a master class with photos and detailed descriptions. To make kanzashi with tricolor, you will need four ribbons - bicolor black and orange, blue, white and red.
- Prepare 7 pieces: 3 white, 2 red, 2 blue, each 5.5 cm long.
- Each piece is placed wrong side up and bent in the center at an angle of 45 degrees.
- The resulting fold line is folded in half again so that the edges are connected at one point, and the top of the tape is double and has an acute angle.
- The ends are folded into small folds and clamped with tweezers.
- The cut is straightened with scissors and scorched with fire until all the folds are fixed in the desired position. The result is a petal with three notches and a pointed end.
- Leaf blanks are made from each segment using the same method. Attention! When leveling the edges and singeing them, you need to make sure that the tails of the leaves are the same length.
- The petals are connected in pairs according to color using glue and tweezers. To ensure that the parts fit as needed, hold them by the very edge with tweezers. The third petal is attached from the inside under a pair of two white ones.
- When all the parts are ready, they are assembled into a spikelet, lightly overlapping each other and secured with glue. First they put red on blue, and then add white petals. As a result, they get a spikelet that matches the color scheme of the Russian flag.
- Take a St. George ribbon 18.5 cm long. The edges are cut with a zigzag and singed. Step back 4 cm from the edge of the tape, make a mark with a pencil or chalk and cross them in this place, securing them with a small amount of glue.
- The spikelet is placed on top of the loop with an inclination to the right side. After fitting, they are fixed with glue in at least three places, under each row of petals.
- On the wrong side, just above the center of the loop, the base for the brooch is glued or sewn. The decoration is complemented with white half-beads, placing them at the intersection points of the petals.
St. George's ribbon with carnation
The hand-made St. George ribbon kanzashi with carnations is a real classic, it’s simple and beautiful. These two signs are symbols of the great holiday; on Victory Day they can be found everywhere.
- The braid is cut into strips of different lengths. The longer the braid, the larger the carnation will be. The smallest one on one side is cut with a small zigzag and fluffed a little so that the carnation looks like a real one.
- The braid from one edge is gathered onto a strong red thread, pulled together and secured. The smaller the gathering stitches, the smaller the bends of the bud inflorescences.
- Green petals are cut out from felt, felt, or store-bought blanks. The entire structure is assembled with threads, without the use of glue.
Kanzashi “marshmallow” from St. George’s ribbon
Using the kanzashi technique, you create a brooch from a St. George's ribbon in the shape of a marshmallow - an airy flower. This flower is made quickly and with a minimum of accessories. Here you only need the ribbon itself, a needle and black thread, scissors and a lighter.
Cut 2 ribbons 90 cm long. Place them next to each other and connect them, singeing the edges with a lighter.
The connected strips are held in the left hand and folded approximately 90 degrees with the solder facing down.
Fold another fold along the tape, getting an isosceles triangle, holding it with your fingers so that the material fits tightly.
The remaining tail of the ribbon is tucked under it. Take a needle and black thread, which must be prepared in advance so as not to unravel the folded structure. Unfold the ribbon and make a few securing stitches in the upper right corner, sticking the needle only into the black stripe. The thread is not cut; it is left there along with the needle.
Turn the ribbon over to the side where you get an isosceles triangle. The ribbons are folded up and to the right, laying them exactly on the triangle, not forgetting to adhere to a 90-degree angle when bending.
Fold the ribbon to the left, aligning all the edges with your fingers and without unraveling the resulting structure.
Make a kind of loop and pass the tape through the top under a bend. Pull the tape down, align all the edges, and secure it in the upper left part along the black line with several stitches.
Continue working according to the same principle, not forgetting to align the edges, folding the tape triangle to triangle. Sew fastenings on the same side, in the upper left corner. This stage of work is completed when the tape runs out. They get an “accordion” of 15 petals. The tail of the ribbon is cut and singed with fire.
The tip of the ribbon is folded inside the flower and glued. The ends of the “accordion” are connected and also glued, laying and bending the tape so that the junction is not noticeable. The middle of the back of the flower is closed by gluing a circle of black fabric with a diameter of 2.5 cm.
The front side of the flower is decorated with a large black half-bead or other decoration suitable in size and color.
At the next stage, cut another piece of tape 22 cm long. Fold it into a loop, securing it with glue or a couple of stitches. The ends of the ribbon are cut with squares and singed. The loop is glued to the product.
The base for the brooch is attached to the back. The ribbons along the bottom are decorated with small half-beads using tweezers.
St. George ribbon kanzashi with tulips
St. George's ribbons can be decorated with tulips by making them yourself, following the instructions in the master class step by step. Kanzashi tulips are made from a 5 cm wide ribbon; they can be any color that matches the St. George ribbon.
- To make one tulip bud, you will need 3 blanks 5 cm long.
- To make a bouquet of 3 tulips, prepare 9 blanks and make petals from them, folding each square 3 times into a sharp petal and singeing it for a tighter connection.
- The parts are turned inside out and 3 petals are glued into each bud.
- To make the bouquet complete, you need green leaf stems. Roll up the pieces of tape into little balls and also burn the edges to join. The buds are glued inside the petals to assemble a bouquet. For beauty, the stems are intercepted with a brocade ribbon or another decoration option is chosen.
St. George ribbon kanzashi with lilac
One of the symbols of Victory Day is the blooming lilac, which traditionally blooms for the holiday. You can make a lilac flower with your own hands from ribbons for the St. George ribbon using simple kanzashi techniques.
- Measure out 2 meters of lilac satin ribbon 2.5 cm wide. Cut it into pieces 2.5 cm long and process it over the candle.
- In the middle of each part, squares are sewn with lilac threads using a regular stitch. The thread is not cut, but pulled together and secured using several looped seams.
- Create a base about 5 cm long from a piece of lilac satin ribbon, the edges are singed. Decorative leaves, purchased in a store or made by hand, are glued to the bottom of the base.
- Starting from the very bottom, flowers are glued in rows, gradually reducing their number, visually creating a branch of lilac.
DIY Christmas garlands for windows made of paper: ideas, templates, photos
A light garland of multi-colored lanterns is a wonderful decoration for windows. This design creates a magical atmosphere at home and looks elegant from the outside.
- Prepare an electric garland - check it in advance to eliminate defects.
- Take strips of colored paper measuring 10x25 cm - you will need several strips according to the number of light bulbs in the garland.
- Using a ruler and pencil, line each piece into strips 1-1.5 cm wide.
- Repeat the same action using a sharp object - a thin awl or needle. After this, the flashlight blank will be easy to bend in the designated areas.
- Gather the paper into an accordion along the folds, then straighten and join in the shape of a cylinder using PVA glue.
- Carefully pull the top and bottom edges together and secure them to the garland using a needle and thread.
St. George ribbon bow
It is not difficult to fold the St. George ribbon into a beautiful bow. Follow the instructions.
An original and simple craft is made from:
You will also need to take glue, scissors, a candle, and tweezers for kanzashi.
5 pieces of 11 cm each are cut from the tape and each is folded into a loop.
The lower edge of the workpiece is folded into an accordion and melted. The edge with fringe is trimmed - 2-3 mm from the edge.
Video: DIY New Year's Toys. How to Make Christmas Balls From Paper. DIY Christmas Balls
You can decorate not only the Christmas tree with New Year's balls, but also hang them on the windows, connecting them into a garland.
DIY window decorations
- Take ribbons that match the color and hang balls or other decorations (natural cones, slices of dried fruit, beads) at different heights across the entire width of the window.
- Decoration with branches will appeal to lovers of all things natural. Collect fallen branches, for example from a park, or buy several fir branches and secure them with fishing line or wire in the middle of the window.
Garlands on a branch
You can hang any decor on such a branch - Christmas tree decorations, paper snowflakes, wooden pendants, tinsel, pine cones.
Figures cut out from orange or lemon zest using a cookie cutter look bright and elegant.
Orange zest garland
Another option for decorating a window would be a New Year's wreath .
- Take a large sheet of thick cardboard. If there is no suitable size, you can cut off part of the cardboard box.
- Cut out the wreath blank in the shape of a ring.
- Attach fir branches, cones to the ring, decorate with tinsel, decorative beads, small balls or ribbons.
New Year's wreaths for decorating windows and doors
From paper
A paper garland is quite simple to make; it can be made for a child’s birthday or simply to decorate a room for any holiday. Making the brightest and most spectacular paper garlands is not at all difficult - the instructions will help you do it in literally a matter of minutes.
We make a garland of flowers with our own hands.
Stylized flowers
We cut out blanks for future flowers from colored paper - a semicircle with markings for the petals. It is better to take bright colors and double-sided colored paper.
We collect flowers - we glue the cones and collect the buds. Three blanks should form one flower.
We cut out a spiral from green paper - it will be the basis for our garland. We straighten the base and glue the flowers at approximately the same distance.
You can decorate a garland of paper flowers using glitter.
Funny roses
Another garland of paper flowers - this time it's stylized roses. Making such a flower garland from paper with your own hands is quite simple - draw it yourself or print out templates for cutting, and trace them on any paper (by the way, you can use paper with a pattern).
Make a lot of roses - you need to cut out a spiral and then glue an original rose out of it. When there are enough flowers, string the roses on a rope, and your DIY paper garland for a wedding or birthday is ready!
Or you can cut out a spiral with a wave, you get a flower like this:
Printable template (click on the image to enlarge and download):
DIY Christmas garland on the wall made from figurines
Please your children with a bright and festive garland of cute fairy-tale characters.
- Cut out all the elements of the garland according to the template from white paper.
- If desired, decorate the figures or make appliqués together with your child, adding individuality to each element.
- Connect all the fragments and decorate the walls in a children's room or living room with a cheerful garland.
Template for a garland of figurines
You can sew figurines for a garland from felt, cut from wood or knit from yarn.
DIY garland of figurines
The original garland will be made from cookies in the shape of New Year's symbols.
Cookie Garland
Making a garland from plasticine for a wall or Christmas tree with the children
Candy decoration is popular at all times. Who among us has not made long chains of sweets and hung them on the Christmas tree or on the walls? How nice it is to gradually remove the candies from the branches and enjoy such delicious and favorite treats. This lesson also shows how to make a simple candy garland, but these will not be real sweets, but lollipops made from ball plasticine. Such a craft can be considered as a practical joke, because friends will probably want to eat delicious candies, but it turns out that they are not real at all.
What you need to prepare to make a New Year's craft:
- ball plasticine;
- stapler;
- file or thick plastic bag;
- golden ribbon or serpentine;
- thread (optional).
How to make a decoration
Prepare plasticine for work. Candies reminiscent of candies will be made from it. You can tie “treats” to the thread or simply staple them together. First, prepare these small pieces.
Turn each into a small triangular-shaped slice. Connect them together, alternating colors. These slices should be approximately the same size.
To make each lollipop round, fasten together about 4 pieces of two colors around the circumference. You will get two-color caramels. Then continue working the next day, when the plasticine has dried well.
Cut the prepared file or thick plastic bag into squares. Wrap a piece of candy in each one. Also have a golden ribbon ready to tie the ends.
Twist the candy wrappers, the candies will be clearly visible through the transparent plastic, they will be in no way inferior to the real thing. Tie bows at the ends with gold ribbon.
Using a stapler, assemble a garland or tie each candy onto a thread. The result was a beautiful New Year's decoration - bright and believable.
DIY Christmas garland for the fireplace made from fir branches
If you have a fireplace in your home, decorating it is important because the hearth symbol is the main focal point.
- For decoration, the mantelpiece, the space above the fireplace and on the sides of the firebox are used.
- You can place a wreath of fir branches and cones above the fireplace, attach several fir branches along the mantelpiece in the form of a garland (this can be done using thin wire) and decorate with tinsel, bows and hanging balls.
- Hang a few Christmas stockings here, and on New Year's Eve fill them with sweets and little surprises for children and adults.
Fireplace decorations
Necessary materials
The name and quantity of the material depends on what type of paper garland will be made and in what volume. There are simplified options with minimal costs of material and time, and there are more complex ones that also require intelligence and skills.
The most commonly used materials are:
- sweet wrappers;
- congratulatory letters, cards;
- pages of colorful magazines;
- colored paper (usually double-sided);
- cardboard (white, colored single-sided, double-sided);
- foil, corrugated paper;
- foamiran;
- regular, curly scissors;
- glue, stapler, double-sided and regular tape;
- satin ribbon, thread, rope;
- beads, sequins, buttons, etc.
It often happens that during preparation, new ideas for craftsmanship come and you have to resort to additional preparation of the material.
We recommend videos on the topic:
DIY Christmas garland on the ceiling made from balls
A bright garland can be made by connecting multi-colored pom-pom balls made of thread, paper or cotton wool with a ribbon.
To make a garland of pompoms, you will need wool threads of several colors. You can use a variety of leftover yarn.
- Cut out two identical rings from thick paper of the same diameter as the pompom you want to end up with.
- Connect both rings together and wrap tightly with thread. Cut the threads along the outer contour of the rings.
- Pass the end of the thread between the paper rings, pull the pompom tightly and tie.
- The rings can now be removed and used for the next pompom.
- When all the pompoms are ready, connect them using fishing line or satin ribbon. The elements of the garland can consist of different threads and vary in size.
Garlands of pompoms
Fluffy, cheerful pompoms can be made from paper.
Garland “Chain” or “Rings” made of colored paper
You will need: colored paper, ruler, PVA glue.
You can create one-color, two-color, three-color and multi-color garland. To do this, select the desired color or colors and follow the master class.
Master Class
- Take sheets of paper and draw stripes 1-5 cm wide and 7-15 cm long. The size of the rings depends on the size of the stripes.
- Glue the 2 ends of the strip together to make a ring.
- Thread the strip into the ring, glue the 2 ends together to make a second ring. In the same way, make the entire garland of the desired length.
Garland for a holiday made of colored paper
Video: Making pompoms from corrugated paper and napkins
You can captivate your child for a long time by inviting him to decorate white ping-pong balls. Here you can safely show your imagination - paste stickers, draw pictures, cover them with a pattern of sparkles or beads. The finished balls then need to be carefully pierced with a hot needle and strung on a fishing line or thin ribbon.
A simpler version of a garland for the New Year with your own hands can be made from cotton wool by collecting ready-made balls or disks on a string.
Garlands made of cotton wool
A very beautiful garland can be made from paper balls made using the origami technique. You will learn how to do this in the following video.
Garlands of pine cones and light bulbs
Already in one of the articles, when we were making souvenirs for the New Year, I showed how you can quickly and beautifully decorate pine cones. And here, too, you can use this product. Dip a pine or fir cone into PVA glue and then let it dry. This is the first option, you can use acrylic paints.
But the second one, dip it in PVA, and then in semolina or glitter. Let the natural material dry.
Then tie a red thread to the cone, after a couple of centimeters again and so on.
Alternatively, you can sprinkle artificial snow on PVA or regular salt.
In general, use your imagination and act!
Here's another idea using wire.
You can make a garland of light bulbs, dip each one in paint and let it dry upside down. Then tie it on tinsel. And voila, the shining multi-colored composition is ready.
How to make a New Year's garland from tinsel and Christmas tree decorations for the door?
To decorate your front door for the New Year holidays, you can make a garland of tinsel and Christmas tree decorations and hang it around the perimeter of the opening from the outside or inside.
- It is better to take an electric garland as a basis.
- Carefully wrap it with fluffy dark green tinsel that imitates spruce branches.
- Having secured the garland above the door, hang Christmas tree balls or other small toys on it at different heights, but so that they do not interfere with entering the room.
Door decoration for the New Year
Quiet paper flags
Bright colored flags on a ribbon are a classic decoration, appropriate for any holiday or just for interior decoration. Today we propose to make an updated version of it, namely from tissue paper or tissue paper and with fringe.
Instructions:
To make your own flag garland you will need: tissue paper/tissue paper of different colors, scissors, pencil, plate (any round object that can be traced), ruler, ribbon that can be folded in half and a glue stick.
- Fold the paper into a stack and draw a circle on the top sheet using a plate.
- Without disassembling the stack, cut out circles. Then cut the stack of circles into halves.
- Start creating fringe on the blanks. To do this, simply cut the semicircle into narrow strips, not reaching 1-1.5 cm from the top edge and maintaining approximately the same interval.
- Now simply glue the top edge of each half circle onto the tape.
- Using the same principle, make a garland of flags and pennants, but use paper of a different color.
How to make a New Year's garland with your own hands from voluminous snowflakes made of white paper?
If you want to help Santa Claus add a frosty fairy tale to your home, make voluminous paper snowflakes and connect them into a garland.
- For such a snowflake you will need several sheets of white paper, glue and scissors.
- Fold a piece of paper along one side to form a triangle.
- Cut off the excess part of the sheet.
- Make slits 1cm apart, parallel to the sides of the triangle.
- Unfold the sheet, bend 2 triangles in the center and glue them together.
- Turn the snowflake over and glue the next strips together - this way glue all the strips together.
- From one sheet of paper you will get part of a snowflake. For a whole figure you will need 6 fragments.
- Connect all the parts to form the center of the snowflake and carefully glue the sides together.
- Once you have made enough snowflakes, connect them into a garland.
Assembling the decoration
We take the remaining piece of tape 25 cm long, fold it and process the edges. Each side should be sealed with fire, after cutting off the middle part to form a so-called “flag”. Even for those who do not know how to make a St. George ribbon, this operation will not cause problems.
We lay the ribbon on the table with the wrong side up, fold the side edges, laying them crosswise. In this case, the edges of the tape can be aligned to the same length or you can opt for an asymmetrical arrangement. We sew the resulting ribbon loop in the center and immediately sew on the metal base for the brooch. After the thread we glue it in order to avoid unforeseen situations when wearing it.
How to make a New Year's garland with your own hands from pictures?
An original idea for New Year's decor would be a garland of pictures or photographs.
- To do this, take a long colored rope or electrical garland. Attach images of your child’s favorite fairy-tale characters or family photos to it using multi-colored clothespins.
- The photographs can depict all the important events that happened in your family in the past year or photos from previous New Year celebrations. Then every year you can add one new photo to this garland, starting a sweet tradition of preserving family memories.
- Frames for pictures or photos can be made from colored cardboard or velvet paper, decorated with sparkles, beads, beads, or ask the child to show his own imagination.
Garland of photographs
Crochet garland for the New Year: ideas, photos
Extraordinarily beautiful New Year's decorations can be crocheted using white or colored threads. You can read how to crochet beautiful snowflakes here .
In addition, knitted elements can be combined into a garland, made into candlesticks, decor for wine glasses, napkins, cards, and also knitted cute Christmas tree decorations.
Garland of crocheted snowflakes
Garland based on balloons
A garland of balloons is usually suitable for one-time use. For example, it can be created for some event: a children's party, birthday or wedding celebration.
But most often it is a children's garland. Bright balloons can be connected into an arch, into figures of angels, into voluminous hearts, or simply placed along the entire length of the wall.
Making such a garland at home is more difficult and takes longer, so many people order this type of garland in ready-made form from special establishments. But, if you start this process at home, you can save your expenses rather than spending money on the services of special agencies.
DIY satin ribbon garland
Satin ribbons are a universal material for decoration. They are used as elements of various crafts and decorations. In addition, with their help you can make bright and elegant New Year’s crafts, for example, a garland of Christmas trees.
- Prepare thin satin ribbons (1.5-2 cm wide and 35-40 cm long) of different colors, beads, threads and a needle.
- For the base of the Christmas trees, take a square bead, and round beads are better for the trunks.
- Fasten the first bead to the thread, then lay the ribbon in the form of symmetrical loops and sew. Use a bead after each loop.
- Gradually narrow the size of the loops towards the top of the Christmas tree, fasten the thread and make a loop out of it to hang the craft.
- When all the elements are ready, secure them to a wider satin ribbon of a suitable color.
Garland of satin ribbons
St. George's ribbon with a star (Order of Victory)
Another brooch in the Kanzashi style with a star that symbolizes the Order of Victory. In order to do it, we will need:
- Tweezers;
- Rhinestones or beads;
- Glue gun;
- Scissors;
- 60-centimeter St. George ribbon;
- Ruler;
- Brooch clasp;
- Lighter or candle.
Stages:
We make 5 rectangles from the St. George ribbon, each 7 cm long.
Using one piece as an example, let's look at how the parts are formed. First we bend one corner.
Fold it again, but on the other side.
And turn the corner inward.
We bend the bottom side as shown in the photo.
Trim the bottom edge and hold it over the fire so that the bottom of the tape sticks together.
We make the remaining petals in the same way.
Now cut another piece of ribbon 20 cm long.
And fold it “according to the standard”.
We attach the base for the brooch with glue from the wrong side.
From the front we make a star in the form of a star. Glue a large bead or rhinestone as the core. The brooch is ready.
In fact, there are just a lot of ideas!
Look: each little thing is unique in its own way, but they are all equally cute.
DIY New Year's garland made from plastic bottles: ideas, photos
- For an unusual garland, take several 0.5 liter plastic bottles. - you will need at least 15-20 pieces.
- Cut off the bottoms of the bottles with a sharp knife and smooth out any rough edges with scissors.
- Heat the sand on a sheet and dip the edges of the plastic blanks into it for a few seconds to get a beautiful rounded contour.
- Connect the elements using fishing line or thin wire.
- This garland can be hung horizontally or vertically. If you have a large number of bottles, you can make a whole curtain or connect the elements with a thick fabric.
Do-it-yourself garland from plastic bottles
You will learn how to make a light garland from this material by watching the video.
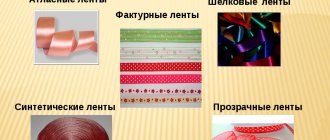
Techniques for working with satin ribbons
Having studied the ideas and instructions for making crafts with your own hands, we can conclude that there are several basic techniques for working with ribbons:
Weaving. This method is suitable for making a bracelet, pendant or embroidery blank. Even an inexperienced person can use this method, since it does not require any special knowledge.
Sewing. This method requires mastering the simplest techniques of working with a needle and thread. Most often in this case, ribbons are used in applications.
Creating things of varying degrees of complexity from various additional parts. This way you can make small baskets with folding handles, boxes and caskets.
If you are just starting to take your first steps in mastering ribbon art, then you need to attend at least one master class on crafts from ribbons. They are organized by experienced needlewomen.
They will be happy to share their tricks with you and tell you all about the specifics of working with tapes. In addition, you can get advice on making a particular accessory.
Starting with simple forms, after some time you will increase your skills and be able to give master classes to beginners. Many popular designers began their journey into the profession with handmade crafts.
Decorative items made from satin ribbons are always unique. Through them, mistresses convey their mood and vision of the world. This is also a great way for any craftswoman to show her level of skill and artistic taste.
Don’t be afraid to fantasize, use your creative potential to the fullest, and everyone around you will begin to admire your crafts.
New Year's garlands: ideas, templates for 2022
Tiger stencil for a garland Tiger stencil for a garland Tiger stencil for a garland Tiger stencil for a garland Tiger stencil for a garland Tiger stencil for a garland Tiger stencil for a garland Tiger stencil for a garland
Tiger stencil for garland
Video: Garland of plastic bottles
- How to beautifully decorate a Christmas tree with your own hands at home, in kindergarten, school, at work in 2022: ideas, photos
- How to make your own Santa Claus and Snow Maiden under the Christmas tree with your own hands: instructions
- How to creatively decorate a Christmas tree in a marine style, with flowers, candies and gingerbreads, citrus fruits, decoupage, quilling, knitted toys: ideas
- Easy DIY crafts for the New Year 2021-2022 for children: ideas, master class
- DIY crafts from light bulbs for kindergarten, school, New Year: master class
- How to make New Year's balls from scrap materials: foil, pasta, toothpicks, CDs: step-by-step instructions
- DIY craft - a snowman made from polystyrene foam balls: assembly diagram, ideas
- Do-it-yourself Bull Mask made of paper, felt on your head: instructions, templates
- Craft - a star made of threads and PVA glue for a Christmas tree with your own hands: instructions.
- How to make a New Year's glass transparent ball with snow and a photo, figures inside with your own hands
- How to make three-dimensional New Year's balls from colored and white, corrugated, toilet paper, paper napkins?
- How to make three-dimensional New Year's balls from polystyrene foam?
- How to make New Year's balls from cotton pads, sticks, cotton wool: instructions
- DIY sweet gifts for the New Year made from sweets, chocolates, sweets: ideas
- How to make a New Year's dress for a girl from an ordinary children's dress?
- New Year's garlands for the Christmas tree, windows, wall, fireplace, ceiling, door: ideas, templates
- How to make a Christmas wreath on the door with your own hands: ideas, master class
- Christmas decorations for kindergarten, for a competition: master class, photo
- How to make New Year's toys from paper, napkins, balloons and threads, pine cones and candies?
- Unusual DIY Christmas tree for a competition for children in kindergarten, school and for adults, for corporate events: ideas, schemes
- How to make an arch out of balloons with your own hands: step-by-step instructions, photos
- Craft, applique – decorative balloon with a basket: ideas, diagram, photo
- Crafts for a street Christmas tree - large Christmas tree decorations, garlands, clocks, candies, bells, snowflakes, balls from CDs, plastic bottles, cups, polystyrene foam
- How to make a hat from paper and cardboard with your own hands?
- Simple DIY New Year's card: master classes, tips, photos
- Happy New Year 2021-2022 with your family: ideas for a festive evening, a cool scenario
- Beautiful decoration of a hall, stage, school classroom, kindergarten, cafe, apartment, room, porch with balloons
- How to make candy, lollipop from paper and cardboard: master class, photo
- DIY decorative candles for New Year and Christmas: master class.
- How to decorate a bottle of champagne for the New Year with your own hands?
- How to decorate windows for New Year 2022: ideas, drawings, photos
- How to decorate a Christmas tree and a house or apartment for the New Year 2022: ideas, photos.
- What should be on the New Year's table in 2022?