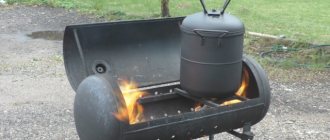
A pan with a flat bottom warms up faster from below, but a cauldron will distribute the heat evenly. This is what makes dishes in a cauldron so delicious. But without a special oven you won’t be able to cook in a cauldron. You can make a stove for a small cauldron from an old gas cylinder.
Are all gas cylinders suitable?
2 parameters are important:
- diameter;
- firebox volume.
If we choose from cylinders with a maximum diameter, we get: 9.2, 18, 27, 50 liters. 9.2 and 18-liter, despite their larger diameter, are “rejected” immediately because of their small volumes. After all, part of the volume will be “eaten up” by the bottom of the cauldron and the ash pit. And it turns out that with such a stove you need to constantly add small blocks - overcoming difficulties that can be eliminated at first.
27 and 50 liter gas cylinders remain. We recommend them for making a stove for a cauldron. A 50-liter cylinder is preferable; it will allow you to fire a larger volume and have a convenient ash pan. And if, when cutting, you miss somewhere, you can correct yourself without noticeable harm.
The second question that needs to be decided is whether or not to build a chimney. The chimney is like a pipe. Usually, a separate chimney is made to reduce smoke around the cauldron. With a tall pipe and good traction it works.
But we have a small portable oven
Our thoughts against:
- The height of this pipe will not be high and it will not create draft;
- A very hot piece of iron will stick out;
- The design is more expensive and heavier;
- You also need to take a pipe with you.
We intended to use such a stove outdoors. If you install a stove indoors, even in a ventilated gazebo, then you need to make a chimney.
The third, important question is whether to make a blower or not.
There are two options for designing the lower part of the cylinder stove:
- The grate is a grate, and small coals and ash fly down;
- A decorated ash pit where small coals and ash fall.
In very rare cases, you may not need to make a blower. Then small coals will fall down. In our opinion, this is a risk and it is better to make a normal ash pan with an ash pan. This is reliability.
Tools
What you can't do without:
- Welding machine and accessories for it;
- Grinder (angle grinder);
- Drill.
It is better to buy all the iron not at a metal warehouse, but to find scraps or used ones. You can search at scrap metal collection points.
We will need:
- Gas cylinder 27 or 50 liters;
- 0.7-0.8 m of pipe (profile or regular) for each leg, for all – 2.1-2.4 m;
- Sheet 4 mm 300*300 mm, for the grate (you can weld the grate from 6-8 mm reinforcement, but this will take longer).
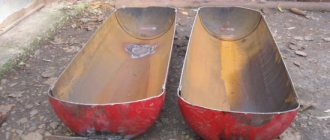
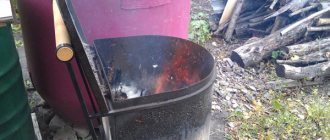
Cut out the cover
We cut with a grinder exactly along the seam.
grill cover
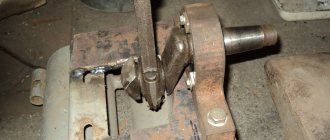
Without cutting to the end, we weld the fasteners for the lid in two places.
cover fasteners
We cut off the lid and get the first building for frying meat - a grill.
BBQ from a cylinder
Do it yourself
The general sequence of how to make a stove from a cylinder:
- We cut the workpiece to size for the oven. Need 450 mm. Parallel, even cuts make the stove neat. If it doesn’t work out smoothly: make the most even cut at the top and straighten the grind. by car.
- We cut a hole for the firebox.
- If you cut it carefully, you can use this piece for the door. Hinges can be made from nuts and scraps of reinforcement. It is important to provide a stopper to prevent the door from falling inside the oven. A good option is the latch.
- For the blower, we make a similar cutout and door.
- In the sheet prepared for the grate, mark and drill as many holes as possible. It is convenient to mark the holes with concentric circles in a checkerboard pattern. We drilled with an 8mm drill.
- Weld a grate blank to the bottom end and cut off the protruding parts.
- In the upper part we make even cuts for the smoke to escape. The cutouts are triangular with a side of 10 cm. We make 4 cuts. Special precision is not required, but the more carefully you do it, the more accurate it will be. If you decide to make a chimney, then instead of cutouts, weld a piece of pipe at least 10 cm in diameter on the opposite side of the firebox opening (coordinate the size with the chimney pipe).
- Legs. Legs 3. We select the height of the legs so that the top of the cauldron is somewhere at waist level. We got legs 750 mm long. The legs are welded at an angle of 10-20° outwards (no more than 30°) and cut so that the stove stands level.
- We weld the handles at the top. The handles must support the weight of the oven. A good option would be handles made of 10 mm reinforcement.
The result was a working stove for a cauldron from a gas cylinder. For neatness, you can paint the stove black. Some of the paint will burn off, but the stove will still look better than a uniformly rusted stove.
Kazan and its features
Humanity has been using a cauldron for centuries; this device arose long before the advent of
electric and gas stoves.
To cook food in this vessel, you need a live fire and the most simple and functional hearth. The cauldron has a spherical bottom and thick walls. Therefore, there is no need to expect stability on a flat surface
.
The round shape suggests a ring-shaped stand. Do not try to place it on a regular
grill grate or on.
A boiler with a flat bottom warms up faster from below, but a cauldron makes it possible to distribute this process evenly. Plus, thick steel is used for manufacturing, and in most cases, cast iron
.
It is unlikely that you will be able to get the right pilaf in a cauldron with a flat bottom or in an ordinary pan with a thin bottom Only a cauldron can delight you with the amazingly tasty and exotic taste of an oriental dish prepared by yourself.
To cook goodies in a cauldron, you will need a good oven, and not some kind of stand on a fire, a stone structure or a primitive tripod. Of course, the ideal option would be a good one, but, unfortunately, dacha conditions dictate the need for a mobile and compact product that you can buy or make yourself without resorting to additional help. It is worth noting that there is also an opportunity to save significant money, gain additional experience and have fun
.
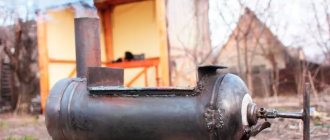
Country conditions make it quite possible to make a stove with your own hands
from an unnecessary gas cylinder.
Overview of species
There are different burner options.
Balloon
This burner is installed directly on the gas cylinder. Made from steel or titanium. There are types of burners with adaptable mounts that are suitable for different cylinders. The advantage of such devices is their minimal weight, modest price and ease of movement.
Integrated
This device is connected to cooking utensils and a cylinder. In fact, it is also a gas pump, but with a significant difference in gas consumption. Due to the radiator mesh inside the cookware, heating occurs much faster, which significantly reduces fuel consumption. This is the main advantage of such burners.
With hose
Such burners are considered the best option for both home and camp use. The material for production is mainly cast iron, less often steel. Their power varies from 3.5 to 35 kW, which significantly affects the quality of cooking. Burners with a hose connection, in turn, are divided into two types - using bottled gas (propane, butane, isobutane) or natural.
Advantages: can be used for cooking large quantities of food - from 10 to 60 liters, adjustable burner power, which ensures quality and convenience of cooking, the ability to use large cylinders, up to 12 liters.
Disadvantages: relatively high price, cumbersome components.
Gas burners are also classified into the following types:
- desktop;
- mortise;
- floor
Tabletop burners are installed directly on a table or other flat surface. Used both at home and outdoors.
Mortise ones are installed in a tabletop or other suitable surface, after which they are connected to the cylinder. Used at home or in the country.
Floor-mounted ones can be used both at home and in camping conditions - fishing, hunting, on a long hike, as well as in the country.
Step-by-step instructions for constructing a stove from a gas cylinder
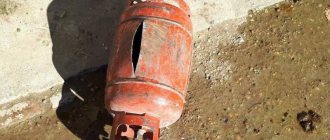
- We check the cylinder for the presence of residues, since if they are present there is a danger of fire or even explosion
. The easiest way is to leave it outside with the tap running for a week or two. - We outline the cutting line using a marker so that it turns out clear. To do this, we retreat from the top part 20-25
cm, at our own discretion. Next we will use the lower part with the bottom of the cylinder for the base of the stove for the cauldron. - Using a grinder, we make a neat cut
, and then try on the cauldron.
The ideal option would be when the cauldron fits 2/3
.
If the cauldron has a larger volume, you need to use a grinder to make vertical cuts about 5 cm from the top
, every 10-15 cm and, if necessary, bend it. - We measure 15-20 cm from the bottom
and cut out an opening for placing firewood. It must be made wide enough so that in the future there will be no difficulties with adding firewood or cleaning from combustion residues. - On the opposite side of the firebox window, a few centimeters higher, you need to make a round hole of small diameter (about 15 cm)
for the combustion products to escape.
Ideally, you need to add a metal pipe
, the diameter of which will correspond to the hole in the firebox, which will make the draft stronger. To increase traction, if necessary, you can make an inverter-type output. This will require a smaller diameter pipe and a little time. Thanks to this implementation, traction will be provided in all weather conditions. - Now you need to try on the cauldron and, if necessary, enlarge the cuts or bend them slightly
.
It is necessary to achieve a tight fit to ensure the fastest possible heating, and therefore quick cooking
. - Having completed the manufacturing process, we heat the oven so that there are no odors and old paint left
.
23348 0 1
Oriental dishes are not only incredibly tasty, but also very healthy
, as evidenced by numerous longevity records held by residents of Asia. The main secret of the presence of such important qualities for food is a unique method of cooking, which consists of using special utensils called a cauldron and a special oven. And if the first one can only be bought, then the second one can be created with one’s own hands, which I will tell you in detail.
Gas type/pressure
For heating, both natural gas (methane) and liquefied gas (propane - butane) can be used. Natural gas is supplied through low pressure gas pipelines. Propane - butane can be used for autonomous gas supply with the installation of a gas holder or supplied in propane cylinders. Heating experience with the use of propane cylinders.
Burners can be designed for a specific type of gas, or they can be universal. In order for gas to burn correctly, it is necessary to mix it with air in a certain proportion. This proportion is different for different types of gas. The burners operate with a special device that ensures the correct amount of gas is supplied to the combustion chamber depending on the air pressure in it. This device is called a gas train, gas fittings, proportional supply device. The air pressure in the combustion chamber depends on the burner options, the draft in the chimney and the resistance provided by the boiler and chimney to the air clot. Changes in ambient temperature affect draft; contamination changes resistance to the clot. So it’s impossible to do without automatically adjusting the gas supply.
In some burners, to switch to another type of gas, it is necessary to change the gas fittings. In others, it is necessary to install or remove a special diaphragm in the gas supply channels. It may also come in handy to replace the manifold. There are universal burners. Conversion to another type of gas is carried out by adjusting the gas train and air supply.
In any case, you need to make sure that the burner you buy is suitable for your gas. Conversion to another type of gas price can be up to 50% of the burner price.
Gas burners have restrictions on gas inlet pressure. Some can operate at completely low pressure. Others require some level. There is a relay installed at the inlet that turns off the device when the pressure is very low. This relay can be adjusted. But there is some slight pressure. It is justified by the design of the gas fittings. Below this pressure the burner will not work. About dilemmas with low gas pressure.
Let's get started
I should immediately note that a suitable oven can also be made of brick and coated with clay. This is exactly what they often do in the countries of Central Asia.
As you can see, in this case a special round ring is also created for convenient immersion of spherical dishes. But for myself personally, I still chose the option of a metal pipe for the following reasons:
- Simplicity and speed of production
. Of course, you will have to work, but the whole process will take much less time and effort than erecting brickwork; - High heating speed
. Brick retains heat longer, but you don’t want to heat the room. The steel shell will much faster create the necessary temperature conditions at which you can start cooking; - Compact and mobile
. The metal structure takes up much less space and can easily be transported to any place on the site or even to the utility room during your absence;
- Low selling price. You will most likely be able to find most of the materials at your own dacha, which will significantly save your family budget.
A stove for a cauldron made from a pipe is made with your own hands in three stages:
Step No. 1: preparing tools and materials
Materials you will need:
- Large diameter pipe fragment
. This will actually be the main “body” of the future furnace. It is best, of course, to find such a product left after any construction work on your own site, but if you don’t find a suitable piece among your supplies, then you can look for it at virtual “flea markets”; surely someone was more thrifty at one time . As a last resort, you will have to go to a specialized store, but keep in mind that there will most likely be pieces of much longer length than you need and this will lead to overpayment;
- A fragment of a pipe with a cross-section of 100-150 mm
to create a chimney;
- Several iron corners or profile tubes
to create legs;
- A grid or steel sheet
to create the bottom.
From the tools:
- Electric drill
with metal drills to create the necessary holes; - Angle grinding machine
for cutting iron products; - Welding machine
for connecting the main fragments of the furnace. This is the most expensive of the tools required to create a cauldron oven;
Welding machines are quite an expensive “pleasure”. Therefore, if you do not have such a unit on your farm, I recommend not buying it for one-time use, but renting it, which will be much more economical.
- A hammer, without which I personally never start any work;
- Spirit level to ensure that the structure is level.
Step #2: design
At this stage, you need to make several important decisions:
- Will you select a pipe for a cauldron or, conversely, a cauldron for a pipe? This largely depends on what you already have on hand. But the main thing is that as a result the dishes are immersed in the oven body by two-thirds or even along the upper edge
. Otherwise, to fully warm it up, an irrationally large amount of firewood and time will be required;
- Are you planning to install racks? You can install the structure on the ground, it is simply then made higher, and the fire itself is lit directly on the ground. If you attach legs, which is much more aesthetically pleasing and functional, then in this case you will also need to weld the bottom to the bottom of the pipe
; - Who will use the oven most often? The height of the racks depends on this. That is, if you are personally planning to engage in oriental cooking, then during the cooking process you should not bend over, and the counters should be at your height
; - How much should the prepared pipe section be cut? To obtain the highest efficiency, it is necessary that the distance from the burning wood to the bottom of the cauldron does not exceed 300 mm. Adjust the steel cylinder to these parameters;
- Are you going to move the stove from place to place? Since the choice fell on a metal structure, then most likely the answer is positive. Then don’t forget about the handles
, the size of which should correspond to the dimensions of the palm;
As a result, you should end up with something like the following drawing:
Step No. 3: performing assembly work
Now let’s begin assembling the prepared materials into a single useful structure that will allow you to experience the wonders of oriental cuisine right on your own lawn:
- We apply all markings according to the drawn up project;
- We cut off the excess part of the pipe using a grinder. After this, be sure to check the horizontal and vertical of the resulting cylinder with a spirit level
;
- Closer to the bottom, cut out the combustion hole
. Its shape can be either rectangular or semicircular, depending on your taste, but this factor does not affect functionality. You should not throw away the separated piece, as it can later become an excellent door or damper;
Never use an angle grinder without a protective guard. Not only can sparks and dross fly in your face, there is also the danger of a ruptured disc, the fragments of which can cause very serious injuries.
- Now we turn the cylinder over and at a distance of 100 from the top edge we create a hole for a chimney pipe
of the appropriate diameter; - Using a drill or the same grinder, we make several ten-millimeter through openings on the sides of the structure. Thanks to them, the fire will be able to receive the necessary amount of oxygen;
Do not make the flame air supply points too high, as the smoke escaping through them will sting your eyes unpleasantly and interfere with the cooking process.
- Using a welding machine, we weld the chimney part from two pieces of pipes connected at right or obtuse angles. Here you can use a “knee” for them or cut the edges at 45 degrees or less, be guided by the situation;
- the resulting chimney to the hole cut out on the body
; - Now we mount corners or profiled pipes as legs
. You can use either four or three supports, the main thing is that an equal distance is maintained between them, and the stove will ultimately be quite stable; - We make the bottom from a lattice
or a solid metal sheet;
- We fix the handles
at the top of the structure; - On one side of the firebox and on a set aside piece of metal, we drill a couple or more holes through which we thread wire, acting as loops. So you will get a homemade fire door, to which you also need to attach a handle;
- We clean all burrs and eliminate other possible design flaws;
- We apply stove varnish or fire-resistant varnish, after which we can consider the work completed.
But there is no limit to perfection, and the design you make can always be improved. Here are some of the ways:
- Possibility of using cauldrons of different diameters
. This is done very simply. It is enough to weld a ring onto the upper edge of the stove, the outer diameter of which will correspond to the cross-section of the cylinder, and the inner diameter will be suitable for installing rings from a standard wood-burning stove. Thus, by adding or removing them, you can adjust the width of the outlet for different dishes;
- Implementation of the blower
. To do this, it is enough to place the grille not at the very bottom, but a little higher, and make an additional door for the lower compartment. This will greatly improve the performance of the furnace;
- Creating a stand for a cauldron
. This is not exactly an improvement to the design you created, but rather some useful addition to the process of its operation. Having built a high ring on which you can place the spherical dishes, you can remove them from the heat at any time and place them on a flat surface. A pre-made section from the main pipe is quite suitable for this.
Gas cylinder stove
Many summer residents may have a used gas cylinder.
, so why not use it as a pipe? Moreover, it already has a bottom. The workflow here is very similar to that described above, but has some differences:
- Elimination of gas residues
. Previously, the cylinder contained a flammable and explosive substance, remember this! Therefore, before starting work, open the valve and leave the product for several days to eliminate the possibility of a tragedy;
- Marking
. This procedure is similar to that carried out when creating a stove from a pipe; - Creating a firebox
. We cut out the required hole using a grinder according to the drawn lines. Here, again, you can make any shape at your discretion, the main thing is that it is convenient to place firewood; - Adjusting the height of the oven
. According to the markings, we cut off the top of the cylinder. If necessary, bend the “petals” of the edges so that the cauldron is at the optimal distance from the hearth during cooking;
- Installation of functional accessories
. Here we are talking about legs and handles, with which the structure is much more convenient to operate, and it will look more aesthetically pleasing; - Internal firing
. You can do without painting, but it is necessary to add firewood and bake the inside to remove any unpleasant residual odors before you start cooking.
Process of creation
A gas burner for a cauldron can also be purchased in stores, but a homemade modification is more convenient. She will become an excellent assistant on hikes and while relaxing in the country.
The main advantages of this burner:
- Ease of use.
- During operation, it does not produce smoke or unpleasant odor.
- There is less soot on the dishes.
To create a cauldron burner yourself you will need:
- Special regulator. Its functions are to supply fuel to the created burner.
- Set of nozzles.
- Heads.
- Unit for mounting a cylinder with fuel (gas).
The DIY working stages are as follows:
- A supply tube is created. A steel tube is used. Its maximum permissible diameter is 1 cm. Required wall density: 2 – 2.5 mm.
- Creating a case for your device. A strong steel rod is used. Its width is 2 cm. There are 2-4 holes in it. They will ensure oxygen gets in. Without them, the fire will not be stable or the device will not start at all. Each hole in diameter reaches 1 mm. Similar holes are required in the cutting rod. A couple of holes are also placed in the body. Their diameter is 5 mm.
- The divider is placed into the housing using pressure. It needs to be pressed very carefully.
- A flange is installed inside the device. The required gap here is at least 0.6 mm. Such a reserve will somewhat slow down the flow of fuel at the outlet section of the igniter.
- Creating an injector. Here you need to use a steel rod and a drill. There should be a blind hole. Drill number – 2. The required distance to the exit section is approximately 1.5 mm. Anything less is not acceptable.
- Creating a jumper. A number 4 drill is used. The created hole must be caulked and the end sharpened. Emery will help with this. You need to sharpen it so that the tip of the pipe sits quietly on the nozzle.
- A hose made from a mixture of rubber and fabric is threaded onto the end of the pipe. The other end is mounted to the cylinder. Fastening is done using a clamp. A screwdriver is used to tighten.
- The body, into which the divider is already embedded, is threaded onto the nozzle thread.
After these stages, the homemade burner can be considered ready. Signs of its correct assembly:
- In operation, it produces an even flame.
- No black smoke appears.
If soot has formed somewhere in the burner structure, slowly turn its body on the threaded section of the nozzle. Examine the connecting points. If the fastening here turns out to be weak, strengthen it: the FUM tape will be used. It perfectly compacts the desired areas. You can regulate the fire by using a valve to introduce gas.
Before using the burner, be sure to examine all its connecting areas for strength and tightness.
After all the indicated steps, the product can be mounted on the stand. The cauldron should easily fit on top. Such a stand can be created from good metal that is not subject to deformation under heavy weight and high temperatures.
It is also very important to protect the flame. This defense will not allow the wind to knock down the fire
And then all the heat will be directed under the cauldron. This type of protection consists of a funnel arranged around the nozzle. When hiking, you can use stones instead of a funnel. But this causes some inconvenience.
A portable gas burner for a cauldron is a device that allows you to quickly and efficiently prepare pilaf during tourist travels. The device has a fairly simple design, so it is not difficult to make it yourself. What burners are suitable for a cauldron and how to build them with your own hands?
Convenient stove for a cauldron: its design and manufacturing materials
A cauldron is a large camping pot made of cast iron with a semicircular bottom. It is this shape and fairly thick walls that allow food to warm up as much as possible and not burn. In addition, the products in the cauldron are stewed evenly, which gives the dishes a simply divine, incomparable taste.
For such a cauldron, a special Roman oven is suitable, which will make the cooking process more convenient. Its main difference from other devices is the hole for the pot in the stove itself.
The width of such a hole should be such that the cauldron is placed 2/3 below the tile level. If you overdo it and make the hole too big, then getting the dishes out will be very inconvenient, and if it’s already too big, then the surface of the dishes will heat up unevenly.
However, today there are already on sale plates with rings of different diameters, so that you can use pots of any size.
You can create a stove for cauldrons with your own hands from:
- bricks;
- car rims;
- gas cylinder or pipe;
- metal
Preparatory actions
At this stage, a gas cylinder is selected, diagrams or drawings with dimensions, materials and tools are prepared.
Barbecue diagram
This is a fairly simple structure. To create it, you do not need complex drawings, but it is advisable to make a diagram with dimensions. This will help determine the amount of materials required and plan the order of actions.
You can also consider the drawings offered online: they will help make useful changes to the proposed version of the barbecue, improve it or simplify the manufacturing process
What you need
In addition to the cylinder itself, you will need the following materials:
- sections of angles and pipes made of steel;
- door hinges;
- metal handles (they are needed for the lid);
- for a chimney: pipe with an elbow (at an angle of 90 degrees) - diameter 100 mm;
- bolts and nuts;
- materials for decorating and finishing the structure - primer, solvent, paint, selected decor, etc.
Tools needed:
- welding transformer;
- grinder (angle grinder), as well as cleaning and cutting discs for it;
- electrodes with a diameter of 3–4 mm;
- electric drill and metal drills;
- clamps - necessary for securing metal parts;
- long metal ruler;
- core;
- brushes for painting the grill (you can also use a brush attachment on a drill to simplify the painting process);
- gas, adjustable wrenches and a set of wrenches.
Cylinder selection
A cylinder with a capacity of 50 liters is suitable. Its design allows you to use skewers over their entire length, making it faster to cook for a large number of people.
The wall thickness of such containers is at least three millimeters, so even those products that have been outside for a long time can most likely be used. The main thing is to check for corrosion. If it is, it is better not to take such a cylinder.
Safety rules when working with cylinders
When working with gas cylinders, follow three simple safety rules:
- Do not use the angle grinder until you are sure there are no hazardous substances inside the cylinder. An unscrewed valve of the container and the absence of gas in it is a sign that the pressure inside is already equal to atmospheric pressure, but not always that the cylinder is safe. Often condensation and gasoline remain in it. These substances must be removed. They do this:
- turn the container over to drain any remaining hazardous substances;
- return to normal position and fill with water;
- wait 2–3 days;
- drain the liquid - after this the cylinder becomes completely safe to work with.
- When welding or cutting metal, do not forget to protect your hands and eyes, and use special clothing.
- Work outdoors or in a spacious, well-ventilated area free of children or pets.
Date: December 19, 2010
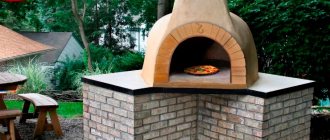
Homemade stove for a cauldron made of bricks
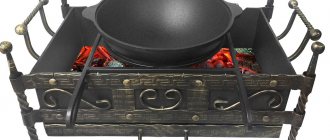
A brick stove for a cauldron can become not only a place for cooking, but also represent a kind of decorative element.
To create a furnace you will need:
- Fireclay brick;
- Bulgarian;
- Floor slab about 2 cm thick;
- Steel corners;
- Grate bars;
- Sand;
- Two doors.
The stove itself should be slightly raised by about 80 cm.
The procedure for creating a furnace:
- Creating a foundation - since the weight of the stove is small, there is no point in building a full-fledged foundation. Therefore, the base is simply poured with concrete and reinforced with reinforcement. First, formwork is made, which is filled with a solution of sand, fireclay powder and water in a layer of 80-100 mm and leveled with the building level. Next, reinforcing bars are inserted into the concrete, between which there should be gaps of approximately 10 cm.
- Laying out walls - laying bricks is done with bandaging the seams: the initial row is half a brick, the second is a whole brick, the third is half again, and so on. All metal elements are installed during the creation of the stove.
- Installing a door - for this, a wire is mounted into the wall, the ends of which are clamped between the bricks and fixed with mortar.
- Installing the grate - this should be done immediately after closing the door of the ash drawer.
- Laying out the firebox - this should be done from durable fire-resistant bricks. The firebox itself should have the shape of a cylinder, placed vertically and cut off in front.
- Construction of a chimney - in the upper combustion part you need to leave an opening for smoke removal.
- The final stage is installing the corners and laying the slab with a hole for the cauldron. After this, you can unstitch the seams and tiling the stove.
After completing all the work, you should thoroughly dry the stove and light up the fireplace to check. You can place a cauldron filled with water on the device. If the air bubbles formed before boiling are evenly distributed, then heating will also occur.
DIY metal stove for a cauldron
For outings into nature, a metal portable potbelly stove is ideal, which is convenient to take with you and use where you need it. The material for such a device can be a pipe or an old 50 liter gas cylinder.
Before using the cylinder, you need to make sure that there is no gas in it! To do this, open the tap and let the container stand in the fresh air for about a week. This is enough for the remaining gas to come out. After all, even a small amount of it can lead to negative consequences when cutting the product.
The procedure for creating a stove for a cauldron from a gas cylinder or pipe:
- First, the balloon is cut into two parts. The cut line can be approximately 20 - 25 cm from the top edge of the product. To get a straight line, you should first wrap paper tape around the balloon and then cut along it.
- Next, the lower part is placed vertically, and the cauldron is installed on it. If the diameter of the oven is not enough to place the dishes in it, vertical cuts of about 5 cm are made on top in increments of 10 - 15 cm. After which you need to check again the tightness of the cauldron to the oven.
- At a distance of approximately 15 cm from the bottom of the cylinder, a hole is cut for adding fuel. It should be wide so that there are no problems with laying firewood.
- On the back side at the top of the stove you need to make a hole for the smoke to escape. For better traction, you can attach a metal pipe.
The metal stove for the cauldron is ready. All that remains is to heat it to get rid of unnecessary odors.
Which cylinder to choose for a potbelly stove
For a system to work effectively, it must be of a certain size. Therefore, options with a capacity of 5 or 12 liters are not suitable, since they are very small. If you need to heat a small space, you can use a variety with a capacity of 27 liters.
To make a potbelly stove from a gas cylinder using long-burning wood, it is best to use 40 or 50 liter products. They are ideal for such purposes and have the necessary dimensions for convenient use.
By the way!
In order not to spoil a good cylinder, you can buy an old or broken one from a supply organization; it will not cost much.
Any options are suitable for work, the condition does not really matter. The main thing is that there is no serious damage or deformation. The most important thing is the size so that it is convenient to lay firewood.
A practical stove for a cauldron made from disks with your own hands
The easiest way to make a stove for cauldrons is to use car wheels.
The work process looks like this:
- Unnecessary disks are prepared and the partition on one of them is sawed off using a grinder;
- Next, the disks are placed one on top of the other - the disk with the partition should be at the bottom;
- The discs are welded together;
- Holes for the doors are cut, handles and stand are welded.
Here is such a simple and original way to make a stove from scrap materials.
By the way, another quick method is to build a stand for a cauldron from an old unnecessary bucket.
So, to make a stand you need:
- Knock out the bottom of the bucket;
- Then, near the former bottom, make several small holes for smoke;
- Next, near the wide part of the bucket, knock out a small door for storing fuel;
- Turn the bucket upside down with its narrow part, that is, upside down;
- Place a cauldron in place of the former bottom, put firewood through the door and start a fire.
Rating 0.00 (0 Votes)
In your garden plot, you want to have a portable stove so that you can cook delicious dishes in the shade and in the fresh air, and after the summer season, you can take it back to the city for greater safety.
Collapse
Each person has his own food preferences: there are those who only love barbecue, but most people are not averse to eating Asian dishes, such as pilaf, and hardly anyone will refuse Russian crumbly porridge with honey and fruit. And these dishes taste best in a cauldron. You can make it yourself from a gas cylinder.
Gas burner for a cauldron: ideal for cooking on the go
A portable gas burner for a cauldron is a device that allows you to quickly and efficiently prepare pilaf during tourist travels. What burners are suitable for a cauldron and how to build them with your own hands?
Gas burner for cauldron
Advantages of a gas burner
During tourist travel, a gas burner is an indispensable, effective device with which you can quickly cook food in a cauldron. This device has many advantages:
- light weight, thanks to which you can take the product with you on a hike;
- ease of use of the device;
- cooking without much difficulty;
- absence of smoke and soot during operation of gas burners;
- the ability to use the product in windy weather;
- long service life of the device;
- safety of use.
A gas burner for a cauldron has many advantages
Design Features
To cook in a cauldron, a stand on a fire or a primitive tripod is not enough; you need a good stove. The ideal option is a high-quality device made of brick, but for outdoor recreation, many people want to have a more mobile and compact device made of metal.
However, any metal furnace structure has weak areas - welds. It is in these places that the metal quickly deteriorates under normal conditions, and when heated to high temperatures, this process accelerates many times over. You can solve the problem using an old 50 liter
. It has a minimal number of seams, thickened walls and bottom.
Cylinder 50 liters, diameter = 30 cm
The cylinder for making a stove for a cauldron is also convenient because it has suitable neck cross-sectional dimensions that correspond to the standard dimensions of this vessel and is an almost ready-made container for the firebox with an ideal spherical shape. All that remains is to prepare the openings for the doors, install the stove fittings and chimney pipe, and the stove for the cauldron from a gas cylinder will be ready for use.
The result will be not only a mobile, but also a fairly safe oven. It heats up quickly and heats the dishes just as quickly. To fully heat the cauldron, you need to choose a size so that it can be immersed in the container by 2/3, or even better, up to the top edge.
Cook-steam-simmer
Archaeologists have long been surprised by the incongruously small size of the fireboxes of ancient Roman culinary ovens compared to the size of the cooking utensils built into them. It was clear that the design was generated by economy; Italy had never been rich in fuel. But how did the Romans boil water using a small bundle of firewood with a heat release of barely 3000 kcal/kg in a cauldron in which a small person could bathe? There is no doubt that they were boiling: many sources indicate that water was continuously boiling in a large cauldron.
Ancient Roman cooking oven with cauldrons
Over time, the secrets of the Roman cauldron oven were revealed. Firstly, smoke tooth 3 (on the left in the figure) in combination with the rise of the semi-circular arch of the woodshed 8 behind it formed the so-called. draft (emphasis on the first syllable) 4 – gas channel of variable cross-section without shut-off valves. The boiler for cooking and stewing 5 in it is simply a cooking vessel built into a cast iron or stone stove 2; There was a burner above the firebox. But the role of hot water boiler 6 is twofold.
Firstly, it represents an aerodynamic obstacle to the flow of gases, and their turbulence behind it creates an invisible gas smoke tooth before lowering into the chimney 7, which further traps the gases in the draft. Then, remember: the water in Roman boilers boiled all the time. The Romans used boiling water sparingly and, having scooped it up, immediately added fresh water.
Boiling requires a large consumption of so-called. latent heat of evaporation, so the gases near the boiler 6, lingering, cool further and their flow rate drops even more. Two clearly demarcated regions are formed: in the draft the thermodynamic process is closer to isothermal, and in the furnace to adiabatic. As a result, the zone of sharp cooling of the flue gases, along the length of the draft, remains above the tooth. In a smooth draft, she would have the opportunity to jump forward, but in this scheme it is excluded by the rise of the arch of the woodshed behind the tooth, immediately behind the tooth there is a visibly distinguishable potential hole.
As a final result, the firebox of Roman kitchen stoves turned out to be exactly the same as a bell-type stove in terms of gas dynamics, with high efficiency and self-regulating: the flue gases circulated in the firebox until they burned out completely. Only part of them passed over the tooth into the draft, carrying exactly as much heat as was needed to support the culinary process.
Nowadays, hot water in jugs is not carried around the rooms, but the Roman cauldron can easily be modified to meet the requirements of modern times, on the right in Fig. An aerodynamic barrier will be created by an oven in place of the hot water boiler, and heat extraction can be assigned to a hot water supply heat exchanger with a storage tank in the chimney lower. By the way, its best design in this case is 2-3 sections of an old cast-iron heating radiator.
Tools
To make a stove for a cauldron from a gas cylinder with your own hands, you will need to prepare in advance a set of tools and protective equipment, namely:
- tape measure and marker;
- chisel, hammer and pliers;
- electric drill and drills for it;
- welding machine with electrodes;
- a grinder with a set of wheels for cutting and grinding metal;
- a stiff brush with steel wire bristles.
Sparks and scale flying in different directions when cutting and welding metal parts of the furnace can damage the skin and retina of the eyes, so you need to use protective equipment during work:
- welding mask;
- special glasses;
- suit made of thick fabric;
- closed shoes;
- gloves.
Chimney pipe installation
The chimney is one of the most important elements of the stove. To install it you will need:
- grinder with cutting discs;
- fittings, elbows with the required rotation angles;
- welding with electrodes;
- steel pipe with a diameter of approximately 100-120 millimeters;
- hammer.
The installation algorithm should look like this.
Step 1. Lay out the fittings with the pipe on a flat surface in the desired sequence, then connect them together by welding. Don’t forget about personal protective equipment – welding mask, gloves and overalls!
Step 2. Remove all bulges and scale using a grinder.
Step 3. Install the finished chimney in the required place - the hole of the appropriate diameter that was made during laying. Coat the joints with oven clay.
Step 4. Check the pipe to see if there are cracks on it - light a small flame in the combustion chamber and watch how the smoke moves.
Note! If the structure was built correctly, the cauldron will heat up evenly. To check this, pour water into it.
With uniform heating, air bubbles will completely cover the inside of the vessel.
There are several possible options for further finishing:
- jointing;
- painting surfaces with special heat-resistant paint;
- plaster.
We also note that the stove for the cauldron is multifunctional, because you can not only cook various dishes in it, but even boil water or fry shish kebab. For the latter, by the way, an iron rod is laid across the slab on which skewers are hung. As a result, the hot coals will cook the meat as evenly as possible.
Note! The construction of a chimney is, at first glance, a simple procedure, but in reality it is not so. Therefore, it is advisable to entrust this matter to specialists.
Manufacturing instructions
Scheme of a stove for a cauldron made from a gas cylinder:
Diagram of a stove for a cauldron with dimensions (*in meters)
When making this type of stove, you must follow the following sequence of actions:
- Eliminate residual gas volume.
Initially, the cylinder was filled with a flammable and explosive mixture, therefore, before welding, it is necessary to remove all remnants of this substance from it. To prevent an emergency, you first need to open the valve and keep the cylinder in this state for several days. Remove residual gas - Apply markings. First you need to measure the height of the future product 45 cm and draw a horizontal line at this level in the upper part of the cylinder. At a distance of 10 cm from this line, you should mark the dimensions of the hole for the chimney pipe, closer to the bottom the dimensions of the blower, and just above it - the combustion opening. It may have a rectangular or semicircular shape; this factor will not affect the functionality of the camera.
Marking. On the back side, at the top - mark the hole for the chimney
- Adjust the height of the oven.
Cut off the top of the container along the marked line. If necessary, you need to make notches 5 cm deep along the entire length of the circumference in increments of 7 - 10 cm and bend the “petals” of the edge so that during cooking you can set the cauldron at the optimal distance from the hearth. At this stage, the cauldron is being fitted. It must be buried in the oven to at least 2/3 of its height. Cut off the top part - Cut openings for the chimney, combustion chamber and ash chamber.
You can use a grinder to create holes. It is better not to throw away the separated pieces of metal, but to use them to make doors. Cutting a hole for the firebox, vent, chimney - Rinse the inner surface of the container. To get rid of the unpleasant odor, the internal surfaces of the walls of the cylinder must be washed several times with an aqueous solution of bleach. Finish washing the container to completely remove chemical compounds with a soda solution. After drying, the balloon can be further converted into an oven.
- Make and attach a chimney pipe. Using a welding machine, weld a chimney from two sections of pipes, cutting off their edges at such a degree that when connected they form a right or obtuse angle with each other. Then turn the cylinder over and weld it to the previously cut hole;
Chimney hole and pipe
- Install stove fittings.
If cut pieces of metal are used, then you can drill two or three holes in the wall of the furnace body along the edge of the openings, and thread pieces of wire into them. They will act as loops. Corresponding holes are also needed in homemade doors, as well as handles for ease of opening. The finished oven casting is sold complete with frames. To install it in a gas cylinder, you must first weld frames of similar size from a metal corner and attach them to the walls of the housing. Cast iron doors are connected to them using bolts. To seal between the frames, you need to lay an asbestos cement cord. Inside the combustion section, guides from the corner are installed, onto which the grate is subsequently placed. It will be much more convenient to remove ash if you weld a simple structure made of sheet steel or use half a piece of metal pipe cut lengthwise. It can be inserted into the ash opening of the furnace during combustion and removed when filled with combustion products. We attach doors, grate, etc. - Installation of legs and handles. It will be more convenient to carry a stove for a cauldron made from a gas cylinder if you attach handles made of a small-diameter steel tube to its sides. Their dimensions should correspond to the width of the palm of an adult. The legs can be made from a corner or profiled pipe. A stove made from a gas cylinder must be stable, so the legs must be placed at an equal distance from each other.
- Drill ventilation openings. Using a drill or grinder, you need to make several through holes with a diameter of 10 mm on the sides of the container, which will facilitate the flow of the required amount of oxygen. They should not be located too high to the top edge of the oven, otherwise smoke will escape through them, which will irritate the eyes and interfere with the cooking process.
- Clean all burrs and eliminate other possible design defects.
Ready-made stove for a cauldron from a gas cylinder
The opening in the cylinder is not as elastic as a whisk in an oven made of thin-walled steel sheet, and the cauldron may jam during the cooking process, especially if it is shallow or has heavily smoked walls. To avoid this, it is advisable to equip the stove with a concave cross with long handles made of steel rod.
Possible difficulties
During manufacturing there is a risk of encountering the following troubles:
- poor quality of seam welding;
- the grate gets stuck when lowered into the cylinder;
- lack of structural stability;
- release of an unpleasant odor during cooking.
A common cause of poor weld welding is the incorrect choice of welding electrodes. To avoid this, choosing their markings according to the thickness of the metal being welded will help.
Important! Iron, steel and stainless steel sheets require different electrodes, and the angles must be made of the same metal as the furnace cylinder. To prevent the grate from getting stuck in the middle of the cylinder, its dimensions are selected 5-10 mm smaller than the internal diameter of the body. To prevent the grate from getting stuck in the middle of the cylinder, its dimensions are selected 5-10 mm smaller than the internal diameter of the body
To prevent the grate from getting stuck in the middle of the cylinder, its dimensions are selected 5-10 mm smaller than the internal diameter of the body.
The instability of the structure results from the incorrect choice of the angle of inclination of the supports. The taller and narrower the cylinder, the straighter the oven legs should be.
An unpleasant odor inside often appears if iron with poorly cleaned paint is used for the structure, so before folding the sheet for the body, it is burned with a blowtorch.
How to use it correctly?
Before you start cooking, you must first remove the cauldron from the stove and heat the inside of the device using a small portion of firewood. In this way, you can eliminate any remaining odors and check the tightness of the installation of doors and chimneys.
During further operation, observe the following rules:
- when fuel burns, the surface of the container and its legs are completely heated, therefore, to ensure fire safety, the structure must be installed on a thick sheet of metal;
- regularly clean the oven from ash residues;
- use only solid fuel for heating. It is strictly prohibited to pour liquid petroleum products into this model of furnace;
- limit the access of children and animals to the heated device;
- do not place the stove near flammable objects;
- Do not light the stove with flammable liquids;
- such a stove is not suitable for burning household and construction waste;
- it is advisable to use only dry firewood, since when raw wood burns, drops of condensation will form and settle on the working elements of the device;
- equip the stove chimney with a spark arrester in the form of a tin can with a large number of holes made with an awl.
Cooking