Decorative vase - the basis of creativity
Making a basic model is very simple. You will need a bottle with a wide neck, hot glue and the twine itself. It would be good if the bottle had an unusual shape.
You need to cover the bottle with twine, starting from the bottom. Place the thread on the glue in a spiral, tightly, so that no gaps form. And then, on the basis obtained, you can give free rein to your imagination.
The photo gallery of twine crafts reflects some popular decoration ideas:
- snow-white lace, ribbon bows;
- beads, decorative stones;
- pattern woven from twine using macrame technique;
- coffee beans;
- shells;
- compositions of natural spices and aromatic herbs.
Let's get started
To work you will need:
- 20-25 meters of 5 mm twine;
- scissors;
- the shape to weave in.
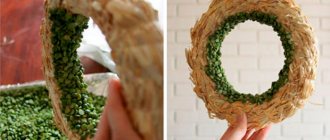
Step-by-step master class on making a basket:
- First you need to make 12 pieces of rope, 65 cm each.
- We make the frame of the basket. To do this, you need to arrange 11 ropes in the form of a cross. We place 5 ropes horizontally, and 6 vertically. The last rope - the twelfth - needs to be secured in the middle. The frame is ready.
- We fix the main thread in the middle and begin to weave. We weave in a circle, between the ropes of the frame. To make it easier and more convenient to form a basket, you can use any bowl and weave over it.
- We continue weaving until the basket reaches the desired height, and then fasten the main thread. We also fasten the frame threads. To do this, we wrap each thread around the last two rows.
Coloring
Many needlewomen value jute precisely for its natural straw color. This gives products made from it a cozy, rustic look. But besides decoration, crafts made from jute twine can be painted.
Playing with color is appropriate in things that are simple in form and execution. There are two options: change the color of the thread before work or color the finished souvenir.
Decorating vases
If you have an old unnecessary container at home in which you can put a bouquet of flowers, but its appearance leaves much to be desired, twine can give it new life.
You can make a beautiful handmade vase from cans, bottles, glasses, flasks, canisters and other containers. The material from which the container is made is not particularly important.
At the preparation stage
Jute can be lightened before work. To do this, the thread must be soaked in any chlorine-containing bleach, for example, “Belizna”. The output will be light beige or milky colored twine.
Bleached thread can be dyed:
- special dyes for cotton fabrics;
- onion peel (color range from yellow to brown);
- pharmaceutical green;
- iodine
Food dyes do not provide long-lasting coloring and stain your hands while working, so they are not used for twine.
How to tie a lasso. 12 reliable knots for survival.
Bowline is a bow knot.
Bowline
People unfamiliar with nautical terminology may think that the name "gazebo" comes from the verb "to chat" or from the noun "gazebo." In the maritime language, the name of this unit comes from the “gazebo”, but not from the usual one, but from the sea gazebo, which is a small wooden board - a platform used to lift a person onto the mast or lower him over the side of the vessel during painting or other work. This board is attached with the help of cables to the lifting cable with a special knot, which is called the gazebo knot. Its second name is bowline. It comes from the English term “bowline,” which refers to the tackle used to pull the windward side luff of the lower straight sail. This tackle is tied to the luff of the sail with a bowline knot, or simply a bowline knot.
This is one of the oldest and most amazing knots ever invented by man. Archaeologists testify that the gazebo knot was known to the ancient Egyptians and Phoenicians 3000 years BC. The gazebo knot, despite its amazing compactness, simultaneously contains elements of a simple knot, half-bayonet, weaving and straight knots. The elements of all these knots in a certain combination give the gazebo knot the right to be called universal. It is surprisingly easy to knit, even with strong traction it never tightens “tightly”, does not spoil the cable, never slides along the cable, does not unravel itself and is easily untied when needed. The main purpose of the gazebo knot is to tie a rope around a person under the arms as a means of insurance when climbing to a height, lowering overboard or in a smoky room during a fire on board a ship. A gazebo can be inserted into the non-tightening loop of this knot.
Twine cat
To make it you will need:
- regular and lightened twine;
- Glass bottle;
- wire 15-20 cm;
- foam ball for the head (large);
- foam ball for nose (small);
- hot glue;
- 2 black beads for eyes;
- black paint or marker;
- scissors, pencil.
Story
Cowboy doors were two-way bar doors found in saloons. Today they can be found in cafes, bars, restaurants and other establishments, the interior of which is stylized as the Wild West. However, the history of the origin of unusual structures is unknown. There are several versions of why swing designs became so popular in cowboy saloons.
Saloons were indoor spaces where cowboys gathered to relax and drink whiskey and other alcoholic beverages. There was such thick tobacco smoke inside that the doors, which covered only part of the opening, were the only air conditioning system providing air circulation.
The design was also convenient for tipsy cowboys who entered and exited the saloon. In the evenings there were so many visitors that a simple door leaf could not withstand constant opening and closing. It was not uncommon for cowboys to enter the saloon on horseback, making it difficult to open and close the door manually.
Since there were often bandits among the cowboys, swing doors helped to notice in time who had come into the saloon: a client, a notorious thug or a sheriff. Such designs also prevented the appearance of angry wives, whose husbands spent all their money in saloons and had fun with prostitutes.
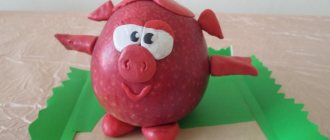
How to make a cat
The design, based on the same bottle as in a decorative vase, is a little more complicated. A step-by-step guide will show you how to make a cat-shaped craft from twine.
- Wrap the bottle with twine, as for the vase. This will be the body of the cat.
- Also wrap a large foam ball - the future head.
- Glue the head to the body.
- Wind the twine around the wire to create a tail.
- Cut a small foam ball in half and paint one half with black paint - this will be the nose.
- Twist 8 circles from lightened twine in a spiral, fastening the working thread with glue. The diameter of each circle is about 2 cm.
- Using regular twine, make four circles of 6-7 cm in diameter, also laying the thread in a spiral. These are the cheeks and paws.
- For the ears you need to make triangular blanks, lined with twine in a spiral. If for the first time it is difficult to lay out the thread, respecting the corners, you can use a paper backing. The length of the side of the triangle is 4-5 cm.
Useful crafts
Using rope to decorate things that we come across all the time is a good idea to give them originality and uniqueness. This way you can change a flower pot, vase, tray, make an organizer, scratching post, flower bed and other items.
Flower pot
The outer walls of the pot are covered with glue and carefully, tightly pressing each turn of twine, glued. The pot can be coated with acrylic paints to match the color of the room or varnish to give it strength.
You can decorate the pot with small elements: butterflies, flowers, ladybugs, beads, sequins.
Vase
Any vase you don’t need will look unusual if you change it with a rope or twine. If it does not fit into the interior of the room or has a small chip, you can correct these defects with the help of a rope. In the same way as a flower pot, it is covered with glue and wrapped.
You can make a vase of a special shape that you want to have in your room. To do this, you can glue any vessel with a tourniquet, after the glue has dried, remove the vessel or leave it inside.
In this way you can make original floor vases, the shapes of which are made from cardboard. Floor vases can be used as scratching posts for your pet.
It is interesting to decorate such vases; by showing your imagination and creativity, you can create a unique masterpiece that you can safely present to guests at home.
Organizer
To make it easier to store various small items, try making an organizer out of twine. The convenience of such crafts is that you yourself can model the number and size of the organizer’s compartments. You can store garden tools, garage parts, office supplies, craft items and other things in it.
To create an organizer you will need:
- Base
- Boxes of different sizes
- PVA glue
- Leg-split
Wrap each box with twine using PVA glue. For convenience, you can glue each box with twine of a different color. Use a box of one color to store certain parts, and another color to store others.
By properly organizing your workplace, you will never lose the right thing. Attach all the decorated boxes to the organizer base.
Tray
The tray with twine glued to it is very convenient to use. The surface of the tray is covered with glue, taking into account the characteristics of the base. Jute rope is glued in a spiral to the bottom. The tray is convenient because you can place hot dishes on it and they will not slide on the surface.
scratching post
If you have a pet in your home: a cat or a dog, then a scratching post will help keep your furniture safe and sound. Let's consider several options:
- Floor: cut strips 15 cm wide from cardboard boxes. Connecting the strips together, roll them into a roll. Cover the resulting form with glue and glue the rope to the roll in a spiral. Decorate the top and bottom with glued thread in a spiral.
- Wall-mounted: connect two boards lengthwise to each other using a metal corner. Apply glue to the boards and glue the rope to them. Attach the resulting corner to the wall.
- The scratching post-cabinet is made from a base and timber. A wooden beam is attached to the base, onto which a rope is glued. The base can be covered with a rug or fabric to match the color of the room's interior.
We have presented you with several options for using rope to decorate your home or site. By showing creativity and imagination, you can decorate the room in an original way, giving it a unique style.
Simple solutions and affordable materials will help you solve many issues of creating convenience and comfort in your home and on the street.
Cat assembly
- At the bottom of the bottle at the front, glue two large circles (legs). Glue three small white circles onto each paw. Glue the tail to the back and bend it arbitrarily.
- Glue the remaining two large circles (cheeks) onto the head, with a dark nose between them. Above it are the last two white circles. These will be the eyes. Glue black beads in the center of the eyes.
- Glue the ears on the top of the head, bend them if necessary.
- The cat is ready.
Additionally, you can decorate the animal with a bow on its neck, place it in a decorative basket or slippers.
Bowline knot: diagram, photo
The sliding bowline is considered the king of knots. Its main difference from the previous one (simple sliding) is that it is not put on a support, but is formed around it.
There are many types of it, consider the diagram of a simple running Bowline:
- First, a simple loop No. 1 with a long end is formed (step 1);
- The free edge is wrapped around the base of loop No. 1 in a figure-eight fashion (step 2);
- Then another loop No. 2 is formed from the remaining rope (it goes around the support), and its edge is threaded into loop No. 1 (step 3);
- Now the Bowline can be tightened (step 4).
You may also be interested: Cefazolin and Ceftriaxone - what are they and the differences
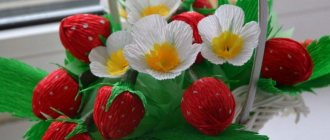
How to make a couple of candy bowls
- Inflate the balloon and tie it tightly.
- Wrap the ball with twine to your taste. The fewer turns of thread you make, the more delicate the product will be. As the number of threads increases, the reliability of operation also increases.
- Dilute PVA glue with a small amount of water.
- It is good to saturate the workpiece with glue on all sides.
- Let dry.
- Pop the balloon.
- Cut the twine piece in half with scissors. You can cut straight, wavy or zigzag.
- Weave a braid from twine threads and paste it over the edge of the candy bowls inside and out.
- The candy bowls are ready. If desired, they can be additionally painted with acrylic spray paint.
A little about practical application
If we have already figured out the question of how to make a lasso, then it’s time to look at how this item can be used in practice. You need to take it in your hand, and then right-click on any animal that is nearby. This way the lasso will control the mob. If you need to tie it to something, then you just need to click on the fence (taking into account if it has already been built). The distance on the leash should be five blocks, and if the leash is in hand - ten blocks. Let us remind you that the lasso can break if the animal falls behind.
Using such a leash can be useful in many cases, for example, when it is necessary to take a mob across a river. If an animal falls into the water, it can be easily saved by simply pulling the other end of the rope.
Users have the opportunity to keep a tethered animal next to them and simultaneously perform a number of other actions: fight monsters, collect resources or break blocks. The lasso captures almost all the inhabitants of the Minecraft cubic world, except for other inhabitants, horses that appeared using console commands, and bats. As for portals, when passing through them the leash simply breaks off.
Twine filigree
Jute filigree is no longer just crafts made from twine and ropes, but a whole art. The algorithm of work is the same as with precious metals. The pattern is laid out step by step with threads, only these threads are not gold, but jute.
Decorative stones, shiny rhinestones, and iridescent beads look harmonious in the curls and petals of the ornament.
Bowline knot: diagram, photo
The sliding bowline is considered the king of knots. Its main difference from the previous one (simple sliding) is that it is not put on a support, but is formed around it.
There are many types of it, consider the diagram of a simple running Bowline:
- First, a simple loop No. 1 with a long end is formed (step 1);
- The free edge is wrapped around the base of loop No. 1 in a figure-eight fashion (step 2);
- Then another loop No. 2 is formed from the remaining rope (it goes around the support), and its edge is threaded into loop No. 1 (step 3);
- Now the Bowline can be tightened (step 4).
You may also be interested: Municipal district and urban district - what are they and the differences
What you need for work
In addition to the twine itself, you need to prepare:
- pattern template, printed or drawn on paper;
- file or transparent film;
- PVA glue;
- a knitting needle or toothpicks (for laying out threads and removing excess glue);
- press (for flat work);
- sharp scissors.
Installation
The installation of such loops is slightly different from the installation of ordinary card loops. To better understand the description below, first look at the completeness of the products and their diagram.
So, double-sided spring door hinges can be adjusted by changing the compression force. Before installation, they must be loosened, and after installation, tightened to ensure that the base returns to its original position on its own.
- 1 – spring;
- 2 – bushing with holes for the stopper;
- 3 – stopper;
- 4 – locking screw;
- 5 – end nut.
And the mandrel is a metal pin with which adjustments are made.
Now you can see how to install a door on double-sided spring hinges with your own hands:
| Image | Description |
| To release the springs, you need to remove the stopper from the hole in the bushing. To do this, insert the mandrel into the nearest free hole and turn the sleeve clockwise. The stopper is released and can be easily removed. | |
| Then everything is as usual: mark the position of the hinges at the end of the base and the door frame. | |
| Using the markings, we cut out grooves in the body of the frame and door leaf. | |
| We put the hinge card into the groove of the box and fasten it with self-tapping screws. | |
| We repeat the same with the second card, screwing it to the door. | |
| After installation, we cock the springs in both pins. Using the mandrel again, turn the sleeve clockwise, inserting it into the hole located closer to the card. And insert a stopper into the vacated hole. Then we go out, close the door and repeat the procedure on the second pin. We check the smooth running and, if necessary, tighten or loosen the spring. |
Often, over long periods of use, the springs themselves weaken. In such cases they are pulled up again. The main thing is not to lose the mandrel.
How to lay out a pattern
These twine crafts are easy to make with your own hands if you have patience and free time. The sequence of actions is as follows:
- Place the patterned paper in a file or wrap it in film.
- Apply glue to the main lines of the pattern and lay out successively with twine.
- Lay out small elements of the pattern one by one (curls, loops, petals). There is no need to cut small pieces from the twine in advance; it is better to lay out the whole thread. And cut off at an angle when the element is laid out and glued.
- Allow the product to dry completely. It is better to put flat work under a press, after covering it with another layer of film.
- After drying, carefully separate the product from the film and cut off any remaining glue.
- Painting, varnishing, decorating – the final touches.
A little about practical application
If we have already figured out the question of how to make a lasso, then it’s time to look at how this item can be used in practice. You need to take it in your hand, and then right-click on any animal that is nearby. This way the lasso will control the mob. If you need to tie it to something, then you just need to click on the fence (taking into account if it has already been built). The distance on the leash should be five blocks, and if the leash is in hand - ten blocks. Let us remind you that the lasso can break if the animal falls behind.
Using such a leash can be useful in many cases, for example, when it is necessary to take a mob across a river. If an animal falls into the water, it can be easily saved by simply pulling the other end of the rope.
Users have the opportunity to keep a tethered animal next to them and simultaneously perform a number of other actions: fight monsters, collect resources or break blocks. The lasso captures almost all the inhabitants of the Minecraft cubic world, except for other inhabitants, horses that appeared using console commands, and bats. As for portals, when passing through them the leash simply breaks off.
Photos of twine crafts
Features of tying loops
It is also important to note that depending on the place where the fishing line will be tied, its type, you should pay attention to a number of points in order to avoid any mistakes during the tying process
At the end of the line
Of course, a large number of fishermen have faced the question: “How to tie a loop at the end of a fishing line?” In order to make a high-quality loop in this place, you should use the surgical option, which is very durable.
It is quite easy to tie, use the following sequence of actions:
As you may have noticed, there are no particular difficulties in the knitting process. Just be careful and follow the steps outlined.
On the main line
A loop on the main line is required in order to attach a leash to it. Before starting to carry it out, the angler determines the length of the leash depending on the fish he wants to catch (for example, for bream they make longer leashes from 0.5 -1 m).
The required length is marked with a triple knot, only after this the leash is attached to the fishing line:
- in the place where the knot will be, another double one is made, which does not need to be tightened to the end, because an eight should appear;
- the end of the leash is passed into it from the first ring to the other;
- after this the figure eight is tightened.
The result is a great loop on the main line.
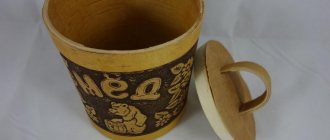
Cans for pencils “Cats”
This is an ideal rope and twine craft for schoolchildren. You will need a base - any tin can (for example, from olives or corn). Coat the jar thickly with PVA glue and carefully and tightly wrap it with rope.
Don't forget to wrap the bottom. When you reach the top, form two ears from the top layer of the rope - fold it with corners and coat it with glue. And below, on the contrary, leave a small tail. Leave the inside of the jar unchanged. When everything is ready, leave the jar to dry for several hours.
Then, when everything is completely dry, all that remains is to spray the cat with varnish from a can, and also glue on his nose from a pink button and eyes - or beads, or ready-made toy eyes that can be bought at a craft store.
The cat jar is ready, you can put pencils, markers and pens in it.
Things in the interior
Experiments with rope are best done on small objects at first. For light accessories and elegant jewelry, it is better to use thin jute and hemp rope.
Flower pots, candy bowls or vases are taken as the first prototypes. The vessel is thickly coated with PVA glue, then they begin to braid. After mastering the technique, to improve the quality of work, they purchase hemp rope and create decorations for the home. Interior items that can be used are interestingly shaped bottles, photo frames, favorite paintings or wall clocks, mug stands, baskets. A frame for a mirror or a pendant for it is made from rope.
Use a rope or thick rope to fill an empty transparent glass container under a coffee table or an aquarium, but do not strive for order in the placement; slight chaos will look more interesting.
Knots made of rope and patterns made of cord are used to decorate the walls and lay out inscriptions. You can decorate your home with already known or new ideas of your own and surprise guests and household members.
Decorative partition
For a spacious office or residential zoning where you don’t want to build blank concrete walls, a partition made of jute rope will be an excellent solution. It will divide the space into zones, will not take away the light, will make it possible to see the entire space, and will make it warmer. You can make such an interior detail in a workshop or with your own hands, which does not require a lot of effort and time. On two planks with pre-made holes, pieces of rope are secured using knots, then the structure is installed in the right place. One strip is attached to the ceiling, the other to the floor.
Owners of spacious private houses, cafes, and restaurants often use functional rope blinds. They are placed in door and window openings, separating the working or sleeping area. If the lower parts of the slats are not fastened to each other and do not have weights, they sway in the wind, evoking a feeling of calm.
Steps
Method 1 of 2:
Knot on the left side
- 1
Wrap the belt around you at the level of your navel.
The right end should be shorter, just a couple of centimeters longer than the tip that will hang down when you tie the knot. This right end remains intact throughout almost the entire procedure.
- 2
Wrap the left end of the belt around your body.
The belt should be at your waist. Make sure the right short end is at your belly button.
- 3
Place the long end over the short one, and keep this crossing at the level of your navel.
As the left end wraps around, overlap the top and keep it at the level of your navel.
- 4
Wrap the long end around your body a second time, overlapping it on top of the first wrap.
Depending on your waist size and the length of the belt, you may sometimes not be able to wrap the belt a second time, or you may need to go around a third time. However, a well-fitting belt can only be wrapped twice.
- 5
Bring the long end towards the center.
Your belt should be wrapped tightly around you. Time to start tying the knot.
- 6
Place the long end of the belt over the short one.
The short end of the belt should point to the right.
- 7
Pull the long end under both layers of the waistband.
It should go down, under the belt and out back.
- 8
Take both ends and tighten them well.
We already have half a node. Make sure your ends are the same length now.
- 9
Cross the two ends over one another.
This is similar to tying a regular knot.
- 10
Pull the long end over the second and pass it into the loop formed by their intersection.
Exactly the same as in a regular node.
- 11
Tighten the knot.
Pull both ends of the waistband until you have a knot in the center of the waistband.
- 12
Tighten the belt and distribute it in the center.
Make sure your belt holds well so the knot won't come undone during your workout.
Method 2 of 2:
Knot on both sides
- 1
Fold the waistband exactly in half to find the center.
This method uses the same type of knot, but the belt is twisted around the body in a different way.
- 2
Place the center of the belt on your navel.
The two sides must be the same.
- 3
Wrap both ends around your waistband and bring the ends forward again.
You will need to switch hands behind your back. Make sure the belt hooks itself. Take the place in front of you where the two ends of the belt cross again in front of you.
- 4
Bring the left end down, under and around the two layers.
Keep the waistband centered and make sure that part of the knot is hidden.
- 5
Cross the ends and tuck the left end under the right to create a square knot.
Tighten the knot and make sure everything looks straight and centered.
What are the advantages of such materials
Creating interesting decor with your own hands is quite interesting and such an activity can turn into a fairly profitable hobby.
But even if such a goal is not pursued, the process itself can bring many pleasant moments, and if desired, the craft can be remade or replaced with a new product.
The use of ropes of natural origin is justified not only by focusing on the principle of environmental friendliness, but also by other factors:
- affordable cost and the ability to select the necessary materials without major financial investments or reuse for new products;
- ropes and ropes made from plant fibers undergo certain stages of processing and formation of the finished material, which is lightweight;
- working material for crafts is characterized by increased strength combined with ease of processing, for which different technologies can be used;
- finished products made from jute or rope are durable, the raw materials do not rot, do not deform and are resistant to mechanical stress;
- materials for crafts are easy to process, they are flexible and durable, easy to cut and glue, they can be complemented with any decor and decorations.
Of course, ropes and jute absorb moisture well, but this cannot be considered their disadvantage, because the finished craft can always be dried.
At the same time, from such pliable and inexpensive materials that can be purchased in large quantities, a huge number of practical and decorative crafts can be made.
Master classes are not always required to implement the chosen ideas, but it is worth practicing before the creative process, which guarantees the creation of interesting and attractive products.
Features of swing doors
Operating principle
If ordinary swing doors open only in one direction, then pendulum doors can move in any direction. The principle of their operation is based on rotation around an axis with the same amplitude in both one and the other direction, and spontaneous return to the closed position. Therefore, such doors are called pendulum, or swinging.
Due to the presence of floor closers in the design of pendulum doors, they can be fixed in the open position. This option is very convenient for residential premises and premises located inside heated buildings - for restaurants, cafes and boutiques in shopping centers.
Purpose
This:
- Preservation of heat in the room.
- Preventing drafts.
- Reducing the penetration of dust and insects into the room from the street.
- Maintaining temperature and humidity conditions.
- Ensuring ease of passage for a large number of people, for people with a load in their hands or with problems with the musculoskeletal system.
- Ensuring unobstructed passage in emergency situations, such as fire.
Pendulum interior doors are also installed in apartments, at the entrance to the kitchen, dining room or workshop, that is, in those rooms that you often have to enter with your hands full.
Making balls as decorative elements
Stages of work:
- Inflate the balloon to the desired diameter.
- Lubricate the string with glue. To do this, apply drops of glue at a distance of several centimeters from each other, and then rub over the surface of the rope, without smearing it along the entire length. An end that is too long, smeared with glue, may dry out while it is not yet wound onto the ball. Starting from the middle of the ball, wrap the entire surface with twine greased with glue, without adhering to any order in winding. In this case, there should be gaps between the individual threads, as well as a hole for removing the ball.
- Leave the ball to dry. Drying time depends on the amount of glue used. After proper drying, the ball should retain its shape when pressed on its surface.
- Carefully coat the dried product with varnish.
- Puncture the balloon and remove it from the finished product.
Such crafts can be of different sizes and colors. As an independent decoration, these interesting products can transform the interior of a room. Similar ideas can be used when making decor in the form of a vase for dried flowers or flowerpots.
History of the Gallows Knot
The ability to tie knots has been known to man since ancient times. The most ancient types of such human activity were discovered by Finnish archaeologists during excavations on the territory of their country.
The development of sailing shipbuilding gave a new impetus to knot knitting technologies. This was due to the need to have reliable, easy-to-use fastening equipment. Nodes appeared:
- Used to connect individual parts of the cable to each other
- Special Application
- To hold any objects at the end of a rope or fix them together. It is this group that includes gallows knots.