Gardening equipment
Gardening work, even within a modest six hundred square meters, is a rather labor-intensive process that can be optimized using various tools or homemade devices. Our craftsmen prefer to make their work easier with homemade products.
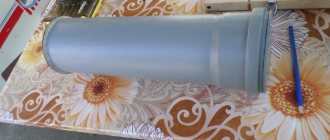
Battery sprayer
Copperfield FORUMHOUSE Member
Operating principle: a small-sized submersible pump is installed inside the tank, the solution from the canister is supplied by the pump through a hose along a rod to the sprinkler nozzle. It works quietly, the pressure is strong. If the trees are tall - the rod is two or three meters, the pressure practically does not drop when the hose is extended. The battery can be attached to the tank; I carry it in my pocket.
Equipment:
- Plastic canister with a wide neck - 10 liters.
- Submersible water pump (19W, 12V).
- Brass sprinkler nozzle.
- Low pressure hose (outer diameter – 9 mm, inner – 6 mm) – 3 m.
- Rod (aluminum pipe, diameter 12 mm) – 1 m.
- 12V battery (from a screwdriver) – 1.2-2.4 A/hour.
The author lists the advantages of an automatic sprayer as ease of assembly, low cost (costs less than a thousand rubles), reliability and a stable, strong spray.
Potato weeder
OlegNF FORUMHOUSE Member
I assembled a weeder for potatoes using the type of flat cutter - with a reciprocating movement, the weed is cut off at the root. Can be processed close to potato stems. Compared to manual processing with hoes, hoes and flat cutters, it is easier and requires much less time and effort.
The unit is assembled from used water pipes and a bicycle wheel, the knife (with adjustment of the reach and angle of “attack” into the ground) is cut from the disk of a grain seeder. After processing the row spacing, all that remains is to go between the bushes with flat cutters. There are plans to install additional spacers on the rods to prevent them from bending backwards.
Device for planting garlic
Vasilich Member of FORUMHOUSE
I came up with it and made it for my beloved wife - so that everything would be beautiful and regular. A perfectionist's delight. We stretch the cord and stick the tool into the ground along it. Using the main pin we get a hole for the slice, the crossbar is a depth limiter; the spike at the end is an indicator of the next hole. The trial test drive showed excellent results - it turns out as intended.
Vasilich did not indicate the dimensions of the punch, since he considers them individual - “everyone has their own concepts of how deep and how often.”
Potted lamps for outdoor flowers
Another interesting lighting option, borrowed from lighting design, is the installation of unusual garden lamps under flowers. This solution will undoubtedly decorate the garden in the best possible way! Modern LED pots will allow you to create a unique romantic atmosphere worthy of the pen of a talented writer.
In the photo: flowers installed in LED pots
Budget-friendly decorative and functional fencing for flower beds and beds
There are a lot of all kinds of plastic picket fences, ribbons and other fences on sale, but not everyone is attracted to the plastic around their beloved flower beds. Let's see how creative our craftsmen are in this area.
Flowerbeds and beds made of wave slate
Danila78 FORUMHOUSE Member
We have three flower beds in a row - the tree trunk circles are fenced with wave slate. We calculated, hammered 9 sections of steel pipes into a circle, and sawed the slate in three waves. The sheets were installed end-to-end, with emphasis on the pipes, holes were drilled and tied in two places with thick aluminum wire.
The flowerbeds are in their seventh season, no complaints, the slate burst only in one place and that was from a blow with a shovel during digging. Danila78 recommends working in flowerbeds with similar fencing with a hoe or flat cutter. As for lawn care, the trimmer line does not penetrate the slate even with direct contact, and mowing the flower beds is not a problem.
For those who want to repeat, the main reminder.
Danila78
Cutting slate is the most unpleasant thing: it’s better to cut with a grinder with a “stone” disc, but there will be a lot of dust! And you can’t breathe this dust, it’s harmful! So it is best to do this with a gas mask or a very good respirator.
IrinaZb Member of FORUMHOUSE
I'll show you my possessions. Our beds are several years old - they stand firmly, although the corners have not been fixed with anything.
Beds at high groundwater level
Titovetsky FORUMHOUSE Member
I bring to your attention a report on the creation of the garden bed. Our site has a very high groundwater level, so creating such beds is a vital necessity.
Materials:
- board 6000x100x25 mm (grade 2) – 3 pieces;
- block 3000x50x50 mm - 1 piece;
- self-tapping screws
Titovetsky
Time required - about an hour. We cut blanks from boards and timber - 4 pieces of 3000x100x25 mm each, 4 more pieces of 1000x100x25 mm each and 6 legs made of timber, 400 mm long. We lay long pieces, level them, determine the top and bottom, place the legs (along the edges and in the center, at a distance of 1.5 meters), fix the boards to the legs. Similarly for the second pair of long blanks. Next, we attach the end boards, and the bed is ready. We move it to the right place, dig under the legs - the bed sits down, fill it with soil and plant it. We also paint our beds. If necessary, you can make beds 6 meters long.
Based on gabions
sfmsx FORUMHOUSE Member
I bought fence mesh from discards to create a multi-tiered bed. During the process of making the beds, we came to understand the low strength of the mesh and the unsightly appearance of the entire structure. On the other hand, the mesh is galvanized and coated with polymer, resistant to corrosion and rotting. It easily bends into almost any shapes and “containers” that can be filled with various materials within the dimensions of the mesh cells. Therefore, I continued experimenting with the design of the sides for the beds - the first one had granite pebbles with bottle solar lanterns. I took ordinary garden flashlights (with AAA batteries, little finger) and inserted them into a plastic water bottle, they illuminated well.
Fortunately, there was quite a lot of yellow limestone on the site - what was not used for backfilling into the drainage became an excellent filling for the gabions. To make it more decorative, sfmsx painted the stone bright yellow (he added a paint color to the impregnation for the stone), and used birch “pencils” as decoration. The ends of the stumps were treated with waterproofing mastic to increase their service life.
sfmsx
Just like the first time - laying it in a fence mesh. The costs are minimal, labor loss - playing Tetris in the fresh air with stones, coloring. For a temporary experiment (possible life cycle 2-3 years), then easily disassembled and...
Unique DIY barbecue
An ordinary barbecue can also be used as a garden decoration... only slightly improved. If the owners know how to handle a welding machine, then they should try to create an original barbecue of an unusual shape: for example, in the form of a steam locomotive, a bicycle or a stroller! If desired, such an invention can be purchased in a store.
In the photo: a custom barbecue on wheels
Pool blankets
With the advent of plastic outdoor pools, many summer residents have appreciated the beauty of swimming in the summer season without leaving their yard. One of the necessary accessories for a font is a special “blanket” - an awning that protects the water from contamination. But, as with any extras, many are confused by the price of the issue. Those who don’t want to overpay do it themselves.
Floating blanket with drum
RDRik FORUMHOUSE Member
The relevance of this item for an outdoor, as well as an indoor pool, has been confirmed by time - standard awnings from the manufacturer are bulky and indecent, suitable only for preservation for a long period. And a factory-made product would have cost me 36,000 rubles. After monitoring the network, I found a manufacturer of four-layer light-resistant film in 1.6 m rolls, from whom I purchased what I was looking for.
RDRik connected the pieces of film together with soldering - a construction hot air gun and a roller, similar to repairing awnings on trucks. The quality of the seam is “C”, since when soldering the film tightens, but the somewhat compressed appearance does not affect the functionality in any way.
The blanket is ready, it’s time for the drum to wind up/unwind as needed. The shaft is made of a 50 mm metal pipe, installed in bearings on supports.
The usefulness of the blanket is undeniable.
It is important that the blanket does not interfere with the operation of the skimmers - they continue to collect the top layer of water with debris and other “delights” even when closed.
Bubble Wrap Blanket
Fenix14FORUMHOUSE Member
In my pool (polypropylene, homemade, round, diameter 4.5 m) I used packaging film, but there were air bubbles inside. I bought it at a construction hypermarket.
The cutting technology is as follows:
- I started with the outer pieces - I placed a metal corner in the center of the board (about 1 m long).
- I released the ends of the film between the board and the corner by about 5 mm.
- He heated the ends with a hair dryer, fusing them into a thin seam.
- I left the corner until the seam completely hardened (to prevent deformation of the seam along its length).
- I moved the film and repeated the algorithm until the end of the roll.
Instead of a winding drum, there are supports made of pipes.
Phoenix14
I welded “horns” (polypropylene tubes) onto the sides. Before bathing, I simply pull out the film and lay it on them. Since the sides have no sharp corners, the film can be installed easily and without damage. Covering the pool is even easier - whoever is the last to leave the water pulls the cover into the bowl with his hands and straightens it. Everything is easy and simple. The only negative is the flimsiness of the film. But if necessary, if the seam begins to separate, you can quickly solder it using the above technology.
Painting on greenhouses
A typical look at a dacha is a massive greenhouse installed on the area near the house, which clearly does not fit into the nearby landscape design. But, as it turned out, this problem is easily solved, and for this there is no need to remove the greenhouse from the territory. It is enough to arm yourself with paints and a brush, and the updated greenhouse will sparkle with bright colors!
In the photo: a greenhouse painted with an original pattern
Useful tips for your piggy bank
Those portal participants who have completed certain stages of construction and arrangement generously share their acquired experience so that their “rake” can be bypassed by those following.
About garbage
kotayka Member of FORUMHOUSE
After demolishing the junk that remained on the site (sheds, sheds, greenhouses), the garbage was placed under the fence away from the entrance so that it would not be in the way at the gate. He didn’t interfere – for a couple of years. Construction waste was actively dragged there, and soon the pile rose higher than the fence. Shame prompted him to call a garbage truck, but it turned out that the entrance to the pile was already closed. Removal was significantly increased in cost by the need for workers to carry garbage manually across the entire yard. The lack of bedding under this garbage Mont Blanc led to the penetration of broken glass, nails and other unpleasant little things into the soil. Conclusion - remove garbage as soon as it appears. Maybe one or two bags, but at once, without cluttering. And the best bedding is a used banner. For short-term waste storage we now use polypropylene tents with ties. We spread it out, dump the garbage, pull it through the holes into a bag and throw it into the garbage truck.
Dax Member FORUMHOUSE
I have a collection pad for garbage: several sheets of smooth galvanized steel. Concrete waste (concrete leaked out when pouring on top of the formwork) and other sharp/cutting rubbish were poured onto them in buckets, after which they were collected with shovels and thrown into the truck without any problems. And now I also try not to store garbage: at the end of the working day, I put it in bags and take it out.
Winter veranda with panoramic windows
What could be better than on a frosty winter evening to gather the whole family on the insulated veranda and, while enjoying delicious tea, sit comfortably in armchairs and watch the falling snow? Anyone who arranges a winter veranda with panoramic windows can see this picture.
In the photo: winter veranda with high windows and glass door
Broken rake - functional decor
Over time, any thing wears out and breaks. In the countryside this is a ubiquitous and widespread phenomenon. But don’t rush to throw away, for example, a broken rake. Leave the part with the teeth, attach it to the wall - and it will serve as an excellent pendant and fastener for various things: tools (practical) or decor (aesthetically).
In the photo: glasses suspended on an old rake
Mini-greenhouses made from plastic bottles and disposable cups
Another useful use of plastic containers. When sowing seeds of heat-loving crops (cucumber, zucchini, pumpkin) in open ground, there is a risk of delayed germination and even death of seedlings in the event of a sharp cold snap. To solve this problem, gardeners suggest using disposable cups after planting seedlings or seeds.
They already have drainage holes that will serve for gas exchange. To prevent the cups from being blown away by the wind, they are buried 2-3 cm into the soil. Seeds, 2 pcs. Sow in a hole in moist soil and immediately cover with a glass. As a result, the seed and developing sprout are in a greenhouse with more favorable conditions.
The top part of a 1.5-2 liter plastic bottle can be used to cover early cabbage seedlings. Immediately after planting the seedlings, the lid should be closed, but not tightly, so that fresh air can penetrate. Once the plants are established, the covers can be removed completely.
Labels for signing varieties of seedlings from juice boxes
When buying seedlings of fruit, berry and ornamental crops at a gardening market or in a private nursery, we often think that we can easily remember which variety is which or hope for a “note” from the seller. As a result, trees and shrubs grow, notes are lost, and simple names are forgotten in a string of others.
We offer a proven method of preserving the name of a variety directly on a growing seedling:
- cut the juice box into strips 3-4 cm wide and 10 cm long;
- make a hole on one side with an awl;
- We thread a string or wire 10-15 cm long into the hole (with its help we will tie the tag to one of the main branches);
- on the inner shiny side we make an inscription in block letters with a gel pen, pressing firmly on the surface so that the inscription is clearly readable;
- Even before planting, we screw the label onto the future stem branch.
In the future, it remains to monitor the condition of the inscriptions and, if necessary, update the labels.
vertical garden
This life hack came to us from France, the homeland of beautiful Provence. Phytomodules, which are the basis of a vertical garden, are extremely popular today: firstly, they save space taken up by plants and flowers, and secondly, they create a wall of extraordinary beauty. The greenery smoothly descending along the wall gives the impression of being in a botanical garden.
In the photo: a voluminous vertical garden of different plants and herbs
How to propagate rare potato varieties with “eyes”
The method that our grandmothers used during the war years due to a lack of seed material. Now it is actively used for propagating rare and expensive varieties. A separate eye on a tuber is a full-fledged bud that will produce a viable plant with a root and a vegetative part. All a bud needs to start growing is 5-10 g from the mother tuber.
Mother tubers of seed potatoes are carefully sorted and only healthy ones are selected. The knife must be disinfected (you can wipe it with alcohol). Freshly cut slices with “eyes” are not planted immediately - the cut areas must dry out to prevent infection. For prevention, they are rolled in ash.
Planting is carried out 5-6 days after cutting. During this period, the slices are stored in the shade, laid out in one layer in a wooden box. Summer residents note an increase in the yield and marketability of potatoes from “eyes”.
Advice! Not all buds of the tuber are active, so cutting into slices is best done after germination, when small sprouts appear.
Barrel with hose
Saving is the basis of a correctly distributed family budget. This quality is especially valued in the country. Don't let your rain barrel sit and mold - use it to water your garden beds! To do this, you need to attach a hose to a barrel, from where rainwater will flow by gravity.
In the photo: a rain barrel with a hose attached to the outside
A quick way to garter tomatoes, peppers and cucumbers in a greenhouse and in open ground
Gartering seedlings takes a lot of time and is very tiring. Experienced summer residents shared their secret: during planting, one end of the twine of the required length is lowered into the hole (the tip can be protruding from the opposite side) and pressed with an earthen lump of seedlings. No knots, everything turns out quickly.
After planting, the other end remains on the ground, and after a week, the rooted plants are simply wrapped with twine and tied to a support. At the end of the growing season, the ropes are simply pulled out of the soil, and the tops are sent to the compost heap.
DIY decorative well
It wonderfully decorates barrels for irrigation, storm wells, well pumps and many other country communications. And even an amateur can create it! This requires very few materials. The result will be a decorative well of extraordinary beauty, which hides unaesthetic communications and decorates the surrounding area.
In the photo: DIY decorative well
How to protect hallway floors from salt
Snow outside is often treated with salt and chemicals. At home, these substances can leave stains on the floor and even warp the floor coverings. Parquet, laminate and carpet especially often suffer from such effects. Therefore, you should definitely get a door mat made of durable rubber and a shoe tray. If you urgently need to clean the floor from salt and snow, use this recipe: dilute 100 ml of 9% table vinegar in 800 ml of water and spray it over the floor surface. Without letting the vinegar dry, wipe the floor with a dry cloth, and then do a wet mop.
The best material for the floor in the hallway is tile, which is easy to clean and durable. More budget linoleum is also suitable.
A fun way to make holes for sowing seeds using cardboard egg cells
It takes a lot of effort to prepare vegetable beds. A responsible task is marking and cutting furrows for sowing. They should be smooth and of the same depth along the entire length. Resourceful summer residents offer a homemade device for marking even and neat holes - a cardboard cell for eggs.
Seeds can be lowered into each hole or by skipping 1-2 holes, thus adjusting the distance between plants depending on the crop.