The hobby of skiing is quite an expensive pleasure: you have to regularly invest material resources to update your equipment. In addition, it would be useful to have additional equipment, which makes the process of preparing skis for use faster and more convenient.
Not everyone who likes to ski has the opportunity to treat them with special equipment before skiing. Such a factory-made machine is quite expensive, but using it to lubricate ski equipment is much more convenient than doing it on some ordinary surface that is at hand.
Previously, they were made very simply - a board was selected according to the width of the skis, their contours were outlined on it, and then cut out. But nowadays there are drawings, using which you can make with your own hands a convenient machine for preparing the surface of skis for their convenient use.
Now on the Internet you can find many options for drawings, according to which you can assemble such a machine with your own hands. Let's consider one of the simplest options, the implementation of which practically does not require any special materials - everything can be made from improvised means.
Wooden ski supports
This drawing involves the creation of a ski machine, which consists of two parts. Thanks to this, it can be disassembled for transportation and assembled for use.
Both parts are identical to each other in their design - at the base there is a square metal pipe, on top of which a wooden support is installed. To ensure that the skis rest gently on the wooden base during processing, a strip of foam rubber is attached on top of it. In one of the parts, you can make a clamp from a piece of leather or durable fabric that will hold the tips of the skis while lubricating them and preparing them for use. But it is not at all necessary to make such a clamp, since even without it the skis will be held quite securely.
Fastening
Before screwing in the screws, pre-drill holes for them. For drilling, use a drill with adjustable speed and drill bits that provide the desired diameter and depth of the hole. If you have access to specialized equipment, use a special drill with an extension. It ensures that the drill is centered in the drill and stops at the required depth. When using a standard drill, use drills with a diameter of 3.4-3.6 mm. If drilling occurs with the help of a brace, the use of a jig is mandatory: without it, the drill often moves to the side.
Machine base
The wooden support is attached to the base using ordinary self-tapping screws. You just need to make sure that its head is as recessed as possible, otherwise this may prevent the halves of the ski preparation machine from connecting to each other.
It is necessary to pay attention that the wooden supports are made with a slight deflection so that the ski, resting its ends on the supports, is slightly short of the bracket.
As a base, it is best to use square metal pipes, which can easily be connected to each other with a regular wooden plank by inserting both sides into the pipes.
Making peak
In addition, how to make homemade skis, you need to make comfortable peaks. To do this you will need to do the following:
- find two straight sticks, clear them of bark, cut off the knots;
- fix together and dry in a warm place;
- using sandpaper, their surface is cleaned to perfect smoothness;
- the lower ends are sharpened with an ax;
- Holes are drilled at the upper ends and thin straps are pulled through.
After this, the peaks are varnished and dried in a warm room.
Bracket holding skis
A bracket is installed in the middle of this bar, to which the skis will be attached during the process of lubrication and other processing. The height of this bracket should be adjusted in height depending on the skis being processed.
To make such a bracket, you can use a round piece of steel, and its diameter should be exactly the same as the diameter of the shoe staple. By welding a bracket to a long bolt with a semi-automatic welding machine, you get a ski mount.
Such a bracket must be securely held in the bar, since during scraping the ski surface or in the process of other preparation, the bracket will be subject to significant impacts, so it must be firmly held in place.
To secure the ski, its central part needs to be pressed a little, attaching it to the bracket. This way, the ski will be securely fixed and ready for processing.
Thus, using the simplest drawing, you can independently make a machine on which it will be convenient to process skis and prepare them for use.
Conservation. Should I do it?
I think it is necessary, especially if these are expensive, “combat” skis, the gliding quality of which you want to maintain for as long as possible. If you do not preserve your skis after the season, over the summer the sliding surface without paraffin will oxidize and dry out - therefore, it will absorb paraffin less well and work worse during the season. It’s better, of course, to take care of your inventory in the spring. If there are chips or scratches, they must be sanded using a machine and covered with universal paraffin at an average temperature of -2 - 8C.
Advantages and disadvantages of the machine
Among the main advantages of this design it should be noted:
- the ability to disassemble the machine, which makes its transportation more convenient;
- high strength, as a result of which the machine can be subject to considerable mechanical stress;
- productivity – the device can be easily unfolded for work;
- ease of manufacture - in extreme cases, you can even do without a preliminary drawing.
The only serious drawback of such a machine is its rather large weight, especially in comparison with factory models that can be found for sale on the market. This is explained by the presence of metal parts in the design, but if an important condition is the low weight of the machine, then the amount of metal used in it can be minimized - only the bracket can be made metal, all other elements can be made of wood.
If during use the machine does not need to be transported, leaving it in one place, then the structure does not need to be made collapsible, using one large piece of pipe as a base. In this case, you can additionally equip the machine with a device for adjusting its length depending on the skis being processed. For more convenient use, you can equip it with folding or regular legs.
It is clear that such a simple machine in design is not ideal, but every ski enthusiast can add some of his own components during the work process, improving it to suit his preferences. As a result, everyone will make a ski machine exactly the way it will be most convenient to use.
In the summer and autumn, all skiers, from members of the national team to students of sports schools and amateurs, spend almost half of their training time on roller skis. Let's find out why they are so popular and are roller ski training suitable for beginners?
Roller skis are divided into two types, just like cross-country skis: classic and skating.
The main difference between classic roller skates and skate skates is the presence of a ratchet on the rear or front wheels, which blocks the wheel from rotating backwards.
Roller skis are divided according to the method of movement, as we described above, and according to speed - into training and racing
Training rollers
– more wear-resistant, soft rubber wheels are most often used, develop low speed and are more stable
Racing roller skates
– lighter frame and rigid lightweight wheels, polyurethane wheels are often used, develop high speed
Selection of material
The first step is to figure out what skis are made of. The selection of material occurs as follows:
- you should find an adult birch, maple, pine or spruce tree;
- it is important to find the texture of the tree, in which the fibers are placed along the trunk;
- there should be the smallest number of knots;
- Take a barrel blank the length of a person with raised arms.
After this, you can start making skis.
Benefits of training on roller skis
- Roller skates help not only to better master the technique of skiing, but also to prepare muscles and joints for skiing in winter. Develops general and special endurance necessary for skiers
- Improving skiing on roller skis occurs using the same means and methods as on skis in winter. Errors that occur are exactly the same as when moving on skis; they must be corrected immediately before they become established. Correction methods are the same both in winter and summer
- The skills learned on roller skis will be useful when switching to skis in winter. Only minor adjustments needed
- The technique of moving on roller skis is very similar to what we use on skis, but errors can occur most often due to differences: in the weight and length of rollers from cross-country skis,
- lack of friction in sliding and guide track (in the classic course)
- having a smaller area of support on them, it is more difficult to learn to maintain balance
Therefore, when training on roller skis, you need to constantly monitor your movement technique. Especially when tired.
But despite these shortcomings, roller skates are still the best way to improve skiing technique in the snowless period.
How do you become a ski master? Did you study somewhere?
There are no special educational institutions that teach ski masters. There are training programs that are regularly held, very detailed, multi-day programs and seminars at manufacturers of skis, equipment, and waxes, where brand representatives discuss in detail with the masters all the issues of using tools, ski “chemistry,” machines and devices. The level of the masters who pass on their knowledge to us is the highest, this is the level of work with top athletes at the World Cups, Olympics, with the best skiers on the planet.
I got into the profession of “ski preparation master” from sports. I skied, got the first category, and always prepared my skis myself. Then a friend suggested that I cook not only for myself, but also for my comrades. In my opinion, all the masters I know also came from sports. It would be strange if a person who does not represent the real needs and requirements of skiers took up this matter.
I continue to ride, I think that the master needs this. And I like to prepare skis. And when it’s not the season for skiing, I switch to cycling. And in the summer I work as a bicycle repair and adjustment specialist.
Before joining Kant, I worked as a ski master in Bitsa. There were slightly different specifics of the work. Here the workshop is next to the store, they bring new equipment more often, and there more skiers came to the workshop, who somehow skated a new pair. We came to train, but, for example, we didn’t have time to prepare our skis, or it wasn’t possible, or we forgot – so we came to the service center.
Roller skis for beginners
pros
As mentioned earlier, the advantages include
- Good physical activity
- Development of motor skills
- Development of coordination, endurance, strength, speed and strength qualities
- Outdoor activities
- A variety of training routes (you can train on asphalt tracks, closed to cars, on city bike paths, in forest parks)
Minuses
The main disadvantages for beginners include
- Falling on asphalt leaves serious consequences (falling on asphalt is much more painful than falling on snow)
- Difficulties in technical development
- Protection required
- Stopping techniques on roller skis are difficult to master
Wood preparation
Suitable wood species for the production of hunting skis: birch, spruce, aspen.
It is best to harvest in the spring (autumn), storing the boards in a well-ventilated area. If you harvest it in the summer, then after cutting the bark, you need to store it for at least 1 year.
It is advisable to prepare material for several pairs of skis at once, since without much experience in the work, you can ruin the material. So, there will be several additional sets in stock.
How to choose roller skis and what are the main differences?
Roller skis for training usually have rubber wheels and do not allow you to easily develop high speed, which primarily provides confidence for a beginner athlete, and for experienced athletes this is an opportunity to get additional load. Roller skis with rubber wheels, among other things, absorb all the unevenness of the road surface, which is so important for our roads. Rubber gives good grip on the road surface. Roller skis with rubber wheels of small diameter are an excellent opportunity to master skiing for beginners and improve their skills for experienced athletes. In our online store you can purchase skate roller skis for training. The most budget-friendly and most suitable model for training is Shamov 02-1.
shamov02-1
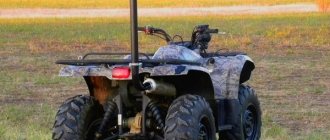
How to make a snow scooter with a chainsaw engine with your own hands
To make a children's gas snowmobile with your own hands, you can take the motor from a chainsaw. For example, common options:
“Friendship” is simple, the device will be without unnecessary details. At the same time, the weight is 12 kg, and the power is small - 1 kW
Another disadvantage is that there are no safety covers, which is especially important for children. “Ural” - the weight is approximately the same (almost 12 kg), while the power is much greater - 3.6 kW. The engine is two-stroke and works even in cold weather. “Shtil” is a saw of medium power, but it is not so noisy
It does not produce strong emissions, which is also important for children.
Required materials and tools
To make a snow scooter with a motor with your own hands, you will need ready-made structures and installations: a gasoline engine, steering wheel, windshield, seat, chassis, shock absorbers. You can take a ready-made backrest for a snow scooter or make it yourself.
For work you need to prepare the following materials and tools:
- Welding machine with electrodes.
- Duralumin pipe D16.
- Bearings: 2 pcs. 16 mm each, 1 pc. – 10 mm.
- Plugs for plastic pipes – 2 pcs.
- Star element.
- Tracks 5 cm.
- Plywood, plastic or fiberglass (sheathing).
- Steel shafts.
- Pipe for frame with a diameter of 25 mm.
- Aluminum profile (letter “P”).
- Profile steel pipe with a cross section of 20*20 mm.
- Fastening elements (nuts, bolts).
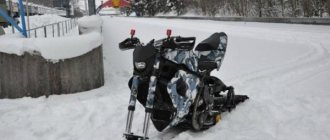
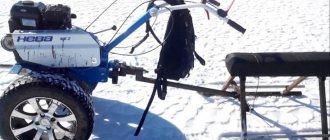
Drawings and assembly diagram of a snow scooter
The easiest option is to take a ready-made children's snow scooter and mount the motor yourself. If you wish and have the necessary elements, you can assemble the structure yourself by taking the engine, steering wheel, making the chassis and other parts. You can take a ready-made drawing as a basis.
When assembling products with your own hands, you must follow safety regulations.
Step-by-step instructions for assembling a snow scooter with a motor consists of the following steps:
- First you need to make a frame. Using spot welding, a steel sheet 2 mm thick is connected in the middle of the entire structure. The chain drive shaft will be mounted here, as well as the gearbox.
- A seat is located in the middle of the frame. You can do this yourself - then you can save money on assembling a snow scooter with a motor yourself.
- The support base is fastened with a beam to the front axle crossbars. A water pipe with a diameter of 15 mm or more can be used as a connecting element. Bushings for the steering wheel are welded at the ends, and a stand is mounted in the middle.
- The next stage of assembling a snow scooter with a motor with your own hands is the stand. For installation, use steel corners with sides of 30*30 mm. They are connected by steel crossbars - 2 mm gussets are suitable for this. The motor will be mounted on this rack.
- The caterpillar is taken ready-made, for example, from the Buran snowmobile. The workpiece needs to be shortened by 50 cm. The caterpillar is secured with transport tape. And the gears are made from cardboard sheets 15 mm thick.
- The drive shaft is made of 14 mm thick pipe. The gears are fixed with the upper flange, and trunnions (tips) are welded behind the drive shaft.
- Now you need to attach the scooter motor. You can also do this with your own hands at home. To do this, take a working unit, weld it and mount it to the rear.
- To make sprockets, you need to take two tips, and the right one should be longer than the left one (to make a keyway that will fix the chain drive sprocket). The sprocket is secured with a pre-threaded nut.
- You can also make the snow scooter's steering wheel yourself. To do this, take a ready-made device from a bicycle or scooter. For proper installation, it is necessary to place it on the central axis so that the traction force controls the skis well.
- At the last stage, you can install a windshield, as well as headlights for illumination at night. It is not necessary to install the brakes yourself for a children's snow scooter with an electric motor or a gasoline engine, since the vehicle does not gain high speed. If necessary, you can always brake with your foot or release the gas.
A finished snow scooter with a motor, assembled with your own hands, is in no way inferior to the factory design
Racing roller skis or racing roller skis
Allows you to reach high speeds. To achieve this, their design has either a rigid, straight or upwardly curved platform to increase stability. Roller wheels have a larger diameter - for free passage of cracks and unevenness on the road, and a smaller width - for speed. The wheels are usually made of polyurethane or rubber, but have a large diameter.
You can buy racing roller skis in our online store. We provide two roller ski manufacturing companies, Shamov and Elva, both of which have excellent roller ski models for racing. These are not all models, but the fastest in the Shamov and Elva lines with a maximum wheel diameter of 100 mm and corresponding speed characteristics.
Elva sk100
How to choose roller skis if you're just starting out?
First of all, you need to decide what style you would like to roller skate.
Skating is speed, classic is a measured and smooth move. When choosing, you can be guided by the following indicators: your balance; if you have problems with this point or you do not want to subject your muscles and limbs to intense stress and are simply afraid of high speed, then your choice is definitely roller skis for the classic move.
Roller skis
Roller skis
And so if you choose the skating style.
Skate roller skis have narrower wheels and shorter frames than classic roller skis.
If you are just starting out and until now have not even tried regular skis, then we advise you to take roller skis with rubber wheels with a diameter of 70-80 mm. Rubber will not allow you to accelerate too much and will absorb all road irregularities. The sports online store Yoway recommends the Shamov 03-1 model.
shamov03-1
If you have cool, smooth asphalt and want to fly faster than the Norwegian team, then polyurethane wheels may be your choice. And here we can offer a cool option on 80-diameter polyurethane wheels, Shamov 01-1 roller skis.
shamov01-1
You have chosen roller skis for a classic ride.
The main difference between classic roller skis and skate skis is a ratcheting (braking) mechanism installed on one of the pairs of wheels that blocks backward rolling. The platform length of classic roller skates is longer (more than 68 cm) to stabilize the course when moving, and the rubber wheels are wider for increased stability (more than 4 cm). The wheels have a small diameter so that the height of the rollerski platform above the surface is insignificant, then it will be easier for the athlete to maintain his balance while riding. This configuration of roller skis provides the athlete with a comfortable ride while training on the classic course.
Our store recommends 2 main models of roller skis for classic skiing: These are the Shamov 05 and Shamov 06 models. The fundamental difference between the models is that the 06 model has thicker wheels and rollers can withstand greater loads compared to 05 rollers.
How to choose a mount for roller skis?
There are 2 modifications of the binding for roller skis, type SNS and type NNN; each of these types has its own boots that fit these bindings. The bindings for roller skis, which are presented in our online store, are universal and are suitable for both classic and skating skiing.
NNN SNS
If you are a beginner and not familiar with these technologies, but you have ski boots, then using the picture below you can determine which bindings you need NNN or SNS.
Tip for a beginner: NNN bindings are the most common and boots for them are much easier and cheaper to buy!
How to install bindings on roller skis?
Any mounts for ski boots, both imported and domestic, are installed according to the following rule: the ski mount assembly is applied to the roller ski platform end-to-end with the rear mudguard. Only after this a mark is made for the screw of the front body of the ski binding on the platform. It is recommended to use a jig to drill all mounting holes for installing ski bindings on roller skis.
Fastenings
How to choose boots for roller skis?
Let’s say right away that if you want to save money, you can use your old ski boots that you use in winter, but if you want comfort, we recommend purchasing boots specifically for roller skis.
Boots for roller skis also assume that you ski in the summer and have slightly different loads that differ from traditional winter ones.
Since we are talking about a domestic manufacturer of roller skis, we advise you to purchase budget boots for roller skis SPINE, but at the same time not inferior to foreign manufacturers Alpine. The boots are available for both NNN and SNS mounts. Prices range from 2500 to 6500 rubles.
How to choose boots
How to choose poles for roller skis?
How to choose sticks
Everything is extremely simple here. For roller skating skis, the poles are 15-20 cm below you, approximately to the earlobe. For classic roller skating, the poles are 30 cm lower than your height.
You can use any poles, but be sure to use attachments for poles - paws. Because standard ski pole tips are not designed for asphalt.
Available in 2 sizes 10.0 mm and 12.3
Tips
How to learn to roller ski?
You can watch a video, read specialized literature on the Internet, or purchase a lesson from a roller ski coach in St. Petersburg. In one lesson you can gain the necessary skills for further comfortable skating, or continue your lessons, reach a new sporting level and take part in competitions.
If you purchase any roller skis from us, you receive a 15% discount on a lesson with a trainer. When you purchase roller skates from us, you receive a discount coupon, which you can present to the trainer and receive a discount on the lesson. And you can train for 850 rubles per lesson, instead of 1000 rubles.
Classes are conducted by professional cross-country skiing coach Yuri Valentinovich Rumyantsev. Education of AFKiS Lesgaft. Coaching experience since 1996, CMS in athletics. Among the assets are the winners of St. Petersburg, the champion of Russia, the winner of the World Cup stages in roller skiing. Location of classes: Pargolovo Vyborgskoe highway 369, Kavgolovo UTK Lesgafta (the route is paid separately), other places are possible. Contents of classes: technical (training in skating, classical and other methods of movement on roller skis), physical (general and special), and other areas of training.
Joinery
Making a block
First, the sliding part is aligned.
Rough processing is done with Sherhebel. The tool is held diagonally to the grain. For finishing, a plane is used, work is carried out along the fibers.
Important: The side of the block closest to the bark is located towards the sliding surface.
The width is determined. To evenly edge the boards, markings are made with a chopping cord rubbed with blue. Large excesses are removed with an axe, and nicks are removed with a plane.
On the planed end, the height of the thickest part - the block (loading area) - 2.3 - 2.4 cm is marked. The entire front part of the board is aligned along it. The exact length of the workpiece is specified and sawed off.
Marking
Markings are applied on the top side:
- Block. From the center of the board, 15 cm is measured to the toe (front part), and 45 cm is measured from it to the heel (back part). Isosceles triangles are drawn to the front and rear of the block, the vertices of which will be the beginning of the stiffener. The cargo area is shaped like an elongated hexagon.
- From the edge of the workpiece, the toe is measured on a bend - 35 cm. At the end, the thickness of the toe part from the lower sliding side of 8 - 9 mm is noted.
- On the opposite side, the dimensions of the heel are marked with a length of 15 cm and a thickness of 10 mm.
The tip of the ski is always located at the butt of the tree.
Performing a ski profile
According to the markings, the toe and heel parts are adjusted to the required thickness and aligned. A smooth transition is formed from the block in both directions. Masters who have made skis many times with their own hands make stiffening ribs at transition intervals. From the tops of the pad triangles, center lines are drawn dividing the ski in half widthwise. Wide chamfers are removed at an angle from the stiffener. Work is carried out from the loading area.
Finally, the corners are removed from the ends of the block, retreating 10 mm from the bottom.
The resulting blanks are dried for 2 weeks by weight in a strictly horizontal position.
Preparing glue for gluing
The glue must be waterproof (thick), so you can use wood glue (epoxy) with the addition of vinegar to make it waterproof.
Read also: Sports boots for cross-country skiing
If it is not possible to purchase high-quality wood glue, you can make it yourself from fish skin (catfish, chum salmon). For what:
- remove the skin from the fish,
- clean,
- soak,
- wrap it around a stick
- wrap with wet cloth on top
- steam over a fire (stove) to obtain glue with a viscous consistency.
Subsistence
Finished skis need to be protected from moisture absorption, so they are thoroughly fattened. It is very good for this operation to use a mass cooked according to the recipe of the old masters. Pour 400 g of linseed oil into the kettle and bring to a boil. Birch tar is added to it in the same amount and boiled for another 1 hour. Then you will need 200 g of paraffin. After the latter has completely dissolved, the pot is set aside and red wood alcohol (400 g) and formaldehyde (200 g) are poured into it. While the mixture is hot, cover the skis very generously. After the product has been absorbed, the coating is repeated until the wood is completely saturated. Next, the skis are dried and, if desired, covered with drying oil.