Those who love puzzles, ingenuity tasks and crafts simply need to pay attention to the transforming cube made of paper. Many people call it a hexahedron, which means a polyhedron of many identical squares. You can find it in stores, or you can make it yourself. You can create not only the geometric figure itself, but also its variations.
What does sweep mean?
This is a diagram with which you can make one or another craft from paper or other material, for example, cardboard. Before you start working with a transformer, you need to be able to do a scan. To create it you will need:
- Paper or colored cardboard.
- A simple pencil.
- Ruler.
- Scissors.
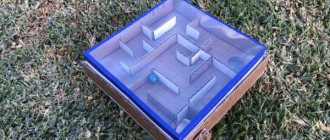
As mentioned above, a cube consists of several squares, in which absolutely all sides are equal to each other. First you need to draw a large square in the middle of the leaf. It is worth remembering that squares have angles of 90°. And also for those who forgot, the cube has 6 faces. It follows from this that there should be exactly six squares on the sheet. In addition to these, we have one extra left and we just need to depict it on the side of some square. Now all that remains is to draw allowances (0.5-1 cm) on three squares on the side and cut off the corners from them at an angle of 45°. The result should be something like this:
Now you need to carefully cut off all the excess, bend the edges, glue special allowances and get a figure.
Origami transforming cube
To make a transforming cube with your own hands in origami style
, you need to remember how modules are made. It is thanks to the modules that the cube can be held together without the help of glue, and the toy itself will turn out to be very interesting and unusual. Let's move on in more detail to the question of how to make an origami transforming cube out of paper.
Thus, a module was created. For a cube of such modules you will need six pieces. All six modules must be done in the same way
Please note that each of them has pockets into which you will need to place other modules. Now all that remains is to connect all the origami parts to create a figure
Do it according to the scheme so as not to make mistakes:
The transforming origami cube is ready. To make your craft more beautiful, you can make each edge a different color or texture.
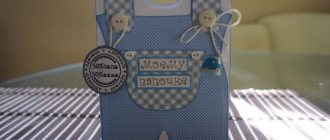
In addition to square paper crafts, you can also make such a magical plant as a rose
. Many people wonder how to make a cube rose out of paper if the flower has round delicate petals. Everything is very simple if you know the diagram or see the template in front of you. So, to make a rose you only need colored paper. You can choose the color of the rose yourself; the example shows a pink rose. First you need to prepare pink and green paper. You need three pink and three green squares measuring 15x15 cm.
We work with green paper in the same way as we did with pink sheets
It is important not to make a mistake in the last step, otherwise the cube will turn out incorrect
It's time to put our beautiful plant together. And we will start with green modules, in which one corner is sharper and larger than the other. It is with a sharp and large corner that you need to connect one module to another, putting the triangle into the pocket. The end result should be a small cube.
Now let's move on to the flower bud
and as you noticed, all the modules are symmetrical to each other, so we can insert them with either side into the module pocket
It is important to remember that you need to insert the corners into the pocket so that the bends of the sheet are directed towards the middle. We put the long corners of the pink one into the pockets of the green module
Now we straighten the green module and carefully lower the corners of the bud.
Thus, we got a beautiful origami-style rose. If you suddenly want to fold it back into a cube, then do everything exactly the opposite and you will get a green-pink cube.
In addition to such crafts, you can make many other interesting figures that came to us from Japan, where our ancestors came up with ways to create cubes and transformers. By the way, a mask for a transformer
You can not only draw, but also do them separately, attaching them to a toy.
Attention, TODAY only!
Due to their dress code, costume parties (Halloween, etc.) require first-class costumes. In addition, at such holidays there are usually competitions for the best, most detailed superhero costume. Who wouldn’t be pleased to take part in such a competition dressed as their favorite hero?
I present to your attention an article on how to do
DIY Optimus Prime costume
.
Necessary materials:
- Hot glue gun + rods for it;
- Adhesive tape (red, gray);
- Masking tape;
- Rulers of different sizes;
- Stationery knife;
- Scissors;
- Aerosol paints (primer, red, blue, white and silver);
- 4 mini flashlights;
- Helmet;
- Velcro;
- Cardboard or foam board;
- 2 empty tin cans;
- 2 plastic “visors” (for windshields);
- Hockey gloves;
- PVC pipes.
Operating procedure
- Print the diagram on a sheet of thick matte paper
- Spread the sheet on a soft surface, such as a carpet, and pierce the marked areas with a needle. It is easier to do this at this stage, while the fragments have not yet been cut out.
- Cut out all the parts with sharp scissors, exactly following all the curves outlined in the diagram.
- Bend the parts exactly along the indicated lines, apply a little glue to the gluing labels and connect all the fixed fragments (the joining procedure is described in detail below)
- The robot's joints are connected using a thin rubber band (the connection procedure is described in detail below).
Fold the two pieces so that the holes match each other and thread the elastic through them. Tie a knot on both sides to prevent the elastic from falling out, and cut off the excess.
The order of connecting the toy fragments
- Glue the torso to the chest
- Connect your shoulders, chest and neck with elastic bands
- Glue your head to your neck
- Connect the tops of your legs, calves and feet with elastic bands.
- Glue the wheels to the calves
- Connect the upper legs and torso
- Glue the wheels to the hips and the thighs to the tops of the legs
- Connect the hand pieces with an elastic band
- Connect the shoulders, shoulder pads and forearms with an elastic band
- Glue the exhaust pipes to the shoulder pads
Translated by alexlevchenko for mozgochiny.ru
Due to their dress code, costume parties (Halloween, etc.) require first-class costumes. In addition, at such holidays there are usually competitions for the best, most detailed superhero costume. Who wouldn’t be pleased to take part in such a competition dressed as their favorite hero?
I present to your attention an article on how to make an Optimus Prime costume with your own hands .
Necessary materials:
- How to make shuriken from paper with your own hands - step-by-step instructions
- Hot glue gun + rods for it;
- Adhesive tape (red, gray);
- Masking tape;
- Rulers of different sizes;
- Stationery knife;
- Scissors;
- Aerosol paints (primer, red, blue, white and silver);
- 4 mini flashlights;
- Helmet;
- Velcro;
- Cardboard or foam board;
- 2 empty tin cans;
- 2 plastic “visors” (for windshields);
- Hockey gloves;
- PVC pipes.
Intergalactic cardboard robots
Space aliens from other planets are no different in execution from the first version. They can be made with movable parts of arms, legs and heads, or they can be put on glue. Intergalactic robots look very interesting when assembled. They are a little more complicated in manufacturing techniques and require more time, since many elements are round in shape. To work you will need:
- 1 sheet of cardboard.
- 1 sheet of white A4 paper.
- Glue stick.
- Black and blue markers.
- Scissors.
As in the first case, the template is printed on a printer. The lines are outlined with felt-tip pens. Glue the sheet with the design onto cardboard, dry it and cut out the details.
Particular attention is paid to fold lines and round elements. To give them clear shapes, the corners are carefully worked out with a ruler.
Assembly is carried out in the same way as the previous model. There are 3 options for intergalactic robots with laser weapons.
Popular articles Flower with a secret
Cubic rose
In addition to square paper crafts, you can also make such a magical plant as a rose. Many people wonder how to make a cube rose out of paper if the flower has round delicate petals. Everything is very simple if you know the diagram or see the template in front of you. So, to make a rose you only need colored paper. You can choose the color of the rose yourself; the example shows a pink rose. First you need to prepare pink and green paper. You need three pink and three green squares measuring 15x15 cm.
- First, take the first pink sheet and fold it in half.
- Now we unfold the sheet and do the same with both resulting halves.
- Unfold the pink sheet again, turn it over to the other side and fold the corners towards the middle.
- Fold the paper along the curves.
- Then we put both sides into the pockets. We got an oblong diamond with corners.
- Now these corners need to be combined. We do the same with two pink sheets.
We work with green paper in the same way as we did with pink sheets
It is important not to make a mistake in the last step, otherwise the cube will turn out incorrect
It's time to put our beautiful plant together. And we will start with green modules, in which one corner is sharper and larger than the other. It is with a sharp and large corner that you need to connect one module to another, putting the triangle into the pocket. The end result should be a small cube.
Now let's move on to the flower bud and, as you noticed, all the modules are symmetrical to each other, so we can insert them with either side into the module pocket
It is important to remember that you need to insert the corners into the pocket so that the bends of the sheet are directed towards the middle. We put the long corners of the pink one into the pockets of the green module
Now we straighten the green module and carefully lower the corners of the bud.
Thus, we got a beautiful origami-style rose. If you suddenly want to fold it back into a cube, then do everything exactly the opposite and you will get a green-pink cube.
In addition to such crafts, you can make many other interesting figures that came to us from Japan, where our ancestors came up with ways to create cubes and transformers. By the way, you can not only draw a mask for a transformer, but also make it separately, attaching them to a toy.
Robot crafts made from paper and cardboard for children 7-9 years old
Using regular cardboard, markers and glue, you can assemble a robot that can move. Such a craft is unlikely to gather dust on a shelf.
To work you will need:
- 1 sheet of cardboard.
- 1 sheet of white A4 paper.
- Scissors.
- Glue stick.
- Paper clips.
- Ruler.
- Elastic bands for fastening.
First, print out the diagram on a color printer. Since paper is too thin a material, a sheet with a pattern is glued onto cardboard. They wait until everything dries, then use scissors to cut out all the details. If the diagram is pale, the details are tinted with colored pencils or paints.
The cut out elements are bent according to the markings, the fold lines are worked out in detail with a ruler. Before gluing the individual parts of the arms, legs and head, they are applied to the body and marks are made where the holes should be made.
Assembly begins by attaching the legs to the body. Using a regular paper clip, holes are pierced in the parts. One end of the paperclip is pushed into a cubic shape with legs, the other remains in the body blank.
When the elements are interlocked, begin gluing the legs. Apply glue, press, and secure with rubber bands. The body is not touched yet.
Next they move on to attaching the arms to the body. When folded, they have the shape of small boxes. First, they pierce one hand with a paper clip, attaching it to the body, then do the same with the second. Apply glue to the black elements, connect them, and clamp them with rubber bands.
All that remains is to attach the head to the body in the same way, apply glue to the protruding parts and connect. The last thing to glue is the body. Carefully connect them together, trying not to disturb the fastening points. Apply glue and secure with rubber bands.
After the craft has dried well, you need to remove the rubber bands. This robot's head rotates, its legs and arms move, and it can be played with.
Transforming Optimus Prime with step-by-step assembly photos
The paper model of the Autobot leader can move all its limbs and also fold into a truck, just like a real prototype of the character.
To create a toy with your own hands you will need:
- drawings of craft parts;
- a sheet of thick paper;
- thick needle or thin awl;
- sharp scissors;
- stationery knife;
- glue stick;
- ruler, preferably metal;
- thin elastic band (if you use fishing line or regular thread instead, the finished model will be difficult to transform).
It is recommended to print the diagram on a matte sheet, but to make the finished Optimus shine like metal, you can also use a glossy one. In this case, before printing, you need to check in advance how the paper will behave in work: if the folds are neat and the glossy coating on them does not crumble, then this material is suitable for assembling the toy.
Step-by-step plan for creating a model
- Print out the drawings on thick paper in A4 format (to get a larger toy, you can use A3 format).
- Place the printout on a flat, soft surface, for example, on a bed or carpet, and using a needle or awl, carefully make all the holes according to the diagram. This makes it easier and faster than punching holes in each cut piece separately.
- Cut out the parts; long straight lines are easier to cut with a stationery knife along the ruler.
- Using the blunt side of the scissors, press all the fold lines along the ruler.
- Bend the fixed parts along the marked lines and glue the valves.
- The moving parts are connected using an elastic band: it is threaded through the holes and secured on both sides with knots.
Assembly procedure for finished parts
The creation of the final figure begins only after all its components have dried thoroughly.
- The body and chest are glued together.
- The chest, shoulders and neck are fastened with elastic bands.
- Glue the head and neck
- The upper parts of the legs, calves and feet are connected with elastic bands.
- Wheels are glued to the calves.
- The torso is connected to the upper parts of the legs.
- The wheels are glued to the hips.
- Glue the thighs and upper legs.
- The parts of the hands are fastened with an elastic band.
- The shoulder pads, forearms and shoulders are connected with an elastic band.
- Exhaust pipes are glued to the shoulder pads.
Paper models of movie and cartoon characters will not only help your child develop fine motor skills and creative thinking, but will also become his favorite characters in his games.
The movable model of Optimus Prime is completely ready.
Paper robots for children 5-6 years old
For preschool children, working with small elements helps develop mental thinking. Making a cartoon robot out of paper with your own hands is very simple; just print out the drawing on a color printer. Next, the design details are cut out. Bend them along the indicated lines. First, using glue, the individual components are assembled: arms, legs, head, torso. They are then glued to the body.
Popular articles Frame for rubber bands
Schemes for printing cartoon robots on a printer:
Matchbox robots
If you have empty matchboxes, you can build wonderful robots from them. In addition you need:
- Colored paper.
- Glue stick.
Cut out 2 strips measuring 5.2x12 cm from blue, yellow and orange colored paper. Cover 6 boxes with them - these will be legs, arms and feet.
One strip measuring 5.2x15 cm is cut out of a yellow sheet. It is pasted over 2 boxes connected together, which will play the role of a head.
The torso is assembled from 3 boxes, the chest - from 4. The torso is covered with an orange strip of paper, measuring 5.2x17 cm. The shoulders (4 boxes connected together) are of the same color with paper 5.2x25 cm. It remains to fasten all the parts in the right places and the robot ready. You can decorate with flags made of colored paper. Use felt-tip pens to draw eyes, a mouth, and various control buttons.
Having completed simple designs, you can move on to more complex ones. The only thing that changes is the location of the matchboxes. When gluing several pieces together, you can use colored or paper tape. It is good to apply paint to the latter.
Felt robot
Some girls are no less passionate about technology than boys. You can invite them to make a felt cyborg with their own hands. Such a craft, created by a girl for an exhibition, for example, in a kindergarten, will definitely take a prize.
The robot will consist of felt cubes filled with any filler - cotton wool, synthetic padding, foam rubber cut into small pieces or scraps of fabric.
There should be 6 cubes - two approximately the same for the torso and head, 4 identical for the arms and legs. We sew each cube from 6 squares.
Recommended cube sizes (length of one side) for the robot:
- body – 7.5 cm;
- head – 5.5 cm;
- legs and arms – 2 cm.
It is better to sew felt with a hand stitch. You can put elements already filled with filler together. They are sewn or glued together with “Moment”.
You can make a textile cyborg not only from felt, but also from other dense fabrics, for example, tweed, jeans.
We decorate the face of the toy using ready-made elements from a craft store, beads and pieces of fabric, or draw it with a felt-tip pen or marker.
Robots from boxes of different sizes
If you select several boxes of different sizes, you can fold the robot to human height. Most of the structural elements are mounted on PVA glue. If they want all parts of the body to move, use I-shaped cardboard joints. In this case, you only need scissors and a pencil to work.
If desired, the boxes can be covered with colored paper or suitable plain wallpaper without a pattern, an improvised control panel can be assembled, antennas can be attached from cardboard cylinders, etc.
Robot applications made from colored paper
Very young children aged 3-4 years are recommended to start doing creativity with simple applications. The boys, of course, will want to make a robot. Having selected a template you like, print it on a printer.
Cut out all the elements, place them on sheets of colored paper, outline and cut out. Any materials are suitable as a base on which the robot parts will be glued: colored or velvet cardboard; thick glossy paper with small patterns; corrugated paper; remnants of wallpaper.
Templates for applications:
The paper robot applique, decorated with multi-colored buttons of different sizes, looks very original. They are attached to the finished product using superglue or hot nails. And if you replace the buttons with sticky shiny paper, add planets or satellites, a star representative from another planet will come out.
If parents see their children's desire for creativity, they should support them. If something doesn’t work out, suggest, give advice, help. And be sure to praise for any, perhaps not entirely successful, result of work. The robot is a craft that both girls and boys can play with. It’s not difficult to do, the main thing is to choose an option suitable for a specific age so that the child can cope with it on his own.
Origami transformable airplane
To create this fun model of a robot airplane, you will need a square sheet of paper (you can use colored paper, painted on both sides) and felt-tip pens to add the desired details.
Assembly video master class:
The duration of the video tutorial is approximately 10 minutes, but assembling the origami transformer itself will take about half an hour, depending on the qualifications of the origami artist.
An origami robot will look good if made from metallic or glossy paper.
Features of fantasy paper heroes
To introduce children to paper art, it is best to create their favorite movie or comic book characters - a hero that the child likes, the child will collect with pleasure, while at the same time, imperceptibly acquiring new skills and knowledge.
Examples of ready-made crafts made from paper and cardboard
A complex paper model of Bumblebee, developments and a description of the work on which are
Paper comic characters in Cubecraft style. A fan of the series can create for himself a real cubic universe of Transformers.
Transforming model of the Autobot leader, 1.2 meters high, assembled from thick paper and cardboard.
Transformable airplane made of metallized paper using the origami technique.
Another version of the origami robot airplane.
Bumblebee from ready-made printed scans. If you add hinges made of rubber bands or strings to such a figure, the character will be able to move his arms and legs.
How to make a transforming robot
Although making moving toys seems difficult, in fact, anyone can assemble a model of their favorite character by choosing the complexity of the craft depending on their age and skills; the main thing is to carefully read the description of the work and carefully cut out and assemble the parts.
Read also: Muscle and nerve tissue
Paper is an inexpensive material, so a child can easily take on assembling crafts that are difficult for him. Even if the toy doesn’t work out, you can always try again, while simultaneously improving your skills and teaching yourself not to give up in the face of difficulties.
Origami transforming cube
To make a transforming cube with your own hands in origami style, you need to remember how modules are made. It is thanks to the modules that the cube can be held together without the help of glue, and the toy itself will turn out to be very interesting and unusual. Let's move on in more detail to the question of how to make an origami transforming cube out of paper.
- First you need to fold a square sheet in half, then bend the edges towards the middle.
- Then bend the lower left and upper right corners inside the sheet.
- Now fold the sheet in half and put the corners that remain unbent into the pockets of the right and left corners.
- Next, turn the sheet over and bend the resulting corners to the vertical corners.
Thus, a module was created. For a cube of such modules you will need six pieces. All six modules must be done in the same way
Please note that each of them has pockets into which you will need to place other modules. Now all that remains is to connect all the origami parts to create a figure
Do it according to the scheme so as not to make mistakes:
Popular articles Autumn bouquet
The transforming origami cube is ready. To make your craft more beautiful, you can make each edge a different color or texture.
Transformable paper star
Prepare 8 squares, for example 4 yellow and 4 pink.
Step-by-step instruction:
- Fold the square in half diagonally in two directions to mark the fold lines.
- Bend the workpiece in half crosswise.
- Expand. Fold the top corners to class=”aligncenter” width=”520″ height=”460″|fcw3qayjh5a| src=”https://miazar.ru/wp-content/uploads/2020/11/з5-1.png” class=”aligncenter” width=”544″ height=”454″|fcw3qayjh5a| src=”https://miazar.ru/wp-content/uploads/2020/11/з6-1.png” class=”aligncenter” width=”634″ height=”476″[/img]
- Bend the workpiece in half from right to left.
- Tuck the lower right corner inward.
- Form the remaining elements.
- Nest one module inside another.
- Tuck the protruding corners of the red inside the yellow.
- Connect the remaining modules in the same way.
- When you press on the figure from all sides, the individual modules will begin to move outward and the craft will take on the appearance of a star.
Figure from a scan
What does sweep mean? This is a diagram with which you can make one or another craft from paper or other material, for example, cardboard. Before you start working with a transformer, you need to be able to do a scan. To create it you will need:
- Paper or colored cardboard.
- A simple pencil.
- Ruler.
- Scissors.
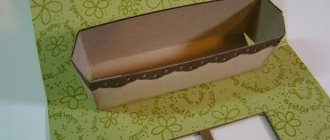
As mentioned above, a cube consists of several squares, in which absolutely all sides are equal to each other. First you need to draw a large square in the middle of the leaf. It is worth remembering that squares have angles of 90°. And also for those who forgot, the cube has 6 faces. It follows from this that there should be exactly six squares on the sheet. In addition to these, we have one extra left and we just need to depict it on the side of some square. Now all that remains is to draw allowances (0.5-1 cm) on three squares on the side and cut off the corners from them at an angle of 45°. The result should be something like this:
Now you need to carefully cut off all the excess, bend the edges, glue special allowances and get a figure.
How to make a transformer out of paper?
Many boys are very fond of transforming toys. This is due to the fact that there seems to be one item, but at the same time you can play it as two different characters. The most popular are robots that turn into cars. They can be made not only from plastic, but also from other materials.
The world of origami and paper plastic is very large, in it, in addition to ordinary paper crafts (panels, appliques, topiary, quilling crafts), there are also transformers, and after reading this article, you will learn how you can make one of them with your own hands. After all, it will be doubly interesting for a child if he first makes it himself and then just plays with it.
How to make a transformer out of paper?
To make it, you only need a sheet of silver paper (paper-based foil), suitable for folding origami. Just keep in mind that a standard A4 sheet will be too small for such a craft, it is better to take a larger one (A3 or A2).
Progress:
- Cut out a square from a sheet of paper. We fold it along the diagonals, and then with the corners towards the center.
Bend the top corner back down, and then fold the right side towards the left.
Take the top layer of paper by the edge and move it to the side. We should get the figure shown in the picture.
Fold the square on the other side as well. Then we raise the middle of the upper square to the top. We do the same with the second one. As a result, we get the basic origami figure “Bird”. We lower the ends of the paper on top to make a figure like in the photo. We do this on the other side as well.
Fold the resulting wings in the middle and down. After this, we lift the lower triangle up on both sides, while directing the side wings towards the center.
Swap the top and bottom of the workpiece. Fold the top wings in the middle. Fold the diamonds formed on top and behind in half upwards. Fold the side corner towards the center, and then bend it inward. We do this with all four corners. We turn the resulting workpiece over again from top to bottom. Doing as shown in the photo, we pull forward the triangle in the middle of the part. Next, we fold the transformer out of paper according to the proposed schemes. This is what we got as a plane. Now we make his arms, legs and head, and we get a robot.
There is a second master class on how to make a transforming robot out of paper.
Origami transformer toy
Prepare 8 squares of colored paper 10x10 cm. From each you need to fold a module, following the step-by-step instructions:
- Fold the square in half diagonally in two directions. Expand.
- Fold in half across and unfold.
- Form a basic "double square" shape.
- Fold the sides of the top layer down toward the center.
- Repeat on the other side.
Assembling the craft:
- Insert the corners of one module into the corners of the other on one side.
- Make a fold at the junction.
- Add the following element.
- Make a fold.
- Add the remaining elements.
- Connect the outer modules to each other.
- The toy transforms if you grab it from the inside and turn it.
It is recommended to make a transformer from bright multi-colored squares.
Happened?
Not really