How to decorate a photo frame and make it unique - use our master class “Decoupage in Shabby Chic Style for Beginners” or “Decoupage Photo Frames Using the Mixed Media Technique.” For those who do not know what the decoupage technique is, it is the decoration of objects of various sizes using paper, napkins, fabric, and so on. Decoupage also uses: acrylic paints, sponges, brushes, PVA glue and varnish.
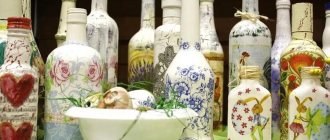
- If you have ever tried to create using this technique, then you know how you can turn an ordinary bottle or jar into an exquisite decorative item.
- Products coated with varnish are not afraid of moisture, they are durable and will delight the eye with their original decor for many years.
Decoupage frames in shabby chic style for beginners
For those who are taking their first steps in decorating techniques, we suggest watching this master class. Decoupage of any (round, square) photo frame begins with sanding the surface. This applies to both new and old photo frames. You need to sand it with sandpaper. For a job such as decoupage of a wooden frame, you will need a minimum of decoupage tools.
For decoupage you will need:
- Wooden photo frame.
- White acrylic paint.
- Paints (watercolor, gouache) cherry and gray, or acrylic paints of these colors.
- Brush, old toothbrush.
- Napkins for decoupage or colored postcards, magazine clippings.
- Fine sandpaper.
- PVA glue or decoupage glue.
- Varnish (alkyd or acrylic).
- Sponge.
- Paper cutter (if using cards or printouts)
After sanding the surface, take a sponge and use tamponing movements to paint the surface of the frame (primer). Let it dry (you can speed up drying with a hairdryer), sand it again and prime it again. You can apply the paint with a synthetic brush.
Next we need to decorate our frame. If you have napkins for decoupage, great. Napkins can be 2- or 3-layer. We need the topmost layer - with a pattern. Separate this layer.
If you don’t have napkins, make a printout or use a color postcard. But these pictures need to be thinned out. To do this, you need to cover the picture with 2 layers of varnish and dry it. Place the bottom side on a damp surface. After 50-60 minutes, remove the excess layer with a knife. The picture is ready.
We tear out fragments from napkins or paper. Let the edges be uneven, “torn”. Napkins consist of 2 or 3 layers. Remove only the top layer for work. Attach the fragment to the place where you want to see the drawing.
Next, use a brush with decoupage glue to glue the fragment onto the frame. If you don’t have such glue, take PVA glue and dilute it with water 1:1. Now you can use it instead of decoupage glue. Coat the fragment from the center to the edge of the picture.
Help with your finger, smoothing out the folds of the napkin.
Then we glue all the fragments in the same way. Leave until completely dry. After all the corners have dried, we sand over the entire area of the frame, cleaning the edges and removing excess paper. Cover the top with one layer of varnish.
Let it dry and then start painting the edges. Take cherry acrylic paint or mix white acrylic with the desired color (watercolor, gouache).
As you can see, we paint the edges inside and outside the frame with a brush and cherry paint. Remove excess paint with a damp cloth. Let's put the work aside until the paint has completely dried.
Next, we must hide the “torn corners” of the drawing. To do this, take a brush and white acrylic paint. We paint around the picture with white acrylic - we finalize the background. After the paint has dried, varnish the surface several times with intermediate drying.
Next, you can do “aging”: take a toothbrush and gray acrylic paint and “spray” it with movements “on yourself”. That's all. Dry it and insert the photo.
On the video - decoupage of a photo frame in the shabby chic style:
https://www.youtube.com/watch?v=uEOj5S1dV_g
Decoupage photo frames with scrapbooking elements
What is the mixed media technique in decoration? It is not just one, but a mixture of several techniques in one work. And what is important is freedom of creativity. In these practical times, many people like to be creative. Self-expression is such a powerful source of inspiration and a good source of positive energy.
To work you will need:
- Canvas 20*30 cm (Canvas can be replaced with a candy box covered with fabric).
- Acrylic white paint.
- Glue Moment or glue gun with hot glue.
- Gold spray paint.
- Dark acrylic paint.
- Paper flowers, parts of hairpins, lace, threads, keys - in a word - elements of scrapbooking.
- Brush, sponge.
So, let's take a canvas for the painting. We lay out the composition on our box or canvas. We cut out paper roses from office or colored paper, you can even cut them out of cardboard egg packaging.
Glue with Moment glue or a glue gun what we have chosen for our composition; do not touch the photo yet. The main work consists of coloring the composition.
Tint the flowers if they are white. You can go over the top of the petals with nail polish or PVA glue and glitter. Next, you need to prime the photo frame.
In this master class they use not ordinary acrylic paint, but interior washable “Oreol”. But this paint is a little runny, pour the liquid solution on top and get a thick white consistency. Next, use a brush to paint everything thoroughly. We go over the canvas once, put it aside until the paint dries and go over it with a brush again with a second layer.
Leave the work overnight until completely dry. Then we take a can of gold paint and apply it to the volumetric parts of the work. If somewhere it turns out a little thick, take a damp sponge and blur it out, shade the details. Let it dry, then apply paint again.
We paste the photo onto cardboard, under the photo we will also have three-dimensional decorative details. We decorate the edges with a dry brush and white acrylic paint. If you are satisfied with the “golden” color, you can stop there; perhaps you are satisfied with such a rich gold decor. If you are not satisfied, go over it again with a dry brush with a minimum of white paint.
Next, take dark acrylic paint and paint over all the recesses and recesses in the work. Using this technique, we deepen the shadow, that is, we give the collage a volumetric effect.
Next, you need to paste the photo on top. Before doing this, touch up the photo (tint the corners and sides). In some places we apply craquelure varnish.
At the end, add a drop of rhinestones. The work is done. If you don't have craquelure varnish, there are many ways to make it from available products. Here's another way to do without craquelure varnish:
Apply a base (acrylic paint) to the surface and give it time to dry. Then apply a thick layer of PVA glue diluted 50/50 to the workpiece. After 5-10 minutes, apply acrylic of a contrasting color, also in a thick layer. Next, dry the surface with a hairdryer.
After this treatment, there will be a lot of cracks on the surface, which is exactly what we wanted.
Ideas for decoupage photo frames
Pictures for decoupage
Source: https://yutka.net/dekupazh-fotoramki
Legend
A number of simple elements that form the basis of knitting:
- Magic ring (VK) - a thread of yarn is wrapped in a ring, then the hook is inserted inside and picks up the yarn, forming a loop from which air loops are already knitted.
- The air loop (AC) is the initial loop. The very first chain is knitted from them, the basis of the future fabric.
- Single crochet (SC) - after casting on the first chain, insert the hook into the second chain loop, grab the yarn with it and pull it through so that two loops form on the hook, then they need to be knitted together.
- Double crochet (C1H) - the thread is draped over a hook, then it is inserted into an air loop or a magic ring, and the caught drink is pulled out. 3 loops are formed on the instrument. The first two loops are knitted together, 2 loops remain on the hook, they are knitted together.
- A double crochet stitch (C2H) is the same as a single crochet stitch, only the yarn is double crochet.
- Half double crochet (P1H) - the yarn is thrown onto the hook, then it is inserted into the third air loop and the picked up drink is pulled out. 3 loops are formed on the tool, which are knitted together.
- Connecting post (CC) - used to connect a chain. To do this, insert a tool into the first loop of the row, grab the thread and knit it through the loop on the hook.
- Adding loops (P) - knitting two single crochets into one loop. This is done on the finished ring; upon completion of the second circle, twelve loops should be formed.
- Decrease stitches (U) - two single crochets are knitted together.
This is not a complete list of notations, but the main elements are presented here. In simple schemes, these elements are basically the basis; in complex ones they still predominate.
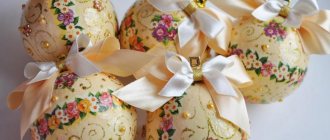
Decoupage photo frames - how to age them in shabby chic style
Elya Bakieva
Hello friends.
Do you know that in the endless sea of accessories, a photo frame plays a very important role? After all, it not only frames cherished memories, but is also an attractive decorative element. Decorate a lady's table in shabby chic style or add a touch of romance to the bedroom, or maybe the kids can make a bright frame with their own hands with funny images and figures?
Today, continuing to replenish my piggy bank with author’s master classes, I have prepared decoupage of photo frames for you. In it you will find a step-by-step description of the execution technique and perhaps create your photo frame in a style that is closer to you and your interior. Here we go.
Materials and tools
Here's what we'll need in our work:
- frame (preferably wooden)
- putty
- stencils
- primer Sonnet (black)
- acrylic lacquer
- white chalk paint (these are gypsum-based paints)
- PVA glue
- napkins for decoupage
- bitumen varnish
- brushes, sponges, cloths.
Frame Vintage baguette for still life with flowers.
For such a motif (I can’t find the author of the painting, but in style it’s clearly 18-19 century) something truly luxurious is required, right?
- As a basis, I took a plastic frame with a beautiful baroque relief (and it was originally white!!! Horror!!!) We primed the plastic with 1 layer of aerosol varnish.
- We cover it with gold paint in a certain number of layers, depending on the hiding power of our paint, you can first cover it with ocher, then fewer layers will be needed.
- After the gold has dried, we take bitumen varnish (for lovers of odorous products) or any patination agent, or even black-brown paint diluted with varnish . I don’t like scented products, but I really like bitumen varnish, so I’ll show you based on that.
We put on gloves (otherwise you will walk around with black nails for 3 days, and then make excuses that you were decoupaging a picture frame), apply bitumen varnish with a sponge to the entire surface , especially in all the depressions of the relief. With a sponge - because you can simply throw it away later.
4. Immediately wipe off all excess from the relief with a dry cloth, leaving the indentations patinated.
This aging happened on a flat surface:
5. We work especially carefully on small elements:
And erase here more carefully:
- Dry for 24 hours according to the instructions (if it is bitumen varnish or bitumen). The rest dries faster.
- We cover this dark matter with a non-aqueous varnish (according to the instructions, bitumen varnish is coated with shellac, but, as always, I prefer aerosol).
- Additionally, you can brush gold wax over the protruding parts of the relief for greater shine.
- Everything can be hung in a baroque interior (meh... we need to change the furniture... and wallpaper... and at the same time paint the ceiling with frescoes... oh!)
Comments
DECOUPAGE FOR BEGINNERS
all the secrets in video format
NEW ARTICLES
NEW MASTER CLASSES
theoryphoto MKfor beginnerspictures for decoupagevolume decorreverse decoupageputtysurface preparationharmony in workNew Yearmaterials for decoupageuseful tricksgallery of workscraquelurecolored haze (shading)
© 2013. Creative workshop “Cozy Home”
Decoupage on wood. Photo frame "Roses"
Decoupage (from the French “cutting”) is a decoration technique. Its essence is to cut out a paper design and paste it onto a surface. Depending on the type of surface, decoupage is divided into decoupage on glass, decoupage on fabric and decoupage on wood.
- If you want to decoupage a photo frame , update a cutting board for the kitchen, or give a second life to old furniture, then decoupage on wood is intended for this.
- Let's look at the technique of decoupage on wood using the example of decoupage of a wooden photo frame .
- You will need:
- wooden blank - frame,
- acrylic paints (dark green, yellow, red, black),
- PVA glue,
- rag,
- paper towels,
- fine-grained sandpaper (2-3 sheets of F-4 format),
- brushes - synthetic (flat - No. 8, fan - No. 12),
- acrylic lacquer,
- napkin for decoration,
- household sponge – 1 pc.
So let's get started...
Using fine sandpaper, sand the entire surface of the frame, including the side surface.
Let's start staining. We moisten the surface of the frame with water and immediately sand it with sandpaper. When exposed to water, the wood fibers rise, allowing them to be removed with sandpaper. This process is long, but the result is worth it.
Apply a liquid solution of acrylic paint (dark green + a drop of black) to the wet wood. We blot with a paper towel and sand it over the wet surface.
Using the same principle - water - liquid paint - napkin - sandpaper - apply a red tint.
Apply a light green tint to highlight areas and to transition from dark green to other shades. We work according to a familiar scheme.
Apply a yellow tint to a well-sanded surface by mixing yellow and lemon yellow. On the side surface of the frame we carry out the same procedures in parallel with the outer part. Sanding inside is, of course, not very convenient, but you have to try. The results are beautiful stains and interweavings of colors, up to a light pink tint.
When the shade transitions are ready, cover the surface of the frame with acrylic varnish. And again we sand the uneven surfaces on a dry surface.
The next step is to apply the design to the frame. We take a napkin, tear out the motifs of the drawing, in my version there are roses. I would like to note that it is necessary to tear out the motifs, since when gluing the pattern to the surface of the product, a smooth transition is obtained and the pattern merges with the background.
We create a composition of roses, remove two layers of napkins and glue the motifs onto the surface of the frame using a PVA solution (PVA glue + water, 1:1). You need to start gluing the design from the middle and slowly, slowly smooth it out with a fan (preferably synthetic) brush.
Carefully remove air bubbles and excess glue with a clean napkin. When the drawing dries (you can speed up this process by using a hair dryer), coat the frame with acrylic varnish.
- Now, after much effort, several kilograms of sanded sawdust and damaged sandpaper, the wooden photo frame using the decoupage technique is ready!
Something like that! Good luck to you!
Source: https://samayamk.ru/dekoupage/dekupazh-po-derevu-fotoramka-rozy.html
Crocheting napkins for beginners - choosing yarn
It is best for beginners to use thicker (but not very thick) threads so as not to get tangled in them. For example, acrylic or cotton is a skein, 50 grams of which are approximately 240 meters.
We select the hook according to the thickness of the thread. This is done by trial method: if you take a very thin hook, then knitting with thick yarn will be difficult, almost impossible. A crochet hook with a very large number will result in a napkin that is too full of holes.
For knitting a thick napkin, a hook with number 2 - 2.5 is suitable. But, again, I repeat, do not strictly follow what is written. Try it, choose the option that you think is more convenient.
It’s better to choose the simplest knitting patterns to start with.
Small napkins can be used as a stand for glasses and cups. White or multi-colored napkins will look good on the table.
Well, in the future, for knitting openwork napkins, it is better to use thin cotton bobbin threads, such as those used for sewing (No. 0-10). The product will be soft and airy.
In this case, the hook should also be taken with the smallest number 0.5 or 1.
You can also knit napkins from thicker cotton yarn such as Iris, Rose and others; the hook number is 1.2-1.5.
So, how to crochet a napkin?
Original decoupage of photo frames: 6 steps
You can make an original photo frame with your own hands using the decoupage technique. Photo frames are an accessory that decorates good memories, the image of people close to our hearts, and does not allow us to forget about the bright moments of life. Increasingly, frames of unusual shapes are used in the interior. You can also find entire sets of frames for creating a collage. But the most original are photo frames made by yourself. To do this you need to master different techniques. To create photo frames, the decoupage technique is suitable. Today it is the most popular and in demand among needlework.
What is good about decoupage frames?
Before you start decorating the frame, you need to carefully study what the decoupage technique is. Translated from French, the name decoupage itself means cutting. Consequently, the decoupage technique involves cutting out various images that can be used to decorate any surface of objects.
Screening.
My idea is to create slightly worn patterns with black paint showing through the wear and with delicate rose flowers in the corner. Let's see what happens, but for now we apply putty through a stencil. I use Parade acrylic finishing putty (it is very finely grained and sands well), and if you don’t have one, you can replace it with putty from any other company or use an artistic texture paste.
I apply putty to one side and let it dry slightly so as not to spoil it when I apply it to the other side of the frame.
My stencil has an adhesive backing and is very convenient to work with. If everything is ready, let the patterns dry well for an hour or more. After drying, lightly sandpaper to remove small particles that are not attached to the surface. Of course, they will all come off later anyway, but it is better to do this before painting with primer.
Decoupage frames: creative ideas for beginners (20 photos)
Decoupage is an original way to decorate products with your own hands using paper images. Using simple techniques, you can easily turn an ordinary photo frame into a work of art.
Components for work: studying basic materials
To decorate a frame using the decoupage technique, different types of paper material are used:
- ordinary napkins with a beautiful pattern;
- special decoupage napkins;
- rice paper with a picture;
- fragments of newspapers, glossy magazines.
When choosing an object for decoupage, do not be afraid to experiment; take a structure made of wood, polymers, glass, with a ceramic coating or fabric upholstery. It is also possible to decorate metal photo frames, models made of stone, papier-mâché or leather.
To decorate a photo frame with your own hands in decoupage style, depending on the material of the object being decorated and the application technology, you will also need the following components:
- paint and varnish compositions;
- primer, putty, glue;
- brushes, scissors, rubber roller;
- fine-grained sandpaper.
For comfortable work, you should find sponges or absorbent wipes.
Varieties of decoupage: studying the features of technology
The traditional method of DIY decoration has acquired new versions over time; today there are several technologies.
Direct decoupage - a classic technique - involves gluing pieces of paper onto a surface, followed by applying a fixing layer of varnish.
Frame Faux abrasions plus dry brush aging.
Here I have chosen a marine motif, there are “antique nautical things” on the chest of drawers, so the frame should match the motif. Our motif determines the style of the frame , so decoupage of a painting always takes less time than decorating the frame for this painting. So, here is the picture itself (there was no frame yet):
There were two options - abrasions on a candle or “on a wash”, but I chose abrasions on a wash, because in our motif the abrasions are more reminiscent of “o ))))))
Let's try to repeat this aging on the frame.
- We paint the frame brown (you can prime it, you don’t have to prime it, that’s fine). Not even brown, but as brown-earthy as in the motif. Let it dry and you can varnish it (I didn’t cover it).
- Mix blue, as in the motif (keep in mind that acrylic darkens slightly when it dries), paint one side with one layer.
After a few minutes, when the paint has dried, we begin to wash with a slightly damp cloth in those places where there should be abrasions . If you erased more than necessary, no big deal, you can re-touch it. If you have not yet watched the video on the box with abrasions on the launder, watch it here.
It turns out something like this:
- When all sides are ready, we take artistic bristles with white paint and, using the dry brush technique, we go over the entire surface, whitening it quite strongly .
Working with a dry brush is as follows:
- Take a small amount of paint on the brush;
- Wipe off almost all the paint on a napkin so that the brush is almost dry;
- We sweep over the surface - and the remaining paint clings to surface unevenness or simply leaves intermittent stripes, as if dusting the surface. We always work from the edge of the workpiece, without leaving clear brush marks.
Here on the frame I poked it further with a brush, leaving white spots. It turned out very picturesque