Photo: mokrausova-ds11.obrpro.ru Autumn comes and brings with it an invaluable treasure trove of materials for amateur activities. Yellow leaves, acorns, dried herbs with flowers - all this allows you to bring new and new ideas to life. This is especially true for kids. So, here are 8 ideas for beautiful autumn crafts for kindergarten with your own hands!
Topiary of cones or chestnuts
To make a charming tree, you will need a pot, a foam block filler and the pine cones themselves. Make the base of the tree with plasticine or take a small ball and glue the pine cones with glue. For decoration you can use scraps of fabric, ribbons, buttons - anything!
Photo: fishki.net
How to dry leaves for crafts
Crafts from autumn leaves cannot be made from raw material. The leaves need to be dried in stages or skeletonized at home. Each type of preparation has its own secrets.
It will take several days to dry the leaves naturally, do it like this:
- Place the foliage in a wicker basket or cardboard box.
- Place the container with the material in a well-ventilated room, on the window. The main thing is that the humidity in the room is minimal.
- Wait 3-4 days and start creating.
After drying in a basket, in rows, the leaves will not be perfectly even. Use them for crafts where this criterion can be ignored.
To get smooth, flat elements, dry the natural material using paper:
- Place the leaves in a book. It should be a heavy, thick volume so that the page presses on the natural material with its mass. The leaves will dry for 10-14 days.
- A quick option is drying using a special herbarium press. Natural material must be covered with paper and placed under a press. It will be ready in 3-4 days.
Another drying technique is skeletonization. The result is an even, smooth and transparent material that can be painted in the desired colors.
There are several options for preparing leaf skeletons, the easiest one looks like this:
- Collect fresh leaves, clean them of sand and dirt.
- Mix baking soda and water in a 1:4 ratio in a metal pan. Dip the leaves into the mixture.
- Place the pan on the fire and boil for 30 minutes.
- Remove the leaves and place them on the gauze, shiny side up. Blot excess water with a paper napkin; do not rub.
- Using a soft toothbrush, gently brush off the top layer from each sheet. Only the transparent base should remain.
- Rinse the cleaned skeletons with cold water and paint with gouache or acrylic in the desired shade.
On a note! If you dry the leaves for painting with an iron, they will become colorless or take on a dirty hue. Such material will quickly break and crumble. As a result, the craft will turn out ugly
The skeletonized material looks bright and elegant. Such leaves can be used for appliqués, voluminous crafts or bouquets.
Chestnut figurines
Animals and fairy-tale characters made from chestnuts will be no worse than those made from cones! And sometimes it’s even better, because the shape of the chestnut is more neutral. For connections, arms and legs, toothpicks and matches are suitable.
Photo: pinterest.at
Paper crafts for children: 8 simple and beautiful ideas
Herbarium
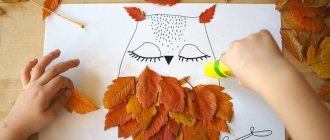
Dry autumn leaves of all colors and shades are a godsend for applications. And this is real creativity that develops imagination and fantasy. No two leaf crafts are the same!
Photo: fishki.net
What to give a 5 year old boy: ideas for the best gifts
Creativity with children
Prepare a craft with your child for kindergarten or school. First, think and imagine what your future painting will be like. You should not use intricate plots or complex drawings in creative work with children. Give your child the opportunity to express himself, his imagination and make a picture with his own hands.
To begin, draw a picture of the painting onto the cardboard, try to draw it as inconspicuously as possible so that the outline of the pencil is not visible in your work.
Prepare different types of cereals and pour them into different bowls.
Start creating the painting. To get started, you need to use a brush to paint over the area that you want to fill with cereal. Now carefully sprinkle it with cereal; if the cereal is large (peas or lentils), then you need to spread it grain by grain with tweezers.
Don't limit your imagination, improvise with different cereals, pasta or coffee.
After completing the painting, let it dry thoroughly and then spray coat it with varnish. Place the resulting picture in a frame and hang it on the wall.
Houses and cities
If all the figures and materials have already been mastered, you can assemble a whole house or a small city from several. Plasticine, small kinder toys, twigs, sticks, pebbles and the like will come in handy.
Photo: culture.ru
10 ideas on how to make a lapbook with your own hands
Materials for creative work
Today it is customary to create homemade hats from paper, cardboard or fabric, depending on the skills and experience of the master.
To work, you will need to prepare a workplace, including a table, lighting and the following set of materials:
- Thick cardboard and colored paper. For individual performances or creative exhibitions, you can use illustrated paper and foil.
- If you plan to work on sewing doll clothes, it is better to prepare fabrics (felt, guipure, satin) in advance.
- To decorate finished crafts, you can use satin ribbons, a veil or any mesh fabric, bows or flowers made of corrugated paper.
- Hats for boys can be decorated with paper fringe, ribbon or border (for example, a pirate model); brooches, cockades, and other insignia can be placed on the cap.
- For most types of work, you need scissors or a sharp stationery knife, glue, thread and a needle.
- For textile crafts, it is better to prepare patterns or templates according to which the main parts will be cut out.
For inexperienced craftsmen, it is better to familiarize yourself with video lessons on preparing parts, as well as the final assembly of the craft. Detailed instructions for making fashion accessories or decorative elements will come in handy.
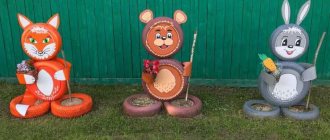
Autumn crafts for kindergarten - photos and ideas
This is just a small part of the interesting crafts for children that are suitable for kindergarten. Get more ideas!
Photo: culture.ru
Photo: podelunchik.ru
Photo: c-deco.ru
Photo: joy-nt.rf
Photo: vplate.ru
Photo: iwoman.bg
Photo: vplate.ru
Photo: tytpodelki.ru
Photo: pinterest.se
Photo: pinterest.com
Photo: culture.ru
Photo: fishki.net
Photo: paper-land.ru
Photo: kalinovkasch.minobr63.ru Photo: megamaster.info
Photo: vidtube.ru
Photo: tr.theanswerexperts.com
Photo: dop.pskovedu.ru
Photo: vapezen.ru
Photo: detkisovet.ru
Photo: vsesvoimirykami.ru
Photo: list-vk.com
Photo: sadpodelok.ru
Photo: kids289.ru
Photo: pinterest.ru
Did you like the post? Subscribe to our channel in Yandex.Zen, it really helps us in our development!
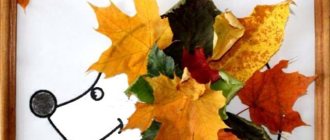
Another Hedgehog
For older children, we offer a more complicated version of the Hedgehog as an autumn craft for school. Prepare:
- polystyrene foam or newspaper ball;
- half beads;
- felt;
- broom;
- foil;
- small acorns, chestnuts, dried flowers, dried berries, leaves.
Cut out a hemisphere of the required diameter from polystyrene foam. Trace the blank on paper and draw a suitable-sized muzzle blank in the form of a triangle 6 cm high. That part of the hemisphere on which we will attach the muzzle must be cut off.
Using the blank, we form a muzzle from foil. It should look like a cone. We connect the body and head of the future hedgehog with glue. To make the structure strong, we fix it on a base made of brown felt, and the felt should protrude by 1.5 cm. Then we glue the protruding base to the hedgehog on all sides.
Cut the broom rods 2 cm long and paste them over the face of the craft in rows. Let's start forming the body: we cover the entire hemisphere with natural material, and close the gaps with leaves and dried flowers. The tip of the hedgehog's nose can be made in the form of an acorn cap, and in place of the eye we glue half beads.