Types of crafts
We have arranged the techniques in order from simple to complex, so that you and your child can increase their level of applied skill:
- Simple applications
- Applications with three-dimensional details
- Simple volumetric figures
- Quilling
- Origami
- Cardboard figures in 3D
- Papier mache.
Applications from up to 3 years
The application is done quickly, children will not have time to get tired or lose interest.
Pet crafts will work well with small children. Children know the main representatives from books and toys: a cat, a dog, piglets, a cockerel, hens and chicks, a cow, a horse.
Draw or copy, if you don't know how to draw, an image from any children's book. Choose the most schematic design.
Break the picture down into simple geometric shapes. The body is an oval or a rounded square, the head and eyes are a circle, the paws and tail are rectangles and ovals of varying degrees of elongation, the ears are triangles or semicircles.
Transfer to colored paper and cut out.
Based on the sample picture, together with the baby, assemble a “constructor” from parts from large to small. Add easily recognizable features to your pet: for a rooster - a red beard and a motley tail, for a pig - a snout and a ring tail (twist a thin strip of paper with scissors), for a cow - brown spots.
Note!
- DIY paper machine craft: various options for creating a machine
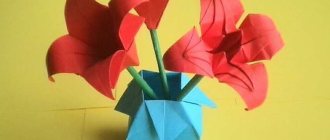
- How to make paper flowers with your own hands for children - a master class on making
- How to make Minecraft figures and blocks from paper: step-by-step instructions
Believe me, children will forgive you for being sketchy and simple, but they will be delighted that they made the animals with their own hands.
Invite the children to make a paper mosaic. Draw a pet on cardboard. Now you need to cover its parts with the correct matching colors.
Tear small pieces of multi-colored paper (10x10 mm). Apply PVA to the base, sprinkle the resulting confetti and let dry. The picture is ready! Kids love magic tricks.
These are simple paper animal crafts for 2 year olds. For older children, we advise you to complicate the task and expand your arsenal of creative techniques.
Complexity is the main principle of making animal crafts
Animal crafts look best if they are equipped with additional attributes or placed in their natural habitat.
- A kangaroo can be placed under a palm tree, a bird in a nest, a bear in a den.
- Depict a beaver with a gnawed log, a rabbit with a carrot.
- Craft pets will include a yard with a stable, fence, horses, pigs, chickens.
- Crafts wild animals - a scene from forest life or part of the jungle. This includes both wolves and foxes, and monkeys and crocodiles.
Complex crafts based on fairy tales are successful. It’s good to play up the gathering of all the residents of Teremok or Koshkina House, to attract all the characters from “The Fairy Tales of Uncle Remus” or the cartoon “The Lion King”, etc. The frog will be placed on a water lily leaf, next to a water lily flower. If you give her an arrow, you get an analogy with the Frog Princess.
Rare animals are interesting - dinosaurs, mammoths, Amur tiger, marsupial wolf. Little is known about them, and only a real hand-made genius can make them.
Applications with volumetric details from 2 to 3 years
Adding three-dimensional details to a flat picture
Note!
What can be made from a box at home for kindergarten: the best craft ideas + video master class
- How to make flowers from napkins quickly and easily: 15 ways to create bouquets of roses, carnations, peonies
- How to make flowers from corrugated paper with your own hands: step-by-step instructions for creating voluminous bouquets
- Glue circles of ever smaller diameter on top of each other. Use thick double-sided tape, then the volume will be even more noticeable. In this design, plump bellies, shells of turtles and snails, fluffy thick tails of squirrels or foxes look impressive.
- Volumetric details from scrap materials: you can depict wool from crumpled wrapping paper or knitting threads, eyes from buttons, imitate feathers, thorns or wool with plastic tubes.
Applications on a volumetric base
On the finished base: a roll of toilet paper or kitchen towels. The scheme of work is the same as with a flat applique, only use a bushing as the body and attach the elements of the “constructor” to it. Pre-wrap the sleeve itself with colored paper or cover it with paint.
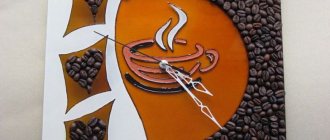
IDEA: Use paper coffee cups. They are often sealed with bright colors and designs. You can make funny little bellied animals from cups with your own hands - just stick a few paper parts (paws, wings, tail or ears) on the sides and draw eyes. Ideas for execution: penguin, owl, frog, elephant.
Glue the base yourself. A squat cone made of yellow or brown cardboard is a great base for a chicken craft, and a narrow, tall cone is a great base for a funny giraffe. Simply cut out a head from cardboard, draw eyes with markers and attach to the top of the cone.
Funny hedgehog made from yarn
Necessary materials:
- thick paper for the base;
- some yarn for needles;
- a picture of an apple or a mushroom;
- glue and scissors.
Cut out the base of the product to the desired size from cardboard or thick paper. It resembles a large drop, where the “tail” is slightly turned to the side. Cut out the body according to the diagram.
To work, you will need some dark gray, brown or black yarn. You can take a bright shade of thread or contrasting colors, then the hedgehog will be even happier.
Cut the threads to the same length, 2-5 cm, based on the size of the hedgehog itself.
Start gluing the “needles” from the outer circle, as in the picture. The 2nd semicircle (leaving the muzzle empty) with glue a little closer to the center. The rows should fit tightly to each other. Make sure that the hedgehog has thick spines and is not bald.
Glue on a black nose, maybe rosy cheeks, a small eye.
- What types of arcade games are there?
- About educational toys for babies
- T-shirts with Native American prints
We glue the apple (fungus) onto the needles for resemblance. The hedgehog is ready!
Below are diagrams of crafts for various animals to choose from.
Pets in kindergarten
As a theme of creativity, they are also popular. If you make crafts with your child before kindergarten, his crafting skills will come in handy.
Accordion base
Instead of a body there is a strip of thick paper folded into a small accordion. Glue flat, stable legs on the bottom, and a head with characteristic details on top to identify the animal.
This way you can make jumping animals: a bunny, a frog, a mischievous monkey with a long tail. Kids will not only be interested in making animal figures with their own hands, but also play with them.
Meaningful sources of animal crafts
Do-it-yourself animal crafts can carry a symbolic meaning or become original thanks to the idea that imbued it.
The Chinese calendar, with its 12-year cycle, provides a constant source of creative inspiration. Sheep, monkey, snake, bull, dog and others - each year a certain animal is the patron saint. It can be made the source of the craft, its fundamental basis.
Animals are part of the Zodiac cycle. Leo, Pisces, Aries, Capricorn can be depicted in crafts.
- Every person has a favorite animal, a kind of totem.
- Some people prefer dogs, some prefer cats.
- Some people collect turtles, others are delighted with fish.
- Many admire the noble stature of horses, the silent dignity of a lion, and the weightless lightness of butterflies.
- Feelings for living beings are also projected onto objects that replicate their appearance.
For children, the main reference points are images from cartoons and from the pages of books, mainly from illustrations. Stuffed Animal Meow, Shrek, Lion Cub and Turtle, Alex the Lion and his friends from Madagascar, the kitten from Lizyukov Street, Winnie the Pooh and Piglet - just a small list of possible images.
Invented images - a unicorn, a dragon, a centaur, a griffin or a Phoenix bird - are no less amazing than real ones.
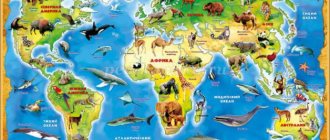
Personal impressions from trips to the zoo or aquarium, walks in a park or forest, trips to other countries help the child enrich his understanding of the world and the richness of the earth's fauna.
Finger Theater
Glue together 5 small multi-colored truncated cones from cardboard the size of an adult finger. On each one you need to stick the head of an animal (even a primitively depicted one, most importantly, recognizable).
With such simple props, you can perform a home performance with your child, for example, “Teremok”, “Who Says What?” or “My favorite animal.”
Crafts for kindergarten
We put it out as a separate item for your convenience. In the garden they love nature themes such as “Golden Autumn” or “Spring has come!”, so forest animals that you have made before at home or in additional classes will be useful for you and your child.
IDEA! Advice for busy parents: assemble the finished figures into a composition on a thick sheet of paper, add seasonal attributes (yellow leaves, pine cones, flowers, twigs, cotton wool snow, etc.) and the standard masterpiece for the garden is ready.
Instructions
If parents don’t know where to start and how to do everything correctly, then to solve this issue they just need to go to the global Internet.
There you can find a huge number of animal crafts diagrams that show in detail and clearly how to make this or that animal.
Based on the information received, the creative process of parents and child will now proceed easily and quickly, which is extremely important in the context of joint efforts.
Quilling
The technology refers to a variety of applications, but of increased complexity. The work is small and painstaking, so it is suitable for preschoolers and primary schoolchildren.
The essence of quilling: you need to cover a graphic image of an animal on a base sheet with “curls” of thin ribbons. Quilling paper is sold in office supply stores.
The method is interesting because it very successfully imitates the texture of wool or feathers, if you take on animal crafts.
Napkin applications
This application is very useful for children, as it strengthens fine motor skills. The napkins are first torn into small pieces by hand, and then balls are rolled out of these pieces. The balls are glued to the base of the animal image. Today, napkins are available in a variety of colors and designs. Therefore, children's animal applications can turn out to be very interesting and colorful.
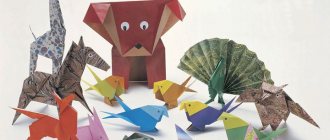
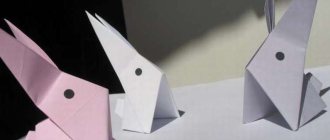
Origami
How to make paper animals with your own hands without glue or tape?
Origami is a technique of folding shapes. The complexity ranges from the primitive “frog” to infinity. Even an older child will need help if he decides to master origami.
The main thing is to stock up on double-sided colored paper and patience. Step-by-step origami instructions can be found in special manuals.
Origami is an oriental technique that often features wild animals and mythical creatures: crocodile, lion, tiger, cobra, dragon.
Origami animals for older adults
Older children can try making animals using the origami technique with more steps. Large voluminous origami animals also look very beautiful.
Beginning adult craftsmen and older children can make any animal and use a more complex method of work, as well as various decorative elements.
a lion
The kings of beasts are one of the most beloved animals of both adults and children. There is one interesting way how you can make it in the form of origami, you just need to prepare:
- orange or brown paper;
- ruler;
- pencil;
- scissors.
Creating origami from paper for beginners step by step animal lion:
- Draw a square with sides 24 cm and cut it out.
- Fold the square diagonally to form a triangle, mark the fold line and straighten it.
- Fold the bottom part along the center line.
- Repeat the previous step with the top part.
- Fold a small corner on the left side.
- Repeat the previous step with the upper part.
- Turn the workpiece over, step back 2 cm from the top and bend the corner.
- Repeat the previous step on the opposite side.
- Turn the workpiece over and fold it in half along the line.
- Fold the top corner, then fold it inward.
- Point the top corner down.
- From the lower right side, turn the corner so that the back of the lion comes out.
- To get the paw, you need to fold the lower sharp corner down.
- Turn the corner again, but forward.
- Draw eyes, nose, mouth, mustache.
Squirrel
To create a furry animal you need to prepare a square of brown or orange paper.
Detailed master class on creating a squirrel:
- Fold the square diagonally, then unfold and fold in half.
- Fold two sides towards the center to form a square.
- Expand the work.
- Bend all corners.
- Turn the triangles out so that “pockets” are formed.
- Turn the product over, pointing the corners of the triangle towards the middle.
- Fold the product in half.
- Along the contour of the large triangle, bend the workpiece to one side and then to the other.
- Return to original form.
- Turn the triangle inside out and fold in the resulting corners.
- Direct the sharp corner to the wrong side.
- Hide the sharp corner on the muzzle inside, straighten the triangles on the sides to form paws.
- Complete the necessary elements.
Modular origami compositions
A module is one assembly unit of a composition. From different sheets you fold triangles and connect them, getting a head, torso, limbs, etc. It is clear that crafts are becoming much more complex and realistic.
What animals can be made from paper in the style of modular origami is up to you. Even a huge dragon, where each scale is a separate module. Preparing modules is a boring routine, so not many people are ready to work on complex figures, especially children.
DIY cardboard paper animals
With children who have mastered independent drawing, try making three-dimensional figures from corrugated cardboard.
Let's look at the example of a cat. To begin, roughly depict the animal in several projections: from the side, front and back. You will get several flat parts: a head (front view), a torso with a neck (attach the head, side view), two pairs of paws (front view), a tail (rear view).
We cut out the parts separately, in each we make grooves with which they will be attached to adjacent elements at right angles. The main thing is the stability of the structure. Such DIY cardboard animals1 develop engineering thinking in a child and will greatly simplify drawing lessons in the future.
Of course, there is an option not to rack your brains with spatial imagination and buy ready-made patterns.
Papier mache
Formally, these are not paper crafts, but rather a sculptural form. Papier-mâché is a method of creating sculptures from paper pulp, and the working material is torn pieces of newspaper. To depict a papier-mâché animal, you need to mold it from plasticine and cover it with newspaper scraps in several layers.
After drying, cut the figure, take out the plasticine, connect the halves and paint. If at a school competition you present a papier-mâché product among the usual appliqués and origami, this will at least ensure you the attention of the public.We hope that the article was useful and we convinced you that paper animal crafts are exciting and entertaining. Create your own and teach children freedom of expression!
Beads
If you want to move away from the banal options with paper, then a person should pay attention to such a material as beads. Animal crafts made from beads look very attractive and unusual, which allows you to put them on public display.
If these are small beaded products, then it is recommended to follow the instructions for making such a product. Now models that depict crocodiles, cats, dogs, butterflies, etc. are gaining popularity.
- Fire Safety Crafts
- DIY crafts for kindergarten - creative fun and creation of interesting applications
- New Year's crafts for kindergarten: the most interesting ideas for 2019/2020 and master classes with diagrams
After a person learns how to make small bead models well, over time he will be able to make more voluminous and larger animals.
Beaded animals are woven using flexible wire, which is folded into horizontal circles with beads strung on it.
Thanks to the use of this technique, a home toy can acquire the desired size. For example, an owlet made of beads turns out to be quite large if it is made from three-dimensional weaving.
And there are a lot of such examples, so there will be plenty to choose from.
Paper crafts animals: photo ideas for crafts with children
Please repost
1+