Childhood is a carefree time for a variety of games: in the fresh air, at home, and anywhere. Children's imagination and developed imagination can turn a boring shop in the queue of a clinic into a ship that goes to the shores of Africa. Or a temporarily placed stepladder instantly acquires a blanket cape and turns into a wigwam! Mom put up the stairs, hung the curtains, walked away for a minute - and then the Indians of the Forest Brook tribe seized the territory! So that.
Modern toy manufacturers offer parents and their fidgets a variety of options for tent houses. There are fairies , heroes, cartoon characters, and a paramilitary version - everything your heart desires. And the child asks for a hut, like in the summer when we went to the river. And the tent is no good for him. What to do? Take on drawings, patterns, call your dad or grandfather to drill holes in the frame sticks , look for an old sheet and instructions on how to make a hut with your own hands - in a word, fulfill a childhood dream and plunge into all this magic yourself!
Materials and tools for making a wigwam
The choice of materials primarily depends on where the hut or wigwam will live.
If you are making a wigwam for children, the choice in any case will be more natural materials: cotton, burlap, etc. If the child will play exclusively at home, then you can use an old sheet or similar fabric that is suitable in size and color. For playing outdoors, in the courtyard of a house, in a country house, etc., it is better to take a denser fabric that will not be blown by the winds and will not get wet from the first drops of rain. Of course, you shouldn’t take tarpaulin, but it’s worth taking a closer look at fabric like cloth!
You will definitely need foam rubber or sheet synthetic padding for the floor. If the games involve children of not the most conscious age who are just getting used to the potty, it is better to sew oilcloth into the top layer of the floor to protect it from unpleasant surprises. For a street hut, such a layer will in any case be insufficient, unless the structure is installed on a plank floor. If the hut will stand on the ground, you will definitely need to sew pillows into it.
In addition to fabric and other sewing accessories, you will definitely need material for the frame; these can be wooden sticks of the required thickness or plastic pipes of a suitable diameter. The latter option is preferable, since the stick can still break under the pressure of children's games, and the plastic pipe is more likely to bend.
The frame and fabric are the main materials for a wigwam, but in addition to this, you will also need a strong rope that will hold the “top” of the frame together.
Step-by-step instructions vary depending on the type of wigwam you choose. First, the frame is made, then the pre-prepared parts are attached, after which you can start decorating. Only then should you move on to decorating the windows, sewing on ruffles, lace and other elements.
Winter plague in the yard
Outdoor games should be played not only in the warm season, but also in winter. On the eve of the New Year, many schools, kindergartens and children's yard clubs hold a competition for the best snow figure. However, few people undertake the construction of tents. Of course, for this to be a full-fledged winter home, you must at least have the roots of the small peoples of the north. But in order to build a winter temporary shelter, little is enough. You will need:
- Thick poles - from 6 to 12 pieces, depending on the desired strength of the tent, the optimal number of poles is 9 pieces;
- Thick rope, hammer;
- Textile;
- Snow and water.
It is desirable that the layer of snow on the ground should already be significant, and the frame poles could be stuck into it.
It is necessary to put all the poles together and wrap the top with rope. Distribute the poles over the optimal radius. Insert the poles into the snow, helping yourself with a hammer if necessary. Secure the ends of the poles with rope. Drape the fabric over the frame. If necessary, make slits in it and tie it to the frame with ribbons.
Start covering it with snow from the bottom up, first forming a snowdrift. After this, add density to the snow layer by sprinkling a little water on it and adding snow again. Increase the snow layer inside the chum. Ready!
#s3gt_translate_tooltip_mini { display: none !important; }
All children love nooks and crannies. Only in solitude can you give free rein to your imagination and go on an exciting journey through imaginary worlds. That is why children often build homemade houses from pillows, blankets and other improvised materials. But if you want your child to feel like a brave traveler or the hero of his favorite fairy tale, give him a hut. Moreover, making a hut for children with your own hands is quite easy, but the child will be able to fill his leisure time with exciting games. Today “Dream House” will share with its readers ideas for building children’s huts that can be installed both in the children’s room and outside.
Making a wigwam frame
You should start with sticks: they are either wrapped in a tight knot or holes are drilled and a rope is inserted there. The second option is more reliable, but not everyone has the opportunity to use additional tools.
The slats are placed at approximately the same distance from each other.
It is recommended to prepare fabric patterns in advance. The edges must be processed so that there are no threads sticking out. They can be attached to strings, sewn, glued, tied to each other - whatever your imagination allows.
DIY New Year's cardboard house! Very simple!
You can exhale, a new project to create a New Year's house is ready! This house will be easier to create than my previous project to create a New Year's house.
A day and a half of work on the New Year's house is completed. Remember when I said that this preparation for the new year would be the most ambitious for me? So, it continues :).
I photographed templates for walls with windows, as well as roofs with a chimney especially for you. I selected the size of the blanks myself so that it would look symmetrical and beautiful!
When I published an article and video on creating a New Year's house from fiberboard, they often wrote to me in the comments that it was very difficult, it could be made much easier from cardboard or even ceiling tiles, and then I decided to try to make a house from ordinary cardboard so that we could do it together see what comes of it.
When creating a house from cardboard, there are pros and cons, the pros include that the cardboard can be cut with an ordinary stationery knife, and the cons are that the structure is not so rigid and strong.
Using hot glue and beads, I made an imitation of snow on the windows and roof, it looks quite realistic
I covered the walls (cardboard) as before with ordinary wall putty, bought at a hardware store, which cost quite a bit, about 50 rubles, after it dried, I smoothed out the unevenness with sandpaper
I placed a small battery-powered New Year's garland in the house itself; it is not at all expensive, less than 100 rubles.
A detailed master class on how to make such a house from ordinary materials, as you already understood from the article, can be seen in the video:
Wigwam pattern
Depending on the shape, wigwam patterns for children may vary. The design can have 5, 6, 9 shelves, but the simplest and most understandable option for implementation will be a square frame option.
To use the material efficiently, you need to correctly position the pattern pieces on the fabric. To do this, you first need to display the “walls” of the wigwam on paper.
This pattern will make 4 pieces. The side elements should be sewn to the middle, this will form the entrance to the house. The pattern implies the presence of a window and a pocket for toys and other small items. The third party will be deaf.
The next step will be making a pattern for the cover. You should start from the front side, where the entrance will be located. Then the remaining elements are gradually sewn together and supplemented with special pockets for sticks.
Product dimensions may vary. The main thing is to maintain proportions and not go beyond a single idea.
Once the pattern for the cover has been drawn, it should be carefully cut out and applied to the fabric. Due to the fact that the cover has a rounded shape, it should be cut out carefully so that in the end the workpiece fits perfectly into the wooden structure.
How to make a wigwam pattern yourself is shown in this video:
Rigid wigwam
If we are installing a hut-tent in a house, then we need to prepare supports, tree branches will do (an excellent alternative is bamboo twigs). If you decide to do all the work yourself, then first of all determine the height of the structure. This value depends on the height and age of the child, so that he feels comfortable in the house and has enough space. You will need at least four sticks to make the structure stable.
Stages of making a hut for a child:
- First, we install the supports so that they do not press against each other. Between them the slope is about 25 degrees. You will get sticks folded in the shape of a flower.
- Tie the support sticks using ropes, passing it several times between the branches.
- To add rigidity to the structure, attach additional horizontal branches along the lower and middle perimeters of the future house.
- If you are planning a large, tall structure, use more solid wooden blocks for supports. For fastening, use a rope, having previously drilled holes in the wooden supports
- We determine what coating to use to make the house. If you decide to do the entire construction yourself, then you need to cover the structure with pieces of fabric or sew a special cover.
- If you decide to make a version with a cover, you need to cut it out, decorate it and sew it together. The entire cover consists of several pieces of triangular-shaped fabric. To calculate them, we measure the openings between the sticks, add a few centimeters to the seam and sew the cover.
- We decorate the finished structure with elements corresponding to the chosen style of the hut. For greater safety, use natural fabric.
Option 1. How to sew a stable wigwam for children
Required tools and materials
To create a wigwam for children with your own hands, you will need the following materials:
- 4 slats to create a frame base and a few more for an additional frame below;
- dense fabric (not synthetic);
- rope or rope;
- threads
The main tools you need are:
- scissors;
- sewing machine and all accessories;
- tape measure or sewing tape measure.
Instructions
- Measure the sides of the triangle walls.
- Cut four pieces of fabric to these dimensions, adding 7 cm on each side.
- Sew them together, leaving one side unstitched - this will be a swing door. In total you will get 3 seams with large allowances - 6-7 cm on each side
- Sew the allowances along the edge so that you get a drawstring into which the stick will be inserted.
- Trim the top edge by 10-15 centimeters - this will be the hole “under the ceiling” of the tent. Finish the edge - overcast or hem.
- Stretch the tent from below onto the poles. Glue it to the wood at the top.
- The entrance to the wigwam is covered with two sheets, which can be folded over the racks or closed, closing the entrance.
- A small improvement significantly strengthens the structure: just on the entrance side, connect two posts at the bottom with tape (you will need glue). It should be attached to the sticks as close to the floor as possible so that the child does not stumble. What does this give? The racks will not be able to move in different directions.
How to make a wigwam: useful tips
The finished structure is quite expensive, so not every parent will decide to purchase such a house for their child. However, you can make a wigwam yourself. The product will turn out no worse than store-bought, perhaps even better.
Before you start making a homemade wigwam, it is better to familiarize yourself with all the nuances of this process in advance.
When deciding to make a wigwam, you must adhere to some rules:
- The building should be given the shape of a cone;
- The fabric should not cover the ends of the sticks (the upper hole provides fresh air).
To make a wigwam, it is not necessary to use waterproof fabric; it is enough to arm yourself with dense material (if we are talking about an outdoor building). Thanks to the special design, water will flow down the walls of the hut without getting inside.
Don't forget about decorative elements. At the same time, it is not at all necessary to decorate the hut with feathers and stones, as the Indians did. You just need to add some zest to the building: tie bright ribbons, add beads or flags, hang small drawings of the child inside. Any ideas are worthy of implementation.
Option 2. Master class on making a wigwam without sewing
Materials and tools
For the frame:
- 6 wooden slats with a thickness of 2 to 4 cm and a length of 2 m. Instead of slats, you can take bamboo sticks - they are light, inflexible and look nice;
- twine or other strong rope;
- roulette;
- drill and drill bit (optional, but recommended);
- a strong rubber band (not needed if you have a drill).
Types of huts and choice of location
Determine where the building will be located: inside the house or outside. This will help you choose the type of design that will be convenient to use later. There is more free space for games on the site. And the child’s original design will make the house a decoration for the area. In this case, the design needs to be thought out taking into account weather conditions. It is not difficult to build a hut for children in an apartment with your own hands. A correctly selected design option will solve the problem of lack of free space. And the child will be able to play in any weather: a house made of thick paper will not get wet.
Option 3. Wigwam without sewing from patches (step-by-step photo)
Any old things or scraps of fabric will do. It looks bright, cheerful, and is done very simply and interestingly.
How to make a children's house in an apartment or on the street
Children absolutely love secluded corners where they can fantasize or play an exciting game. For this reason, children often build homemade houses from scrap materials: pillows, bedspreads, chairs. You can make your child’s leisure time exciting with the help of a DIY children’s hut.
But first, it is advisable to decide where the structure will be located: on the street or in the room. The choice will depend on the list of materials used and dimensions.
Wigwam in the house
During the cold season, a wigwam is an excellent option for games in the room. It is one of the attributes of a children's room decorated in Scandinavian style. A textile house in the form of an Indian hut can be made using:
- strong wooden twigs or slats, connected at the top with a rope, and at the bottom opened in the form of a polyhedron;
- a textile cover or fabric triangles attached to a frame made of rods.
The stability of the structure will be ensured by transverse rods attached to the bottom of the wigwam.
Such a hut will become indispensable if you use it to store numerous toys.
House - tent
If the area of the children's room does not allow placing a hut on the floor, you can make a removable awning over the child's bed. This option will allow him to independently turn his sleeping place into a play area.
As a frame, you can use narrow bent metal-plastic tubes connected with tape. Textiles stretched over tubes will serve as a roof in an improvised tent. The homemade house is easy to install and fold without the help of adults, which children will certainly appreciate.
Cardboard version
For kids you can make a small house out of cardboard. Among the advantages of this design:
- quick installation;
- ease of manufacture;
- an opportunity for a child to show creativity and do their own interior decoration using paints and pencils.
Parents just need to use a couple of large boxes, scissors, glue and tape to give the house the desired shape. Following your child's imagination, you can build princess castles or fortresses for a knight. And it doesn’t matter that the structure is fragile. This is more than compensated by the pleasure of creating and playing it!
Summer house
For the happy owners of a summer cottage or private territory, the choice will undoubtedly be made in favor of the street. This will not only allow your child to spend more time outdoors, but also provide shelter from the scorching sun.
It is better to abandon the idea of building a playhouse for your beloved child in an open area, and give preference to a flat area in the shade.
Traveler's hut
Older children can make their own structure from available materials: ropes, sheets and pegs. To do this, it will be enough to perform the following steps:
- stretch a rope between the trees;
- throw a sheet or blanket on top;
- Stretch the edges of the blanket and secure it to the ground with wooden pegs.
Such a house, made with your own hands, will give your children double pleasure. Blankets or pillows will add comfort, and thematic attributes will help you feel like a hero of a fascinating story: a flashlight, binoculars, a flask and a backpack.
Dream tent
Young ladies will love a summer house in the form of a tent. To build it you will need:
- gymnastic hoop;
- a long piece of fabric or sheet;
- rope for fastening.
The basis of the structure will be a hoop, and the walls will be a long fabric attached to it. The hoop is suspended from a tree branch with a rope at such a height that the edges of the fabric reach the ground. The roof can be made from a separate piece of fabric, sewing it to the hoop around the circumference. In this case, to hang the structure it will be enough to use a strong ribbon sewn to the center of the dome.
Option 4. DIY children's tent
Materials and tools
What we need:
- wooden slats - 4 pieces, each size 2.5 x 4 x 150 cm;
- rod dowel (round slats) - 3 pieces measuring 1.5 x 100 cm;
- fabric - 4.5 m;
- colored tape.
Instructions
- We make 2 holes in each wooden batten. One is upper, it is made 10 cm from one edge, the other lower is 3 cm from the other edge of the slats. The diameter of the hole should be 1.5 cm so that the round rail fits through it.
- We thread one round rod into the upper holes of all 4 slats. We will pass the second rod through the lower holes of the 2 slats. Using the third rod we connect the 2 remaining slats at the bottom.
- At both ends of the fabric, sew “pockets” for round sticks so that they can be inserted there. We insert the rods and stretch the fabric onto the frame. To secure the rods and prevent them from slipping out of the holes, simply wrap the outer edges with tape several times.
- All that remains is to put the pillows on the bottom, and the hut is ready!
How to make a hut with your own hands
To work you will need:
- Slats or plastic pipes with a diameter of approximately 2 cm - 6 pieces, 1.5-1.8 m;
- Rope;
- Drill, tape measure or long ruler;
- Sewing machine, thread, scissors, needles, pencil, etc.;
- Fabric measuring 3 by 1.5 m;
- Ribbons 30-40 cm long, 6 pieces;
- Sintepon and fabric for a pillow, whatman paper or a piece of wallpaper.
Step-by-step description of the process:
- Drill holes in the frame racks , departing from the top edge of at least 20 cm. The diameter of the hole should correspond to the thickness of the rope. Thread the rope through the holes, tying the frame together, but not too tightly.
- Spread the risers to the sides as wide as possible, so that their lower ends form a circle. Secure this position with a rope that is threaded through the poles, and additionally secure it at the top where the posts intersect.
- Cape . Fold the fabric so that you get a square with sides of one and a half meters, the fold line should be on the left. Take the bottom right corners and fold them towards the top left corners, that is, folding the square diagonally.
- From the resulting triangle of fabric you need to make a cone. To do this, you need to step back 10 cm from the upper acute corner (it is located at the bottom if the fabric has not been turned over) and draw an arc. In the wide part of the triangle from the right angle, set down 6 cm and draw an arc again. The result is a cone. Cut along arcs and unfold the fabric.
- Throw the fabric over the frame , distribute it evenly and fix it temporarily. From the inside, where the fabric comes into contact with the frame, make marks on it at a distance of 15-20 cm from the floor. Remove the awning and sew the braid along the marks (parallel to the floor line).
- Processing edges and cuts. To process the upper rounded cut, you need to make notches 1.5-2 cm deep and 2 cm wide, bend them to the inside and stitch, preferably 2-3 times for strength. Fold the bottom 1.5 cm and also stitch. The “entrance” needs to be processed with a cut and a fold. In the upper part you need to close the entrance, that is, sew a distance of 20-25 cm from the upper arc.
- Carefully place the awning on the frame and tie the fabric to the poles with ribbons in the right places.
- Using a tape measure, measure the inside of the hut along the floor. On whatman paper, draw a template for the future pillow-bedding, cut 2-5 layers from sheet synthetic padding. Fold them in a stack, sew them crosswise with large stitches, do not tighten the thread too much.
- Using the same template, cut out two pieces for the pillowcase, making a 2 cm seam allowance. Fold the fabric face to face and stitch, leaving a window to insert the filling. Turn the pillowcase right side out, insert padding polyester, and sew up the slit. The pillow is ready!
Option 5. Wigwam for a girl
Materials and tools
You will need the following:
- tulle with a small pattern for the bottom;
- tulle with a large pattern for the top;
- wooden slats - 6 pcs.;
- rubber;
- ruler;
- scissors;
- drill with drill bit;
- thick yarn or ribbon;
- rope;
- pencil;
- buttons;
- pins;
- threads
Instructions
We mark each strip and make a hole. We pull the rope through them and tie a knot. We install the frame and adjust the position of each slats.
We lay out the tulle with a large pattern. Cut a triangular piece of material with the top cut off.
Fold the top and bottom pieces and secure them with pins. We sew them together. We repeat the same with the rest of the blanks. We fold large triangles with long sides, connect them with pins and sew them together.
We put the awning on the frame and secure it with buttons. Cut a small piece of tulle to make a wigwam threshold. We bend one of the sides and stitch it. We fix the threshold on the frame with buttons.
Children's wigwam: exploring design options in the photo
The design of a nook for your baby can have different shapes and dimensions. Often there is a simple tent design with a quadrangular base and a crossbar at the top (pictured below) or with a pyramid-shaped frame.
The base of this model can be square or elongated
Less commonly used are models with a three-, five- and hexagonal base. For cozy homey houses, the best option is a pyramid-shaped structure with a square or rectangular base.
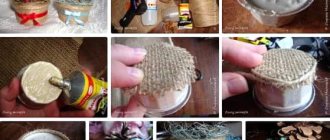
Option 6. Wigwam using PVC pipes for the frame
An excellent and non-standard approach to organizing a wigwam is to create a frame from polypropylene pipes. If you have scraps of such structures lying around at home, consider yourself lucky.
Despite being somewhat bulky, such structures are stable and lightweight.
To decorate such a structure, you can use denser fabrics - such a house will not fall apart!
You can build a traditional trapezoid-type frame, similar to a wooden frame; special holes are drilled into the PVC. It is important to work very carefully here so that the pipe does not burst.
Leaf Crafts
Leaves of different shapes and colors can create a magical underwater world.
Undersea world
And in this application, the authors used not only leaves, but also pebbles to decorate the seabed.
Seabed with leaves and pebbles
From leaves, flowers, and birch bark you can make a very impressive picture depicting the inhabitants of the sea.
Leaf painting
Or you can make a real forest picture with a hedgehog, a mushroom and a forest.
A picture of leaves with a hedgehog, a mushroom and a forest
From the leaves you can make a deer with branched antlers.
Application “Deer from leaves” Such a wonderful hedgehog can be made from dried leaves and a plate folded in half.
Hedgehog made from leaves and a paper plate You can use not only leaves, but also a pine cone in the applique. Then we can have a funny little turkey.
Turkey made from pine cones and leaves
Perhaps my favorite applique of yellow maple leaves is the lion.
Lion applique from leaves You can make a chic dress for the queen of autumn from leaves. We paint the background with delicate watercolor stains with salt. Application from leaves “Queen of Autumn”
You can make an “autumn forest” craft from cardboard rolls and natural materials.
Autumn forest
Leaves, branches and berries make a fairy-tale forester. Such a craft will not go unnoticed at the autumn exhibition.
Fairytale woodsman made from natural materials
A bouquet of maple leaves has already become a classic of autumn crafts in kindergarten.
Rose from leaves
Option 7. Wigwam using a stepladder
Another non-standard solution is a wigwam based on a stepladder. For all its ambiguity (children and heights), this method is not without practical aspects.
Your child receives not only shelter, but also additional shelves in the form of steps
Another significant advantage is the mobility of the structure; such a frame can be easily moved and made into a wigwam almost anywhere. And for decoration it is enough to use any piece of fabric or blanket. The main thing is to monitor how firmly the folding mechanism is secured. Such a wigwam will not take up much space, and to fasten the elements you can use ordinary cords, which are very easy to use on metal fittings.
What is a children's wigwam: learning the principle
Anyone who has at least once watched a film about Indians or read about them in books knows what a wigwam is. This is a house built from support sticks covered with cloth. How is a wigwam house for children different from an Indian dwelling? In fact, only in size and simplified design. We don’t need the structure to protect from rain and cold or to be stable under gusts of wind. The requirements for a home wigwam are that it be safe and interesting for the child. Therefore, the design must be strong enough, the materials used must be environmentally friendly, and the decor must be cheerful.
Helpful advice! When thinking about making a house, you need to take into account the dimensions of the room in which it will stand and the age of your baby. The child should not be cramped, but the wigwam should not occupy most of the room.
Option 8. Tent for a little princess
A children's tent does not always imply wild and active games; often the child just wants to play quietly there alone, maybe read a book, etc. Having his own corner, closed from everyone, even in his own room, is not a rare need for children.
Materials and tools
In order to make such a tent, you will need:
- aluminum hoop (aka hula hoop);
- fabric, thread, scissors, rope;
- a hook or loop in the ceiling.
Instructions
The fabric needs to be gathered into a cone so that it is evenly distributed over the hoop, and a dome of about 30 cm remains at the top. Sew a loop from a strong fabric and place it in the center of this assembly. Sew the top of the head with thread and tie it with a rope on top. Use a few stitches to secure the fabric to the hoop.
Next, hang the tent to the hook by the loop and distribute the fabric. Place a thick pillow inside.
Making a hut for children yourself - some interesting ideas
Sheet and rope
To make a hut, just stretch a rope between the trees, throw a sheet over it and secure its edges with wooden pegs or other suitable means. To make your child comfortable, place soft blankets, blankets or pillows on the ground. And even though there is nothing supernatural in such a “structure,” a child’s imagination can fill it with an exciting story. A homemade hut for children on the street will provide many interesting games and, moreover, will protect kids from solar overheating.
When choosing a place for a hut, give preference to darkened and level areas.
A simple homemade hut-tent
Children's outdoor hut made of fabric and rope
Hut made of gymnastic hoop and fabric
An ordinary gymnastic hoop can be an excellent basis for a children's hut. It is enough to sew a long fabric to the hoop and hang it in a horizontal position, for example, from a tree branch at such a height that the edges of the fabric reach the ground. Alternatively, you can simply throw a large piece of thick fabric over the hoop, build a cone-shaped roof and secure the frame at a convenient level. Then, to hang the hut you only need a reliable strap or ribbon.
How to sew a mattress into a wigwam for children
We advise you not to do complex cutting, but to sew a square mattress. You can use a large pillowcase. If you put a 10-20 mm sheet of foam rubber into it, the frame will stand on top. If there is a piece of synthetic padding in the pillowcase, the mattress will be soft and can be placed inside the wigwam by tucking the corners.
A mattress is a must - it closes the space, it is warm and cozy. With it, a wigwam, sewn with your own hands for a child, turns into a house, a nest, a cave, a secret shelter - depending on the circumstances.
Wigwam Decor Ideas
If you can choose almost any stick for the frame, then you should approach the choice of fabric responsibly. After all, how the wigwam will fit into the interior and how much the child will love it depends on its type. Further in the selection we presented several interesting examples of huts for boys and girls.
The most versatile and win-win wigwam is made of white or beige fabric. It will not overload the interior and will be combined with any decor, and there will always be pleasant lighting inside it. True, you will have to wash a white awning a little more often than a colored one.
A white tent can be decorated with fabric paints, embroidered with appliqués, or covered with tempera stickers.
Even the simplest wigwam will become cozy and beautiful if you decorate it with LED garland.
In this selection of photos you can get ideas for decorating the top of a hut.
A window that can be closed and opened will turn the wigwam into a real house.
Sew pockets on one or two walls inside or outside the tent so that your baby can store the necessary little things in them.
How to decorate a wigwam
To make the wigwam even more attractive, you can decorate it. Decorations for such a home can include:
- pillows;
- flags (especially good for masking the upper ends of support sticks);
- bows;
- pom-poms;
- LED garlands;
- tassel pendants;
- dream Catcher;
- mobile with stars or planets;
- feathers;
- decorative braid;
- fringe;
- embroidery;
- thermal stickers;
- applique.
You can learn how to sew flags for wigwam sticks from these video tutorials:
From this video you will learn how to make a simple but very beautiful decoration for a wigwam - a garland of tassels made of paper.
This video shows in detail the technique of making yarn tassels.
How to make a dream catcher is shown in this video:
How to sew two charming pillows: a cloud and a star - shown in these videos:
In many ways, the selection of decorations depends on the style of the wigwam (Indian, nautical, knightly, romantic, New Year's, space, for a princess, etc.) and the children's room as a whole.
DIY wigwam (photo master class)
Similar articles
- DIY wall panel: photo, video instructions
A beautiful panel on the wall of an apartment can decorate a room and make the interior exclusive. At the same time, doing it yourself is not at all difficult... - Do-it-yourself topiary: how to make, photos, videos, beautiful crafts at home, step-by-step master class
Decorative topiary can replace living plants on the windowsill At first, topiary was simply called a garden in which decorative plants were trimmed short... - Do-it-yourself wedding topiary: photo for a wedding, MK, master class, bride and groom from coffee and ribbons, bouquet for anniversary, make for a table from organza, video
Wedding topiary will not only decorate the wedding table, it can be a good decor during photos and video filming of the bride getting ready or the groom will appear on...
Wigwam in the interior of a children's room
In a children's room, a wigwam will become a place of solitude for the child. It doesn’t matter whether this room is for two children or for one, the baby still needs a house that is commensurate with himself, and not with the world of adults. There you can talk secrets with the shaggy bear, look at a book, and just fall asleep on the mattress.
Sources
- https://detskaya.info/igrushki-i-igryi/vigvam
- https://yellowhome.ru/2018/03/27/sooruzhenie-detskogo-vigvama-svoimi-rukami-master-klass-s-poshagovym-foto/
- https://kakpostroit.su/vigvam-dlya-detey-svoimi-rukami/
- https://luckclub.ru/kak-sshit-vigvam-dlya-detej-svoimi-rukami-vykrojki-master-klass
- https://mychildroom.ru/handmade/vigvam-za-9-shagov-master-klass-i-idei-dekora.html
- https://daynotes.ru/vigvam_svoimi_rukami_vykrojki_razmery/
- https://ratatum.com/kak-sdelat-vigvam-shalash-palatka-dlja-detej-svoimi-rukami/
- https://HouseChief.ru/vigvam-dlya-detej-svoimi-rukami-foto-poshagovogo-izgotovleniya.html
- https://active-mama.com/kak-sdelat-detskij-vigvam-svoimi-rukami.html
Wigwam for toddlers
I’ll tell you right away why this tent is important for children:
- This is their personal space;
- Like your gift.
- This is a space designed specifically for little ones. It is clear that the whole room can belong to them. But adults can also enter the room; no one can “break into” a tent so easily anymore.
- You devoted your time and labor to create a hut. And the kids, seeing how hard you were trying, felt your attention and love!
These huts are convenient to take to the beach or in nature; they fold up easily and can protect from the sun and wind.