DIY beads: step-by-step video instructions and description of how to make beads (95 photos + master class)
Handmade jewelry is now so popular that experienced needlewomen even manage to earn a lot of money from it.
If previously homemade jewelry was not in demand and was considered tasteless, now, on the contrary, every fashionista strives to purchase a handmade accessory or make it herself.
In addition, any available materials can be used to make such original and unique jewelry.
In this article we will talk about how to make beads with your own hands.
Subtleties of working with wood
By and large, anyone can make a simple wooden bracelet with their own hands. This area can be divided into two areas. The first and simpler one is carved and stacked bracelets with an open solid texture. The second direction is painting on wood.
Product with ornament.
Advice: do not start with highly artistic carved models or fine paintings. Take on what you can do here and now. Remember, mastery comes with time.
What type of wood to choose
Of course, it is better to start with soft types of wood, such as linden or cedar. Having mastered the basics of work, it will be much easier for you to switch to hard and dense wood. Also, an important role is played by who exactly the bracelet is made for.
Dark, with an open, pronounced texture, men's wooden bracelets. While light and painted decorations appeal to the weaker half of humanity.
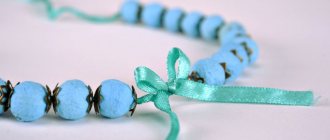
Beads made using the felting technique
Felting wool is a very interesting and exciting hobby, thanks to which you can make a lot of cute things.
Take a look at the photos of wool beads made by yourself, and you will see for yourself that it is not so easy to guess what material they are made of and how they are made, which means that you will have a unique and attractive accessory.
So, get ready for work:
- Wool of various colors.
- Film.
- Rubber mat.
- Sharp knife.
- Bamboo mat.
- Towel.
- Grid.
- Soap solution.
Let's look at a detailed master class on making beads with your own hands:
Pinch off small, equal-sized pieces of wool and place them in a row so that you get a multi-colored cloth measuring 30 by 20 centimeters.
Moisten the workpiece with water and cover it with a net, and sprinkle a previously prepared soap solution on top. Next, lay wool of a different, contrasting shade on top. It will serve as a separator between the colored pieces.
Cover the workpiece again with the mesh and spray with soapy water. Next, using film, wrap the workpiece into a roll and roll it thoroughly so that the layers adhere to each other.
After this, wrap the roll tightly with a towel, wrap it in a bamboo mat and continue rolling until the workpiece turns into a single whole.
Now all that remains is to cut the resulting roll into identical pieces, string them on fishing line or strong thread, and the beads are ready.
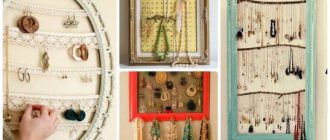
Required materials and tools
Beads, beads, and glass beads are very small in size, so I begin any creative activity by preparing the work space. A needlewoman must have a wide table with an equipped organizer.
In the cells of the organizer, parts for assembly will not be lost, and they will be much more convenient to use.
To conduct master classes you will also need:
- Mesh fabric for embroidering pictures.
- Crafts made from beads and buttons are very original , so buttons should also be prepared.
- Thread, fishing line or metal wire. The set of materials depends on the chosen craft and assembly method.
- Needles, scissors, glue.
- Tweezers will make the task much easier for the technician.
To make a New Year's toy or Easter egg you will need a base. The basic figure can be cut out of foam, wood, or take a plastic mold from a chocolate egg. To create jewelry, girls need metal cuts, which can be purchased at craft stores.
Beads from an old T-shirt
How to make fabric beads with your own hands? It’s hard to imagine that you can use an old T-shirt to make an original necklace.
The main material of the accessory is knitwear, cut into thin ribbons. In this way, you can make different versions of beads, adding large beads, metal rings and other decorative elements to the fabric.
It is worth noting that the strips can be of any length and any width. The finished product will look impressive in any case.
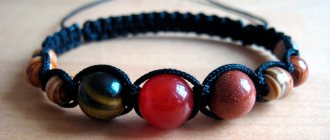
Features of beads made from wooden beads
Scientists have proven that different types of wood can eliminate the cause of various diseases and have a beneficial effect on the human body as a whole.
For example, oak has strong energy. Wooden jewelry can easily compete with gold or silver. At the same time, it will be an excellent addition for a girl of any age. Once, well-known to everyone, Coco Chanel said that every girl should have two things in her wardrobe - natural linen and wood. It was thanks to her that girls began to wear wooden jewelry with almost any outfit.
This decoration will be a great addition to a summer outfit. Pairs well with summer wedges and a beach bag. Beads on a long string go perfectly with summer jeans and a tunic.
Reference! For a work outfit, it is better to give preference to a necklace. It goes well with various natural materials, but should not be used in combination with synthetic materials.
Beads for jewelry - types and examples of use
In this article we will talk about beads for creating jewelry with your own hands, their main types and methods of use.
A bead is a three-dimensional decorative element of various shapes with a through hole for fastening on a thread. They vary in shape, size (from a few millimeters to several centimeters) and material of manufacture. Beads of various shapes have found the widest application in needlework: from traditional (making jewelry) to designing floral arrangements, embroidering clothes, etc.
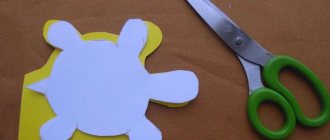
The process of making a wooden bracelet for beginners
Using these step-by-step instructions, even a school-age child can make his first bracelet from wood, and subsequently master more complex techniques.
For the first bracelet, the material can be sticks from eaten ice cream or a similar material, the main thing is that it is no thicker than 2 mm. For one simple bracelet you will need 2 sticks, but you can put on several of these rings at once, having fun decorating them.
The first step is to drill holes along the edges of each stick for future fastening. After this, you need to soak the material in water for at least 48 hours.
When the wood is soft and flexible, thread a thin rubber band through the drilled holes. Which used to be used to seal money on both sides. Afterwards, you should select a glass container that is comparable in diameter to the child’s wrist. Pull a stick with an elastic band onto it so that it goes around half the plane of the bottle or jar.
Having strung all the soaked sticks onto the axle, leave them in this position until completely dry, this will take about a day.
When the pieces are dry, you can start painting them. For this, acrylic or oil paints are usually used; to make the drawing more beautiful, you can use a stencil. Multi-colored stickers cut to the size of sticks are also suitable for decoration.
All that remains is to fasten the parts together using the same rubber bands that were used to give the desired shape to the bracelet.
As it turned out, starting to work with wood is not as difficult as it might initially seem. And you can make your first bracelet from scrap materials using minimal time.
DIY beads - the best ideas and recommendations for selecting materials (video and 100 photos)
Designer jewelry attracts attention and is used as exclusive style accessories that highlight the taste of its owner. The high price of such products can often be compared with the cost of jewelry, so after several master classes, you can learn how to make unique jewelry yourself.
Looking at photos of beads made by yourself, you can be surprised at the rich variety of bright and unusual ideas that are easy to implement.
This skill is easy to master and bring any idea to life, complementing your own, individual style, which will become the basis of a unique, original and harmonious image.
Exclusive and original beads
Having chosen the jewelry you like, you can immediately find out how to make beads with your own hands by carefully studying all the necessary information.
After all, to create a real masterpiece you will need a certain amount of time, basic materials and auxiliary accessories or fittings that give the finished product a finished look.
Using inexpensive materials, you can create not just jewelry, but also a real work of art that does not look cheap.
Various ideas, different techniques and a wide choice of basic materials allow you to make status and designer jewelry with your own hands, suitable for a classic or modern outfit.
How to choose materials for production
To make stylish and beautiful beads with your own hands, you need to choose the appropriate materials, for processing which different techniques are used.
You can immediately purchase sets of ready-made beads, but then the product will turn out to look like standard jewelry, and for exclusive jewelry you can use the following materials:
- plain, colored and different-sized beads;
- balls made of plastic or wood, for beads;
- large and small shells of various mollusks;
- colored cardboard or thick paper, postcards;
- polymer clay, plastic mastic and salt dough;
- sea pebbles and ground glass of different colors;
- metal rings, arcs and wire made of metals;
- natural and artificial leather, suede materials;
- satin and grosgrain ribbons, strips of colored fabric.
In addition to the basic materials for the creative process, you need to stock up on fishing line or strong thread, scissors and several needles with a large eye.
It is important to purchase the appropriate fittings, fasteners or decorative elements that will help give the finished decoration a complete and presentable look.
Sources:
https://svoimirukami.guru/busy-svoimi-rukami/ https://melodiabisera.ru/stati/businy-dlya-bizhuterii-vidy-i-primery-ispolzovaniya/ https://mirrukodelija.ru/busy-svoimi- rukami/