Before the New Year holidays, many parents, as well as kindergarten teachers and school teachers, are asking themselves the pressing question: how to make an outfit for the main New Year's character with their own hands. You can buy a ready-made carnival costume in a store or order a New Year's dress made in a studio. But this is not always financially beneficial, and there is no desire to buy a cheap and low-quality Morozko or Santa Claus outfit, which is sold in every supermarket. Children are unlikely to believe in such a wizard, and the New Year's fairy tale will be ruined.
New Year's decoration pattern
Before sewing a fur coat and hat for Santa Claus, first select short-pile fabric . This could be, for example:
- velvet;
- velours;
- velveteen;
- corduroy;
- flannel;
- red or blue satin;
- red and gold brocade.
To finish a fur coat and hat you will need:
- white fur;
- batting;
- padding polyester, which can be replaced with a beautiful white fabric.
Decoration
We trim the sleeves, collar and along the front edge and hem with padding polyester or fur. The belt is made not too narrow, but long so that it can wrap around the waist twice; fur can also be sewn on the ends. Instead of something fluffy, you can use a wide braid, but it will not look so beautiful. So, our fur coat is almost ready, all that remains is to decorate it with stars; they can be cut out of anything shiny, for example, from wrapping foil; in extreme cases, you always have tinsel on hand. Decorations can be glued, if you don’t mind, or you can sew them on. It is better to take thick fabric for a Santa Claus costume, beautiful deep shades, it is good if you come across it with embroidery or a printed pattern in the form of ice patterns. By the way, an old sheepskin coat or the same bathrobe will work as a fur coat; they just need to be covered with fabric (this option is for those who are not comfortable with cutting material).
Fur coat for the main character
Usually this role is entrusted to men, but women often have to dress up as a grandfather. The fur coat is worn over clothes, so the size will be approximately 50, 52, 54. And a grandfather of size 46 will seem funny, but he should be omnipotent. This means you will need a lot of fabric. First, you need to take measurements with a measuring tape from the person for whom you want to sew a Santa Claus costume. Then you need to carefully study the selected pattern and make sure that it fits in size.
Next, the pattern needs to be transferred to the material in full size on the wrong side using:
- a piece of chalk or a piece of dry soap;
- rulers and measuring tape;
- finished, cut out pattern.
Then you should cut the fabric, leaving seam allowances of about two centimeters.
The fur coat is sewn from five parts : two front shelves (right and left), a back, a collar and a belt.
After the parts are cut and cut, you can begin to connect the parts. First you need to stitch along the shoulders the two front shelves with the back, then sew the side seams along the wrong side. All seams must be machined using a zigzag, overlocker or special scissors so that later the edges of the material do not fray or diverge.
Separately, you need to sew the sleeves and process the seams. Then the sleeves need to be sewn into the armholes of the fur coat. The main thing is to do it correctly so that the sleeves fit correctly.
How to sew a Snow Maiden costume
In the book by L.M. Tukhbatullina and L.A. Safina “Masquerade Costumes for Children and Adults” there are many interesting options, including costumes for the Snow Maiden and Father Frost.
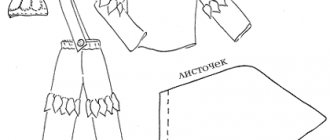
Snow Maiden costume pattern from the book
Snow Maiden costume pattern from the book
Snow Maiden's outfit
If you look at most of all the variations of outfits for the main characters of the New Year, you will notice that the pattern for them is a robe model. You can see how to create a robe pattern in this article; there are also universal Portuguese patterns and Soviet retro patterns.
What to make a Snow Maiden costume from
For work we will need blue fabric. They sell special canvases with a New Year's theme, for example, the plush in the photo below. Its composition is 100% polyester.
Fabric for the Snow Maiden costume
The cuffs and neck of the Snow Maiden's dress can be decorated with fur or tinsel. Rhinestones, sequins and other shiny elements can also be used to decorate the costume.
Snow Maiden dress and circle cape
Snow Maiden's hat
Children's Snow Maiden costume with hat
Snow Maiden's hat
Cape for children's Snow Maiden costume
The Snow Maiden also has a headdress. The easiest way is to sew a hat from the same fabric and decorate it with shiny decor. But the kokoshnik will look much more impressive.
Kokoshnik of the Snow Maiden
Kokoshnik is a fairly old headdress; it is considered a symbol of traditional Russian costume. Just remember how beautiful kokoshniks were in old fairy tales and cartoons, and in books you can often find images with this accessory.
Kokoshnik SNKgurochka
The kokoshnik is held on the head thanks to a backdrop - a kind of cap on which bows are often attached.
Kokoshnik diagram
Initially, the front part of the kokoshnik is cut out of thick cardboard. The inner part (arc) is adjusted to the head. After this, they begin to cut out the patterns.
In the picture below, the measurements are given as an example and without seam allowances. All measurements will need to be taken again individually. The kokoshnik is sewn for one person, since despite all the external similarity of the shape and size of the head, it most likely will not suit another girl.
Kokoshnik pattern
Details of the kokoshnik
Crown
Figured crown
Kokoshnik with elastic band
An individually sewn kokoshnik fits its owner perfectly, which also has its advantage.
The pattern consists of the following parts: the front side, the “face” or crown, the long panel of the top and the “back”. Everything is cut out in 2 copies.
Cardboard crown
Using the finished cardboard crown, two pieces of fabric are cut out with seam allowances. For the front part of the crown you will still need to cut out a lining, preferably two, but for the back part one will be enough. You can use thick and soft flannel as it. On this basis, jewelry (rhinestones, beads, etc.) will look much more beautiful. The lining should match the tone of the main fabric.
The lining must be sewn to the main part along the contour (without going into the allowances). And sew the inner backdrop along the edge of the inner contour.
Do the same with the second (back) part, only here one layer is enough for the lining.
Both parts of the “face” need to be turned inside out and stitched along the entire length of the arc. You need to stitch as follows: on the one hand - from the center down and to the bottom corner, on the other hand - in the same way, but bending over this corner and including the bottom part, and to the very beginning of the backdrop.
Excess fabric is removed to the back, where it is disguised under the backing.
Then the cardboard base is inserted and the lower part of the arc is manually sewn.
Children's kokoshnik...
….and an adult
If you sew the bottom on both sides at once, it will be difficult to insert the base. You will need to manually stitch the backdrop along the inner arc. Sew the bottom edge of the backdrop using a machine.
Christmas hat for Santa Claus
After the fur coat is ready, you can start sewing a hat for Santa Claus .
For this you will need a pattern. Using a measuring tape, take measurements of the person for whom the item is intended. If you are sewing for a child, all measurements must be taken from the baby, for an adult outfit - from an adult.
When the size of the selected pattern is ideal, it can be transferred to the fabric. It must be transferred to the fabric with the required dimensions.
The hat consists of three parts:
- top part;
- bottom;
- band.
After the finished pattern is transferred to the fabric from the wrong side, you need to cut out all the details, not forgetting the seam allowances. Then you need to sew the top of the hat with the bottom. In order for the hat to keep its shape, you should sew a band made of starched cotton fabric or cardboard or thick paper. To complete the work, the hat, like the collar of the fur coat, must be decorated with white fur or fabric.
If you are preparing Morozko's magical decoration for a class or kindergarten, an indispensable attribute of this should be a magic stick-staff. You also need a bag with gifts. Let's look at how to sew it.
Construction of the shawl collar
The collar is planned to be large and rich - fur. Take faux fur with a knitted base, it is easy to work with. Let's start building:
- Draw a straight line up from the first button and a point 2 * 3 cm from the highest point of the neckline - this will be the bend of the lapel of our collar, see fig.
- On an auxiliary straight line, perpendicular to the side line and passing through the highest point of the neckline, set off the length of the back neckline from the fold line of the lapel. It sounds long, but everything is clear from the picture.
- From this point up:
- 4 cm for figures with a stooped posture
- 5 cm for figures with normal posture
- 6 cm for kinky figures
- This will be the point where the base of the collar rises
- Now, focusing on the drawing, we draw an auxiliary straight line.
- Complete the collar, 15-20 cm wide
- Measure the stitching line into the back neck (lower red arc in the drawing) and compare it with the length of the back neck.
At this stage, I advise increasing the width of the border (by about 1/2 the width of the border according to the pattern), especially if you are sewing for a man with a belly. And we’ll redesign the collar’s flap.
- Slightly widen the sleeve towards the bottom.
- We design a fur trim - a cuff.
- We outline the width of the hem and the top collar.
The parts painted white are made of fur.
Fur trims - edges along the bottom of the fur coat, along the sleeves, along the side - make them stitched. Just cut it out of fur and stitch on the top details.
I showed how to model them in great detail in the picture.
These are the pattern details we got.
Don't forget the lining. There is a fold on the back part of the lining for freedom and convenience.
Frost Bag
Sewing a bag for gifts from Frost is very simple. To do this you will need a piece of fabric you like, a sewing machine, a tailor's measuring tape and fifteen minutes of free time. Ideally, the bag for gifts from Santa Claus should be sewn from the same fabric as the entire suit. But if there is no similar material left, the bag can be sewn from any material, the main thing is that it matches the color or is of universal colors:
- Red and blue;
- silver and gold;
- white and oily.
Beautiful granddaughter
Our Grandfather does not go anywhere without his faithful companion - his granddaughter. Of course, for a children's party you can get by with just one frosty old man, but it is better if the Snow Maiden also pleases the children. She not only comes first, entertains the children with round dances, songs and dances, but also plays the most important role. She encourages everyone to call Grandfather Frost with gifts, and the Snow Maiden can also explain the rules of New Year's games and help light up the Christmas tree. You can't do a holiday without her! All clothes and decorations for the famous granddaughter can be purchased in the store or made with your own hands.
The Snow Maiden's costume is quite simple and consists of a dress or robe, kokoshnik and boots or shoes. The main thing is that it all sparkles and sparkles, giving the image a fabulous shine.
Making a staff
The image of Morozko will be incomplete if he does not have a magical, fairy-tale staff . It's not at all difficult to make. You need to take a long club, wooden or plastic, wrap it and cover it with foil. You can also paint it with white, silver or gold spray paint.
The top of the magic staff is crowned with a large star. Cut out a large five-pointed star from thick cardboard and cover it with foil or paint it. The edges of the star and the staff can be decorated with shiny tinsel, large beads, rhinestones, snowflakes and any New Year’s decor made by yourself or bought in a store can be glued onto them.
You can complement the magic star with a pair of small bells, which will create an original, fabulous effect from the appearance of Grandfather Frost at the holiday.
Separate conversation about the beard
The beard is an integral part of the image; you still have to work on it. There are many options for what and how it can be made. The simplest thing is to use cotton wool, it’s not for nothing that they say “Santa Claus is a beard made of cotton wool.”
But thick hair made from a wig or artificial hair still looks better. So we will need our imagination to create the best Santa Claus costume with our own hands. Here is an approximate list of possible materials: paper, gauze, fabric, padding polyester, clothesline and fur. Don’t forget to make elastic bands for the ears; our cotton-padded polyester construction will be held on them.
Mittens for Santa Claus
Hands are precisely the element by which children recognize their daddy, teacher or physical teacher in Grandfather Frost, so mittens should be an obligatory component of a carnival costume.
To sew mittens, you need to choose the same fabric as for sewing a fur coat, hat or bag. If you are sewing mittens for a baby, then the pattern should be reduced.
It is necessary to transfer the pattern onto the fabric. Each mitten consists of three parts: one back and two inner (top and bottom). To cut a mitten for the second hand, transfer the pattern to the material in a mirror image.
Then you need to cut the material taking into account the seam allowance (one centimeter) and sew it. First, the inner parts of the mitten, then connect them with the back side. All seams are stitched from the wrong side and must be processed with a zigzag or overlock.
How to enlarge a pattern
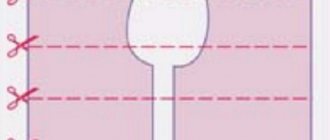
- Cut the pattern pieces lengthwise and unfold them as in the diagram.
- Move the parts apart and arrange them as shown in the diagram.
Magic Mitten
An interesting idea for a Magic Mitten craft - with a hiding place. Very simple to make, but original.
This mitten will delight your family with an unusual solution and a gift. These are two interconnected halves of a mitten, small in size, made of cardboard or felt.
If it is made of cardboard, then both halves are glued together along the edge, leaving free space inside for a “surprise”.
The felt parts are sewn together with a beautiful seam and contrasting threads.
Inside this craft you can place a gift in the form of a banknote, a ticket to a New Year's performance, a movie, a certificate for the purchase of jewelry or cosmetics.
The front side is decorated with various festive decor using imagination.
Completing the production of the surprise mitten
All the elements are ready, you can begin the final layout of the surprise mitten. The first step is to add a little filler to the mitten to give it a certain volume. Next, the hot glue gun will come into operation.
A little filler in the mitten, and it gains volume
You should immediately prepare coniferous branches and a small bunch of rowan berries - green with red spots will look perfect. In our case, artificial needles were used. But you can believe that the natural one will look even better.
Artificial needles ready for use
Assembling elements into a single composition
First you need to coat the bottom seam of the mouse with hot glue. Here you need to work not only carefully, but also quickly, because the glue quickly cools and hardens. You shouldn’t skimp on the hot-melt glue; you can pour it more generously, which will allow the mouse to “sit” more firmly in the mitten. It turns out that only the head of a curious animal will stick out from the mitten.
The bottom seam is coated with glue, after which you can “put” the mouse in the mitten
Next, you should place coniferous branches and rowan berries on the branches on the sides and back of the mouse, fixing them with the same hot glue. It is these touches that will add completeness to the composition. At the same time, you can glue snowflakes or buttons on the mitten in the same shape as in our case.
Coniferous branches and rowan berries will complete the composition. Buttons in the shape of snowflakes will fill the void on the surface of the mitten.
Finalizing the mittens, making a suspension
Despite the fact that this decorative element seems complete, there is one more detail that needs to be done. After all, we need to hang this mitten somehow. To do this, you can take a simple wire and make something like a bucket handle out of it. Its size should allow the hanger to pass over the mouse’s head.
Small loops are made at the ends of the wire, which are generously coated with hot glue and tucked inside the mitten on both sides. When the glue hardens, the handle is unlikely to be easily torn off. Using it, you can hang a mitten with a mouse on the door, on the handle of a cabinet, or even on a Christmas tree.
This is the kind of miracle that can happen if you put your hands to it
Dress
Use the simplest cut, since the most important thing here is the decoration. You can take, just like for the Santa Claus costume, a robe or some ready-made product and cover it with fabric of the desired color. Decorate the hem and sleeves with fur or cotton wool, and create a cape made of lightweight material. Cut out stars and snowflakes from shiny foil and glue them all over the outfit, add tinsel, you can use foam or something that looks like snow. A Snow Maiden costume for a girl, if you are preparing for a children's party at school or kindergarten, it is better to make it simpler, since children move a lot, and some parts may simply fly off.
What material and tools are needed
The only tools you will need are a pencil, a needle and thread, and a hot glue gun (at the last stage). The material also does not shine with variety. Among the necessary:
- fabric scraps (plain red, taupe and white fleece);
- a little padding polyester as a filler;
- pins;
- 2 black beads;
- several coniferous branches, a bunch of rowan berries (can be artificial).
And, of course, hands that are not afraid of work. Although it’s difficult to call making such a decorative element work, it’s more of a relaxation.
To begin with, on a piece of paper or cardboard you need to draw a pattern for a mitten and a mouse. This is quite easy to do.
This is what the pattern for the mitten and mouse looks like
Rat and bull
Very often, animals from the Chinese horoscope are used in New Year's symbols. To make the New Year successful, they give symbolic souvenirs with their image. What if you dress up as such an animal? For example, a rat, in honor of the outgoing year 2022, or a bull, which symbolizes the new year, 2022. If you are going to a party together, you can make a pair costume of these animals.
How to make a rat costume for the New Year? Any plain dress in gray or white will do, because 2022 is the year of the white metal rat. A pantsuit works too.
If the blouse has a hood, we sew ears of the same color to it, you can make them two-colored: gray on the outside and pink on the inside. If there is no hood, you can buy ready-made ears on the headband or sew homemade ears to hairpins.
Let's not forget about the long tail, so that it holds its shape; you can use flexible wire, which we wrap with white or gray tape. And, of course, the right makeup will complete the look: muzzle, mustache, nose and sharp teeth.
A bull costume is not so easy to buy, so we will make a bull costume for the New Year ourselves. Any clothing that we decorate with spotted fur or fleece will do.
Choose fabric with large irregular spots, like cow prints, not to be confused with zebras or leopards! Pieces of fabric can be sewn onto a vest and trousers, or onto the sleeves of a sweatshirt and the bottoms of trousers, use your imagination. 2022 is the year of the white metal ox, so a white pantsuit or soft tracksuit would be a great base.
Of course, a bull needs horns and ears. You can buy ready-made antlers, but red devil or deer antlers are more common. You can sew them yourself from a piece of dark felt and stuff them with something soft. You can sew them on a hat, hood or headband. Soft ears and a curly faux fur forelock complete the look.
Other works for the New Year's Crafts Competition
Publications on the topic:
Photo report “Mitten and boots for Santa Claus” and a selection of New Year’s riddles Forest beauty, So green, Decorated with toys, Garlands, firecrackers. Christmas tree We looked out the window, All the paths were already covered in snow, So the holiday will come to us...
Photo report “Santa Claus's Mitten” - Trouble! Trouble! - the magpies chirped, flying over the site of the “Solnyshko” kindergarten. - What's happened? – asked the guys who had just gone out to...
Photo report “Mitten for Santa Claus” Mitten for Santa Claus. First junior group. To make a mitten you will need the following components: colored cardboard, colored paper (preferably...
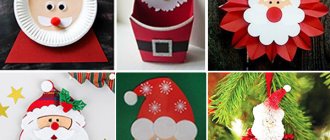
Crafts made from cotton pads
Cotton pads and cotton wool are the easiest materials to use in kindergarten. Children can glue cotton pads (or balls) onto templates prepared in advance by adults or make a craft entirely with their own hands, first painting it and then decorating it with cotton wool parts. These can be snowflakes cut out with a figured hole punch, the cotton beard of Santa Claus, as well as details of his costume.
Identical templates, decorated with details from cotton pads and cotton wool in accordance with the tastes and skills of each child, will become wonderful and different gifts that children can take home and give to their loved ones.
For creativity in older groups of kindergarten, more painstaking and complex work is suitable - creating crafts from cotton swabs. Sticks attached with glue will be a good building material for creating fabulous winter landscapes.
What can be useful when creating the simplest version of a costume?
Before you start sewing, you need to decide on the model. The standard version is a set of the following products:
- Coat to toe.
- Belt-sash.
- Mittens.
- A cap.
A long shirt and wide trousers may be present, but usually these elements are not visible under the coat, so it is not necessary to make them. To sew festive clothes for an average person, you usually need about 2 meters of base material, 0.5-1 meter of finishing material.
Additionally you may find it useful:
- Threads in the color of textile materials.
- Braid, ribbons, beads, ribbons.
- Glue gun with silicone rods.
- Scissors, safety pins, needles.
- Figured pattern, preferably number 6.
- Ruler, measuring tape.
During the work process, you may need other tools and materials - it all depends on the level of skill and experience of the creator of the outfit.