Rida Khasanova May 29, 2022, 09:20 In many countries, the tradition of sprinkling newlyweds with rice or millet cereals, coins, nuts, candies and flower petals is still preserved. The rules of the ritual from different nations have long been mixed, and now everyone conducts it as they wish. But in any case, the important question remains: where to get the change from?
for sprinkling? This can be a specially sewn bag or an openwork bag, but according to the old Russian tradition, a sieve is intended for this.
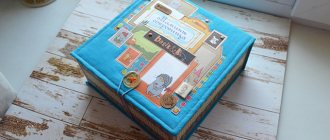
Photo of a sieve for a wedding
Why do you need a sieve at a wedding?
Despite the fact that the wedding sieve is inherent in the Russian people, it is becoming less and less common at weddings, as its importance and meaning have been forgotten. Why do you need a sieve at a wedding? , great importance was attached to this household item.
.
It was believed that water poured through a sieve was healing, and grain sifted from the husk promised a rich harvest. That is, the sieve is a symbol of health, abundance and fertility
Among the Slavic peoples there are at least two rituals with a wedding sieve:
- When the groom leaves his house to go get his bride, his aunts and mothers ask him to drink the water
pouring through a sieve. She runs in different directions and does not get into her mouth, and at this time the women say: “So that you have so much grief in your life, you drink so much water from calico”; - When the bride and groom leave the house together, the girl’s mother sprinkles
them with coins, grain and nuts, as symbols of family wealth and well-being. They are put in advance into a festively decorated sieve.
put in a sieve
:
- grain - so that young people can have children;
- flower petals or confetti - so that love and romance do not leave their lives;
- coins - for prosperity;
- sweets - for the sweet life.
Photo of a DIY wedding sieve
Decorating the wedding hall with flowers
Natural flowers
They always refresh and give the room an elegant and very festive look.
The only thing is that, of course, they quickly lose their appearance without water
, so attaching bouquets of fresh flowers to the walls is not a good idea.
It is entirely possible to use only artificial flowers
, which will cost you less and which can be used many times later.
Ready-made artificial flower garlands
are sold , and your task is just to hang them in the right places.
large vases with water somewhere in the room
.
Since tables at weddings are usually full of dishes, and there is almost not enough space for decorations, you can choose tall narrow vases with flowers
.
Simple wedding sieve decoration in 10 minutes
When you don't have a lot of time to decorate
wedding attributes, from a simple sieve you can make something elegant and beautiful in just 10 minutes.
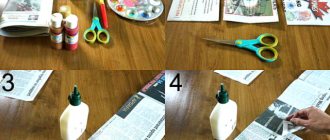
A detailed master class will tell you how to do this. For decoration you will need
:
- sieve (not very large in diameter);
- lace fabric;
- organza ribbon;
- rhinestones;
- sequins;
- Super glue.
How to make a sieve for a wedding with your own hands:
- Cut a strip of lace fabric equal to the inner diameter of the sieve. The height of the lace should be about a centimeter less.
- Glue the lace from the inside of the sieve. If you use light-colored lace, then instead of “Moment” it is better to use hot-melt glue: it will not leave unsightly yellow spots after drying.
- Cut another strip of lace to cover the outside of the sieve. Now the height of the material should be approximately 1.5 cm above the sides.
- Glue the lace along the outer circle, and bend the free edge inward. The junction of the two strips should be almost invisible.
- Tie an organza ribbon around the outside of the sieve and tie a bow. The width of the tape should be approximately 3-4 cm.
- Glue a beautiful button or brooch to the center of the bow.
- Place sequins and rhinestones on small drops of glue, distributing them evenly over the lace.
The wedding sieve is ready - all that remains is to fill it with coins, rose petals or candies.
Wedding sieve with lace trim
DIY wedding glasses with lace
Another very simple way to decorate glasses is to use lace.
.
Lace is an ideal ready-made material that already contains an intricate design and looks great on glass. Ideally, wide white lace is suitable for wedding glasses.
To make the lace richer, it can be supplemented with beads, satin ribbons and other decorations
. In this case, the glasses were decorated with rhinestones.
Advice:
To better attach the beads to the uneven surface of the glass, it is better to use flat beads or rhinestones.
Wedding sieve decorated with tulle and ribbons
The wedding day should be special, perfect and tasteful. Even such a minor detail as a sieve should be decorated in the same style
, which is the whole holiday. You can learn how to decorate a wedding sieve with your own hands from the detailed instructions below.
To apply you will need:
- satin fabric;
- tulle;
- satin ribbons of different colors and widths;
- half beads of different sizes;
- scotch;
- White paper;
- scissors;
- hot glue gun;
- pins and thread.
Step-by-step progress:
- Cut a strip of paper equal in width and length to the dimensions of the wooden rim of the sieve. Using a heat gun, cover the inner and outer surfaces of the rim. If you plan to continue using the sieve for kitchen purposes, then at this stage it is better to use tape. You immediately need to determine the junction of all materials - it should be uniform so that at the end of the work it can be easily hidden under the beads.
- Cut a strip of white satin fabric. The width should be 2 times the width of the sieve, and the length with an allowance of a couple of centimeters.
- Glue one edge of the fabric to the rim of the sieve at the joint. Wrap the entire headband and secure it with an overlap of about a centimeter, while folding the seam allowance inward.
- Glue the remaining fabric at the top onto the inner circle of the sieve - the glue should be applied along the very edge in a thin strip.
- From tulle, cut the same strip as from satin fabric, but without leaving centimeters for an allowance. Glue on top of the fabric.
- Use a wide tape of a contrasting color to glue the upper part of the inner wall along the edge. Work should begin from the joint.
- Use half beads to close the joint from the outside and a little from the inside, where the ribbon passes.
- From a narrower ribbon, roll up roses - a large one and several small ones.
- Glue strips of contrasting tape crosswise onto the tulle on the central side of the sieve, and on top of them - a white tape of smaller width.
- Glue a large rose in the center of the composition, and randomly place small ones next to it.
- Place half beads in one row along the upper edge of the sieve.
Wedding sieve made of satin fabric and tulle
Sprinkling the newlyweds with a sieve is a fun and beautiful ritual, which also has a symbolic meaning.
. Usually this is done by the mother of the bride, but all interested guests can join her. And for the process to be truly festive, you need to decorate the sieve beautifully, and you can do this with your own hands.
How else you can elegantly and delicately decorate a sieve for a wedding with your own hands, you will find out by watching the video:
My sister and I went to buy wedding accessories and were very upset. The prices are outrageous, the materials are of disgusting quality, the beauty is questionable, and it’s quite difficult to combine everything in one style. One word - consumer goods.
But a wedding is a unique event. I would like to believe that this will happen for the first and last time in my sister’s life, so everything needs to be at the highest level. So we dared to decorate the wedding sieve with our own hands.
Decorating a wedding hall with fabric
To make the festive table look even more magnificent and solemn
, you can add fabric decorations on the sides. Usually these are light and airy materials - lace, mesh, tulle, tulle and others, which are attached with waves and complemented with multi-colored floral decorations.
Think in advance what colors your room will be in.
. Pay attention to the color of the walls, floor, ceiling. The most neutral color for jewelry is white, but you can combine a variety of colors with it. For example, the tablecloth itself can be white, and the fabric decorating the tables can be soft pink:
Large strips of delicate fabric also look beautiful
hanging from the ceiling. To do this, you need to carefully study whether it is possible to attach the fabric to the ceiling. If not, then it’s better to focus on decorating the walls, tables and chairs.
garlands of light bulbs under the tablecloth and table fabric of the bride and groom
. These decorations are usually used as New Year's decorations, but will look incredibly beautiful at a holiday banquet, making the bridal table stand out from everyone else.
Light bulbs will also look chic on the ceiling and walls.
For small cozy rooms, you can create a romantic atmosphere using dim lighting and lots of candles
. This is suitable for those who want to hold a modest, quiet wedding with pleasant, calm music, without particularly wild fun and noisy entertainment.
How to make a wedding sieve with your own hands:
The usual, cheapest sieve needs to be wrapped in white paper - so that the unevenness is smoothed out and the color of the wood does not show through.
Using a strip of paper, measure the required width of the fabric cut, mark the fold line, the inner and outer edges.
Add 0.5 cm along the edges for a loose fit. You will need it after gathering the fabric. We mark the stitching lines with a very thin pencil along the wrong side. The main thing is that it is not visible from the front side of the fabric.
Singe the edges of the fabric over a candle to prevent fraying.
We sew all three lines using a regular stitch on a machine, but change the tension of the upper thread. I set it to the maximum - 9. For an even seam, I set it to 6.5. In this case, the fabric gathers evenly on its own. At the end, do not tack and release longer threads. If the length of the gathered fabric is not long enough to wrap the sieve, you can manually slightly straighten the gathered fabric to the desired length. The main thing is to do it evenly. When the length of the gathered fabric is equal to the diameter of the sieve, add 1 cm for the loose fit and 0.5 cm on both sides for the seam (total +2 cm). We tie knots with the ends of the threads so that the adjusted width of the fabric does not change.
We fold the fabric with the right side inward, match the stitches and sew together using a regular smooth seam - do not forget to correctly adjust the tension of the upper thread.
We put the fabric on the sieve, aligning the middle gathering seam with the top edge of the wedding sieve.
We glue double-sided tape along the inside of the sieve along the bottom edge, bend the edges of the fabric and press the fabric to the tape. It is necessary to ensure that the folds are perpendicular so that the fabric does not become beveled.
Similarly, we glue the tape along the outer base of the sieve and also fold the fabric and press it to the tape.
We place the satin ribbons on top of each other and, having measured the circumference of the sieve, sew them together. We singe the cuts. We put the resulting hoop on a sieve - it will tightly press the glued fabric from the outer edge.
All that remains is to decorate the sieve with a bow.
Place the ribbons one on top of the other, fold them facing outwards and stitch along the narrow ribbon, setting aside the planned width of the top bow from the fold. The bottom bow should be slightly wider.
We fold the free ends of the ribbon to the middle with the wrong side inward, forming a second (lower or larger) bow. We sew, securing with a stitch the position of the lower bow at the very middle.
This is what you should get:
We carefully center and straighten the bow blank made from satin ribbons, and sew it together with a couple of stitches. Glue a flower with a bead onto the stitches. You need to glue it very carefully. The drop of glue should be very small. It’s better to drop a small drop of glue, let it harden completely, then drop another small drop of glue onto the same place and only then press the flower. Then the glue will not spread across the fabric.
Double bow made of satin ribbons
Using hidden stitches, sew the bow onto the seam of the satin hoop.
Here's the wedding sieve and it's ready!
how to decorate glasses glasses look
Let's decorate the champagne
The hosts or wedding organizers often give the future newlyweds a list of accessories that need to be purchased for the celebration. Sometimes the bride and groom do not know why this or that item is needed. In this material you will find answers to your questions.
How to make a rose out of ribbon
Wedding glasses are often decorated with small roses
, made from the same narrow satin ribbons. You can buy ready-made roses at a jewelry supply store, but they are easy to make yourself. There are several ways to create a rose from ribbons, we offer you one of the simplest.
To make roses from satin ribbon you will need: ribbons, scissors, thread and a needle
.
Let's get started:
Take the edge of the ribbon in your left hand, and with your right hand begin to fold the ribbon so as to get the middle of the rose
. Then secure the result with thread and needle.
Continue to twist the ribbon, not too tightly, remembering to periodically make stitches to secure it.
At the end, do not wrap the ribbon too tightly so that you get a half-opened bud
. Secure the base of the rose with thread. Cut off the excess with scissors.
Advice:
In order to easily attach the rosette to the flat surface of the glass, make it as flat as possible.
By the way, it’s a great idea to cover the glass with real rose petals.
, however, such decoration is short-lived and will look perfect “fresh”.
In addition to glasses, you can also beautifully decorate a bottle of champagne. You can read more about this here.
Plate
This item also came into the modern wedding from the Russian traditional one, just like the sieve. Previously, in front of registry offices or restaurants, one could often see the following picture: newlyweds breaking glasses or a plate on the asphalt. There is such a sign: broken dishes are good luck. Perhaps the newlyweds became happier after this, but it is unlikely that the employees of restaurants and registry offices, who then had to remove this glass from the road.
That’s why a special plate was invented as a wedding accessory. It is placed in a special beautiful fabric bag. After the newlyweds break it, the fragments do not scatter in different directions, but remain in it. If desired, they can be kept as a souvenir.
Decorating the wedding hall with balloons
Balloons
will cost you a little less than flowers, so you can leave flowers only on the tables and decorate the hall itself with balloons.
If you don’t know how to weave gorgeous garlands from balloons and make unique shapes out of them, it doesn’t matter. You can simply combine several colorful balls and hang them.
You can use balloons filled with helium.
This gas is lighter than air, so the ball will constantly strive towards the ceiling. To prevent it from flying away, it is enough to attach it to chairs, tables or other interior parts.
With such decorations, even a simple interior acquires its own zest.
and it becomes more comfortable.
Balloons filled with helium do not need to be tied to anything; it is enough to tie a streamer
and let it hit the ceiling. This decoration of the hall will look original if the ceilings in the room are not too high.
Ring pad
It shows the newlyweds carrying out their rings during the wedding ceremony. Instead of a pillow, you can use a beautiful box.
Among the many items that are traditionally used at almost all Russian weddings, a sieve especially stands out. It is from this that parents of newly-made spouses sprinkle their children with coins, hops, candies, nuts and grain. Making an original sieve with your own hands is not at all difficult; all you need is a little perseverance and imagination to decorate ordinary kitchen utensils!
Necessary materials:
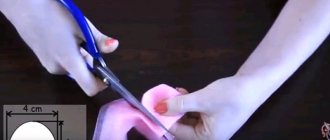
Step #1. The first thing you need to do is prepare the fabric for decorating the sieve and creating flowers. Crepe satin is best. Peach-colored fabric for roses must be cut into four equal strips measuring 5 cm * 25 cm. Champagne-colored fabric must also be cut into three strips of the same size (5 cm * 40 cm)
Step #2. The edges of all strips and the cut for the sieve must be slightly burned over a candle to avoid the fabric from scattering during operation.
Step #3. To wrap the sieve, a piece of peach-colored fabric (110 cm * 25 cm) must be folded in half (lengthwise) and sewn using a sewing machine.
Step #4. Strips of fabric for flowers also need to be folded in half (lengthwise) and stitched.
Step #5. Let's start forming the flowers. To do this, you need to take a sewn strip of fabric and twist it, squeezing it a little, and also fix each turn with glue from a hot-melt gun.
Step No. 6. In total we need to make seven roses.
Step #7. Then sew sewing tape over the seam of the screen fabric.
Step #8. Tie the ends of the ropes together on one side on the sewing tape.
Step #9. After this, you need to tighten these ropes a little. There is no need to tie them yet.
Step #10. This is what you should get.
Step No. 11. A piece of champagne-colored fabric (10 cm * 70 cm) must be glued inside the sieve, use a glue gun.
Step No. 12. On the outside, distribute the peach-colored fabric that has already been prepared and pulled into an accordion in a circle. The seam on the fabric should be glued very carefully.
Step #13. Then, also in a circle, on top of the peach-colored fabric, glue a satin ribbon to match the fabric.
Step #14. We glue the flowers on the opposite side of the seam. We fix a peach-colored rosette in the center, and distribute the rest, alternating by color, in a circle.
Step #15. We glue small white beads onto the roses and onto the sieve itself in random order.
That's it, the wedding sieve is ready! Made in delicate creamy peach tones, it will be a worthy decoration for a wedding ceremony.
Create with inspiration and use them with pleasure!
This master class will teach you how to make a wedding sieve with your own hands and decorate it
Today I want to offer a tutorial on how to create a “wedding sieve” yourself from available materials that can be found in any home. Rice. 1 Sweets, money, grain and nuts are usually poured into such a sieve. When the newlyweds leave the bride's house, the girl's mother showers them from head to toe with symbols of family wealth from the wedding sieve. A wedding is a wonderful and brightest day, so you want everything to be great! And even simple little things, for example, a sieve, should not be ordinary, but beautifully decorated elements for the wedding. To make your own “wedding sieve” that gives abundance to newlyweds, you will need:
- regular sieve;
- satin ribbon 5 cm wide;
- glue gun and any good quick-drying glue;
- nylon lace in the color of the ribbon;
- satin roses measuring 1-1.5 cm in the color of the ribbon and lace;
- blue boutonnieres.
Take a simple wooden sieve. Glue a satin ribbon to the very top edge. I took pink. After gluing the main tape, take the lace of your choice. Glue the lace very carefully to the bottom of the ribbon. Make small tucks (folds) every 1.5-2 cm to create small waves. Rice. 2 When the entire circle of lace is finished, cut it 1.5 cm longer than the first seam and make a final tuck with 1.5 cm of lace. Do not glue the cut edge of the lace, only the upper part - like throughout the sieve. Rice. 3 and Fig. 4 There will be a small space under the lace, undecorated. You can leave it just like that - under the lace this place will not be visible. Rice. 5 Then take a sieve and prepare blue boutonnieres - I removed the artificial blue flowers they were sold with in advance from mine. Rice. 6 Glue the boutonnieres all over the circle, leaving a distance of 3 cm between them (you can first mark the location of each flower on the tape with chalk). Rice. 7 Our sieve is almost ready! The only thing left is to glue the small satin flowers onto the blue boutonnieres. I also took pink flowers. Rice. 8 First apply a small bead of glue to the back of the rose. Rice. 9 With your other hand at this time you need to push apart the mesh on the boutonniere... Fig. 10 ... and glue our rose to the center where it is connected. Rice. 11 I did not decorate the inside of the sieve with anything, because... it will be filled to the top with all sorts of gifts and it will not be visible. That's all! Our magical “wedding sieve” that brings prosperity to the newlyweds is ready! Rice. 12 Thank you all very much for your attention to my MK.
Comments
Decoration with garlands
The easiest way to create homemade garlands is to use threads and colored paper
. For this you will also need a sewing machine. Such garlands look very stylish, especially in large quantities, despite the simplicity of their material and ease of manufacture.
Cut out circles of different sizes from colored paper.
Then, using a sewing machine, sew the circles of paper so that they are connected into one long garland
. In this case, you can leave a small distance between the circles.
You can make entire compositions from these garlands and decorate your wedding hall with them.
Decorating a sieve for a wedding
Master class with step-by-step photographs: decorate a sieve for a wedding with your own hands (for sprinkling the newlyweds with petals, rice, candies, coins).
Materials:
- Sieve (any size)
- Satin ribbons (width 5 and 1.3 cm)
- Lace
- Sequins
- Glue super moment
- White spray paint and nail powders
Blow out the inside of the sieve with white paint from a can and, without waiting for it to dry, sprinkle it with nail glitter.
We take a wide tape and carefully glue one end to the sieve, stretch it so that the tape fits tightly and glue the 2nd end on top of the first. You should get a flat, smooth surface.
In the same way we glue lace to the bottom of the sieve and thin tape to the top
We make a bow from a wide ribbon and decorate it: carefully place beads on droplets of glue with tweezers
We glue the bow to the sieve in the place where the junction of the 2 ends of the ribbon is visible - we “mask” it.
Looks rather poor...
We make another bow from a thin ribbon and glue it on top of the large bow - it seems better this way.
We glue sequins all over the sieve (you can use small bows or beads instead).
That's it - all that's left is to stock up on candies and coins to sprinkle on the newlyweds!
© Mir-svadbi.ru
When copying site materials, keep an active link to the source.
mir-svadbi.ru
Why candles and a sieve at a wedding: the purpose of these and other popular wedding accessories
The hosts or wedding organizers often give the future newlyweds a list of accessories that need to be purchased for the celebration. Sometimes the bride and groom do not know why this or that item is needed. In this material you will find answers to your questions.
Sieve
This accessory is now rarely used. A sieve is an attribute of a traditional Russian wedding. Parents poured cereal or small coins into a sieve, and then showered them on the newlyweds. It was believed that this brings happiness and wealth. If you have a Russian-style wedding, then you can include this tradition in its program.
Baskets or bags for rose petals
Every detail is important at a wedding. If you are planning to hold a ceremony of showering the newlyweds with rose petals, then it should be beautiful. Plastic bags of all colors, in which petals are still often placed, will not decorate what is happening. In addition to their unsightly appearance, they have another drawback: they rustle loudly. Therefore, it is better to order special baskets or beautiful fabric or paper bags for the petals.
Wedding ideas: Decorating a wedding sieve for sprinkling the newlyweds
In the wedding traditions of many countries, it is customary to sprinkle the newlyweds with rice, millet or wheat, small coins, nuts, sweets, rose petals or flowers. We now have all these traditions and rituals mixed up and everyone does what they want, often even inventing their own rituals and traditions.
Therefore, the newlyweds themselves or their parents decide what to sprinkle on the newlyweds. Usually the mother of the groom does the sprinkling, but other options are possible here too.
At the same time, the question is always relevant: “What will mom get this sprinkling from?” I answer the question posed. It can be a simple package or a sewn pouch. You can make a beautiful basket or use a regular flour sieve.
Today, in particular, we will talk about the wedding sieve and how to decorate it. We hope that this wedding idea of ours will help someone create a beautiful ceremony, with an amazing wedding sieve, and at the same time for very little money.
Wedding ideas: Decorating a wedding sieve for sprinkling the newlyweds
The sieve itself is not expensive at all and you can easily decorate it beautifully with your own hands. Here is one of the options for such decoration and another idea for a wedding.
For the wedding sieve we will need:
Wedding ideas: Decorating a wedding sieve with your own hands
Wedding ideas: Decorating a wedding sieve for sprinkling the newlyweds
To decorate the wedding sieve, cut a piece of lace, the length of which is equal to the length of the inner circumference of the sieve.
Now we glue this lace along the inside of the sieve.
We do the same along the outer edge of the sieve. It turns out that the walls of the wedding sieve itself are located between the laces.
Wedding ideas: Decorating a wedding sieve for sprinkling the newlyweds
To complete the look, we tie the sieve with an organza ribbon along the outer edge. We tie it in a bow, the center of which can be decorated with a bead, rhinestones, a beautiful button or sequins.
That's all. In just 10 minutes you can create such an elegant wedding sieve. All that remains is to fill it with rose petals or coins with candies. Did you like this wedding idea? I would like to hear your opinion.
Do you know how to organize great corporate events? I advise you to go to the website and find out everything.
Wedding ideas: Decorating a wedding sieve for sprinkling the newlyweds
More wedding ideas:
Bridal bouquet
Wedding dinnerware set, option 1
Wedding dinnerware set, option 2
Postcard book
Unusual wedding gift
tkalez.com