Master class: how to sew a hedgehog from felt and fur with your own hands
Print out the hedgehog pattern.
We cut out the details of the hedgehog as follows, not forgetting the seam allowances:
- Item 1 – two pieces in a mirror image made of gray felt.
- Item 2 – two pieces in mirror image made of fur.
- Item 3 – one piece made of fur.
- Parts 4 and 5 – one piece each made of gray felt.
- We cut out the leaves from red and green felt without stitches.
We sew together parts 1 and 2, parts 3 and 5 with a seam over the edge.
We sew the resulting three parts together, sew on part 4, leaving about 3 cm unsewn at the back of the hedgehog’s body in order to turn it inside out, insert the cardboard base and stuff it.
Cut out part 4 from thick cardboard.
We turn the hedgehog inside out. We insert the cardboard into the hedgehog's body. Cardboard is needed to make the hedgehog's tummy flat. We stuff the hedgehog's body with stuffing material.
Sew up the hole with a blind stitch.
Sew on black eye beads. We cut out a circle from a piece of black fabric, gather its edges with a thread, put a ball of padding material inside it, tighten the thread, and secure it with several stitches. It turns out to be a nose. Sew it to the hedgehog's face.
Using colored “Iris” threads, we embroider the veins on the leaves using a “forward needle” stitch.
Sew the leaves onto the back of the hedgehog. The felt hedgehog is ready! A wonderful gift for any holiday, for example, March 8th.
Our next master class will show you how to sew a simple toy to develop children's fine motor skills.
This fleece hedgehog can be easily sewn even without a sewing machine. Just your desire is enough!
A bright hedgehog will delight a child of any age. For little ones, you can sew a loop and hang it over a developmental mat, in a crib or stroller. Soft and pleasant to the touch, it will promote the development of sensory and fine motor skills.
How to sew a developmental mat with toys
Algorithm for creating a felt toy
The algorithm for making different toys has common principles. Initially, blanks are made; for this you need to prepare templates. You can come up with them yourself or pick up ideas from other masters, download them on the Internet, print and cut them out.
Mark the future part on the fabric with a marker, not forgetting to add a few millimeters for the seam. Using the marks, cut out the toy parts from the material of the desired color and thickness. You don’t have to use a marker, just baste the paper template with needles and immediately cut out along the contour.
Most often, the body parts of the future toy are oval or round in shape. The head and body are sewn from separate parts, but can be made from one piece. When all the pieces are ready, the front and back parts are sewn together with a reverse decorative seam.
It is important to not sew the seam completely, leaving a small hole for filling the part with padding material.
The seam is then completely closed. Individual parts of the future toy can be sewn or glued together. Sew on the decor during the sewing process, before stuffing the toy, or glue it at the end.
Wonderful decoration for New Year's holidays
Various craftsmen offer creative crafts for the Russian New Year holidays. But the most original ones are the ones you sew yourself. And we will help you, tell you how to create New Year's toys from felt with your own hands.
What have we prepared? Winter decor collection. All this with step-by-step manufacturing instructions. If you use our version of felt craft prompts, it will be very easy for you to repeat everything. We will show in detail how to sew flat and three-dimensional figures.
The manual describes each stage in detail: we cut out the parts, sew them together and completely design the product. That is, we do and sew everything, from start to finish. All this is easy to repeat even with your child. This will be an unforgettable vacation and entertainment.
Pattern of a fawn:
Ideas for inspiration:
Animals from original material
This collection of soft crafts is interesting because it features real fairy-tale heroes and friends of children. And it was created taking into account the sympathies of our little ones. Here you will find all those that the child himself will gladly want to create.
Hedgehog. A real children's favorite is a felt hedgehog. The kids are used to seeing him as a wise cartoon character. They will happily get to work creating a hedgehog.
Owl. Kids will definitely like this adorable felt owl. Moreover, when offering a felt owl pattern, we completely leave the color of this night bird up to you. Everyone is used to her dull feathers. What if your felt owl was bright, pink or multicolored?
Owl patterns:
Butterfly. Here is a wonderful miracle - a butterfly made of felt. Light and colorful. And this is exactly what this excellent material allows you to create.
Dog. By creating crafts with your children, you can teach your little one several things at once:
- love independently and create in company;
- good taste is instilled;
- the baby will always be able to create an original gift;
- and also, he can make himself a friend with his own hands.
And it is a felt dog that is the most common work of toddlers. After all, she can be made both cheerful and serious, playful and protective. And how many breeds! And how many sizes and colors!
Bear. In Raschudesye, you can choose from a full assortment of both a white resident of the land of eternal people and a local, our fellow countryman. All these models can be designed independently, in the form of activities with the baby.
Dolls. Do-it-yourself felt dolls are not just a return to the traditions of their people, when such products were exclusively the work of the parents, and then the little one himself. This is also the desire to give your baby the best. Create a dream for him.
All the wishes of a child can be easily realized in the craft of making dolls. You shouldn’t follow conservative, boring views when you can make such a funny and bright doll that our little one will definitely like and delight him!
LiveInternetLiveInternet
Sunday, September 09, 2022 22:00 + to quote book
[/td]
*Creating flowers from felt This article will tell you how to create flowers from felt with your own hands, and will also provide master classes, patterns and diagrams for creating flowers. Felt is a versatile material that is well suited for creativity. You can use it to create a variety of accessories and interior items. It is well suited for making gifts and souvenirs for loved ones. Felt does not fray, does not have a front or back side, you can easily sew the necessary item from it and glue it or glue it to other parts of the product without any problems. DIY flowers made from felt are a great idea for interior decoration and more. With their help, you can embellish any outfit, giving it sophisticated elegance or a touch of colorful mood. With the help of such flowers you can make a decoration for wrapping any gift. The list of applications for crafts made from colored felt is extensive - from decorating postcards to making hair clips and headbands.
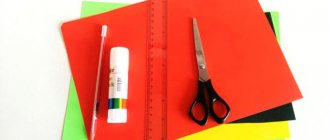
Before you start creating flowers from felt according to the master class, you need to prepare the following tools and materials:
- pattern paper;
- scissors;
- beads and beads;
- needle and thread;
- felt;
- stationery knife.
On paper you need to print or draw a pattern for making felt flowers. You can make buds of different sizes and types. You can also draw fantasy flowers that you created yourself. But in this case, you need to take into account your skills, without which complex flowers will not turn out the first time. Before printing the pattern, which is in an electronic version, you should adjust the dimensions so that they are suitable for realizing the idea.
To decorate a postcard or photo album with felt crafts, you need to adjust the width of the parts to the dimensions, which are maximum 2.5 cm. To decorate clothes, the width of the parts can be increased by several centimeters. You also need to take into account that when sewing, the dimensions will decrease slightly.
*Master class of felt flowers
Many people are thinking about a unique gift for their loved ones. And most are interested in the question of how to make flowers from felt. To make flowers according to the master class, you must first prepare patterns for the petals.
You can download templates and patterns for flowers made from felt yourself on the Internet or draw it yourself, then cut it out along the contour from cardboard. At first glance, some petals will be very similar, but in fact they differ in their shapes and sizes. This is necessary for the correct formation of the petals in the bud.
Next, according to the pattern, you need to cut out the future flower. The edges of the petals can be decorated as desired by sewing with a simple thread or floss, the color of which is suitable for the petal.
Then you should arrange the petals in the correct order and sew or glue tightly, so that in the middle of the flower there is a small depression for the core.
The core can be cut out of a darker felt color and glued into the middle of the flower or sew on a beautiful bead. The flower can be decorated with additional fittings or an ornament can be embroidered on the petals. The resulting craft can be used to decorate a hair clip or headband. Or you can make several of these crafts and form a bouquet. Even a beginner who does not have much experience in making felt crafts can make the flower that will be made using the given master class.
*Master class on felt roses
Next, a master class on making a classic rose will be offered.
For work you need to prepare the following materials:
- multi-colored felt;
- regular and curly scissors;
- glue;
- thread and needle;
- washable or disappearing marker;
- template for a pattern;
- multi-colored floss threads;
- pins;
- beads or buttons.
If a person does not have experience in creating flowers from felt, then the best option would be to use patterns and diagrams. They will help you choose the right proportions for flowers and not make mistakes with the size of the petals.
To create this craft you need a small amount of felt. On the prepared material you need to draw a circle, the diameter of which will be about 10 centimeters. It is worth noting that the larger the diameter, the greater the volume of the future rose. But still, you don’t need to make the rose too big, as the result will be a rough and sloppy flower.
Then you need to draw a spiral on the circle, starting from the outer edge and ending in the middle.
The wider the line, the larger the petals will be. Using curly scissors, cut out semicircular petals in a spiral. Next, the stage of assembling the rose begins. The resulting spiral must be rolled into a flower. You need to start from the middle, roll it up a little, coat it with glue to secure it and let it dry. After this, twist the entire rose to the end and strengthen the lower part with glue.
The ends of the petals can be trimmed with thread, but you can leave them as is.
Because felt does not lint or fluff. This completes the master class on making roses. You can make many of these crafts in various sizes and colors and decorate your hair clip with them. Or add a few green leaves to the flower and attach it to a brooch base. This brooch will be an excellent decoration for any style of clothing. Today, there are a huge number of different templates for felt flowers that you can use to create patterns. Such crafts will be an excellent decoration for clothing or interior design, for postcards or albums. They will be able to breathe new life into old things. https://minigift.ru/zhenshine/tsvety-iz-fetra-svoimi-rukami-shablony-shemy.html *Templates for creating flowers from felt
https://ok.ru/group/54348247924851/topic/66867278564211
| Categories: | HANDCRAFTS/DIY |
Cited 4 times Liked by: 1 user
Like share
0
Like
- 1
I liked the post - Quoted
- 0
Saved
- Add to quote book
- 0
Save to links
Liked1
0
Tree “4 seasons” made of felt
You can make a didactic felt toy for individual lessons no less colorful and visual. The uniqueness of this craft is that it is completely safe and environmentally friendly. A tree made from natural materials will appeal to any preschooler. Children will find it interesting to decorate the crown of the tree in accordance with the proposed time of year. You can also guess the name of the season yourself based on the corresponding signs.
The principle of the toy is as follows: the corresponding parts (fruits, flowers, snowflakes, clouds and colored leaves) are glued onto the base-trunk. Children must independently select the appropriate tree decoration details that are characteristic of a particular season.
Educational book made of felt
What are educational toys? These are unusual toys that develop memory, imagination, and the ability to combine and organize. Toys for role-playing games will help a child acquire communication skills and broaden their horizons, while toys with functional fasteners and removable parts will develop fine motor skills and logical thinking. In early childhood, the development of fine motor skills in a child is very important, because it affects the further development of attention, speech, and perseverance. Why an educational toy in the form of a soft book? Because turning the pages is such a pleasure, because it’s so interesting “What’s next?”))) This instills a love of books and reading.
What beginner craftswomen can make from felt with their own hands
Thanks to its pleasant texture, felt is often used for sewing children's toys, including educational ones. This is a great opportunity to practice, since crafts are not difficult.
Felt crafts for beginners: educational letters for kids
Soft letters can be filled not only with padding polyester or holofiber, but also with rustling foil or cereal; such a craft will be used as a developing alphabet. Many needlewomen sew metrics with the child’s name, which act as the main accent in the nursery. For preschoolers you can make a real alphabet, board and letters on Velcro. In this way, in a playful way, you will prepare children for school.
Use a felt-tip pen to trace a template made of cardboard or thick paper. You can sew halves of letters together using any seam, the main thing here is accuracy
We offer you to look at several felt works that you can easily make with your own hands together with your children.
Indistinguishable from the original: delicious food made from felt
Unusual, but at the same time simple felt crafts in the form of all sorts of goodies can be made in just an evening, the main thing is to show your imagination and choose the material according to color. Large parts are sewn by hand, and filler is placed inside for volume. To connect small elements it is easier to use a glue gun.
We will show the entire manufacturing process using the example of pizza.
Diagram of pizza, sauce and ingredients Prepare the base, put the filling inside near the edge - these will be the sides, cut out the sauce from red felt, and cheese from yellow felt Cut out the ingredients from colored felt and glue to the pizza
In the video you can get ideas for creating “delicious” felt crafts with your own hands as a gift for a child:
Watch this video on YouTube
Step-by-step instructions for making a felt pincushion with your own hands
A needlewoman should definitely make a gift for herself, for example, sew a pincushion from felt. The craft can be in the form of an animal or a fruit; we suggest making it in the shape of a cactus.
To work you will need:
- green felt;
- pins;
- green threads with a needle;
- marker and scissors.
Let's get to work.
| Illustration | Description of action |
| Prepare a template for one side of the cactus and cut out 8 blanks from felt. | |
| Sew two pieces along the straight side at a distance of 2 mm from the edge. | |
| Sew the next piece along the semicircular edge. | |
| The fourth element is sewn along a straight edge. Further all actions are similar. | |
| After sewing all the parts together, the workpiece took on the shape of a cactus. Next, sew and tighten the top with a thread. Place the filling inside on the reverse side. | |
| Cut out a flower from white felt, lightly color the edges of the petals with a yellow marker or chalk and sew the cuts together as shown by the arrows. | |
| For the center, cut a yellow strip 10 cm long onto a fringe 2 mm thick, without cutting to the edge of 5 mm. | |
| Twist the yellow strip, sew it to the flower and then to the top of the cactus. Additionally, you can make a pot out of brown felt and fill it with filler. |
You can watch the whole process in more detail in the video:
Watch this video on YouTube
Felt hairpins and elastic bands
Multi-colored felt is often used to create beautiful accessories and high-quality, inexpensive jewelry.
Soft material is used to cover beads, form flowers from individual petals, cut from colored fabric and other elements that will decorate style accessories.
Prepared decorative ornaments can be used to decorate accessories for hairpins, creating original masterpieces.
Soft elastic bands can be easily created by sewing a rectangular piece along the length with an internal seam and threading a regular elastic band into it; such elastic bands do not damage the hair and always look elegant.
Felt. What kind of material is this?
Felt is a non-woven material made from fibers. It is usually made from wool, but nowadays manufacturers produce it from various fibers, both natural and synthetic. Here are the most common types of material:
Acrylic felt. Consists entirely of synthetic fibers. Its structure is smooth, with a noble shine. The color range of this type of felt is very diverse and can be purchased at any craft store. This material is suitable for making souvenirs, keychains, cases for mobile phones and tablet computers.
Felt made from bamboo fibers. This type of felt is made from bamboo and viscose. Its cost is quite high, but it is very durable and strong.
Note! Do-it-yourself felt letters: patterns, templates and a master class for making beautiful letters (155 photo ideas, instructions and video)
Accessories
Nowadays it is fashionable to put mobile phones in homemade felt cases. This is a fairly simple craft that requires minimal skills.
Pattern. 2 parts are made according to the size of the phone, an allowance is added for the thickness of the phone in double size. If there is a valve on the cover, you need to cut it out in 2 parts. The front side is decorated. This can be a thermal image or rhinestones, embroidery, felt and fabric applique. Even sewn multi-colored buttons will make the case unusual. On the wrong side you can sew a pocket for credit cards or travel cards. If the case has a flap, then first the flap is sewn onto the reverse side, a magnetic button is placed on it, and the second part of the button is installed on the front part
It is important to accurately calculate the connection location of the magnetic fastener. Sew both parts either by machine or by hand.
Application "Flower Garden"
Flowers are relevant everywhere and always. The photo shows a wonderful example of felt applique. A child can easily make this for his mother or grandmother for his birthday, March 8, Mother’s Day.
- Cut 18 petals from felt using a template or yourself.
- Place the petals as shown in the diagram on thick felt or cardboard.
- Sew the side petals in two threads with a chain stitch, and the middle one with a darning stitch. Attach all 6 flowers in this way (you can change the number if desired).
- Draw a stem and leaves in the shape of stripes on the base with a pencil.
- Embroider the stems and leaves using a stem stitch using four threads.
Such applications for children, especially in schools, are popular because they are simple to do and look beautiful.
Peppa Pig
Children like cute animals, especially if they are characters from their favorite books or cartoons. Let's look at how to make Peppa Pig from felt with your own hands.
You will need to prepare:
- felt in five colors for the face, dress, eyes, shoes, blush
- needle and thread, padding polyester
- beads for eyes, glue gun.
Operating procedure:
- Cut out all the cut pieces as in the picture above.
- Sew two parts of the dress and stuff the red felt with padding polyester.
- Then glue Peppa’s tail, arms, legs, and shoes with glue.
- Sew on the eyes, snout, blush, draw a mouth. The pig is all ready.
If you use it as a magnet, you also need to sew pockets for magnets on the body and head.
Ideas for creativity
Felt is good because it can be used to make flat and three-dimensional shapes; they can be filled with any filler:
- padding polyester;
- cotton wool;
- wood shavings;
- foam balls;
- plastic film.
Kids love to play with crafts stuffed with rustling cellophane, seed husks, and buckwheat. Adults will be delighted with a little thing with coffee beans inside and aromatic herbs. Felt absorbs odors well; if you drop a few drops of orange, coniferous or lavender oil on a souvenir, you will get a flavoring.
What interests children
If you want to spend a few quiet minutes with your child, keep him busy with creativity. School-age children are enthusiastically making sewn toys, and kids are gluing together parts cut out from patterns. If a child knows how to use scissors, he is entrusted with marking and cutting felt. By March 8th, soft bouquets are made for gifts.
Felt flowers are attached to a hoop or hair clips. If you hook the bud on a pin, you get a brooch. For the New Year holidays, they make refrigerator magnets or Christmas tree decorations with the symbol of the year. How to make a pig, read below in the master class. For Easter, an excellent gift would be a small chicken, an egg-shaped pincushion, souvenir paints, and a cake covered in glaze.
Things for adults
Women love to use soft, original-shaped cosmetic bags, key holders, small bags for phones and small items on a long strap made of durable tape. Soft jewelry looks original: brooches, necklaces, bracelets.
Soft felt panels and decorative crafts are trending:
- cacti in pots;
- decorative fruits;
- coasters for mugs;
- warmers for teapots or saucepans.
Young mothers make educational mats and boards from felt for babies, wall toys for storing pajamas. Craftswomen make custom soft letters for the baby's name - such gifts for newborns are very popular. For Valentine's Day, soft voluminous and flat hearts decorated with flowers and decorative buttons would be appropriate. Cases for phones and laptops are practical - they help preserve battery power.
Preparing for work
Before you start implementing your idea in the form of an application, you need to prepare everything you need for the work. Creative success largely depends on the fact that the necessary parts are always at hand.
Selection of materials and tools
Everything you need to make an applique can be purchased at a special store or found at home. You should prepare:
- scraps of thin multi-colored felt;
- dense thick flap for the base;
- small element templates;
- patterns for patterns;
- pencil and scissors;
- glue gun;
- a set of multi-colored embroidery threads.
It is better to make blanks for appliques from scraps of material in advance so that it is convenient to assemble the picture. Blanks are made using templates.
Patterns for complex products
If templates are prepared using ordinary stencils, then toys, panels or paintings may require patterns that you can draw or build yourself thanks to step-by-step recommendations or photos.
Necessary materials for work
To start making felt flowers, all you need to do is purchase several sheets of the required colors. You can freely choose them both in regular craft stores and order them online. You also need to have thread, needle, scissors. For some options you will need PVA glue. If you have a glue gun, that can also be used. You can create not only flowers from felt to decorate clothes or hats, but also make them on thin sticks and put them in a vase. For such a craft, you can use both simple twigs covered with fabric and other waste material, for example, cocktail tubes or wooden skewers.
New Year's toy Rat (mouse) made of felt with patterns for the New Year 2022
Anna Konstantinova made a cool felt mouse with her own hands, and also shared her master class with a wide audience of the YouTube channel. I suggest you get acquainted with the scheme of its work.
To work you need to prepare:
- felt in several colors;
- threads and needles;
- thin tape 0.3 cm wide;
- filler for toys;
- eyes with a diameter of 6 mm;
- black fishing line;
- scissors;
- glue gun;
- pattern.
We cut out all the details.
We pierce the yellow felt parts with a hole punch to make cheese. We make the cheese from hard felt, and sew the mouse from soft felt.
To make a piece of cheese realistic, we recommend making holes of different diameters.
We place the head pattern on the body, put a piece of cheese and stitch it.
Sew the legs together using an overcast stitch. Fill the small paw with toy stuffing.
Are your paws ready? We begin to sew the body of the mouse. We glue the ribbon and ears with a glue gun.
Next, we sew both parts together with an overlock stitch using sewing threads to match the color of the toy.
Sew on the paws.
Now we glue small details onto the muzzle: eyes, nose, mustache. We collect a cheese bow and glue it onto the mouse’s head.
Be sure to try making a felt toy. It will become your baby's favorite. Like and subscribe to new articles, there will be a lot of interesting things!
Flowers in a vase
Volumetric flowers on stems, made of felt sheets, can be placed in a vase and decorate the interior of the room. They are created from several identical circles folded into wavy lines. To do this, cut identical round parts and fold them in half, then fold them again. The result is triangles with rounded edges.
To fasten them together, threads and a needle are used. The flower itself is spherical in shape. In order to place the bouquet in a vase, you need to attach the stems. They can be made from cocktail straws or wooden skewers wrapped in crepe paper. You can cut a couple of leaves onto the stem and attach them by wrapping them around a stick with PVA glue or a glue gun.
From the article you learned in detail how to make flowers from felt. The techniques for making such crafts and how they can be combined to create an original pattern from fabric are carefully considered. Since felt is a soft and elastic material, products made from it have a pleasant appearance. Any, even the simplest, flower will decorate the clothes or headdress of the housewife. Try and imagine, add your own options and color schemes. Good luck!
What useful crafts you can make with your own hands from felt for storing things with photo examples
Useful felt projects that you should try to make yourself include boxes and a phone case.
How to make a phone case from felt quickly and easily
A telephone is an expensive and very necessary thing, so you should treat it with care. The felt material will protect both the screen and the body from scratches, protect the product when dropped and give pleasant emotions to the owner.
Sewing is carried out using a sewing machine and hand stitches. The appearance and decor of the finished product depends on the creative approach.
Convenient felt box
You can probably sew anything from felt with your own hands. Why not make a storage box for various handicrafts? You will need as much felt as you need storage space. It is better to initially choose a material of good quality and high durability.
The service life of the box depends on the quality of the felt material.
More felt ideas and good mood in your creativity!
Felt rose.
As usual, you need green felt and pink felt.
You need blanks in the form of stripes, squares, one circle and the rest of the drops.
We do it by analogy with the previous ones. We insert a leg into the center of the circle, pour glue and twist it.
Then we take the strip and fold it like an accordion. And between the folds we pour a little glue.
We combine several accordions together and glue them together.
We bend the edges in one direction and insert the stem with the existing core into the center.
Glue the petals on top in one layer.
And we glue a green seal under the flower.
This is the rose that came out of felt.
It looks beautiful.
Now we will make additional decorations for the bouquet. We will need yellow felt balls.
Take the ball and scissors.
We make a cut with a cross, pour just a little glue inside and insert the cane.
It looks like a felt dandelion.
In a vase they look original.
Take turquoise firth and create various branches and leaves.
Draw a shape on felt and cut it out.
There are practically no sharp corners.
We pour glue along the main trunk and glue the wire so that we can combine them with the bouquet.
This is what we get.
Each petal has a different shape.
And they look very beautiful in a vase.
There is a lot more that can be done and invented, but I think this will be enough. We will collect everything in one vase and arrange it.
Take the wire and cut it into equal pieces.
Compose an initial bouquet of several flowers and wrap it with wire in the middle of the stem.
This is how it should work.
As you add several flowers or decorative accessories, wrap the wire again.
Evenly distribute flowers of the same shape so that they do not stand next to each other in the bouquet.
See that the colors combine beautifully with nearby flowers.
You can insert some branches higher. This will lengthen the bouquet.
We trim the edges of the legs if they are not even.
Then cut off a small piece of felt.
We pour glue onto the edges of the legs, near the flowers, and wrap them with a cut piece of felt.
Use the remaining felt to wrap the entire length of the bouquet's legs.
This is what happens.
And at the end, we wrap a ribbon in the form of burlap along the green firth.
Here is the final result of the DIY felt bouquet.
DIY felt crafts are one of the most affordable types of handmade crafts. And this is largely due to the amazing flexibility of the material. Felt is felt made from natural wool. Its texture is thick “notches” of fibers that are thoroughly intertwined and help the product keep its shape. Felt fabric comes in different colors and thicknesses, so you can always choose the material that suits your design. So, let’s say, toys are made from thicker felt, and flowers are made from thinner felt. But there are no strict compliance laws in this matter.
Felt phone case
Sewing a case for a smartphone or tablet is quite simple; for this you need to prepare two parts from dense material.
An original craft will be created by using different methods of decorating the cover, and it is better to sew the prepared parts with an external seam.
Dense wool threads are used for stitching, which will create the illusion of volume and further decorate the case.
Additionally, you can decorate the case with beautiful embroidery, felt overlays of a different color, elements in the shape of flowers, leaves and animals, and geometric shapes.
Simple manufacturing methods
If you are a beginner, then you can make a beautiful keychain using several simple methods. To implement them you will not need a lot of time and energy, and the result will please not only you, but also your loved ones.
What can be made from paper
This option is the most affordable and simple. You can create a wide variety of crafts from paper that will be a great addition to your style. The process does not take much time and consists of the following steps, which explain how to make a paper keychain:
- We take sheets of suitable density. When creating a keychain, you can use cardboard and corrugated cardboard of any color or old magazine covers.
- Cut the selected material into triangular strips.
- We attach an ordinary toothpick to the wide part of the paper strip.
- We fold the strip and glue the narrow tip with PVA.
- We coat the workpiece with varnish.
- We put it on a rope and decorate it with beads.
How to make a felt tree with your own hands master class
The long-awaited spring has arrived, the time when everything around awakens from the winter cold. Do you want to fill your home with a spring atmosphere and give comfort to your family and friends? Then you will definitely like this article from the News Portal “Vtemu.by”, because we will talk about amazing felt crafts - trees!
Felt trees of the most incredible shapes and sizes, colors and styles will be a wonderful decoration for any interior, and in particular such amazingly beautiful trees will look great in your little one’s room. You can try to create a whole composition around such a homemade tree - hang a swing, install a ladder, sit a couple of funny birds or baby squirrels. In a word, you can do absolutely everything that your limitless imagination is capable of.
To make a tree from felt, you will need: felt of various colors, filler (sintepon, cotton wool, foam balls, cereals, scraps of fabric, etc.), a glue gun and a weighting agent, which will need to be laid at the base of the tree to make it stable. The weighting agent can be the most ordinary stone.
So, using the finished pattern, cut out the future tree trunk from dark brown felt in two copies. Then sew them together, not forgetting about the filling and weighting material.
Now it's time for the most enjoyable part. Use felt of different shades and colors to make foliage, which you then glue or sew to the tree trunk. The more leaves you decorate your homemade tree, the more impressive the work will look.
Another option for a homemade felt tree is to make it based on a cardboard trunk. The cardboard blank of the barrel must be covered with felt of the desired shade, and then the craft should be decorated with felt leaves.
Ready-made homemade felt trees will be a wonderful gift for any holiday and for any occasion.
Felt family tree (and more)
Hello, dear needlewomen!
Recently, we were given the task of making a family tree in the garden.
On the Internet you can find a huge number of templates on this topic, print them out, stick a photo and you’re done, BUT! I decided to go ahead and make a tree out of felt.
It turned out very bright and beautiful
I didn’t film step by step how I did it, but I can easily describe it in words so you can repeat it
- on an A3 sheet of paper we draw the grass and sky with paints. Let it dry.
— so that our sheet does not bend, we make the base from cardboard. Attach using double-sided tape.
- using a pattern or by hand, draw a tree trunk and its crown, as well as apples (or, for example, acorns, flowers, etc.)
— I cut the trunk from artificial leather, the crown from soft felt 2 mm thick, and the apples from hard felt.
— we print the photos on a printer; of course, it will be necessary to adjust them to the size of the window in the apple.
- secure the edges with glue and sew the frame with threads to match or not (at your discretion)
— glue all the parts using a hot-melt gun.
— we print the names of relatives on paper, cut out the leaves and glue them to the apples.
OUR TREE IS READY
Felt crafts and toys with patterns: creative ideas for children
Why not give your children some new handmade toys? The variety of cats and owls look especially interesting.
Felt cats: the cat world of childhood
Do-it-yourself felt figures appear very quickly, especially if they are small in size. The filling is cotton wool, padding polyester or holofiber. You can teach cats and children to sew.
Cats are sewn in the same way as other figures. It’s not difficult to get a template, draw it, or take the base from a large children’s coloring book. Three-dimensional toys are sewn on a sewing machine. The shape of the product can be any, even the most bizarre.
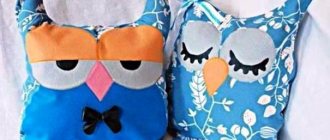
DIY cute owls
DIY crafts for children made from felt are especially beautiful and original. Probably, the point here is in the material itself - it’s comfortable to work with, the edges don’t crumble, and everything is sewn together very easily. We suggest you try making funny owls from different pieces of felt.
Small owls are more difficult to make; the beauty of the work depends on the size of the stitches and the ratio of small parts. To help those who wish, a pattern of a standard owl.
Children's crafts made from felt
Together with your children, you can make interesting three-dimensional and flat felt crafts using appliqué, stitching and gluing techniques.
The soft material is ideal for developing creativity and fine motor skills, imagination and perseverance in children of all ages.
Toys
Sewing toys with your own hands together with children is a lot of fun, and before that you can give your child the opportunity to draw a sketch of the craft.
Such designer products help the child to express himself and realize his abilities in crafts, depicting his favorite character or hero of fairy tales and comics.
Letters
Three-dimensional letters are not difficult to make; to do this, you need to draw a letter on a sheet of felt and, duplicating it on the second one, cut out two identical blanks.
The elements are folded together and sewn along the edge, with an outer seam, for which dense, colored threads are used; at the end of the work, the letter is stuffed with filler and completely sewn up.
Using the same technique, you can make numbers and any figures (punctuation marks) that can be used in the learning process, turning classes into a game.
Educational books
An interesting solution to diversify home activities and broaden a child’s horizons in accordance with his age are educational books. Pages made of soft felt are stitched and you can place magnets in them or sew one of the pieces of Velcro onto the surface.
On the pages of such fascinating and educational books you can place various flat figures cut out of thick felt with attached magnets or second parts of Velcro.
Types of felt
Felt is one of the varieties of felt, being a non-woven and fairly durable material that is made from different fibers. The quality and origin of fibrous materials determine the classification of felt, which can be of several types:
- natural felt can be down, wool or down-wool, as soft and pliable as possible, it is best used for needlework if children are involved in the creative process;
- synthetic material is available in two types, acrylic and polyester, this felt is flexible and easy to process, it has a denser structure that ensures long service life of finished products;
- mixed felt is made from a pre-prepared mixture of synthetic and natural materials; it belongs to the middle price category; it is used for sewing durable and useful crafts.
All types of felt are soft and pliable; they hold their shape well in finished products and are relatively inexpensive.
Most often, the material is sold in sheets of different sizes, and you can choose different colors and shades, which is convenient for creating bright and colorful crafts.
DIY felt toys with patterns (can be printed)
Using felt it is easy to make simple toys for little ones. Craft making activities develop fine motor skills of the fingers. The child learns about the world around him, like a colorful soft fairy tale. Along with the soft cats comes the first game: “Who said meow?”
When your child can grab with his hands, make him a soft caterpillar. The craft is based on primitive circles and small pieces of fabric for the legs. Fill each part with holofiber and sew on Velcro.
By 6-7 months the baby gets tired of lying down. He tries to understand the world around him and explore the rooms. Make a soft city for your child. You will need simple patterns of houses and trees. These are squares and circles. Decorate the craft with buttons. Select small and large beads. Sew on the zipper.
Felt souvenir: master class
Handmade souvenirs, designer gifts. Make felt clouds as a birthday surprise. Or hang crafts on a baby's mobile above the crib.
Materials for work:
- white felt;
- threads;
- small black rhinestones or beads;
- small pink buttons;
- satin ribbons;
- filler;
- scissors;
- ruler;
- liquid glue;
- eau de toilette or bed linen fragrance.
Steps:
- Cut out a random cloud pattern from a sheet of white paper. Make it approximately 11 cm long.
- Redraw the pattern onto felt.
- Cut with scissors. You should get 2 parts for one toy.
- Apply odorless liquid glue around the edges. Leave one arch clean for filling.
- Connect the two parts. Press with your fingers to ensure the patterns adhere evenly. Leave to dry for 30-50 minutes.
- Moisten the filler with eau de toilette. Stuff into the base.
- Seal the hole.
- Glue rhinestones in the shape of eyes and thread in the shape of a mouth.
- Measure 10 cm of satin ribbon. Glue it into a ring. Fold a thin ribbon from a 5 cm ribbon. Glue to the ring in the form of a bow.
All you have to do is attach the bow with glue to the cloud. Make another craft in the same way. Use pink buttons to make cheeks for the clouds. After a few minutes the glue will dry and the craft will be ready!
Easter eggs - patterns for beginners
Small felt crafts will also come in handy for Easter. It is easy to sew an egg from oval patterns. Fill the blank with padding polyester. Decorate with embroidery, satin ribbons or braid.
Patterns for Easter eggs made of felt.
From two oval blanks you will get an almost flat egg. Want to make a 3D Easter egg? Use wedge patterns. You will need several of them. Sew it in the form of a round piece, stuff it with filler. Cover with beads or glass beads.
When decorating an Easter egg with a flower, decorate one half. Sew petals, a bead, and scraps of braid to it. Only then sew both halves to each other.
Felt piggy for New Year 2019
A great idea to give felt toys to guests at a New Year's party. Let this be the symbol of the New Year 2022 - a cute pink pig.
Materials for work:
- textile;
- scissors;
- filler;
- threads with a needle;
- beads for eyes;
- thin satin ribbons;
- accessories for decoration;
- heat gun;
- fabric outline;
- pattern template.
The template for the craft is made on A5 paper. Want to do more? Print the template on A4 sheet.
Steps:
- Use a template. Cut out fabric pieces for the craft.
- Using an overcast stitch, sew two pieces for each part of the pig. Fill each piece for volume. First make the legs and body. Then the head and ears of Piggy. The ears will remain flat.
- Place your head against your body and insert your paws. Stitch.
- Glue a patch to the head with a heat gun.
- Using a contour along the fabric, draw eyelashes, eyebrows, and a mouth. Don't have an outline at hand? Just embroider small details with thread.
- For the pendant, make a satin bow. Scorch the edges with fire.
- Cut out the details for the Christmas tree. Sew like a piggy using an overlock stitch.
- Decorate the Christmas tree.
Make a flat pig in the same way. It will be easier. Cut out similar pieces from felt. No filler is used. Hem every detail. Attach the parts with a heat gun. Decorate the face and the Christmas tree.
DIY felt applications
If you don't like complex types of needlework or are just a beginner in the field of artistic creativity, you will definitely love felt appliques. They are easy to make, and such souvenirs look bright and original.
Ideas and options
Felt appliqués are made both in the form of simple objects, for example, a heart with decor or a flower, and consisting of a large number of elements that make up entire plot compositions.
With this technique you can do the following:
- magnet;
- brooch;
- pendant;
- postcard;
- wallet;
- album cover;
- soft toy;
- pillow toy;
- decorative panel (flat or three-dimensional).
The list of options is, of course, not limited to just these. It all depends on your imagination.
Tools and materials
To make felt appliques, you will need the following:
- Thin felt in different shades.
- Thicker felt for making the base.
- Element templates.
- Paper or cardboard for patterns (when making complex objects).
- Pencil, eraser.
- Scissors.
- Glue (it’s good to use a heat gun).
- Threads with a needle, for example, floss (usually in a contrasting shade to the color of the elements of the composition).
Felt applications: patterns
As a rule, simple shapes, often geometric shapes, are used for work, so you can draw templates using ordinary stationery stencils. If you need more complex contours, for example, of natural objects, use printed blanks.
With the help of such contour drawings, you can make different applications from felt. Patterns can also consist of more than just contour elements of the shape. The following illustration shows a fish preparation. The general outline of the object is formed from several separate parts, and not from one common one as in the first diagram.
You can do the same with the templates from the first diagram, dividing the butterfly or heart into halves, and for the sheep, compose the entire figure from individual parts.
It’s easy to use any photorealistic image as a pattern stencil (the first illustration in the text or the next section). If the pattern is located frontally and not on the side, then it is enough to print the picture in the required size and trace the contours of all the elements separately through the glass. It’s also easy to do directly from the screen, placing glass on top so as not to damage the monitor.
Let's consider the technology using the example of manufacturing decor for interior decoration. Similarly, any composition, even a simpler one in the form of a single flower or animal, and the decor of a voluminous item, for example, a pillow or soft toy, will be performed. In the last two cases, the base will consist not of one blank, but of two simple-shaped parts sewn together and filled with padding polyester or other materials.
To make a magnet in the shape of a heart with flowers, as in the following illustration, work like this:
- Cut one (if you want to make the base flat) or two pieces in the shape of a heart. Choose a color of your choice, not necessarily black.
- Sew the workpiece with a buttonhole stitch. If you want to make a three-dimensional heart, you need to connect two parts and sew them together using this seam, which in the first case serves only a decorative role. However, to obtain a voluminous heart, it is better to sew the parts together after completing the appliqué. You will be laying padding polyester inside (between two parts), so if you do this right away, creating an applique on the front side will be inconvenient.
- Apply the remaining parts in layers in accordance with the sample. The stitches that secure the elements are clearly visible in the photo. If desired, use beads for decoration as shown in the picture.
How to make a panel
To make a decorative panel you need to work like this:
- To make beautiful appliqués from felt, use ready-made templates for parts. Print out your favorite pattern or color illustration (photo below).
- Cut out all the necessary elements from paper.
- Lay out the pieces on sheets of felt of the appropriate color. Trace the contours, cut out the blanks.
- Prepare light blue felt for the base (if you are making a landscape similar to the one shown).
- Place a blue sky detail for the background, a light green ground, and a grass silhouette for the foreground. Pin and baste the pieces.
- Machine stitch a seam along the front side around the perimeter of the background rectangle.
- Sew another stitch along the wavy edge of the blue piece, the arc of the light green piece, and the carved side of the grass.
- Do the same with the sun and crowns, and then tree trunks.
- Sew the flowers by hand, although if you don’t have a machine, all seams can be done simply with thread and a needle, however, this will take much longer. Flowers in the form of circles can be easily made from sequins, securing them with a bead in the middle. Small parts can also be attached with glue.
- Frame the panel. The easiest way is to glue the work onto cardboard in a contrasting color (in this case, black).
So, felt appliqués are made using simple technology, so even novice needlewomen can make them. There are a lot of options for souvenirs that can be made in the form of bright appliqués.
fb.ru
Toys that interest children
Beautiful felt toys can attract a child’s attention, make them wonder and give them joy. There is something about them that makes not only a child’s soul, but also an adult, attend the holiday. Let's figure out together what makes them so attractive and what benefits they have:
Let's figure out together what makes them so attractive and what benefits they have:
- A felt toy develops a toddler's development from the first months of life;
- High-quality active play: making toys and playing with them;
- A felt alphabet with animals will introduce letters and the amazing world of nature;
- Bright, colorful, and baby-safe material from which the soft toy is made.
Develop children with unusual dolls
These soft toys for children are simple and cute. They are a real miracle that you want to play with. But at the same time, we can safely say that they are unusual. How? Let's look at this with examples.
A bright flower in which each petal has a different filling.
This felt toy is for newborns. Little ones learn about the world through touching everything. Therefore, such an original idea with different-feeling “fillings” will diversify newborns’ ideas about what surrounds them.
Puzzles.
It will be interesting and useful for children to collect felt pictures, divided into 2 parts. Soft figures with your favorite toys: a felt bear, a ball, a pyramid, a fish or a train. How much joy awaits the children when the picture matches. But at this moment they learn to compare color and shape.
Patterns for puzzles:
Lacing - Hedgehog with a harvest.
A hedgehog runs quickly through the forest, stopping near an apple tree and a pear tree, collecting the fruits of the trees that are hidden in the grass. There was a tree stump in his path, and under it a mushroom. The felt toy suggests that the little ones will be able to help the hedgehog harvest.
Choose clothes for the beast.
A difficult task awaits the kids; various felt animals have “lost” their fur coats. Do our children know what clothes a turtle, zebra, pig or fish wear? What is the fashion of the giraffe and the cow? This remains to be seen.
Fun account.
Who said that learning to count is tedious and uninteresting? We will break the stereotype. With the help of these felt toys, even very young children will delightfully master the now boring numbers. Moreover, they are presented in two healthy versions.
again ladies from felt + patterns
oh, I love them, they’re so cute, this is the second time I’ve sewn them, the first ones can be seen here https://stranamasterov.ru/node/582238?t=2167 the patterns for them will be in this post. Although I now have 10 of them, and usually I give away my crafts as gifts, I didn’t have the courage to part with any of them! I love them all, although I haven’t used them for their intended purpose yet, but I’m waiting for one event after which I will definitely use them, this is the purchase of a sewing machine, and then they will come in handy. In the meantime, let's watch.
I photographed on different backgrounds, so look at two options at once, strangely on pink it gave some kind of cold pale green effect, well, as you like. and so meet me, this girl is dreamy and sentimental, loves summer and the sun!
this madam is not indifferent to the shine of precious metal
this very energetic, eccentric, very addicted nature
well, you already understood that, princess
this white girl is a very romantic person
and this is my favorite funny girl, she loves tea roses
I won’t say anything more about them, there must be a mystery in a girl, so guess it yourself!
Well, now the promised patterns, in this picture the body, that is, the head, neck and shoulders, beauties and the base, in the previous post I made it on a triple basis, this time I was lazy, I made it on a double basis, as you already understood, they overlap each other
Well, here’s the most interesting part: hairstyles! the first top four patterns are from past ladies, and the rest are from today's ladies. Please note, there are hairstyles that have a slit, in them we insert the face from top to bottom and sew it directly to the first base, the rest first the face, and then apply the hairstyle, sew everything on the first two bases, and only when all the decorations are sewn on does it take the turn of the last base , so we will close all the threads and knots
stranamasterov.ru
Mushrooms in a basket
Everyone knows that autumn is mushroom season. So, if a child wants to make autumn crafts from felt in the form of mushrooms, this is quite suitable for an exhibition. Mushrooms can be placed in a small basket, having “collected” various types in the forest. For example, boletus and boletus mushrooms will look beautiful. The legs can be made from white felt, and the hats from brown and red or pink material. You can add champignons. These are porcini mushrooms with a brown bottom part of the cap.
To make the legs, rectangles are cut out, in which the width is equal to the thickness of the leg, and the length is its height. Next, you need to sew the rectangle, and push cotton wool or padding polyester into the resulting pipe. The bottom of the mushroom is sewn up. Next, work begins on the hat. To do this you need to cut out two circles. One white one is the bottom of the cap. And the other - colored - is the upper part. It should be larger than the white circle. Cotton wool is placed on the white circle, covering the entire surface of the lower part. Place a brown or red circle on top and sew both parts together. All that remains is to connect the stem and the cap. You need to make several of these autumn crafts from felt to fill the space of the basket.
Oak fruits
As an autumn craft, you can make beautiful wavy oak leaves from felt and add the fruits of this tree to them. It’s convenient to make leaves using a template, cutting it out of paper, but to make acorns you will need to buy filler. It can be simple cotton wool or padding polyester. Take a piece of filler and roll it into a tight ball. Next you need to take light green felt and wrap it around the cotton wool.
On the resulting ball of felt material, you need to tie a knot with threads, and cut off the excess material with scissors. Then the same is done for the acorn cap. The only difference between making the cap and the acorn itself is that the cap needs to be flattened rather than rolled out into a ball to make a “pancake.” Finally, the cap is sewn to the acorn itself so that the seams are inside the product. They should not be visible from the outside.
For autumn crafts in the garden, you can make several oak branches from felt with two or three leaves, onto which two acorns can be sewn. Make one large and the other smaller.
Application "Sun"
Children should really like such a simple and bright craft as a sun. It will be easier for those who are familiar with a needle and know how to sew.
If you can’t draw the templates yourself, you can use the patterns from the photographs below.
- First you need to cut out blanks from yellow felt using templates.
- Arrange the parts so that the lower rays look out from under the upper part, the circle is in the center.
- Thread a yellow double thread into a needle and connect the parts using a darning stitch. The picture clearly shows how it should turn out.
- Decorate the lower rays with a stem stitch of 6 threads. Orange threads are suitable for this.
- Decorate the central circle with a chain stitch in the form of a spiral.
- The resulting sun can be attached to a base made of thick felt or cardboard.
- In the first case, it is better to use a heat gun or a corner with thread; in the second, regular PVA glue will do.