How to make your own pillow
The production of a pillow can be divided into several stages.
Ears
Sew the parts along the sides and the triangular part and turn them inside out. From the oval side they are connected so that the ear is curled into a semicircle and stitched.
Horn, tail, legs
The triangle of horns is sewn in half, the tail and legs are sewn on the sides, lengthwise and one side widthwise. They turn it inside out. Stuff with a pencil. The horn is tight, the tail and legs are weaker.
Photo 2. Various color options for a decorative pillow in the shape of a fabric unicorn.
Mane
- Made from cotton. Fold in half with the right side inward, stitch along the width. They turn it inside out. The open part is basted, and then the thread is pulled and the fabric is gathered, making folds and reducing the length of the thread. The fold is ironed.
- Made from fleece. Stack the blanks on top of each other and stitch them in the middle. Then cut into strips 1-1.5 cm wide, not reaching the center.
Torso
The parts are fixed inside. The ends of the horn and ears point down, the legs upward.
Important! The unicorn is facing to the right, the horn is pointing up and to the right. Pinned from the inside with the point down and to the left
- Remove the pattern and pins. Pin a horn to the bottom part in the middle of the head. Then the ears, with a cotton mane between them.
- The mane is secured along the edge of the neck.
- The tail is pinned. The legs are fastened at the same distance from the ends of the body.
- The body is secured with pins along the contour. They sweep.
- The product is sewn with frequent stitches. A hole is left on the stomach through which the pillow is turned out. If fleece fabric is used, one seam is sufficient. The edges of the cotton fabric are finished with a buttonhole stitch.
- They turn it inside out.
Details
The eyes, nose and mouth are embroidered. The unicorn's eye is closed.
Embroider a smooth arc, then the eyelashes.
Back stitch, wide stitches, it is recommended to sew without gaps. Use floss in 3-4 folds or thread in 4 folds.
Sew the cheeks on both sides.
Stars and a crescent moon are sewn onto the croup or back. Use a loop stitch for cotton and a backstitch for fleece.
The fleece mane is sewn to the finished product from the ears along the neck.
Stuffing the pillow.
Reference. It is recommended to “fluff” the synthetic winterizer before stuffing. To do this, tear the padding polyester into small pieces, pull against the grain, adding volume.
How to sew a saddle pad for a horse yourself
Both a saddle pad and a sweat pad are created quite simply.
A saddle pad is created as follows. First prepare for work:
- sewing machine,
- fabric (natural and synthetic),
- foam rubber,
- sewing tools.
Manufacturing process:
- Take measurements. The standard size is approximately 70x90 cm. It should be remembered that the saddle pad always looks out from under the saddle. Transfer measurements to natural and synthetic fabric. Cut the workpiece, leaving 2 cm on each side for seams.
- Cut out a suitable layer from foam rubber and place it between the fabrics. Attach the layer using stitches along the perimeter of the workpiece.
- Using a sewing machine, stitch the workpiece along the edge, and then go over the product in such a way as to obtain even squares. This will make it possible to more securely fix the foam inside the fabric. Then the equipment will fit better to the horse’s croup and will not cause him discomfort.
- Cut a strip from the remaining natural or synthetic fabric and sew it along the edge of the saddle pad so that the tape hides the seams.
Anyone who loves horses, but does not have the opportunity to keep a real horse, can make a horse with their own hands. Or buy a toy version for yourself and choose ammunition for it of any size and from any material. Patterning a horse is also quite simple. It all depends on what kind of horse you need: how believable, what size, etc. But you can make any decoration and equipment for it.
Soft toys made of felt - a horse and a lion cub. Master classes
- Felt toys Horse
- We sew a soft toy “Lion Cub”
Felt toys are very cute and funny. Here are interesting options from our authors - step-by-step descriptions with patterns on how to make toys with your own hands.
horse
In this master class from Anna we will make a felt horse, which can be used as a toy or as a decoration for the New Year tree.
For production you will need:
- Paper;
- Felt of any color;
- Scissors;
- Felt-tip pen or pen;
- Floss thread;
- Needle;
- Black paint or nail polish;
- Blush pink.
On a piece of paper we draw a template for the future horse. We draw all the parts of the horse together in one detail. Let's draw 2 small ears on top. Then cut out the template using scissors. This horse can be made to any size. Photo 1
Next you will need a blue sheet of felt. You can use any other color, but it is better not to choose too dark. Such horses look great in soft colors: blue, beige, pink and so on. Using a pen or felt-tip pen, trace the paper template onto the felt. Then cut out 2 identical parts. Photo 2
Now you need to sew the 2 parts of the horse together. Sew using any convenient seam. As we sew, we fill the horse with padding polyester. The padding polyester can be pushed into the paws with scissors or a ballpoint pen. Photo 3
Popular articles Octopus artist
Now we need to make the mane. For this we will use floss thread. In this case, it is a peach-colored thread, but you can take any other color. The main thing is that it goes well with the color of the horse. Cut short pieces of thread. We don't make the mane too long. Then we form a bang from the tip of the bun and place it between the ears.
We make 1 seam, attaching the bangs to the head. Next, we lay a bunch of thread down along the neck and make stitches periodically. This is how we will sew on the mane and create the effect of a braided mane. Photo 4
Let's make a tail. It also does not need to be made long, no longer than the horse’s legs. To do this, you will need 1 more bundle of peach-colored thread. We tie it in the center and fold the bun in half. We insert the thread used to tie the bundle into the needle and pull it through the seam to the horse in the right place. Then we tie a knot and cut off the excess. Photo 5
Now let's design the face. We won’t come up with anything complicated, we’ll just draw it. Use black varnish or paint to paint the eyes. You can use a toothpick or a match. And apply blush to the cheeks, which will make the horse’s face more expressive. Photo 6
We sew or glue it onto the horse's head. This is such a funny and cute felt horse.
DIY Christmas tree toys
I really like vintage cotton wool Christmas tree decorations. They have some special charm, a piece of the soul. And in general, doing something with your own hands is nice. For the upcoming New Year of the Horse, I made a Christmas tree toy out of cotton wool, a horse of course, and I want to share my experience with you.
We make a wire frame as shown in the photo: leave a couple of centimeters on the tail, form the hind legs, torso, neck, head, front legs. We twist the rest of the wire around the body. For the hooves, take 4 small beads and string them together as you work. This way the horse will stand more stable and stronger.
We set the horse's frame in the desired position.
Preparing the paste: 1 tbsp. dilute a spoonful of potato starch with 1 tbsp. spoon of cold water, then, stirring, pour in 0.5 cups of boiling water. The paste should thicken. If this does not happen (as it did for me this time), you need to transfer the solution to a metal container and heat it over very low heat for several seconds. Stir all the time with a spoon so that there are no lumps.
Next, we make the first layer of the horse from cotton wool. We take cotton wool and separate thin strips from it, moisten our fingers with the paste and saturate the cotton strip with it. We wrap the horse's frame like a mummy. First the legs from the hooves to the body, then the head, neck, torso. Wrap tightly and carefully.
We leave the horse blank to dry. I put it under the fan heater.
Making the horse's tail. We take a strip of cotton wool, place it with the center on the wire tail and bend this piece of wire towards the center of the body. Thus, the horse's tail is clamped in a loop.
Lubricate the tail with paste, forming strands.
We continue to gradually wrap it with cotton wool. The second layer is more voluminous. Now you can wind the dry strip, and then lightly smooth it with your fingers moistened with paste.
This is how it works:
It doesn’t matter if the cotton wool horse looks a little rough. So it looks more like ancient toys made by the hands of our great-grandmothers.
All that remains is to make the ears and mane. Lubricate the head with paste or PVA glue and apply a piece of cotton wool, moisten it with paste and form ears.
We also do the mane. We fasten the flowing strands, and at the end we make bangs.
We dry the horse completely (it should be very light) and paint it with acrylic paint. I took 2 colors: pearl and brown. I added brown to pearl and it turned out golden-bronze. I painted the horse's body with this color. Hooves eyes and nostrils are brown. The mane, tail and muzzle are pearl.
This is how the vintage horse turned out. A cotton wool horse can be either an unusual souvenir or a Christmas tree toy.
To be able to hang it on the Christmas tree, we will make a bridle from a beautiful thread: we make 2 through punctures - in the muzzle and closer to the ears. We insert a thread into the needle and thread the bridle.
This is how easy it is to make a Christmas tree decoration with your own hands.
Happy 2014 Year of the Horse!
See also a master class on making Santa Claus from cotton wool and Horse - cross stitch.
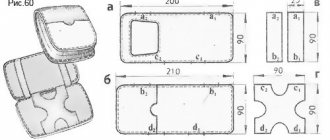
How to make a pattern with your own hands
Glue 4 sheets of paper into a rectangle or take a piece of wallpaper.
- The biggest one is the body. Divide the length into 3 equal parts.
- A square is added to 1/3 of the part in the upper left corner - this is the neck.
- Add another rectangle to the neck - this is the head. Its length is slightly more than half the body. The unicorn looks to the right.
If you draw the neck on the right, the unicorn will look to the left. The edges of the rectangles can be rounded.
For the horn, draw a triangle with a height of 1/3 of the length of the head. The length of the ears is approximately equal to the length of the horn or slightly less. For the ear, an oval is drawn, but on one side the oval is sharpened in the shape of a triangle.
Legs and tail. Draw two rectangles 1/3 long from the body or a little more. One wider rectangle is the leg, and the other narrower is the tail.
To decorate the pillow, stars and a crescent are drawn. For the cheek - a circle.
For the mane. The width of the pattern is 2 times wider than the desired length of the mane. For example, if the mane needs to be made 4 cm long, then the width of the pattern is 8 cm.
Photo 1. Making eyes on a soft felt toy using dark threads and a standard seam.
For fleece fabric, draw a rectangle of this length: the middle of the neck is 1/4 from the head inclusive.
For cotton: the beginning of the neck at the body is 1/3 from the head inclusive.
Cut out patterns.
The mane and tail can be made from wool threads. To do this, cut the threads of the same length so that when folded in half they are the desired length. For example, if you need a mane and tail of 15 cm, then the threads are cut into 30 cm pieces. Gather the part into a tail and tie it with thread to make a loop. For this, the tail is sewn to the finished pillow. The mane is stitched with a “back needle” seam and, when assembled, sewn inside.
Master Class
We begin work by preparing the pattern. Below you will find a diagram of the toy parts, which you need to download and print on plain paper. You can reduce or enlarge the picture and achieve the desired size of the future craft.
Next, you need to cut out the parts from the printed sheet, transfer them to cardboard using a simple pencil, and cut out cardboard blanks.
Pattern
The next stage of work is transferring the patterns onto felt cloth. Place cardboard patterns on felt and trace along the outline with tailor's chalk
Please note that the picture shows the number of parts of the toy that must be cut out of felt. Carefully cut out the parts
Additionally, cut out two small triangles, from which you will later form ears. The base of the horse is ready. We begin assembling the felt toy.
First, take the two lower parts and the belly, fasten them with English needles along a concave line and carefully sew them together. Then connect the parts of the tummy and the side of the body with the wrong sides so that the contours of the legs match. Secure with pins and check for symmetry.
Using small stitches, starting from the back leg, sew them together with a buttonhole stitch. Repeat the same steps with the second side part. The details of the tummy, the contours of the torso and legs should match in symmetry and be at the same distance from each other. After you sew the pieces above the legs, start filling them.
Popular articles Cool toy «
To stuff the legs, we recommend using soft wire: wrap it with threads and carefully insert it into all the legs. While continuing to sew up the side parts, neck and head, do not forget to leave a small hole through which you will fill the rest of the cavity of the toy with filler (you can leave it on the back of the horse, and later insert a hanging loop or cord there). Distribute holofiber or padding polyester inside the toy and sew up the stuffing hole.
Batik: practical advice
The base of the horse is ready, all that remains is to give it a beautiful mane and a fluffy tail. To do this, cut out a rectangular piece of felt and fold it into two parts lengthwise. Using sharp scissors, cut it across, leaving the middle (4-5 mm) uncut to form a fringe. Using an overcast stitch, sew the resulting mane to the horse’s neck, then sew the ears symmetrically on each side or glue them with a glue gun. Mark the locations of the eyes and sew on the beads using matching threads.
The tail must be made in the same way as the mane and sewn to the back of the body.
Finally, decorate the horse using beads, rhinestones, and ribbons. We recommend creating an imitation of a saddle and harness, so the horse will be more harmonious. If you make a loop, you can hang the toy on a door handle or in a car, or decorate your desk space with it. If you make a lot of horses of different colors, you will have a children's play set that any child will be delighted with!
How to make a felt horse - pattern, description
The first thing you need to make a felt horse is a pattern. It consists of eight parts:
- Tail – 1;
- Torso – 2;
- Ears – 2;
- Lower abdomen – 2;
- Mane – 1.
The pattern must be printed on plain paper. The size can be varied by decreasing or enlarging the pattern. Let's cut out all the elements along the contour and transfer them to cardboard. Let's trace the cardboard layouts onto felt. Add two small triangles for the middle of the ears. Now we will cut out all the parts from the material in the required quantity. Next we proceed according to the scheme:
- Connect the two lower parts of the abdomen with pins and carefully sew them together. Connect the belly and side elements of the body with the wrong side, matching the outline of the legs. We fix it symmetrically with pins.
- Sew the pieces together using a buttonhole stitch. Let's do the same with the second side.
- It’s easier to stuff the animal’s legs using wire. Wrap it with thread and carefully sort the filler into the toy. When sewing up the elements, we will leave a gap to stuff other parts. If the stuffing is complete, sew up the hole.
- Let's start working on the mane and tail of the toy. Cut out a rectangle of felt, fold it in half and cut it vertically. We leave the middle untouched - about five millimeters. This will be the fringe of the mane.
- To make a beautiful horse made of felt with your own hands, we make the fringe as fluffy as possible. The stripes should be thin. Sew it on and use an overlock stitch.
- We glue the ears on the head with a glue gun and decorate them with small triangles in the middle.
- We will make the eyes from beads. You can take buttons or embroider eyes.
- For the tail, take a small piece of felt and roll it into a cone. We secure it at the base with a couple of stitches, then make a fringe and sew it to the toy.
- The felt horse is ready. All that remains is to decorate the product to your liking.
Form
Make the shape. You can copy a toy horse, even a stylized one. Tear paper napkins. It is better to lubricate the mold with cream or Vaseline so that the paper layer can be separated more easily after drying. If you use children's plasticine, you can do without lubricant. Make the first layer from wet pieces of napkin or newsprint. Place the scraps close to each other. It’s okay if they overlap one another. Place the second layer on the paste. It, like all the others, is made from office paper. In total you need to make at least 8 layers. There are two options. Some papier-mâché masters alternate layers placed on paste and on water. Others sculpt pieces using glue only (except for the first layer). In any case, you need the thickness to be approximately the same over the entire surface. Let the workpiece dry, then cut it in half and take out the plasticine. Glue the halves together with pieces of paper and dry the figure again.
To make a horse we will need:
- - felt in gray, blue and light pink colors;
- - raspberry colored felt with polka dots;
- - black beads;
- - threads of black, gray, pink and blue colors;
- - scissors;
- - paper;
- - needle.
The procedure for making a small horse
1. Let's make a paper pattern of a small horse. It should consist of the following parts:
- - torso;
- - tail;
- - leg;
- - hoof;
- - muzzle;
- - ear;
- - collar;
- - two saddle parts - one larger and the other smaller.
2. Place the pattern of the body on gray felt and outline it with chalk, a ballpoint pen or a special felt-tip pen. Using sharp scissors, cut out two identical parts of the body.
3. You also need to cut out eight pieces of legs and two pieces of a tail for the horse from gray felt.
4. We will cut out the details of the ears for the horse from gray felt from pink flowers. Two parts of the ear need to be cut out from gray felt, and two parts from pink felt.
5. Now let’s cut out additional small parts for the toy horse. From blue felt we will cut out eight parts of hooves and two large parts of a saddle, from light pink felt we will cut out two parts of a muzzle, and from raspberry felt with polka dots we will cut out two parts of a collar and two small parts of a saddle.
6. Let's start sewing the horse. First, let's take the parts of the body and to each part we will sew a part of the muzzle in the head area, and then a collar in the neck area. We will sew on the details of the muzzle with pink threads, and the collar with crimson threads.
7. Sew smaller crimson parts to the large blue parts of the saddle. We will sew on the saddle parts using small basting stitches.
8. Sew the prepared parts of the saddle with blue threads to the parts of the body in the back area.
9. Sew the parts of the body with gray threads, and leave a hole on the stomach. We will sew the body together using an overcast stitch.
10. Fill the horse’s body evenly with padding polyester.
11. Take the parts of the legs and sew the blue parts of the hooves to them. We will sew on the hooves with blue thread.
12. Place the leg pieces in pairs. We sew these parts with gray threads, leaving a hole on the side of each leg.
13. Fill each leg with padding polyester.
14. Use gray thread to sew up the holes on the legs and body.
15. We firmly sew the legs to the body with gray threads using hidden stitches.
16. Each ear will be made of gray and pink parts. Sew these parts together using small, even overlock stitches. There is no need to leave holes in the ears.
17. Pull each ear a little at the base. Let's sew the ears to the head.
18. Put the tail parts together and sew them with gray threads.
19. Sew the tail to the body of the horse.
20. Use black thread to sew beady eyes to the horse’s head, placing them at the same level. If the horse is intended for a child who is less than three years old, then it is better not to make the eyes out of beads. In this case, it is better to embroider the eyes with black thread.
Popular articles Keychain made of viscose napkin
The felt horse is ready. If you plan to use the horse as a pendant or as a Christmas tree decoration, then you also need to sew a loop of ribbon or colored decorative cord. The horse can be made not only in gray, but also in any other color - white, beige, blue, yellow, pink, etc.
A horse made of white felt with a bright red mane and tail turns out to be very elegant. It can be a souvenir - to decorate a chest of drawers or a shelf, or it can be a game - that is, an ordinary soft toy. Both girls and boys enjoy playing with horses. Therefore, such a toy is suitable for any child.
DIY felt horse toy - patterns, step-by-step guide
crafta.ua
Another way to make an original horse requires the following materials:
- Pink threads;
- Needle;
- Black beads – 2;
- Pink felt;
- Lilac felt.
The product pattern is printed on a printer, transferred to tracing paper and cut out. It consists of ears, legs and body. When transferring to fabric, take into account a seam allowance of three millimeters on pink felt. Lilac material is used for the tail and mane. No allowances required. Progress:
- The two body elements are sewn together. The seam starts from the muzzle of the product. A mane is sewn between the back and front elements.
- The work can be done manually or by machine - the individual choice of the master.
- When the seam reaches the legs, a tail is inserted between the layers, then the back is connected.
- The horse's belly is not sutured.
- Work is carried out on the wrong side. At this stage, the toy turns inside out. It is stuffed with padding polyester, cotton wool or other fillers, then a seam is made on the tummy. Blind stitches are used.
- The ears are sewn on using hidden stitches.
- The eyes are fixed in the form of beads.
It turns out to be a cute DIY felt horse, which will be an excellent gift or home decoration.
Felt horse stitched on a typewriter
If you prefer to minimize hand sewing, then we offer you a master class on creating a blue horse with a minimum number of hand-made seams.
You will need:
- Blue felt 2 mm thick;
- Pink and white felt, 1 mm thick;
- Beads for eyes;
- Threads and needles;
- Scissors;
- Stuffing material;
- Glue Moment Crystal.
To create one horse you will need these parts. It will be in apples.
Sew two pieces with legs on top.
Glue the apples and ears with glue.
We attach the halves of the saddle to both halves of the body. A zigzag stitch is used.
Now we glue the apples and the white part of the felt eyes, and attach black beads on top.
Now we alternately sew the halves of the horse’s body to the belly blank. Left to left, right to right.
The lower part of the horse with legs must be filled with material for volume.
Now we glue the tail and mane to one of the sides.
Now you'll have to sew a little by hand. Using a loop stitch, we sew the upper part of the horse, securing the tail and mane. Our saddle remains unstitched. Through this hole we fill the rest of the horse with material. We sew the saddle with a hidden seam.
We cut the tail and mane into fringes.
We fold the ears in half at the base and sew them on.
The result is such a neat horse.
New Year is everyone's favorite holiday. So people ask us to make something for New Year’s. And what could be more New Year's than the symbol of the year. I draw the pattern by hand. I cut out the parts without allowances, because I will sew them by hand along the front side. I take acrylic yarn for the tail and mane. Cord ends to make hooves. Silver cord for legs. A piece of rubber band for the eyelet.
2. First, I will prepare all the “spare parts”. I wind several turns of yarn directly onto my palm, cut it and tie a bunch of threads in the middle. Then I tie it again to make a tassel.
5.
6.
7. For the mane, I take longer threads, step back 2-3 cm from the edge and stitch through the threads, trying to pierce them all. This is so that if you want to test the mane for strength, the horse does not suddenly turn out to be bald. Then I wrap the stitching area tightly and secure it with a knot. I cut the loops of thread, forming the future bangs.
9.
10.
11.
12. I sew the tail to the body part. From the inside I place 4 layers of pieces of felt for fastening strength. If you just sew it to the part. it will come off easily; thin felt will tear easily.
12.
13.
14.
I tie a piece of round silver elastic with a simple knot - this will be a loop for the suspension. You can use a cord, but experience shows that it is better when the loop stretches easily. I cut legs from silver cord. I tie knots on one side, put on the end for the cord, and tie a knot on the other end.
17.
18.
19.
20.
21. I begin to sew the parts of the body from the front side, adding legs and a loop for hanging as I work. I sew the legs by piercing the cord near the knot, which is hidden inside, this is for the strength of fastening the legs. But I don’t pierce the loop, but secure it with two stitches between two elastic bands. At the end of the work, I stuff the body with holofiber or padding polyester and sew the part up to the end.
22.
23.
24.
25.
26. I make the ears from two triangles and, when sewing the head, I substitute the ears and sew on the mane. I stuff it, sew the body to the end and take the needle out in the middle of the back of the head, sewing the mane on the back of the head. And I sew the head to the body.
27.
28.
29.
30.
31. Bringing beauty. I braid the hair and attach flowers or bows. I draw the face and decorate the body
30.
31.
32. Happy New Year!!! In our cavalry regiment arrived
1.
LiveInternetLiveInternet
Quote from Lana_Berg
Read in full In your quotation book or community!
year 2014.
Felt horse. Master class with step-by-step photos How to sew a horse with your own hands , which will be an excellent gift for the New Year 2014 The white horse in the mythology of many nations represents the Sun, daylight, strength, intelligence, and speed of thought. I propose to sew a small decorative White horse from felt, which will bring joy and will definitely attract success and prosperity to your home.
SOURCE For work you will need: • white, blue and red felt, • a needle, • floss threads in white, red, blue and black colors, • scissors, • transparent glue “Moment Crystal”, • a sheet of cardboard, • holofiber, • 2 black faceted beads
Make out of cardboard patterns the parts of the body, the inner parts of the legs, the saddle, the outer and inner parts of the ears, the mane, the tail and two round parts of the spots - a large one and a smaller one. Open out the parts of the mane and tail with small allowances (5-6 mm), as they will be attached inside the product between the parts of the body.
Now cut out all the felt pieces. From white felt, cut out 2 parts of the body and 2 parts of the inner part of the legs, from red felt - 2 parts of the saddle, 2 parts of the outer part of the ears and 10 small circles of the parts of the spots. Cover the details of the mane, tail and 10 large circles of the speckle details from blue felt.
Glue the blue parts of the spots to the parts of the body - 5 circles for each part.
Glue one small red speck piece on top of each blue circle. Secure each spot with a French knot made with blue thread in four folds.
Having retreated 1-1.5 mm from the edge of the speck detail, sew it with red thread in two folds with a “forward needle” stitch. Decorate all the spots on both parts of the body in this way.
Now glue the saddle parts to both body parts. In this case, the upper edge of the saddle part should protrude 1.5-2 mm beyond the edge of the body part. Then, using blue thread in four folds, make a decorative seam “forward the needle”, retreating 2 mm from the edge of the part. Do not trim the top of the saddle.
Using black thread, sew eye beads to both parts of the body.
Place both parts of the inside of the legs together and overcast them at the top with a buttonhole stitch made with white thread in two folds.
Place the stitched parts of the inner part of the legs between the two parts of the body. Using a red thread in two folds, first sew the right part of the legs and the right part of the body with a buttonhole stitch,
and then the left part of the legs and the left part of the torso.
Stuff the sewn legs with holofiber. Glue the mane and tail parts to one of the body parts on the inside.
Use red thread in two folds to sew both parts of the body with a buttonhole stitch, gradually filling the figure with holofiber.
Make several small cuts along the edges of the mane and tail pieces.
Using glue, connect the parts of the inner and outer parts of the ears.
Having placed the ears on both sides of the head, secure their lower edge with glue. And then secure both ears at once with a “needle forward” stitch. Sew the seam in two directions, making checkerboard stitches to create an imitation of machine stitching. When making a seam, tighten the working thread slightly.
The finished horse is very similar to the Dymkovo folk toy, just as colorful, bright, and playful. Such a craft will never go unnoticed and will create around itself a joyful atmosphere of celebration and unbridled fun of folk festivals.
Author: Elena Babenko
- Horse made using quilling technique. Master class with step-by-step photos
- DIY gifts for the New Year 2014. Horse with a horseshoe. Master class with...
Master class on how to sew felt souvenirs
Nowadays it has become very fashionable to sew toys for children who have just been born or when they are one year old. Usually they do this in the form of a name and some kind of plot. I suggest you watch this video, just for those who don’t know how to properly sew together the parts of felt toys, this video will help you figure it out, watch all the stages of work:
Well, and of course, if you dream of sewing any fairy-tale hero or cartoon characters, then be sure to use this video instruction, based on it you can subsequently make absolutely any animals or people, the main thing is to find and print the template of the one you plan to sew:
Patterns of New Year's toys made of felt
Of course, the symbol of any year is mittens, mittens, Christmas trees, horses, since all these accessories always decorate the spruce.
You can even make a keychain and give it as a souvenir.
Or this table set.
Christmas bell.