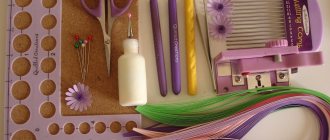
Don't have enough places at home to store all sorts of little things? Are you thinking about buying another chest of drawers and dividing its drawers into sections? This is unlikely to be a good solution, since new furniture requires additional space and is often overgrown with unnecessary things. What about neat felt baskets in which you can store small but very necessary things? Embroidery threads, needles, buttons and much more. Let's try to make them together.
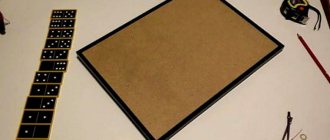
Measuring work
- Take a ruler and carefully lay a piece of felt on the table.
- Place dots that will be located at a distance of 9 cm from the edges.
- Connect the 4 dots by drawing 4 straight pencil lines.
- Clearly indicate where the two lines intersect.
The success of all further work depends on the accuracy of the pattern. Therefore, it is better to check all the measurements again. Draw a line along the ruler so that anxiety does not interfere with making an even cut.
We make a comfortable duvet cover with our own hands: you will need two sheets
Alexandra Shoua's eldest daughter grew up without him, but forgave him all his insults
The release of the Resident Evil 4 remake has been postponed to 3023: game development has been restarted
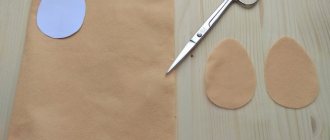
Master class on making a basket with hares
Now I would like to invite you to make an original basket with Easter bunnies from fabric. And I present to your attention the step-by-step manufacturing process.
You will need: fabric of different colors, template, threads, scissors, cardboard, PVA glue, padding polyester, pencil, acrylic paints, brush, ribbons.
Work process:
1. Save and print the template.
2. Along the lobar you need to cut out 4 strips:
- 2 parts for the top of our bunnies (10x73 cm);
- 2 parts for the bottom (7x73 cm);
- 2 parts for the basket handle: 5x55 cm (from “inner” and “outer” fabric).
Allowances for these parts are already included and are 0.5 cm.
3. Take cardboard and cut out a circle with a diameter of 19 cm. This will be the bottom. Place it on the “outer” fabric, trace and cut with an allowance of about 2.5 cm. The edge does not have to be even. And after that, place it on the “inner” fabric, trace and cut out with an allowance of about 1 cm.
4. Glue the padding polyester to the cardboard circle on all sides and place it under a press. And after drying, trim off the excess padding, leaving about 0.3 cm.
5. Now stitch the top parts of the bunnies together with the bottom parts. Allowance 0.5 cm. Smooth the seam.
6. Trace the hares according to the template, retreating 2 mm from each other. There should be 10 animals in total. In this case, draw a “side” for the first and last ones, and only the heads for the rest. Up to the seam line.
7. Sew the heads along the drawn lines. Use curly scissors to trim the excess fabric close to the stitching. In the right places, namely between the ears, between the bunnies and in the places where the ears go into the head, leave notches.
8. Iron everything. Place vertical stitches between the animals: from the horizontal seam to the bottom edge. Use a simple pencil to outline your future nose. Use acrylic paints to paint eyes and nose. Tie knots on the ears with regular thread.
9. Cheeks can be painted with regular eye shadow or blush. Fill the figures tightly with padding polyester. Place a stitch along the bottom edge and overcast the edge.
10. Decorate the top seam with ribbon, braid or lace.
11. Using a hidden seam, connect our bunnies into a circle.
12. Now let's finish the bottom. Take a circle of large diameter and place basting stitches close to the edge, and at the circle of “inner” fabric, fold the seam allowance and secure it.
13. Place a cardboard-synthetic padding blank on the circle of “outer” fabric and pull the thread. Carefully tuck the padding polyester inside, trying to stay free.
14. Place the inner circle and sew it with blind stitches.
15. Sew the bunnies to the bottom using hidden stitches.
16. This is what you should get.
17. Now let's sew the handles. Take the strips cut out for the handles. Fold them in half lengthwise and stitch at a distance of 0.5 cm from the edge. At the same time, also sew one short section on both strips.
18. Turn them inside out and fill them with filling, and then sew them together, braiding them. Tuck the ends inside the edges and sew them up. Attach the finished handle to the basket.
19. Tie bows from satin ribbon on the ears and handle.
Well, how do you like this option?? I think it's incredibly beautiful!! And by the way, if you read the article to the end, you will see more great ideas for Easter baskets made of fabric and felt. So stay until the finale))
Stapling corners with a paper clip
Now the shape of the future basket is already becoming obvious. The staple prevents the corners from moving when connecting the other two on the opposite side. This is the most convenient way that allows you to model the design at your own discretion. As long as the corners are held with staples and not sewn tightly together, it's a matter of a few seconds.
A step-by-step recipe for making cute cakes with an original design and taste
In Russia they are asking to cancel the mandatory fee for choosing a seat on an airplane
You can make a pet bed with your own hands. It is soft and very comfortable
Another option for a felt basket for Easter eggs
On the eve of the holiday, pleasant chores await you: you need to paint eggs, buy sprinkles for Easter cakes, bake goodies, buy sweets to treat all your relatives. All this needs to be put somewhere, and therefore we offer another option for making a felt basket for Easter with your own hands.
Just imagine how much joy you will bring to your child by asking him to help in such an exciting activity. While making crafts, you can tell your child about the history of the holiday and how it is celebrated.
We need:
- Thick cardboard size A4.
- Felt of different colors, you can get by with a standard set: red, green, white, pink, emerald, yellow.
- Glue can be replaced with a glue gun.
- Sharp scissors.
- Simple pencil.
- Round stencil or compass.
- Beads for decoration.
- Painted eggs.
To prevent the contents from falling, the basket needs a strong cardboard base, which is what we will cover with felt, cut strictly to size. From colored fabric we cut out grass, the sun, and flowers, which we glue to the basket with glue guns in any order.
The grass can be glued to the bottom of the entire product, it will be a beautiful composition. Give children freedom of action and you will get a truly unique product.
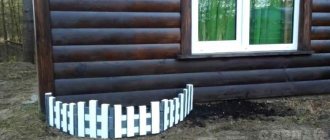
You can make dies for a fence or sunflowers from yellow felt, it will be original. If you doubt your creative abilities, you can be guided by the attached photographs, there is an exact step-by-step explanation of each step.
Give the remaining beads to the kids, they will find a way to fit them into the basket. Add eggs and sweets to the finished product and you’re ready to go visit.
Link to the master class from which the photos were taken.
Permanent seam
To prevent the basket from falling apart during use, you will need to make several stitches with a needle. For now we are making them with a hidden seam so that the product does not fall apart as a result. Now you can remove the staples and move on to stitch design.
To do this you will need to complete the following steps:
- Cut a piece of 30 cm of thread.
- Thread the thread through the eye of the needle.
- Tie a knot at the end of the thread.
Using a simple stitch, connect two opposite corners, starting from the outer corner.
- At a later stage, the two outer parts will cover the nodes.
- Cut the thread and repeat the step on the other side.
- Use a paper clip to secure the loose corners again.
At this stage, you can already think about what you will store in this basket. The higher the objects are supposed to be, the thicker and higher the walls need to be made. In this case, it is recommended to buy thick and hard felt and create an additional inner hoop. Then the basket will be able to withstand even men's tools, screwdrivers and pliers.
Water scarcity on Earth is increasing: March 22 is World Water Day
They don't see water: unexpected things that are difficult for cats to do
“Creativity and Creativity”: Rosobrnadzor is thinking about transforming the Unified State Exam
Easter basket made of felt or fabric with patterns
And as I promised you, I offer you pictures of finished souvenirs made from felt and fabric. Look and choose, and the patterns will be below.
Option from sheet format.
It’s quite simple here: we make strips and stitch them.
And to be a little more detailed, first make templates from cardboard.
Transfer to felt and cut out. Then take small strips and stitch them onto the cardboard blank. Glue the ends.
Then glue and stitch the bottom.
Next, take long strips, stitch them and weave.
Cut, stitch and sew the handle.
Make green grass and sew Easter eggs.
Prepare the flowers.
Cut out the bunnies, stuff them and sew them.
Decorate the work with prepared elements.
And look how spectacular the grass with the fence is, it’s very easy and simple to do.
Or here's another nice option.
What do you think of these ideas? Well, there are simply no words!!
Don't forget to use different ruffles and braid.
Here is another type of work that we have already discussed in detail.
Or patchwork, it looks very creative.
And keep the patterns. Save, print, transfer to fabric and sew.
Let's work on the corners
Usually these parts are the most problematic.
- Attach the remaining corners to the circle with a paper clip.
- Do this on both sides.
- Now you can adjust the opposite sides so that the edges line up nicely.
- Make sure there is no space between the inside and outside.
- When all the edges fit well together, push a pin through the outside and the already sewn corner from the inside.
- Do the same on the opposite side.
Video material
Thus, making a felt basket with your own hands is not at all difficult. We looked at only a couple of ideas, but using your imagination, you can make many more different options for similar products from a material so convenient for needlework.
Good afternoon everyone. In our city, winter still doesn’t want to go away, and the weather does not indulge in the warmth and gentle spring sun. How are you doing with spring?! After all, Easter is very soon and I really want the snow to melt and the willows to bloom.
And since I started talking about this holiday, I think you guessed that we will talk about preparation for this bright event. Most likely, you already know how to paint everything, we also discussed the topic, and even this year you will bake it yourself and not buy it)) So what else can we talk about?? And that's what it's about!! Today we will make very beautiful baskets; they can serve as table decorations and as original stands for paints.
As always, I looked through what the Internet offers us and selected for you the best works in different techniques and made from a variety of materials. So get ready, it will be interesting.
And we will start with a difficult master class prepared by Marina Ilyina. I’ll say right away that the work can be done by an adult or someone who is already well versed in the technique of weaving from tubes. I suggest you make a very elegant basket in the shape of a chicken. Such work would be very appropriate as a gift.
You will need: newsprint, glue pencil (or PVA), scissors, knitting needles, doofe, water, stain, rope, braid, cardboard, wire.
Work process:
1. Take newspaper paper, clean. We will make tubes out of it. Cut the newspaper into A3 sheets and cut lengthwise into four strips. The width of the strip should be 7.5 cm. Using a 1.5 mm knitting needle, wind the tubes very tightly so that they are of the same thickness along the entire length. Glue the tubes together with glue.
2. Then paint the prepared tubes with colorless impregnation dufa + water + stain. Dufa about 3 tbsp. spoons per half liter of water with stain.
3. Now do the following:
- braid four pairs of tubes with a simple rope;
- extend the working tube;
- if the tube is thick, then make a dent with your fingernail and fold the tube, then put on a new one;
- the connection must be hidden under the working tube.
4. Take a thick knitting needle and push the posts apart. Braid rope around each post. Next, weave the bottom to the desired size and take the desired shape.
5. Take a cotton braid and tie the shape to the weave so it won't slip. Next, weave several rows with a rope, and then one row with a rope of three tubes. And to create an even gap, we use a simple device - cardboards, which are fastened with a stapler, of the required height, put them on the racks.
For further weaving, you should have a fairly large distance between the posts, so add posts in each gap, simply inserting them between the weave and the form, then simply cut them off.
6. Weave a rope from three tubes, placing them at the beginning of the row behind the posts. And weave the row to the end. When you have one unbraided post left, take the nearest working tube, weave it in front of the two, behind the third. And then weave the second one from us, too.
8. You must complete a row, and then make an imperceptible transition to the next one, just like in a rope of three. It turns out that when you have one unbraided stand left, take the working tube closest to you, and then the second.
In the second row, do exactly the same. Add another working tube and weave a rope of three. Before doing this, take out the shape and weave a row, pulling the shape a little to give it a rounded shape. To do this, point the racks slightly inward.
9. The row must be completed without changing anything. Next we will fill the tubes. So, tuck the one farthest from you under the first working tube, with which the row began. Then tuck the second one from you under the two tubes at the beginning of the row. And the one that was closest to you should remain in place.
10. Now glue and carefully cut. And remove the tail from the inside. Glue and cut again. Thread the ponytails from the first rope of three.
12. Glue everything and trim it so that all the ends are hidden behind the weaving. Now take the wire, we will weave the chest and head. Take 9 racks, cut 4 racks through one. There will be 5 left. Insert a wire into the outermost and middle ones.
13. You need to weave with one working tube, gluing it at the beginning of the row. Use calico weaving. Then weave at the narrowing, and when the distance between the posts becomes minimal, weave the middle three tubes together.
Now weave on three stands. If the racks run out, extend them, while cutting the racks diagonally for further extension.
14. After a few rows, cut off the extra two posts in the middle. Braid the narrow neck-head. Coat this neck with glue and twist it tightly and secure it with something to dry. Then move on to the handle. So, after the breast, cut out 4 racks through one.
15. We will weave the handle on three stands. Cut the wire to the full length of the handle and insert it into the posts. Place the tubes on the wire, thus extending the base for the handle. Braid the handle according to the photo below.
16. Weave a handle of the required length and coat the posts very well with glue, then drag them into place from the opposite side so that the posts from the bowl remain on the wrong side, then cut them off. Pull the handle along all four rows and trim off the excess from the bottom.
Braid the ponytail in the same way. Each feather should be on three posts, into which you also insert the wire.
17. Remove the cardboard from the gap and cut off the posts that were placed in the gaps. Add elegance to the chicken.
18. Make quilling strips. Paint them with a brush, let them dry a little, and then wind them onto a thick knitting needle (3 mm). Twist into any patterns and fill in the empty spaces, glue on the beak and comb.
And here are some other wonderful chickens you can weave:
And in this version there is also an apple, a kind of little box.
Isn't it really indescribable beauty!! Those who have been familiar with this technique for a long time will cope with such weaving with a bang.
Decorative embroidery
Now the basket is ready, all that remains is the decor. It is worth noting that you can design the product at your own discretion. Cover it with beads, decorate it with sequins, embroider it with beads or ribbons - in any case it will look beautiful and elegant. The proposed option is the simplest of all.
- Mark 4 dots on the felt.
- You can use crochet yarn.
- If you don't have crochet yarn, you can double thread and cross stitch twice.
- Push the needle through the back of the felt.
- Insert the needle now diagonally at the front of the other end.
- Insert the needle from the same side into the remaining point on the back of the felt.
- Insert the needle at the front of the remaining point.
- Pull the thread inside the basket.
- Then insert the needle at approximately the same height from the inside to the outside.
- Make sure you only go through one layer of felt with the needle.
- The thread should be located between two layers of felt.
Easter egg basket made from a plastic cup and knitted yarn
Of course, when it comes to crafts, various available materials are used. And I found a wonderful master class on making our present from an ordinary plastic cup. This kind of work is easy to do and takes little time. And instead of knitted yarn, you can use regular thick threads.
We will need: a plastic cup, twine (or thick threads, yarn), Titan glue, a hot gun, a piece of plastic packaging tape used to wrap furniture, any ribbons, braid, beads and other decorations.
Work process:
1. Take the twine and glue the end to the bottom of the glass. Wrap the threads in a circle, having previously coated the bottom with glue.
2. Next, lubricate the walls of the glass with glue and, using simple winding movements, glue the twine, and beautifully round the tail and also secure it with glue.
3. Cut off unnecessary plastic.
4. Take a piece of packing tape of the required length for the handle. Decorate it with braid using a glue gun.
5. Attach the finished handle.
6. Take beads and other decorative elements and decorate the product.
This is such a miracle thing that happens!!
It would be great to do this kind of work for a competition in a kindergarten or school.
You can also take a colored plastic glass, cut the walls into strips and screw them to the base. Makes an excellent egg stand.
Or you can use a large glass, which is wrapped with adhesive colored paper, and decorated plastic spoons are glued on top, then everything is tied with a ribbon. It turns out to be a basket-vase.
This is how you can do extraordinary things simply and brightly.
Making a craft from newspaper tubes
I don’t know whether you have ever seen such beauty or not, but I decided to share such work. Of course, in order to create something like this you need to know at least the basics, how to properly roll up newspaper tubes and cover them with paint. For complete beginners, I put together this video.
It’s not difficult to learn how to do this, so if you like this idea, then go ahead and sing.
Well, for those who are in the know, look what the great Internet offers us, to make such a nice chicken.
Or like this. How cool it is, and the main thing is that you can do everything yourself.
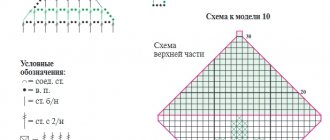
How to crochet a basket (description and diagram attached)
Let's move on and make some wonderful souvenirs for Easter from knitting threads, take note for needlewomen. For those who know how and love to knit, this post will also be interesting. From last years I still have such different ideas on my shelves.
I’ll start with perhaps the egg, namely the stand or case, I don’t even know how to put it more correctly. But one thing I can say is that you can crochet such a beauty in literally an hour. And please others too. You only need a little bit of thread.
So, try to create! An approximate diagram is like this.
Or you can make it even more delicate; to do this, take this idea and turn it into reality. If you need a diagram and description of this model, write to me at the bottom of the article, I will send it to you by email.
I can offer another option, it looks a little like a vase.
Honestly, someone might even say that this is such an original box. Although they put mushrooms here, you can bring Easter gifts here.
This is such a wonderful, beautiful cockerel, just wonderful, I once made it out of a magazine description a long time ago.
I also really like this bird family of chickens. You can hide Easter eggs with them.
Or tie potholders on which to place the Easter cakes.
If you are new to knitting, you can use this craft - an egg stand.
Or knit a chick that will decorate your holiday table.
Cool new items this year are, of course, basket bunnies and mother hen.
I also have a detailed description and diagram of this illustration in my piggy bank, if anyone needs it, please contact me.
Either take this blank and create something weird, it’s also a cool version of a bunny, or maybe it’s a rabbit. According to the description, this is a mini crochet basket for Easter eggs.
I also liked this option. A very simple diagram.
And in conclusion, this is a charming miracle, which is also unrealistically beautiful.
It feels like a flower opening.
I was really looking for a description for this model, but unfortunately I couldn’t find it. If anyone has one, please share).
Beautiful basket made of cardboard in the shape of an egg for children
Now it’s time to surprise and make very unusual things, for example from threads.
Stages of work:
1. Take a large bowl or even a basin so as not to get dirty; you can cover it with cling film or line it with newspapers.
Inflate the balloon with your mouth to the desired size. Blow until it resembles an egg, and then tie the ends with thread.
Then apply PVA glue directly over the ball, and fill the threads with glue too.
2. Now rewind the ball with threads randomly. And then boom, pop, pierce it with a needle.
3. Wait until the threads are completely dry, and then take scissors and make a hole.
Each one produces absolutely their own masterpieces.
This time we cannot do without the kirigimi or protruding technique.
You will first have to print the template on your printer, and then use a cutter to cut and glue two bunny blanks together.
Same with the flower.
Do the same with the chickens.
The main thing is to take your time and be careful and everything will work out.
Or will you stick with these options?
You'll have to work a little here.
You can do something interesting and unusual yourself.
Who needs templates and stencils for these crafts, write below.