Fabric boxes are great for storing items such as clothes, linens, towels, toys and other various household supplies.
Using simple materials, you can create a textile container yourself.
A handmade product can add originality to the interior and last a long time, taking its rightful place on the shelf.
We’ll tell you in this article how to sew a fabric box for storing things with your own hands.
What do you need for sewing?
It is better to use dense fabric for sewing boxes that can hold its shape well. At the same time, it should not be too heavy so as not to “collapse” under the weight of its weight. Thick cotton or raincoat fabric is ideal.
To make a box you will need:
- 2 types of material: one for the external finishing of the product, the second for the internal;
- cushioning material with a high-density adhesive base;
- chalk or marker;
- scissors;
- safety pins;
- threads, needle;
- Equipment: sewing machine, iron;
- optional elements for decoration.
In this box model, brightly colored fabric is used for the inside and top edge, and plain fabric is used for the outside. If necessary, “bones” (Regilin) can be inserted into the side sections. Then the finished product will be as smooth and stable as possible.
DIY felt craft ideas. Visual master classes.
Crafts for children, various jewelry and hair accessories. miniatures (keychains, magnets), bags, wallets. covers, paintings and panels, needle cases. home decor. Crafts made from felt are so diverse, thanks to the properties of the material, that they are limited only by your imagination and it is simply impossible to post everything in one article. But even in such a small collection, I’m sure everyone will find an interesting idea for themselves.
Let's see what not only an experienced, but also a novice needlewoman can do on her own.
Mobile for a crib.
For the little ones - mobiles made of felt with different figures. They will attract the baby's attention and will not let you get bored during waking hours.
Educational toys and games made of felt
You can sew amazing toys for kids with your own hands. These can be educational games, cubes, puzzles;
DIY felt puzzles - master class
A simple and accessible master class will help you make puzzles for your baby. According to MK from shillopop.com
You will need:
1. Artificial (100% eco-polyester) hard felt. The thickness of the felt for the base is 1.2-1.5mm, for the applique 1-1.2mm. 2. Threads. 3. Needle or sewing machine. 4. Scissors. 5. A fabric pencil or any other that draws on felt.
We cut out the applique details and the base square - no need to cut it.
We lay out the applique and sew it on with a small stitch - first the body, then the beak. Embroider the eye
We attach the pattern of half of the puzzle and trace it. Better. if the line does not affect small details. Mark the line and cut it out.
Now you need to sew on the bottom part, hiding the wrong side. To do this, cut out a rectangle slightly larger than half of the puzzle and sew the two pieces together.
Cut off the excess felt.
The toy is ready!
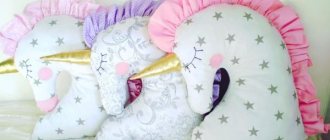
Soft felt toys
All children love soft toys, and a toy sewn by their mother simply cannot be ignored. Simple templates will help you make a toy quickly and without special skills.
DIY felt books
A great idea for children's development is a felt book - after all, this is something that will attract the baby's attention for a long time. There are so many interesting games and bright pictures. moving parts, pockets and secretaries. Even after the child has studied the entire book, he will return to this exciting activity more than once.
Book page ideas:
Hairpins. headbands and hair bands.
Felt headbands, headbands and hairpins are a very cute and delicate accessory. which even a novice needlewoman can make with her own hands. Bright headbands and headbands are especially relevant in summer.
Fashionable felt accessories can also be used to create a bright look for a holiday or photo shoot. A unique headband or headband will perfectly complement the outfit of a little princess.
However, such accessories are becoming popular not only for children, but also adults are happy to decorate their hairstyles with felt flowers made with their own hands.
Master class on making a butterfly clip with your own hands
Making such a hairpin is very simple and quick.
You will need:
- Multicolored and white felt
- bobby pin
- Scissors
- Needle and thread
Butterfly hairpin template
Felt flowers
Brooches and other jewelry
Handmade jewelry will help add originality to your look. A spectacular felt brooch will definitely attract attention to its owner. Necklaces, bracelets, and earrings will be a bright and unusual addition to your outfit.
Embroidery looks very good on felt. Contrasting colors add special brightness and originality to the product. Crafts can also be decorated with beads, seed beads, and ribbons. buttons, in general, everything that comes to your mind.
“Clothes” for cups and hot mats.
To create coziness in the kitchen and a warm hospitable reception of friends, small cute and cozy little things, such as handmade felt coasters, will help. A cover for a cup will be an excellent gift for a loved one.
Master class on making hot coasters.
A simple photo master class will help you make cozy autumn coasters for cups.
Patterns for autumn coasters
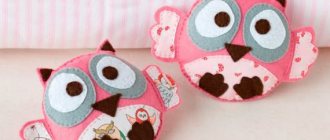
Keychains, magnets and just miniatures
Making a keychain with your own hands from felt will take a little time, and the variety of such gizmos is limited only by your imagination.
Master class on making a felt keychain with your own hands
You will need:
- Felt in different colors
- Loop tape
- Threads
- If keychains are for keys, then a key ring
You can download the template below. The template does not include small details: circles for the toadstool, eyes for the bird and owl, small triangles for the ears of the fox and the nose of the owl.
Bookmarks
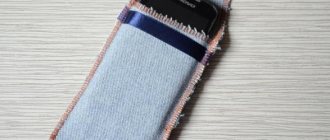
Phone cases.
An original phone case can be made as a gift.
Pencil cases, covers, cases
You can make your own pencil case, scissors case, or glasses case from felt:
Wallets, cosmetic bags, handbags.
Or you can simply decorate the bag with felt flowers.
Photo frame
Other felt ideas
And a few more ideas on what crafts you can make from felt for yourself or as a gift.
Camera toy to hold a child's gaze
Headphone holder
Notebook covers:
Felt panels and paintings
They will decorate a child's room and enliven the walls of the living room and bedroom.
You can involve a child in the making of a painting for a nursery, who will be happy to help his mother in this exciting activity. If your child is already good at scissors and appliqué skills, then you can safely entrust him to make a felt painting on his own.
Pincushions:
Sewing process
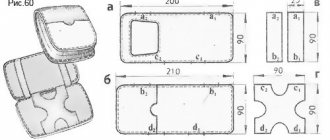
You can cut out parts in two ways:
- In the first option, the box is made with the least number of seams, but the material consumption is high. In this case, it is necessary to cut out two cross-shaped parts from the main and lining fabric, one from the adhesive sealing fabric. The length of the sides of the “cross” is the size of the height of the product with the addition of 1 cm for allowances.
- The second method is recommended as the most economical. Fabric consumption is reduced, while providing additional rigidity to the ribs of the box. With this option, you need to cut out five squares from the base, lining and adhesive materials. Each side of the part is equal to the height of the box plus 2 cm.
In addition, you need to cut a strip to finish the top of the container: width = 4.5 cm; length = box height × 4 + 2 cm. To make handles, you need to cut out two strips from the main fabric: length = 15 cm; width=4 cm.
Progress of work (cutting was done using the second method):
- Preparation of handles . Stitch the parts so that their right sides are on the inside. Then turn it inside out and iron it.
- Inner part . Using an iron, connect the parts made of adhesive material with the elements made of lining fabric. Sew wall squares to the bottom part on four sides. Cut off the corners of the seam allowances and iron them inward. Sew a finishing stitch around the perimeter of the bottom. Connect the side walls.
- Grinding handles . Using pins, pin the prepared parts to the opposite outer walls of the square. At the same time, bend the open edges of the handles and leave them protruding slightly forward. Customize the elements.
- External part . Sew the seams in the same way as connecting the lining parts. Then insert the inner one into the outer finished box and fasten them along the top with pins.
- Preparation of facing . Along the entire length of the part, make a 1 cm inward fold and iron it. Leave one edge of the facing open. Fold the second one 1 cm and fix it with an iron. The folded edge will subsequently cover the opposite one.
- Stitching the facing . Pin the piece to the top of the box with the non-iron side along the entire top edge. Then stitch at a distance of about 8 mm from the edge. Raise the facing up and iron it. Then fold the part inside out and baste. Make a stitch, retreating 5 mm from the place of initial stitching, while grabbing the folded edge of the part from the wrong side of the container. The box is ready.
If you need to make a box with a lid, then the additional part is made in the same way as the main part. Only without facings and handles.
The video will show you how to sew a fabric box:
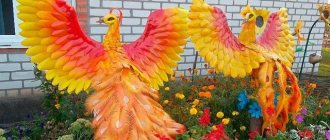
Grass basket - an unusual gift option for Easter
Mini basket in the shape of grass. It takes a few minutes to do, but it looks so original.
For the base we need a plastic bottle. The volume depends on the desired size of the basket. The example shows a 0.5 liter container. Before using the bottle for work, cut off the top. How much to cut depends on the desired height of the product. To prevent the edge of the cut from scratching, we “melt” it with an iron.
We apply the material to the bottle and measure the place from which the weed will begin. Then we make cuts on top, which will create the effect of grass. We create decorative elements from fabric of other colors. Using a glue gun, fix the main green part, then the decorations.
We complete the design of the basket using sisal.
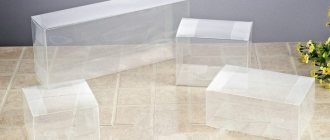
What is better - buy or make it yourself?
Soft textile boxes can be purchased ready-made. They are sold in stores that sell household goods.
You can also order fabric containers on marketplaces:
- Ozone;
- Wildberries;
- Yandex. Market;
- Aliexpress;
- SberMegaMarket, etc.
The cost of the product, depending on the size, material and workmanship, varies between 250-1300 rubles.
Despite the fact that storage boxes are commercially available and are immediately suitable for use, there are a number of advantages to making them yourself:
To create a product, you don’t have to choose expensive materials; you can get by with simple but effective ones.
The costs of making a box can be minimal or reduced to zero, since sometimes materials that have been “stay” at home for a long time are used.- It is possible to choose the size, shape, and color that you need.
- Exclusivity.
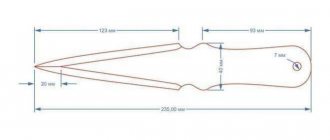
How to make a box with a heart
If you have been thinking about how to make a heart-shaped box with your own hands, then this post is for you. This packaging can be done in 5 minutes. Don't believe me? Then let's try