A crocheted teapot warmer is a practical and affordable option that will allow you to decorate your teapot and will last for quite a long time. This type of knitting is quite possible for beginner knitters, and the abundance of patterns and options makes the idea even more attractive. The video at the end of the article will help you better understand and complete this product.
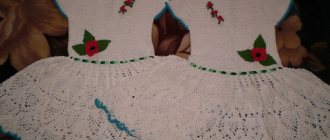
Hot water bottle "Rose"
A heating pad according to this description can be knitted in two sizes: for a teapot for 4 or 6 mugs.
We will need:
- yarn, 100% cotton, 71g per 109m – a skein of raspberry (No1), plum (No2), blue (No3), light green (No4), white (No5), carrot (No6), red (No7);
- hook No.5.
Density: 13 StBN for 14 rubles. equal to 10 cm by 10 cm.
Description
For the heating pad we knit two identical parts. We alternate color stripes every 2 p. in sequence: No1, No2, No3, No4, No5, No6, No7, No6, No5, No4, No3, No2, No1 (see photo).
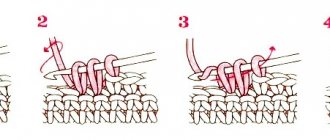
We cast on with yarn No. 29; 36 VP and knit according to diagram 1, performing repetitions of the last one. row up to level 10; 13cm. We complete the pattern purlwise. R.
We perform the top of the part according to diagram 2, knitting 6p. Then we move on to diagram 3: raise it by 3p. and at 4 p.m. 10 VP and knit them together with the loops raised from 1p. and 2p.
Next row: 1 VP, 1 single stitch in the 1st stitch, [2 SC in two chains of 10 VP, 1 SC in the next row. p.]x3; 4 times, 1 sc in last. StBN. In total we have 11;14st. Let's turn the work around.
Next r.: 1 VP, 1 sc in the 1st sc, 2 sc with a common top x 5; 7 times, 1 sc in the next. 0; 1 StBN. Cut the thread and fasten it.
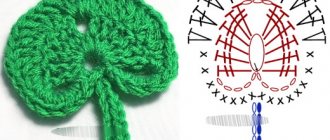
We knit the second half of the heating pad. We sew the parts together, leaving 6 gaps for the handle and spout of the teapot; 8.5 cm. According to diagram 4, we knit a flower and sew it to the heating pad.
How and what to make a rooster/chicken hot water bottle for a mug/teapot with your own hands?
How can you sew or crochet a rooster/chicken to make a warmer for a mug/teapot? How to do it yourself?
Popular articles Cute flowers - petals
It’s easy to make a heating pad for a teapot or mug in the shape of a cockerel or chicken. Absolutely anyone can do it.
Firstly, you can sew such a heating pad from fabric, insulation (for example, padding polyester), various ribbons, braid and lace.
The cutest version of the hot water bottle, in my opinion, is chicken with chicken.
To make it you will need
You will find a detailed description of working with photographs here.
If you are not very good at sewing, then you can make a simpler heating pad. One of the simplest options is this perky cockerel.
The cockerel can be cut using this pattern.
The next simple option is this Ryaba Chicken.
A detailed description of the work on Ryaba can be found here
You can not only sew a heating pad for a teapot, but also knit it. If you know how to knit even a little, you may well end up with a chicken like this Chernushka (although it’s just as easy to make a chicken of a different, more cheerful color).
Step-by-step instructions for making this chicken can be found here
The next version of the heating pad - Cockerel - is suitable for those who know how and love to knit.
How to tie such a beautiful cockerel is described here
I find the first and last option of heating pads especially attractive
They will undoubtedly attract the attention of your guests while drinking tea.
The easiest way is to sew a heating pad by hand from two parts, connecting them to each other - it will look like a cap. First, you should make a common part to completely cover the kettle, and then additionally “attach” elements for the spout and handle of the kettle, sewing a head and neck to the chicken on one side and a tail on the other.
It is more difficult to make a heating pad for a teapot from several parts, sewing them together: the head and body, beak, beard and comb, wings, tail. But this heating pad turns out to be more attractive.
You can also sew this original heating pad for a teapot in the shape of a Rooster:
It requires the following parts:
First, a “suit” is sewn together, which is made from six wedges.
Another heating pad “Chicken” with a pattern:
There is also such an interesting, cozy heating pad, as in the image:
You will need for work:
The filler can be holofiber; you will also need a ring, a couple of beads for the eyes and accessories, such as a needle and thread, scissors.
Another interesting option for a knitted heating pad:
There is also a master class for her.
When making a heating pad for a kettle, the most important thing is to ensure sufficient thermal insulation, so the choice of material should be approached most carefully - it can be drape, felt with an additional insulation lining, you can also use light fabric on top, but the bottom layer should be made of quilted warm lining fabric. You can immediately make such a heating pad from thick quilted material. The upper part can also be tied. It should be noted that the shape of a rooster/chicken itself is very suitable for creating teapot warmers - here are a few examples:
Here are a few more patterns that you can use to create your own looks, including:
With the approach of the New Year - the Fire Rooster, I want to “pamper” seven symbolic things in order to “attract good luck to the house.”
With one of these little things you can make a “chicken” for a teapot, saving the heat of the most popular drink in our harsh winters.
The simplest and most uncomplicated version of a “warmer” for a teapot can be sewn on several layers of fabric. Choose a fabric that is more colorful and brighter.
There are a lot of master classes on making a warmer for a teapot or mug in the shape of a rooster or his life partner, a hen, and there is plenty to choose from. For those who know how to crochet, this bright option is suitable:
For those who like to sew more, you can use the following options:
When practical things. such as teapot warmers are also made at a high artistic level; they not only decorate the interior of the kitchen, but bring their quiet, cozy charm to the Russian tea ceremony.
A heating pad in the shape of a Cockerel or a hen will look very elegant. Try one of the options if the process “delays” you. then you can make such heating pads Rooster and Hen as gifts for Easter and New Year celebrations with the symbol of the Rooster.
I really like teapot warmers, crocheted or knitted, they are invariably elegant and provide good warmth and keep their shape; in addition, you can usefully recycle the remains of brightly colored yarn.
A heating pad for a “chicken” and “cockerel” teapot can also be sewn from fabric or drape or felt. If you are sewing a heating pad from fabric, you will need to make several bottom layers with padding polyester. which will keep the kettle warm.
Hot water bottle with caps
We will need:
- brown yarn for the top of the warmer;
- black yarn for the bottom of the heating pad;
- some yarn of different colors (see photo);
- hook No. 1.75 and No. 5;
- filler.
Description
From black threads we collect 60 air stitches. loops and knit 3p. RLS. Next, we divide the knitting in half (30 stitches each) and then knit each of the parts separately, switching to brown yarn. We fulfill 16 rubles. columns without/n.
We connect the parts and knit a stitch without / n, making decreases in each. R. 6 loops each. When the number of loops is 20, we begin to knit a cone.
Next Decrease 1 stitch on 4 rows. in everyone. We switch to yellow yarn. and knit 7p. RLS. Next 2 rubles decrease by 5p.
Cones
Choose the thread color as desired. For one cone, we collect a chain of 3 VPs and close it into a ring. Further:
- 1st row: 7 sc in the middle of the ring;
- 2nd rub.: +7 increases;
- 3 rubles: +5 increases;
- from 4r. 10 rubles: without additions we knit sc;
- from 11 p.m. 18 rubles: + 2 increases in each rub.
We make three more cones of different colors.
Assembly
We decorate the cones with yarn tassels, fill them with stuffing and sew them to the heating pad.
Tabby cats
This set of cat warmers will create a cheerful mood in any kitchen. The main thing in this model of warmers is to choose a nice fabric and play with it when sewing.
We measure the teapot or pan according to its largest diameter and add about 4 cm for free fitting. Divide the resulting amount by two. This will be the width of one half of the product. We cut out the two main parts, not forgetting the seam allowances.
We also cut out the overlay for the muzzle and ears (2 parts).
We cut out the lining for the ears from white fabric. For the tail, cut out a long strip.
From white fabric we cut out the linings for the main parts without allowances. You can immediately use a warm cloth for this.
The second option is to use synthetic winterizer for insulation.
We assemble the inner cap. On the outside there is synthetic padding.
We sew the ears together, slightly adjusting the colored fabric. Sew a small fold on the white fabric.
Finished ears - see photo.
We make a loop from colored fabric.
We fold the parts of the colored cap with the right sides inward, put in the ears, a loop and sew along the upper contour. When inserting your ears, make sure that their tops are directed toward the center.
We turn the part inside out and put it on the white cap.
Match the side seams and stitch the parts along the bottom edge.
Sew the tail along the long side.
Then on a short one. We turn the part inside out.
Fill with filler, pushing small pieces of padding polyester through.
To cover the muzzle, cut out an insert from cardboard. If desired, you can make the overlay fluffy by placing padding polyester between the cardboard insert and the fabric.
And if you want the cat to have beautiful and embossed underpads, as in the photo, then assemble the overlay along the contour, putting the filler inside. Sew a bean bag in the center - see photo above.
We process the edge of the part with a seam over the edge, slightly gathering it.
Place the fabric over the insert and tighten the thread.
It turned out to be a beautiful overlay.
We apply the overlay to the main part and sew it on.
In this case, we place the seam inside the fold, between the main part and the overlay.
Sew on the tail. We make eyes and attach them to the muzzle.
The heating pad is ready!
Pestle for teapot
Sewing a heating pad for a chicken-shaped teapot is not as difficult as it might seem. Having prepared the fabric for the inner and outer layers, insulation (batting, padding polyester), threads, scissors, sewing machine and needle, you can start working:
- To make the body, you need to determine the dimensions according to the same scheme as in the case of a heating pad in the shape of a cap. To avoid a seam along the top edge of the warmer, fold and cut the paper measure into two equal rectangles, then join them together at the long sides. The result is a rectangle whose height is twice its length. Thus, the seams will be at the front and back, which will add rigidity to the structure. But it’s better to sew it after the wings and tail are sewn on.
- The wing pattern can be made by drawing a right triangle with a height equal to half the back and a base 2/3 of the height. The corners need to be rounded. The combination of white stripes and the fabric from which the upper layer of the body is made looks impressive. Now the wings need to be sewn to the body, adding a little padding polyester for volume.
- The tail is also a triangle, but isosceles. Its base is equal to half the length of the back, the other two sides are 2 cm shorter. You need to cut out two such figures from a canvas stitched from white and stripes of the same color as the body. After this, you need to fold them with the right sides inward and sew along the sides. Turn it inside out, fill it with a small amount of padding polyester, and sew “feathers” along the border of the stripes. Having retreated a fifth from the edge along the line of the back, align the middle of the base of the tail with the resulting point. Now you need to sew it on, first placing the triangle in the opposite direction (towards the head), and then, turning it away, stitch it again. In this case, the tail should protrude beyond the body by a third of its height.
- Now you can sew the main part of the heating pad front and back.
- To make the head, you will need two round pieces of white fabric. The diameter is almost half the length of the back.
- The easiest way to make a comb is from stitched red fabric. By wrapping a 2 cm wide strip at an angle of 45 degrees alternately to the right and left sides, you can form a ridge. Stitch to secure folds.
- The beak is a triangle, folded from a two-centimeter yellow ribbon and stitched together.
- You will get two beards if you sew together two red circles with half the diameter of the white ones. After this, the circle is cut in half, turned inside out, and quite a bit of padding polyester is placed in each half.
- Now you need to place the comb and beak on the round blanks, perhaps even baste them, and then sew the head, stepping back half a centimeter from the edge and first folding it with the front surface inward. Do not sew a third of the circumference - through this hole the head will be filled with padding polyester. The unsewn part should start from the beak.
- For each white blank, it is necessary to baste the beards immediately under the beak, after which the head is “planted” on the corner of the chicken body and swept off by hand.
- All that remains is to make the eyes. You can use black buttons, embroider them with floss threads, or simply draw them.
First master class
Hotty cock
For the base you will need:
This is all. Even a sewing machine is not necessary if you have the desire and skillful hands. And I’m sure you will always find scissors and thread with a needle in your home.
1. Let's start making a simple paper pattern. To do this, you need to measure the circumference of the kettle, including the spout and handle, as well as its height. We take these dimensions as a basis.
Take the simplest version of the drawing first. I found it on the Internet.
2. Selecting fabrics. The pattern can be absolutely anything, from colorful to monochromatic. If you find extra waffle or terry towels in the house, the cockerel will be irresistible.
If there is no padding polyester, then batting or any other insulation will do.
Popular articles Poems for May 9 Victory Day to tears
For the reverse side, you need a thinner, but again, cotton material, cambric or chintz. For the manufacture of small parts, such as a comb, beak and beard, try to find dense, preferably red, fabric. But this is also not a prerequisite. It is convenient to use felt, fleece, drape or any dense material that does not require additional processing.
3. Transfer the design from the paper base to the fabric, not forgetting to add 1.5 cm to the seams. We cut out small details (comb, beak and beard) separately. And cut it out. All parts need to be cut out in two pieces.
4. We add three layers of our future heating pad in the sequence: top, padding polyester and lining. We pin it with pins. The result was two identical blanks. To ensure that the blanks do not fall apart and have a finished look, we sew or hand-embroider decorative seams on each of them. This will emphasize the volume. It’s also best to sew an eye button to each separate half right now.
5. We fasten the resulting two blanks with pins or basting to each other, with the seam inward, not forgetting to first place the pre-sewn small elements in their places: the comb, the beak and the beard.
6. Before stitching completely, turn the sample inside out and try it on, placing it on the kettle. At this stage of our needlework, we need to make sure that the heating pad will fit just right. Sew the two side elements of the heating pad together using a final seam. And don't forget to finish this inner seam by hand or with an overlocker.
7. If the height of the product allows, fold the bottom edge inward and simply stitch. If not, then use braid, piping or leftover fabric to form a decorative welt for the product.
The heating pad in the shape of a rooster is ready. Now you can put it on the kettle and not worry about it cooling down quickly.
Using the same principle, you can sew a chicken, excluding one element. Yes, it's a beard. Therefore, we will not repeat ourselves, although chicken will also come in handy, since you also have a teapot. And this is already a whole family. Also consider a mitten and potholders in the same color. No doubt, your household will love it.
If you master the simple task of making such an improvised rooster warmer or chicken warmer, then believe me, you will be unstoppable. For this reason, I propose to depict something more delightful in the next master class.
Second master class
I hope you have heard about the woman on the samovar? Here. Let's make a hot water bottle doll. Believe me, this is also not difficult, since we will use only affordable materials available in every home, which means we won’t have to buy anything special. You are already quite an experienced master.
Baba on a samovar or hot water bottle doll
So. Are we sewing a peasant young lady, a merchant's wife or a society lady? The less we guess, the more interesting the result. In addition to the materials that were used for the base of the previous craft, we are looking in the house for everything that could be useful for an exclusive and truly magnificent work.
We will need:
1. Sew according to the pre-measured dimensions of the base. You already understand how this is done. But I propose to simplify the task even further and, as a pattern, draw a regular rectangle, the length of which is equal to the diameter of the teapot, including the spout and handle. The height is also known. Don't forget to add 2cm for seams. This will be the base, also known as the underskirt.
2. You need to stitch together the folded parts of the base with just one seam.
3. Carefully hem the bottom of the skirt and gather the top into a gather, not forgetting to leave a hole for sewing in the body.
Now the underskirt is ready. You can leave everything in this form, additionally placing a nice apron on top of the finished doll, which can always be removed and washed if necessary. Which, of course, is very convenient.
But, if all this seems not enough for you and your imagination continues to run wild, do not deny yourself the pleasure of amusing your imagination and start sewing a chic overskirt.
4. Overskirt.
If you decide that your product is not a simple woman on a samovar, but an exclusive work of art, then do not limit your possibilities. Use beautiful bright fabrics, lace, ruffles, flounces, artificial flowers and all sorts of fashionable accessories. Anything is good. Sew the finished top skirt along the side seams. Fold the bottom. Once again, evaluate whether all the details are applied and fasten with a cotton base.
That's not all. A little patience.
5. To complete the masterpiece, you will have to find or make very important parts. For them, you can use elements of an old rubber doll. Of particular value is the head, where everything is already there: eyes with eyelashes, lips, rosy cheeks and even hair. If there is no extra doll in the house, then you will have to work a little more and sew the head, torso and arms separately. Or you can link it. Experiment. Old knitwear, socks or tights can also help out here.
6. We sew up the sewn or knitted head, turn it inside out and stuff it with filler. The pattern for the head is simple and depends on the size of the doll. I suggest using the following.
7. To create hair and style your hair, use any yarn, including bright and colored ones. You can use a soft base to embroider a smooth hairstyle with a parting in the middle, and then braid voluminous braids or tie funny ponytails with bows. Or you can immediately create a full head of hair by first loosening an old scarf, which will give volume and a curl effect. If you decide to dress the young lady in a knitted hat, turban or a spectacular deep hat. In this case, you won’t have to bother with making hair.
8. Cut and cut the arms and torso according to a simple pattern that does not require exact dimensions. One condition is that all parts of the body must correspond to each other. Each part requires two pieces. Sew them together with neat seams, turn them inside out and stuff them with filling. It is convenient to use knitted materials.
The patterns are so simple that you don’t have to look for them on the Internet. You can easily draw them yourself:
9. The arms, torso and ready-made head must be connected to each other to form a whole workpiece.
10. Finishing touches. Embroider funny eyes, nose and smile. Dress the doll in a smart blouse. All you have to do is carefully fasten the workpiece to the base (lower and upper skirt). All.
Just great. The result was not a woman at all, but a charming girl. But as soon as you put a crown on her head, she will already be a princess. And with a rose in your black hair you can end up with a beautiful gypsy.
Experiment. Believe me, there will be no limit to the delight of family and friends. Now you know how to sew a heating pad for a teapot with your own hands. Have no doubt, the ability to make such souvenirs will definitely come in handy. You can now give a master class to anyone. Moreover, the issue with gifts has now been resolved once and for all. Moreover, such textile products are now in fashion. This is also a functional gift. After all, it not only decorates the kitchen, but also allows you to retain heat inside the kettle for a long time. That's what we wanted. Enjoy your tea.
Pink kitty
The pink cat is a modern kitchen accessory that can be made by hand. It is designed in the same way as a regular heating pad. For this you can use two types of materials. Then the animal's muzzle and the corresponding darts on it, a curved tail, paws and back are created. The muzzle is created in two layers: the first is a lining made of calico, and the second is made of knitwear or other fabric.
Popular articles DIY dream catcher
Pink kitty pattern
German and Korean cotton, Russian flax and Belarusian calico are excellent for this. The ears are complemented by an openwork braid. After attaching the muzzle to the created warmer with lining, the paws are sewn on. Then the back part of the cat's body is made and at the end the tail is sewn on. At the very end, the decor is created: eyes, nose, mouth and mustache are sewn on.
Finished model of a pink cat
Variety of ideas
The variety of models of kettle warmers presented, for example, on the Internet, is amazing. Here you can find video tutorials and detailed stories from craftswomen describing the work.
Let's look at some of the most popular examples with crochet patterns:
- Crochet heating pad “White cat”. The finished height of the work is 14 cm.
- The “Scientist Cat” option is quite easy to use.
- Festive New Year version “Tiger cub on the Christmas tree”. The work is done with crochet number 2.
- Another New Year's theme is the Santa Claus and Snow Maiden warmers.
- Set of kitchen accessories "Cornflowers". Made from “Kudelnitsa” yarn in 2 plies.
- A more complicated option, recommended for more experienced craftswomen “Ripe pumpkin”.
- Cozy doll-warmer for a teapot “Tea Party at Grandmother’s”.