I need a cheap and powerful subwoofer for my speakers, and instead of spending money on it, I decided to build a homemade subwoofer from a regular speaker at home. I found a 10-inch Pioneer TS-W255C for only 800 rubles and will tell you how to make a subwoofer with your own hands.
What you will need:
- Old computer power supply (wattage depends on how big your subwoofer/amplifier is)
- Car amplifier (something that can be a bridge and has a built-in crossover)
- Subwoofer. There are quite a lot of choices here, but most car subwoofers are poorly made. Look for a heavy magnet in a fancy casing.
- Speakers
- 18mm fiberboard, depends on the size of your subwoofer
- Several thick wires for speakers
Designing a subwoofer enclosure
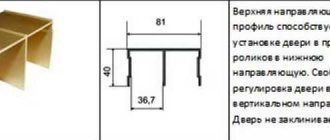
Before you start purchasing materials and start working on how to make a subwoofer with your own hands, you need to design and roughly estimate the design and shape of the main part of the subwoofer - the housing.
The design of the case is divided into two main stages, each of which should be done as thoroughly and carefully as possible in order to ultimately obtain a high-quality product:
- Establishment and approval of Thiel-Small parameters for the loudspeaker
- Program for calculating acoustic designs
Other tools, such as a subwoofer box, can also be made by yourself.
All of the above can be purchased at almost every electronic goods store. Everything is installed according to the instructions that come with all components. Everything is written quite clearly and even a layman can figure it out and install everything without errors or breakdowns.
The main thing is to follow all the rules and do it carefully and carefully in order to make a high-quality subwoofer for the home with your own hands.
How to increase the rigidity of the box?
- The first, the simplest and most obvious. This is the thickness of the material, the thicker the material, the greater the rigidity. When making a subwoofer, we recommend using materials of at least 18 mm, this is the golden mean. If your subwoofer has a power of more than 1500w RMS, then it would not be superfluous to choose a material thickness of 20 mm or more. If you have difficulty finding thick-walled materials, you can use the following recommendations.
- An option that will add rigidity to your box is to make a double front wall. That is, the front part in which the speaker is installed. This part of the subwoofer is most subject to stress during operation. Therefore, having a material width of 18 mm, making the front wall double we get 36 mm. This step will significantly add rigidity to the box. You should also do this provided that your subwoofer has an RMS (rated power) of more than 1500w. If you have a subwoofer with a lower power, for example, 700w, the front wall can also be made double. This makes sense, although the effect will not be very large.
- Another tip is to use spacers inside the subwoofer to add extra rigidity. This works especially well when the subwoofer has a large volume. Let's say you have two 12-inch subwoofers (speakers) in a box. In the middle, the rigidity of the box will be the smallest due to the large area. In this case, it would not hurt you to strengthen the structure and install a spacer in this place.
That's all we wanted to tell you about materials for the subwoofer. If this article helped you, please rate it out of five below.
Do you want to try to calculate the box yourself? Our article “Learning to count a subwoofer box” will help you with this.
Making computer calculations
Quite an important part of installing your own subwoofer. You should not rely one hundred percent on the devices and tools that you purchased. To be completely sure and confident that your home theater is working properly, you need to make preliminary computer calculations.
Computer programs do not provide for non-trivial solutions and errors that are typical for humans. This eliminates almost all risks and the possibility of error.
JBL subwoofers often use a computer plugin called JBL SpeakerShop. A fairly high-quality program that has wide functionality and runs smoothly even on the weakest computers and laptops.
Periodically, it is worth installing such software and checking the operation and functioning of all components of speakers and subwoofers.
How to assemble a subwoofer: required materials and tools
Materials
- Speakers. When choosing a speaker, you should know that they differ in their characteristics. The box or instructions usually indicate the recommended acoustic design for a given speaker.
- Plywood, fibreboard, chipboard. The quantity depends on the size of the body being manufactured.
- Terminals for wires (acoustic terminal). Not necessary. You can drill two holes and bring the wires from the speaker out through them.
- Speaker cable.
- Silicone sealant or PVA glue.
- Self-tapping screws for wood. The nails don't fit.
- Epoxy resin.
- Paint or varnish.
- Glue in a can for carpet. You can use other glue.
- If you are building a bass reflex enclosure, you will need a bass reflex tunnel of the required size. If what you need is not on sale, then a plastic (cardboard, iron) pipe of the required diameter is selected at a hardware store.
Tools
- Hacksaw or jigsaw.
- A screwdriver, or a screwdriver will do.
- Tape measure or long ruler.
- Pencil (marker).
- Carpet or vinyl, or other material for covering the outside of the body is also suitable.
- Scissors.
Before assembling a subwoofer, you need to correctly calculate it. We download the JBL SpeakerShop program on the Internet (or similar ones, for example WinISD or bassbox6pro), which is needed to calculate the dimensions of the case.
All these programs work on the same principle: we enter the characteristics from the instructions for the speaker into the appropriate fields in the program or search for our speaker in the program database. We select the type of housing we want to build and the volume recommended in the instructions. The program will display the dimensions of all the walls of the subwoofer enclosure. The instructions for many speakers already indicate the sizes and types of recommended boxes. If the shape of the subwoofer enclosure specified in the instructions is suitable, then you can do without the program. Each speaker requires an individual calculation of the volume of the housing, the size and location of the port. For the subwoofer body, the shape does not matter; the volume is important to obtain certain sound characteristics.
Speaker
The speaker, in fact, is one of the simplest components of a subwoofer. But this goes against the fact that the speaker is the most important part of the entire mechanism.
Speakers are divided into several sections according to different parameters. Firstly, it is worth highlighting the separation of speakers by frequency. Specifically, the subwoofers you need use low-frequency speakers.
Low-frequency speakers with a frequency below 150 Hz are regularly used and are built into almost all subwoofers that can be used to equip a home theater.
Note!
- Do-it-yourself charger for a car battery: a step-by-step guide for making the device at home, selecting materials for assembling the structure
- DIY laboratory power supply | Step-by-step instructions on how and from what elements to build a power supply
- DIY antenna for digital TV - photo instructions on how to make simple antennas for digital TV
The speakers are not sold separately, but with special tools that, after installation, create a special acoustic design. This allows you to create high-quality and clear sound that will be pleasant to listen to and will delight you when watching movies or TV series at home.
Speakers aren't just used in home theaters. Also, similar equipment is purchased when setting up music and recording studios, and installed in cars for playing music loudly.
The types of acoustic design may be different, but you still shouldn’t purchase expensive professional equipment. This is done so that if you make a mistake, you won’t feel sorry for a lot of lost funds.
Seek help from specialists and special technical services. Yes, you have to spend a little money, but it’s worth it, because in the end you will get a high-quality subwoofer that will complement your home theater and work properly for a long time.
Where to begin?
Once the tasks for the sub are determined, consider the device that is responsible for the amplification in your system. If it is a receiver, such devices already have a dedicated subwoofer output. It is most often indicated by a corresponding inscription near the connector.
If your system uses a stereo amplifier, most likely it does not have a separate output for a subwoofer. In this case, the selected subwoofer model must have a so-called “high-level input”. This input allows the subwoofer to process and correct the outgoing full-range signal from the stereo amplifier.
With this option, the subwoofer is connected to the speaker terminals. It is preferable to use the “-” terminal from one channel and the “+” terminal from the other. But there have been cases when experimenters connected a subwoofer to the terminals of one of the speakers - this option is quite acceptable, but remains at your discretion.
There are also subwoofer models that are equipped with two pairs of terminals for your acoustics. In this option, both channels from the stereo amplifier are connected to the corresponding inputs on the subwoofer, then the signal from the subwoofer is supplied to the stereo pair.
This allows the sub, using the built-in crossover, to unload your speakers from low frequencies. But in this way one more link is introduced into the sound path, and I don’t think that fans of “direct drive” and similar buttons will prefer this option.
Subwoofer design
It will not be possible to describe everything in as much detail as possible, and even in such a way that everyone can understand it. Not everyone understands such complex technology at the same level.
Note!
- DIY induction heater - instructions on how to make a simple and powerful heater
- Do-it-yourself sound amplifier: selection of materials and tools for making at home + step-by-step instructions for creating and assembling yourself
- Do-it-yourself wind generator: step-by-step instructions for making a device at home, choosing materials and type of construction
In order to understand in more detail and understand the entire design of the speakers, sound cards, and various accessories included in the subwoofer, you should find special technological maps and diagrams on the Internet. This can be done on any thematic forum or resource, or simply on a random site on the Internet.
Such images describe in detail the structure and design of such equipment. There are symbols, arrows and explanations of all abbreviations.
In general, everything is done to make it as clear and accessible as possible for you to study this issue. It is better to take ready-made drawings and diagrams for a subwoofer than to do it yourself.
Shield
In addition to the standard subwoofer device, it can be made in the form of an acoustic screen. To carry out this procedure, you will need a special tool called a shield.
But there is a catch - you can do this with your own hands at home only if the cladding of your walls is quite stable and made of high-quality materials.
Note!
- Do-it-yourself incubator: a step-by-step master class on how to build it yourself, choosing building materials and type of construction
- Do-it-yourself cyclone: methods for assembling the device at home, preparing materials and tools + step-by-step instructions
- DIY Bluetooth speaker - step-by-step master class on making and installing it yourself, necessary materials and tools
Otherwise, due to the high bass content, problems may arise with this and you will have to spend money on repairs. Do-it-yourself shield or sub is very risky, but if you do everything correctly, the final result will definitely surprise you.
What should a subwoofer box be like?
The answer is simple. The main requirement that a subwoofer box must meet is its rigidity and strength. The stiffer the walls, the less vibration the subwoofer creates during operation. Of course, in theory, a box made of a ceramic slab or cast of lead with 15 cm walls would be considered ideal, but of course, this can be considered nonsense, since such subwoofers will not only be expensive to manufacture, but also enormously heavy.
Types and comparison of materials for a subwoofer.
Let's look at real options for materials for making a subwoofer and try to give a short conclusion on each of them.
Plywood
Better moisture resistant. In our opinion, this is one of the most worthy materials for the manufacture of acoustic equipment.
But there are a couple of downsides;
- This is the most expensive material.
- It is difficult to find plywood with a thickness of more than 18 mm.
- If the wall area is large, it begins to “ring” (additional stiffeners or spacers are needed)
MDF
Now it is gaining great popularity. It is a kind of gap between plywood and chipboard. Its main advantage is its lower price than plywood (about the same as chipboard) and good rigidity (but not as good as plywood). Easy to saw. Moisture resistance is higher than that of chipboard.
- It is problematic, but possible to find, a thickness of more than 18 mm.
Chipboard
Cheap, common material. Every furniture company has it, and you can order cutting from the same companies. This box will cost you 2-3 times less than one made from plywood. Flaws:
- Very little rigidity of the material (example about grandma’s closet above).
- Not moisture resistant. Absorbs moisture well and crumbles. It is especially dangerous if water gets into your trunk.
Antiacoustics
This is a very important part when arranging a home theater and a subwoofer in particular. You need to create excellent anti-acoustics, especially if you do not live in your own house, but in an apartment building.
Neighbors may complain about the loud noise, and they have a right. Create high-quality sound isolation and watch TV shows and movies, listen to music as much as you want.
The first thing you need to stock up on to create proper sound insulation is special acoustic foam. This is a fairly popular material that musicians regularly use to decorate their home music studios.
It is characterized by high efficiency and low cost. You can find soundproofing foam on various Internet resources from third-party manufacturers, then the price will be even lower.
You can also upgrade the existing walls in your home so that they add anti-acoustics and sound insulation. There is a special ceiling shape design that cannot be installed at home, but if you spend money and order the design from professionals, you definitely won’t regret it.
We assemble beautiful and high-quality 2.1 speakers for a PC from scratch: my way
This guide is primarily interesting because it uses non-standard approaches in design, use of materials and manufacturing method - the final product is completely manufactured on a 40W CO2 laser cutter.
I renovated my daughters’ room, bought a new PC, and connected UPS. The only thing left to do is the speakers. Of course, you could go to the store (no, you can’t, COVID, however) or order on the Internet, but the requirements for size, design and sound quality were such that you would have to take at least either Harman Kardon Soundsticks 4 or something from Bose or Bang & Olufsen. To put it simply, you would have to pay at least 300 bucks, or even many times more. But then I started thinking, am I my own engineer or what? And I decided to build a 2.1 system from scratch, which would fit into the updated design of the room, would have decent sound, but at the same time, would not cost an indecent price. In the process of developing the design, the speakers were given the working name “Santa Barbara”, but this is not at all in honor of the famous series, but more in honor of the visual, which we managed to make quite interesting and atypical, being based on my impressions after familiarizing myself with the architecture of the above-mentioned city, about 10 years ago.
Why 2.1, and not “full-fledged” 2.0 speakers? The reason, as always, is the size. My daughter’s computer desk is small, only a meter wide, and I didn’t want to clutter it with large speakers. Therefore, I decided to make compact but high-quality satellites, and generally hide the subwoofer under the table (although I initially planned to make a table-top subwoofer). In general, initially I did not plan a 2.1 system, but wanted to make something like a sound bar, and I wanted it so much that I developed two different designs and even began to implement them in wood, but after mature reflection, I still made a choice in the direction of 2.1 systems, since to get decent sound from a “soundbar” form factor that would fit on a desktop, you would have to install a good DSP and use very expensive speakers, but in this case, due to the cost of all materials, I easily “fit” into $50 while saving desk space.
The frame of a soundbar that never went into production
And this is what the finished “assembled” system already looks like. (Yes, I am aware that the monitor is a little old, and the color doesn’t match the room. A replacement is already in the process of being manufactured, and there will be a separate review on it)
Structurally, the system consists of two satellites with dimensions of 120x85x65mm, in which there is a 50mm wideband speaker with a neodymium magnet and a 50mm passive radiator with a rubber suspension. The subwoofer has dimensions of 300x200x100mm, it uses a bass driver with a diameter of 75mm, and the subwoofer itself is made according to the Band Pass acoustic design. Also, in the subwoofer housing there is a 2.1 class D amplifier, on two TPA3116 microcircuits, a 17V 3A toroidal transformer, a rectifier and other little things. The satellite housings are made of 3mm plywood, with additional impregnation and damping, and the subwoofer housing is made of 10mm plywood, also with sizing and damping. The dimensions of both the speakers and the subwoofer are dictated by the maximum working field of my K40 laser cutter, which is 30x20cm.
A quick note about the photos at different stages. Don’t be confused by the fact that the speakers in the photographs slightly change shape and appearance during the manufacturing process - several different prototypes were made, and each stage of manufacturing was documented on separate prototypes, hence the possible “discrepancies.”
When designing the satellites, I was guided by several requirements at once.
- The design should be subdued, modern-minimalist, in the so-called “Apple” style (which, in fact, was created by Braun designer Dieter Rams back in the late 60s).
- At the same time, the design must be original, not copy anyone or anything in particular, and use simple geometric shapes for ease of production at home.
- Home conditions also dictated the choice of method for making speaker enclosures - “conventional” and photopolymer 3D printing was discarded for obvious reasons, I don’t have a Metal Sinthering 3D printer yet, just as I don’t have a 5-axis CNC milling machine, so it was decided to make the enclosure from plywood, and cut everything on a laser cutter.
- Recycling waste is my strong point, so I decided to decorate the speakers not with vulgar wood-look film or wood veneer, but with the remnants of wallpaper from the children's room, which has a fine-grained stone structure and is perfect for the chosen geometry. (Although initially I considered (and even made prototypes) options using leatherette or Alcantara. But I decided that it was better to use such materials where they belong - in a car, but at home and ordinary wallpaper will do).
The drawing for the satellite housing was created in semi-automatic mode on the website makercase.com - enter the required dimensions, material thickness, select the shape and the site will generate it. An SVG file that can be sent directly to a laser cutter, or, as in my case, modified a little and made cutouts for mounting speakers and a passive radiator in Corel Draw.
The front and rear panels of the speakers were made of 3mm plexiglass in a beige-cream color, and the inserts in them were made of 3mm plywood and covered with brown acoustic fabric. Also, holders for passive radiators were made from plywood.
Initially, I planned that one of the speakers would have volume and tone controls “on board,” but due to the complexity of manufacturing and wiring, I decided to give up and make both speakers the same. We also had to abandon the decorative nameplate - it was visually too small and did not fit into the overall design.
Similar to the speakers, the subwoofer cabinet drawing was also created in Corel Draw. Practice has shown the redundancy of so many mounting holes - the idea was to use them to ensure that the body parts are pressed tightly against each other when gluing, since I do not have a clamp or vice of a suitable size. But as it turned out, the number of holes can be safely reduced by half.
The bass speaker from the Bang & Olufsen smart speaker - BeoSound ($1200 RRP) with a diffuser size of 3 inches was used as a subwoofer speaker. In the satellites I used 50mm speakers from JBL bluetooth speakers (Charge 3, if I remember correctly). To the logical questions - “Where did you get it and how much?”, I’ll answer right away, I got it for money, but where I got it, it’s no longer there and it’s unlikely there will be again).
After all materials are prepared, we begin assembly. To begin with, we glue the speaker housing - it must be sealed in order to get a decent sound. The rounded part of the speaker has many slots, which provide the necessary flexibility, so I will seal them first. To do this, it is better to use PVA glue - first you need to coat the part that will be on the inside with glue, bend it to the desired shape and insert the remaining parts into the grooves so that the body is “assembled”.
We wrap the satellite body with masking tape and, depending on the ambient temperature, let it dry for at least half an hour, or even more. The next step is to coat the assembled structure with PVA glue from the outside. You don’t need to pour a lot of glue at once, it will take longer to dry, and there will be unevenness on the surface, and sanding PVA with sandpaper is not an easy task. I applied 4 thin layers, at 15 minute intervals, drying the structure on the radiator between layers, making sure that all the grooves were reliably filled with glue. Afterwards, we leave the speaker to dry in a warm place for at least 12 hours, and during this time, you can glue a passive radiator to the back of the case, and the speaker itself to the front. For gluing the emitter, urethane sealant was the most suitable - silicone and “moment” with “nairit” did not stick to the rubber part of the emitter, and the cyanoacrylic glue fell off due to vibrations. For greater rigidity, when gluing, I used a plywood washer, which presses the emitter to the panel. During the gluing process, after all the screws are tightly tightened, you must carefully clean off any excess sealant that has leaked into the emitter.
Using a similar method, you can glue the speaker to the front panel. But since it will be additionally pressed with screws, strong glue is not needed here, and it is quite possible to get by with a simple silicone sealant, which dries faster and is more convenient to work with compared to urethane.
After the individual components have dried, you can proceed to assembling the case itself. First, we connect the front panel and the main body. For this purpose I used "5 minute" epoxy glue. You shouldn’t waste time sealing all the cracks with epoxy - it’s better to make a couple of other “tacks”, taking care of the evenness and geometry, and when it dries, coat the seams from the inside with either silicone or urethane sealant - both work equally well, but I prefer silicone - both I already wrote above, it’s easier to apply, it dries faster, and if something happens, you can help yourself in the right places with your finger.
Since the speaker (and, accordingly, our center of gravity is in the upper part) and the speaker itself will be tilted backwards, the first prototypes were very unstable and easily tipped over due to powerful bass. To improve stability, a metal plate was attached to the bottom of the column. In my case, a piece from ********* (the first person to read this far and guess what this plate is from will receive 500 KR from me).
As practice has shown, the weight of one plate turned out to be insufficient - although the speaker no longer tipped over, it jumped fervently on the table due to the bass, so I had to add a second plate.
After the sealant at the joints of the front and side sides has thoroughly dried, you can cover the sides and front panel from the inside with sound-absorbing felt - this will help remove body resonances, which would otherwise give the sound a “out of a cardboard box” effect. Felt should also be glued to the back panel - after assembling the speaker - this will be problematic.
We glue the back panel “pointwise” with epoxy glue along the contour, and coat the inside with silicone sealant. But we glue the bottom only with silicone, not sparing the sealant, so that there are no air leaks (of course, before this you need to solder the wire to the speaker and bring it out through one of the holes that was used to attach the pressure washer of the passive radiator, and plug the other 3 ).
To be on the safe side, wait a couple of hours (or better yet, overnight) and begin an air leak test. It is done very simply, rhythmically press the passive radiator and look at the speaker diffuser - it should move in time with the presses, and with approximately the same amplitude as the radiator itself. If the movements are noticeably weak, and even so, just for control, it is worth checking the body for cracks. To do this, we wet our lips, bring the speaker at the joints to our lips and rhythmically press the emitter - if there is a leak somewhere, we will feel a chill on our lips. After the leak site has been localized (and it is quite possible that there will be several of them at once), use a utility knife to slightly expand the leak site and pour in silicone - so that a slide 2-3 mm high is formed. After the silicone has dried thoroughly, we cut off everything that sticks out with a stationery knife, without tearing it off in any case - this way you can tear out the “cork”. Well, let’s do a leak test again.
After the tightness test has been passed, it would be a good idea to conduct a test for resonance and rattling - connect the speaker to an amplifier, the amplifier to a computer or low-frequency generator, and apply a sinusoidal signal in the range of 100Hz-10kHz, gradually increasing the frequency as well as and power, while listening to overtones. If rattling appears at any frequency, then using the poking method (or rather, squeezing and pressing), we determine the resonating place. If such a place is found, then we make a small (2-3mm) hole in it and fill it with a little silicone. Let it dry and check again. If the rattling cannot be overcome by external mechanical influence, then the speaker can be disassembled, or rather, cut to remove the speaker and emitter - the housing will have to be remade.
If everything went well, then you can start finishing, and later – the false panels. To cover the speaker with wallpaper, I tried several different methods - wallpaper glue, PVA glue, Moment glue, epoxy glue, double-sided tape, and it was the latter that proved to be the best - both in terms of ease of repetition and in terms of the quality of the final result.
We will need thin double-sided tape - this is usually used for gluing carpets and other utensils. We use it to glue the speaker body around the perimeter. A small life hack - this kind of tape sometimes starts to create wrinkles after gluing it. To avoid this, before gluing, the roll of adhesive tape must be thoroughly warmed up, say, by placing it on the battery for an hour, and glued tightly to the body.
We also cover the perimeter of the ends with 2-sided tape, but this time it’s narrow; you shouldn’t completely cover the ends with tape, since then we’ll have problems with attaching the false panels.
From a roll of wallpaper we cut a piece of sufficient length so that the column can be overlapped, and 2-3 centimeters wider than the depth of the column. We start gluing the column from the bottom, stretching the wallpaper during the gluing process. After we have covered the entire perimeter, we make cuts along the protruding edges of the wallpaper, approximately as shown in the photo.
Pulling these “ears”, we glue them to the ends of the speaker. Don't overdo it with tension, I tore a couple of pieces in the process and had to start all over again.
If the tape or wallpaper comes away from the ends, then you can warm it up a little locally - with a hairdryer, iron, and so on. After the process is completed, you need to trim the wallpaper a little along with the tape around the perimeter - we will have false panels made of plexiglass, we will glue them, but reliably gluing plexiglass to plywood is not so easy, you need epoxy, and not just any one will do. As practice has shown, epoxy adhesives with a weak or sulfurous odor do not glue plexiglass well, but those with a very strong, “chemical” odor glue well.
The next stage is the manufacture of the front false panel. It is made of plexiglass, with inserts made of plywood and, again, plexiglass.
We place an acoustically transparent fabric on the plexiglass contour and insert the corresponding parts into the corresponding grooves. The acoustic fabric should be stretched a little - it is better if someone helps you and holds it.
We check how well the fabric is stretched and cut off the protruding excess first with scissors, and then “go through” the joints with a soldering iron - the fabric melts and fuses into the plexiglass, thereby ensuring a reliable connection.
After processing with a soldering iron, if you do not cut the fabric butt, you may end up with uneven edges, as in the photo above. Carefully cut them off with a knife and go over the edges again with a soldering iron.
The rear false panel does not require such tricks, since everything is simple there - just slots and that’s it.
Before gluing the panels, you need to lightly sand them with 80-100 sandpaper on the inside. This will improve the strength of the adhesive seam. For gluing we will use epoxy glue; I wrote about choosing the type a little higher. We apply the panel, center it relative to the body and let it dry well - despite the stated curing time of 5-10-15-30 minutes, the actual hardness of the gluing area is ensured after 12 or even 24 hours.
This is what the finished front speaker looks like.
Let's move on to assembling the subwoofer. As I already wrote, it is made of 10mm thick plywood and uses a band pass box acoustic circuit. It also houses an amplifier and a power supply.
The photo shows an almost finished case with a short bass reflex installed. As practice has shown, the bass reflex turned out to be tuned to a very high frequency, so that the resonance, by ear, was somewhere in the region of 200-300Hz. Therefore, the bass reflex pipe was lengthened with a piece of PVC pipe, to a length at which the sound was perceived most pleasantly. Of course, such an extreme extension of the pipe caused a typical problem with the sound - it became a little farting. But this only happens at volumes at which this subwoofer will never work - the volume control knobs are not brought out, and during the assembly process they are installed so as not to cause any side sounds, even when a signal with the maximum level is supplied to the input.
(For those who want to repeat, the length of the pipe turned out to be approximately 18cm)
When assembling the subwoofer, I decided to play it safe and cut an additional hole in the side to improve heat dissipation from the transformer and amplifier. As practice has shown, this was unnecessary - one ventilation hole on the back of the case is quite enough for cooling. Class D amplifiers have quietly made a big revolution in audio - forget about bulky radiators and fans, complete with huge power transformers.
The agony of choosing a location for a side hole (as practice has shown, it’s too much)
All joints are well sealed, and the insides are covered with acoustic felt. It seems nothing special, but the difference is noticeable by ear.
The subwoofer is in the process of drying - all the screws will subsequently be unscrewed, and sealant will be poured into the holes.
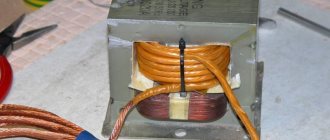
The amplification and nutritional part is located in a separate compartment, isolated from the acoustic part. It consists of a 2.1 class D amplifier board, based on TPA3116 chips, a 16 volt, 3 ampere toroidal transformer and a rectifier board with 35 volt filter capacitors - 4700 µF + 2200 µF. Two more 2200 µF capacitors are installed directly on the amplifier board (in the photo one of them had to be pulled out a little because the transformer was in the way).
The amplifier board is shown in the photo. All connectors were removed from it, the power supply electrolytes were replaced with Rubycon YXA, and the proven, low-noise NE5532AN from Signetics was installed instead of the “regular” NE5532 op-amps. To be honest, the difference is not particularly noticeable, but if the parts are there and the replacement is within a minute, then why not?
The entire structure is installed on stainless steel angles and 3mm threaded pins. On the back side of the panel there is a network connector, connectors for connecting satellites, and a ventilation grille in the same style as on the satellites.
The photo shows an attempt (unsuccessful) to cover the panels with wallpaper using double-sided tape.
After everything is assembled and checked for normal sound and absence of rattling, you can cover the body with wallpaper. The option with double-sided tape did not work here - the wallpaper began to create wrinkles on large surfaces, so I had to glue it with PVA glue.
This glue is very tricky - it’s easy and pleasant to work with, it’s also easy to wash your hands, but after it dries, it’s very difficult to work with it - it turns out to be a very viscous and poorly processed mass - when gluing the sidewall, the glue came out edges, I didn’t clean it in time, as a result, I got ugly protrusions on the side that had to be cut off, and thereby bury the idea of completely covering the subwoofer with wallpaper.
So, if you follow my thorny path, it is better to work together - one removes excess glue with a scraper, and the other immediately cleans up this excess with a damp cloth. And I had to “invent” false panels for the subwoofer. It didn’t turn out as beautiful as I planned, but the sub will stand under the bedside table, behind the printer, and it will practically not be visible, so it’ll do just fine 
The “extra” ventilation hole on the side had to be covered with a decorative cover - a mesh from a 3-inch speaker.
Finally, everything is assembled, configured, and even installed at the “workplace”. It turned out quite nice, fresh and unusual, and the sound is generally great. Small, final touches to the sound were given by adjusting the system equalizer (small, -3dB dip in the range of 100-400Hz to remove room resonances), and adjusting the subwoofer level relative to the satellites - I had to muffle it a little so that the sound was smooth and not classic “ boom-boom, tsik-tsik” om.
In conclusion, a little advice and warning to all audiophiles, lovers of Till and Small, the BassBox program, warming up the ears and so on, who will have quite expected objections and advice about the design, shapes, internals and, in general, the meaning of life. The author of this article, that is, I know about all this splendor and generally have a good understanding of acoustics. I worked as a sound engineer for 10 years, and mixed many different tracks, including some that later ended up in the Billboard TOP 20. So I have a sufficient idea of the correct sound, and the design of the entire system was calculated and selected so that in a specific room , in a specific place, to provide the most decent sound. I won’t boast much (why?) but in terms of overall sound quality (loudness, detail, stereo panorama, bass, mids, highs), this solution corresponds to branded bookshelf speakers with a price tag of around $300 and is head and shoulders above any Microlab/Sven/Defender/Edifier and others of similar configuration.
Since the blog format does not provide for the ability to “attach” files, for this reason I cannot post the drawings, but if you want to repeat it, write in the comments, I will send everything by email.
And here is the topic of the next DIY review - Clocks on seven-segment indicators, in the same visual style as the speakers under review, but with some unique properties - the color of the symbols changes depending on the time of day, and control is done with gestures (for example, you can turn off the alarm without getting out of bed - simply waving his hand at the watch)
Car subwoofers
As already partially mentioned earlier, subwoofers are used not only for home theaters and music studios. Some drivers who lack music and drive install powerful speakers, speakers and subwoofers in their car in order to listen to music loudly.
If you are one of these people, then you should remember that you can only play loud music during daylight hours, so as not to disturb the people around you. You need to remember not only about yourself.
Installing a car subwoofer
Do-it-yourself subwoofers are placed in the car mainly in the cargo compartment. There is another, less popular option, when this device is attached directly to the driver’s seat. Both positions provide excellent audibility, acoustics and sound quality that will allow you to listen to music in the car without any problems.
Of course, making your own under-seat subwoofers will look better than its counterpart.
The advantage of installing a subwoofer in your car is that it does not require certain additional accessories. You won't even need to remove any components of your car dealership.
There are different types of subwoofers in cars. The most popular are the stealth type. They are distinguished by clear sound, regardless of bass content. So, they are quite organic, as the name suggests.
Installing stealth car subwoofers will not cause you any problems or breakdowns. It is enough just to choose a copy that is suitable in shape and size and secure it tightly in the car using special fasteners.
A DIY subwoofer for your car is simple and very effective.
Auto subwoofer
Are you interested in a car subwoofer? Then keep in mind that the choice of location for their implementation is not limited to the trunk or directly next to the driver's seat.
Let's talk about trunk space. There is one caveat: this arrangement takes up quite a bit of free storage space. But if you take into account the location under the driver’s seat, there is a significant risk of damaging the subwoofer with your feet.
It is also worth focusing on one very significant point, namely: you cannot do without the mandatory effect of masking noise in a cramped car interior.
Due to this factor alone, almost every car subwoofer is primarily optimized for bass.
The subwoofer opens the curtain on a whole dimension of the musical world for us! I think you have noticed before how different the sound can be.
For example, remember the thin, weak, melodic sounds from home acoustics. Do you remember? Now, for contrast, imagine the same composition, only if it is played in a concert stadium, where powerful bass rumbles from large speakers, making you feel it in your body!
A good subwoofer setting adds depth to the music being played and emphasizes the beauty of the low frequencies. In this situation, low waves will not dominate, and the person listening to the composition will be immersed in the overall picture.
Filters
Yes, installing filters is not a necessary procedure if you are going to use the subwoofer in a country house, where no one will hear and you will not disturb anyone. In addition, filters prevent certain sound defects caused by excessive bass or too loud sound effects.
Subwoofer filters are a fairly affordable and inexpensive accessory that almost everyone can afford. Similar items are sold in a special themed music equipment store.
If there is no such store in your city, then try to find music filters in an electrical and computer instrument store.
Filters are necessary for the proper functioning of a homemade subwoofer.
How to make a housing for a subwoofer
The easiest to make is a buried box or box. This is a completely closed structure, the manufacture of which will require a minimum of simple wooden parts. How to make a housing for a sub becomes clear when you see such a device. Essentially, this is a rectangular box with a hole cut out in the front wall for a dynamic head. The box consists of six walls, which are easy to cut out of the appropriate material. A terminal block is mounted on the side or rear wall to connect wires from the amplifier. The closed box (CB) is distinguished by dense and not vague bass, smooth amplitude-frequency response, but has the lowest efficiency among all designs.
The box can be in the shape of a parallelepiped or trapezoid with beveled walls. Due to its characteristics, the closed design is suitable for many musical styles. The sealed, closed design conveys bass well in pop and rock music, classical, jazz and instrumental works. But fans of rap and dubstep will be disappointed, as the closed box is not suitable for playing music that has a lot of heavy bass and where the low frequencies are the basis of the music.