Main stages of work
The next step will be to make a handle. The author uses a wooden block for this, which he then rounds on a lathe. You will need to drill a longitudinal hole in the center.
If you don't have a lathe, you can use a piece of the handle of a shovel or other garden tool.
We wrap the fum tape around the thread and screw on the fitting, onto which we then put the hose. That, in fact, is all the work.
When using a homemade gas burner (and a factory one too), be sure to install the reducer on a propane gas cylinder. Don't neglect safety rules.
How to renew a sofa damaged by a cat
Site headings
- Aviation
- Auto and motorcycle
- Army and Navy
- Archeology
- Animals
- Health
- Celebrities
- Games
- Interesting
- Internet and computers
- Story
- Space
- Crime
- Cooking
- Culture and art
- Fashion & Style
- Music
- Science and technology
- News
- Society
- Hunting and fishing
- Policy
- Nature
- Psychology
- Travel and leisure
- Entertainment
- Religion
- Rodnoverie
- Needlework
- Garden
- Homemade products
- Sport
- Construction and design
- Secrets and myths
- Economy
- Humor, jokes
- Sandbox
When I play Topigr, I would like us to be completely free of problems, and not bess.
Now there is so much that is inexplicable in the world that mom, don’t worry.
Pindos, admit that you have not been to the moon and we will leave you behind.
Basque is the same banderlog as Rotaru! Basques, why aren’t you going to perform in Crimea and Donbass?
The so-called “truly great star” sponsored the genocide of Donbass! Let him speak.
Another pig returned to his pigsty. Donbass has become cleaner.
I agree 90% with the author’s opinion. Here is the opinion of a.filipovic. I still don’t understand who it is.
This is not a sandstorm. The sea receded with the wind and the wind raised the sand.
How to make a heated bath in your summer cottage
The information and entertainment site “Labuda” is daily, operational, relevant, interesting news and useful information from different spheres of life.
Full or partial copying of labuda.blog site materials is permitted only if an active and indexable hyperlink to the publication source is indicated.
legal information
Dear authors, remember that the publications you post must not violate the laws of the Russian Federation and the copyrights of third-party resources.
*Extremist and terrorist organizations banned in the Russian Federation and the Republics of Novorossiya: Right Sector, Ukrainian Insurgent Army (UPA), ISIS, Jabhat Fatah al-Sham (formerly Jabhat al-Nusra, Jabhat al-Nusra"), National Bolshevik Party (NBP), Al-Qaeda, UNA-UNSO, Taliban, Majlis of the Crimean Tatar People, Jehovah's Witnesses, Misanthropic Division, Brotherhood "Korchinsky, "Art preparation", "Trident named after. Stepan Bandera", "NSO", "Slavic Union", "Format-18", "Hizb ut-Tahrir".
Device using two needles
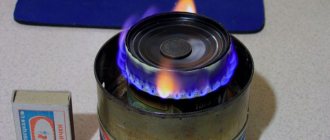
A miniature propane torch is made by hand from 2 needles. One needle can be taken from the pump and the other from the syringe. You will also need two droppers and a compressor from the aquarium. The device is connected to the canister for charging lighters. You will also need copper wire.
The temperature in such a burner reaches 1000 degrees. It is made in the following order:
The gas coming from the can is mixed in a thick needle with air coming from the compressor. The composition of the mixture is changed by regulators.
If there is no compressor
, you can replace it with a plastic bottle:
The burner is ready for use.
Scope of application and types of gasoline burners
The main task of a gasoline burner is to prepare a mixture of air and gasoline vapor and supply it to the outlet nozzle. Specific burners differ structurally in parameters depending on the purpose: for hiking, for melting metal or working with roofing materials.
A tourist gasoline burner can be pump/pumpless, hose/hoseless. The fuel medium is supplied to pumping units by a pump; they are less safe and more functional, have fewer operational failures, and at the same time cost and weigh more. In pumpless ones, the movement of the working medium is carried out according to the principle of natural circulation during the heating process of the medium; these designs are lighter in weight and much cheaper than the first option.
Hose devices have two separate structural elements: a tank and a burner, connected to each other using hoses. These are safe devices; thanks to the good visualization of the circuit, it is easy to identify leaks or breakdowns in them. In hoseless designs, the burner is built into the vessel. The positive thing is that such devices work well even at subzero outside temperatures.
A gasoline torch for soldering should create a high temperature regime - 1300-1500 C.
A gasoline burner for modern roofing materials has replaced bitumen mastics. Its task is to heat and “glue” the euroroofing felt to the roof. Then it is used for drying, soldering and firing.
In fairness, it should be noted that the favorite in this process are diesel burners, which are less fire hazardous, but BG has an important advantage - the ability to work at low outside temperatures
Gasoline camping burner
Babington waste oil burner - how to make it yourself
When using waste oils for heating a private home, an eternal problem arises - preliminary preparation of fuel, purification from impurities and water.
The Babington burner, which burns waste and other liquid fuels of any quality, will help to simplify the task. Since its design and operating principle are of considerable interest, we will consider these issues in this material.
At the same time, we’ll tell you how to make an “omnivorous” oil burner with your own hands.
Operating principle of the Babington burner
A few words about the history of the invention. The considered method of burning heavy fractions of liquid fuel appeared relatively recently - in the middle of the last century. More precisely, inventor Robert S. Babington (RS Babington) patented his diesel burner in 1969. However, the patent has long expired and now its device is available to everyone interested.
Babington’s invention is fundamentally different in operating principle from traditional oil burners, where a mixture of air and fuel is injected by a nozzle under pressure:
- Exhaust or diesel is supplied from the tank by a low-capacity pump.
- Fuel drips onto the working surface - spherical or inclined. The fuel flows down along it, forming a thin film.
- In the center of this surface there is a hole of small diameter (no more than 0.3 mm), through which the compressor pumps compressed air.
- A Babington waste oil burner operates on the following principle: a stream of compressed air exiting through a small orifice under pressure tears off part of the oil film from the surface.
- As a result, we obtain a jet of air-fuel mixture, which, after ignition, forms a stable flame. It is sent to the firebox of a furnace or boiler, heating the walls of the chamber or the water jacket. The figure below shows the operation diagram of the burner device:
Since some of the fuel flows past the hole, it flows back into the tank
Here you can clearly see that the unburned waste oil residues flow from the hemisphere into a special container, and from there back into the main tank. From it, the fuel is supplied for combustion under low pressure, and is preheated to liquefy it. As you can see, the design does not provide any filter elements.
Preheating waste oil or diesel fuel before burning it with a Babington burner is very important and here's why:
- The heated waste liquefies and forms a thinner film on the working surface, which is well atomized by the air flow. This promotes more efficient combustion.
- The smaller the droplets of liquid fuel suspended in the stream, the easier it is to ignite a boiler or Babington stove in manual/automatic mode.
Reference. Finding and buying a ready-made Babington burner in a factory version is unrealistic. Well-known manufacturers of oil and diesel units, for example, KROLL or EURONORD, do not produce them. There is only one way out - order a burner from a good craftsman or make it yourself.
Pros and cons of the Babington burner
The peculiarity of this type of burner devices is that their positive and negative sides balance each other.
As you might have guessed, the main advantage is the use of heavy liquid fuels of any quality.
Even with a large number of impurities in the used oil, a homemade air-pressurized burner will function properly (unlike other furnaces made to use similar fuel).
The presence of water or automobile antifreeze in the waste stream (within reasonable limits) is not a hindrance, although minor malfunctions may occur. The fact is that the surface tension of water is higher than that of liquid hydrocarbons.
Accordingly, the waste film is more easily torn off from the working surface under the influence of air pressure in a Babington burner.
If there is a little water in the oil, then the latter practically does not enter the combustion zone, but flows down into the sump.
Advice. It is still not worth abusing the “omnivorous” nature of the burner device. It is better to pass the waste through a coarse mesh filter before use.
Another pleasant fact for the user is the large selection of types of liquid fuel used. True, when switching from one to another, you will have to reconfigure the burner according to the dosage of fuel and air. Here is a list of these types:
- waste oils and fuels and lubricants of any origin and viscosity - from cars, machine tools and other machines and mechanisms;
- diesel fuel and biodiesel;
- fresh, old and burnt vegetable oils;
- fuel oil;
- light heating oil, kerosene.
The waste oil is preheated in a tube surrounding the burner body
Now about the shortcomings, of which there are also plenty:
- The Babington oil burner is a relatively simple device. But the system of dosed fuel supply and drainage will be more complicated. The circuit involves 2 containers, a pump and a fuel path with combustion intensity control. It is important to ensure the quality of the connections, otherwise the oil will begin to leak.
- When using liquid fuels, especially waste fuel, the boiler room is rarely clean. You must understand that dirt and odors in the furnace room are inevitable. The disadvantage manifests itself in the process of setting up a Babington burner to work together with a homemade stove or boiler. This also includes reconfiguring equipment to switch from mining to diesel, fuel oil or vegetable fuel.
- Occasionally, malfunctions occur during the operation of the burner due to the fact that the nozzle, or more precisely, the tiny air hole, becomes clogged. Most likely, the reason lies on the compressor side. For example, wear of the piston group leads to oil from the crankcase entering the nozzle and can cause failures.
Separately, it is worth mentioning fire safety measures. When performing work related to the installation of an oil burner device, it is recommended to keep a fire extinguisher on hand. The latter must always be located in the boiler room.
How to make a burner yourself
To understand how to make a Babington burner device, you need to study its design from the drawings. You can find quite a few of these on the Internet, but for manufacturing it is better to adopt the experience of specialists and use a proven prototype for work. Below is a drawing of a burner made and tested by one of the experienced participants in one of the specialized forums:
Now a few words about what the unit can be made from according to this drawing. The author used a regular steel tee with threads for connecting pipes with a diameter of 2 inches (DN50) as a body. Instead of a tee, a cross of the same size will do. The remaining elements are in accordance with the list:
- Any metal part with a hemispherical end can act as a
hemispherical nozzle or a hollow ball for a Babington burner. There are several options - starting from a brass door handle and ending with various spherical nuts. - The nozzle is made from a metal pipe with an external pipe thread, length – 150-200 mm.
- Copper tube with a diameter of 10 mm for the fuel path.
- Metal tube for organizing air supply. Diameter – at least 10 mm.
- Threaded fittings are used to connect a copper tube to the body.
You will also need a small pump to pump used oil. Units from a VAZ car or motorcycle cope well with this task; you just need to ensure their rotation from an electric motor. Any low-power compressor is suitable, including one from a refrigerator, since the pressure in the air path should be low (nominal - about 2 Bar, maximum - 4 Bar).
Advice. To dose or shut off the fuel line, it is necessary to install a special valve on it.
An important operation is to drill a calibrated hole of very small diameter in the improvised nozzle. But first you need to select a drill of the required size, because the power of the future homemade Babington burner will depend on the size of the hole. Calculating power will be discussed in the next section, and how to make a small hole yourself is shown in detail in the video:
Power selection
The trick is that it is quite difficult to independently make such a calculation using formulas.
There is data obtained in practice, and it says that different craftsmen make one or more holes with a diameter of 0.1 to 0.3 mm.
There is also more accurate information: if you make a burner with 1 hole measuring 0.25 mm, you will be able to achieve a boiler power of up to 15 kW (depending on the type of fuel).
Advice. Do not drill a hole that is too large (more than 0.3 mm), this will lead to poor atomization and combustion of the waste. In addition, the device will be more difficult to ignite, and the consumption of liquid fuel will increase unjustifiably.
Based on these data, you can select the thermal power of the unit by the number of holes. To reach 30-35 kW, you will have to drill not one hole 0.25 mm, but two.
Moreover, the distance between them must be maintained at least 8 mm so that the torches of the air-fuel mixture do not extinguish each other. According to experience, when operating a Babington burner, exhaust through one hole is 0.
25 mm, the approximate oil consumption in maximum mode will be up to 2 liters per hour.
Manufacturing recommendations
When the hole is ready, you need to attach an air supply tube to the ball and install it inside the tee. To ensure a sealed exit of the tube from the housing, you will have to make a threaded plug.
A hole is drilled in it, where the tube is inserted. A fitting is cut into the tee from above by soldering, and a copper fuel supply line is connected to it.
To heat used oil before burning, we use the following methods:
- An electric heating element with a thermostat is built into the tank, from where the waste material is supplied to the hemisphere.
- The tube leading from the tank makes several turns around the heated nozzle, due to which the fuel passing through it heats up.
A nozzle is first screwed to the tee, and then a copper tube pre-bent into a spiral is put on it. And only then it connects to the fitting. By the way, 2 holes with a diameter of at least 8 mm should be made in the nozzle for the intake of secondary air. A detailed description of how to make a Babington burner yourself is given in the video below:
The lower outlet from the tee is designed to drain used oil into the settling tank. It can be placed directly under the burner, but this is not aesthetically pleasing and unsafe - the flame is too close.
It’s better to take the tank to the side and come up with a fitting with a screw plug and a tube to drain the waste.
Anyone who is strong in the field of electronics can attach an automatic ignition and safety kit with a controller to the burner.
Electrical ignition can be provided by one or two automotive spark plugs screwed into the beginning of the nozzle.
This will make it possible to stop and start the boiler automatically, shutting off and resuming the supply of waste oil and air to the burner.
The controller can receive signals from the flame sensor, water temperature in the boiler and fuel level in the tank and, based on them, turn off the pump and close the fuel line valve.
About converting a blowtorch for testing
Some home craftsmen, having studied the operating principle of the Babington burner, are trying to convert an ordinary blowtorch to burn waste oil. The goal is to reduce the cost and simplify manufacturing, because the processes in these two devices are supposedly similar. This opinion is erroneous, since a blowtorch functions differently than the homemade burner described here.
In the lamp, air is pumped into a tank of gasoline with one purpose - to push it out and deliver it to the nozzle. In this case, the fuel goes through the stage of heating and evaporation.
The nozzle supplies gasoline vapor to the combustion zone; the liquid can be observed there only at the ignition stage, when the “head” of the blowtorch has not yet warmed up.
The used oil will not be able to evaporate and the nozzle will supply it in the form of large droplets, which does not contribute to normal combustion. And the cross-section of the jet will quickly become clogged with various impurities.
The conclusion is simple: it will not be possible to convert a blowtorch to burn heavy liquid fuel.
Conclusion
At the moment, a universal burner operating on the Babington principle is the prerogative of home-made craftsmen. Although it has a lot of advantages, well-known brands are in no hurry to start producing such units. It can be assumed that the reason for this is the fire hazard of such a product and the projected price being too high due to the complex fuel-air supply system.
Safety regulations
- When working with fire tools, sparks are very often generated, which can hit the cornea of the eye and lead to loss of vision. To avoid this danger, work should be carried out in special dark safety glasses;
- At the beginning of work, the control valves should be opened only halfway, or even a quarter, and only then ignite the burner mixture;
- After ignition, be sure to adjust the pressure and power of the flame for each specific case;
- It is forbidden to ignite from a large open fire or a burning object: the flame can spread to nearby flammable objects or employee clothing;
- The ignition process is carried out with sulfur matches or a small lighter, with direct regulation of the flame;
- At the end of the work, the supply of the combustible mixture is shut off by shut-off valves, which leads to the extinguishing of the burner flame. It is prohibited to extinguish it in any other way;
- After the burner has stopped operating, you should carefully check the fuel supply regulator: it should be completely closed and covered with a protective cap.
After this, the device is put away in a special place until next time.
Safety precautions for use
Remember about the explosion hazard of liquefied hydrocarbon gas, including propane-butane mixture and other gas mixtures used in gas equipment. Both during testing and during further use of the gas burner, follow the safety rules.
Do not use a gas burner at a distance closer than 10 meters from a gas cylinder, this violates safety rules and can lead to an explosion and fire
It doesn’t matter whether the burner is factory-made or home-made, if it is used incorrectly and if the gas cylinder is handled incorrectly, the following negative consequences are possible:
- fire occurrence;
- explosion of a gas cylinder;
- getting burned.
Burns can be caused not only by an open flame, but also by touching heated surfaces. To minimize risks, install the gas cylinder strictly in a vertical position on a flat surface, in a well-lit place, but not in direct sunlight or in a passage or doorway.
The distance from the cylinder to an open flame must be at least 10 meters, and from heat sources - at least 1 meter. Protect the cylinder from impacts and falls. Do not connect more than one burner to it.
Check the reducer quarterly, the burner monthly, and the hose daily. The need to check the hose daily is due to its vulnerability - even a slight mechanical impact can lead to ruptures and cracks, which will become the site of a gas leak, which must be excluded.
The risk of gas leakage also increases if the nozzle and tube are dirty, so it is necessary to clean them regularly. To inspect and maintain the burner, first disconnect it from the gas cylinder.
With timely maintenance of the torch, its flame will be powerful and stable, which will allow welding of many materials at temperatures of about 1000 °C
Do not warm up a frozen gearbox with an open flame. Operate the burner outdoors or in well-ventilated areas. Turn off the power supply if you work near electrical appliances, do not pinch or bend the hose, do not wrap it around your belt, etc.
After finishing the work, be sure to tighten the cylinder valve and put the protective cap on the cylinder.
DIY gas burner from a blowtorch
A gas burner is a special device that ensures uniform combustion of gas and allows you to regulate the fuel supply.
Often, not every person can afford such a device, but a do-it-yourself gas burner, made from scrap materials, will be an economical and practical alternative to factory-made analogues.
Homemade gas burners
The main components in the manufacture of powerful gas burners are industrial valves.
They may be new, but for a homemade device it is enough to use used ones if there is no gas leak.
They are designed to work in tandem with a 50-liter propane gas cylinder, which has an angle valve and a reducer.
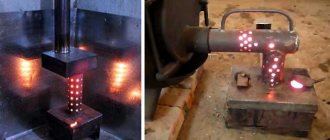
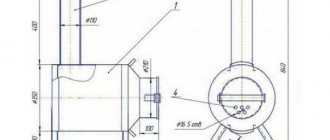
Burner with valve VK-74
The structure of this burner is shown in Fig. 1. The oxygen cylinder valve VK-74 is taken as the basis.
A fitting-handle turned on a lathe is installed at the outlet end, to the corrugated part of which the hose from the cylinder is connected.
A cap with a prepared hole with a thread for the nozzle is screwed onto the part of the valve with a conical thread K3/4˝, with which it was connected to the gas cylinder. You can use a ready-made blowtorch or gas stove.
The nozzle is made from a piece of 1/4˝ steel pipe 100 mm long and welded to the cap on two pieces of ∅5 mm wire.
A distance of 15 mm should be left between the cap and the nozzle to allow air to enter the combustion zone.
The position of the nozzle is adjusted by bending the wire holders to achieve a central flame position.
Sequence of actions to ignite the burner:
- Open the cylinder valve;
- Place a lit match near the nozzle and slowly open the burner valve;
- Control gas ignition;
- Adjust the flame using the burner valve
By the way! The highest flame temperature is at the end of the green-blue part of the torch.
A homemade gas burner of this design has one drawback associated with the location of the valve.
The gas flow is directed in the opposite direction to the normal position. The stuffing box seals experience constant gas pressure (incl.
when the valve is closed), therefore it is necessary to constantly monitor the tightness of the seals.
Attention ! Valve VK-74 should be used only when adjusting the flame. Stop the gas supply only at the cylinder
Burner converted from acetylene gas cutter
If you have an acetylene torch with a faulty oxygen supply valve, do not rush to throw it away.
It is also suitable for making a burner (Fig. 2).
The mixing chamber requires modifications, the contents of which must be removed to reduce weight.
The oxygen barrel and valve will need to be removed. Solder the resulting hole with hard solder. Connect the hose coming from the gas cylinder reducer to a fitting with a left-hand thread M16 × 1.5.
We recommend! Do-it-yourself resistance welding from a microwave
Using a union nut, secure a homemade tip bent at 45° to the mixing chamber to make it more convenient to work with the burner. Screw a flange with a nozzle welded to it onto the thread of the tip.
One of the options for such a burner is to use a cap with an M22 × 1.5 thread. The design of the nozzle here is similar to the nozzle of the burner described above. The homemade gas burner is ready for use.
Gas mini burner
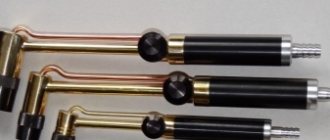
Mini gas burners are more suitable for working with small parts. The mini burner is based on a needle for inflating balls.
It is necessary to make a cut in it, a little further than the middle of the needle. Some needles already have a similar hole, which significantly speeds up the work process.
Next, you need to take the syringe needle and bend it about 45 degrees in the middle.
Mini gas burner design
It is best to sharpen the pointed end of a syringe needle so that it is straight. After this, it needs to be inserted into the ball needle so that one end comes out through the hole, and the other protrudes from the large needle by several mm.
The resulting mini structure should be fixed using soldering. After this, droppers must be attached to the bases of the two needles.
Clamps - dropper regulators need to be moved as close to the needles as possible.
In the resulting burner they will act as gas and air supply regulators.
All that remains is to connect a source of compressed gas to the finished device, the burner is ready for use.
This homemade gas burner can heat objects up to 1000 degrees.
You should work with it carefully, observing safety precautions.
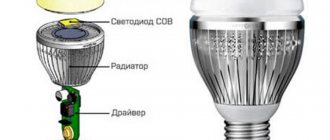
Infrared heater
Using homemade gas burners may give you the idea of creating your own infrared heater. Such heaters are designed to heat houses or garages in the face of ever-increasing gas prices.
The easiest way to retain heat is to use ordinary food foil. It must be mounted on the wall behind the battery.
Heat flows will be reflected from the aluminum surface into the room, which will not allow heat to escape through the walls.
We recommend! How to make welding electrodes with your own hands
In a more complex version, you can use a spiral. To do this, you need to purchase an incandescent coil and an infrared port in the store.
Making such a device is quite simple: the spiral needs to be placed in a metal block, which is connected to the electrical network. An infrared port is attached to the resulting structure.
This device works based on the ability of the port to distribute thermal information received from the hot coil into the room.
For garages or other small non-residential premises, a heater made from a small tin box and graphite sand is best suited.
Top 10 best gas torches for soldering
Welcome everyone to the blog! Today I will give you my Top 10 best gas torches for soldering and welding small parts.
It is necessary to understand why people came up with gas soldering in the first place and where it is advisable to use it.
Let me give you a simple example: an electrician is installing wiring in a new house and wants to solder copper wires in the junction box for a reliable connection.
It is clear that there is no wiring yet and there is nowhere to stick the soldering iron. This is where a gas burner or gas soldering iron comes to the rescue.
Soldering and gas welding are often used in jewelry - when a high melting point and an even seam of product parts are needed.
In amateur radio practice, gas burners are not very common, but there is nothing better than such a burner when soldering radiators, housings and other parts that require intense heating. And how nice it is to heat shrink with such a burner - it’s just brilliant. Well, enough of the lyrics - let's get on with the review.
1st place – mini gas burner with soldering attachment
Designed for both heating medium-sized parts and for contact soldering due to the heating of the tip from the flame. A kind of soldering iron without wires.
The gas tank capacity is 8ml. The flame temperature when filling with butane reaches 1300 degrees Celsius, and the tip temperature – 450 degrees. The flame length is adjustable from 4 to 6 cm.
The length of the burner is 13 cm and the diameter is 1.5 cm.
The price of such a burner is 400 rubles.
Advantages: small and inexpensive, enough refill to solder several medium-sized parts, has a nozzle for contact soldering, easy to refill.
Disadvantages: no piezo ignition.
2nd place – gas micro burner
There is nothing in it except a tank with a filling valve and a nozzle with a gas supply regulator.
The ZC57100 does not have piezo ignition and it is supplied unfilled, so you will also have to buy a gas cartridge - it will be suitable for lighters.
In general, to solder two wires or heat heat shrink without a soldering iron, such a torch is enough. The burner is also about 20 cm long and weighs 43 g.
This is the cheapest burner that can be found and the price of such a micro burner is 200 rubles.
Advantages: cheapest, easy to refill.
Disadvantages: small flame, refill runs out quickly, no piezo ignition.
3rd place – mini gas soldering iron KVT XZ-1
This remarkable soldering iron from the gas powered brand features piezo ignition and comes in a case with a set of 4 soldering tips, a spool of solder, and a tip cleaning sponge.
Thus, the declared power of the soldering iron for contact soldering is 137 W - this is a lot for a soldering iron with a length of 21 cm and a weight of 120 g. Electric soldering irons have never dreamed of such weight and size characteristics.
This soldering iron is not positioned as a torch, but it can be used as a torch - the flame is pencil-type.
Device and principle of operation
In order to understand how to make a forge with your own hands, you need to understand its design. Physical processes are based on the combination of carbon and oxygen. In other words, the process of carbon combustion occurs, releasing heat.
To prevent complete combustion of the metal, the amount of oxygen is not supplied in full. This is regulated by air blowing. You shouldn’t overcook the workpiece in the forge either. The metal will dry out and become hard but brittle. The classic example is cast iron.
A homemade forge for forging consists of the following parts:
- Table made of refractories.
- A firebox or hearth with a grate.
- Air chamber.
- Air drainage.
- Supply air duct.
- Air valve.
- Camera.
- Window through which workpieces are fed.
- Umbrella.
- Chimney.
- Crucible.
- Quenching bath.
- Gas-air chamber.
Figure 1: Drawing of a forge For lining a table with your own hands, use refractory bricks. The hearth is based on a form that includes a firebox, grate bars and an air chamber. With the help of air drainage, the blowing is adjusted. The chimney is designed to remove accumulated gases. A hardening chamber is not always necessary. It is required in the case of forging damask steel so that the product undergoes the necessary heat treatment. The crucible is the place where the maximum temperature is maintained. At home, it is made of fireclay bricks.
Construction of a heater from a pipe
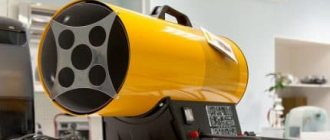
This homemade design is also called a thermal gas gun. It produces significantly more heat than previous heaters and absorbs more energy resources. Also, such structures are often equipped with chimneys, which makes them bulky and difficult to carry.
The diagram will familiarize you with the principle of operation and design features of a gas heat gun. The heat flow generated by the device is distributed using a fan
To assemble the heater yourself, you need to collect the following material:
- three meter pipes of various diameters (two 8 cm and one 18 cm);
- steel plates with which the fastening will be carried out;
- Metal sheet;
- gas burner with piezo ignition;
- axial fan.
You will also need a variety of tools: drill, welding machine, tape measure, level, grinder, metal scissors. Pipes can be replaced with cylinders or fire extinguishers of suitable diameters. A grinder will be needed to cut the bottom and top, as well as shorten the workpieces.
Working in intensive mode to heat a room of 15 square meters, a forty-liter cylinder is enough for about a week. While working, the gun dries the air, so you need to humidify it
In a pipe with a diameter of 18 cm, two holes of different diameters are drilled: 1 cm and 8 cm. They need to be drilled opposite each other.
A 30 cm section is cut from a pipe with a diameter of 8 cm, which will represent the combustion chamber. Fasteners are welded to this pipe and a hole with a diameter of 1 cm is drilled in it. Then this pipe is inserted into the first pipe.
You need to cut a plug from a sheet of metal. It will close the gap between the heater body and the combustion chamber. A combustion chamber is welded to the body, and a pipe for exhausting hot air is welded to a hole with a diameter of 8 cm. After this, the plug is welded. After making sure that the gas burner is tightly attached to the combustion chamber, you can insert the hose through the centimeter holes.
A fan is installed at the back of the device, and a smoke exhaust is installed at the top. In order for the heater to stand stably on the surface, the legs should be welded. A gas heat gun efficiently heats rooms and uses gas economically. However, when using it, you should adhere to safety precautions.
Connecting a blowtorch to gas
In the next step, we will need to connect the blowtorch to the gas. To do this, take and screw the reducer onto the gas cylinder. For safety reasons, it is forbidden to connect gas consumers to a cylinder without a reducer.
To secure the hose to the blowtorch tube and to the gearbox, it is best to use small removable clamps. However, if there are no clamps, then wire can be used for these purposes. It is important that the wire does not break and is flexible enough.
This completes the conversion of the blowtorch to gas. Before testing the operation of a gas blowtorch, be sure to first check all connections for leaks. To do this, use a soap solution (dilute a little soap in water), then apply it to each thread and connection. After opening the gas cylinder, make sure that no soap bubbles emerge from the connections, which would indicate a gas leak.
Share on social networks
Portable tile heater
Small rooms, a garage, a greenhouse, a tent can be conveniently heated with a portable tabletop gas heater. Such a device is constructed from a quadrangular flat tile equipped with a metal grid.
Assembling this device involves attaching part of the gas stove to a metal casing. Due to the installed combustion chamber, the air is heated to the desired temperature, and several or one fan ensures the supply of warm air and its circulation throughout the room. The assembly of such a device consists of several stages and does not require special technical knowledge.
A gas heater made according to this design is more powerful than the previous version. With the help of such a device it will be possible to heat small rooms even in winter.
The first stage is working with measuring tools. You need to use a ruler or tape measure to take accurate measurements from the quadrangular tile. This will be required to determine the parameters of the heater housing. After taking measurements, you need to cut out blanks from a tin sheet using scissors. Next, the blanks are fastened with rivets into a casing.
Then the casing is fixed with hook strips on the tile. In order for it to be quickly removed and mounted back, you need to make a movable bar. Such a bar can be easily made using a small spring, which is connected to a lifting lever.
Thanks to this solution, in the future it will be possible to easily remove the casing for cleaning or transportation. The homemade scheme under consideration assumes the presence of a special ventilation system. To install it you will need a simple fan without any additional complex devices or materials.
Instead of tiles, you can also purchase a ceramic infrared burner. The infrared heating system provides heat distribution similar to solar radiation. Such heating does not heat the air, but objects, which then radiate heat
A small fan from any home device is suitable for installing ventilation. You can use scissors to adjust the size. Trimming and giving the desired shape and size to the fan blades takes about half an hour. After carrying out these steps, you need to install a ready-made fan behind the heater housing so that there is draft inside the housing.
You also need to install a metal combustion chamber. The combustion chamber body must be studded with many small holes. They can be made using an electric drill and a metal drill or using a hammer and nail. The holes should be a short distance from each other.
You also need to purchase a rubber hose with an adapter to connect the flat tile to a gas pipe or gas cylinder. A fan installed at the rear of the casing ensures the supply and distribution of warm air over a fairly wide range in the heated space.
The gas flows through the hose to the burner. The burner burns the resource and heats the heat emitter, which releases thermal energy to the room. At night, such a heater illuminates a small area around itself
Such a homemade gas heater copes well with the task of heating a room not only in the autumn-spring period, but even in winter. Also, such a device consumes gas economically and has a high efficiency.
What is the difference between a gas torch and a blowtorch?
Blowtorches operate on liquid fuel: gasoline, kerosene, alcohol. As the name itself suggests, the fuel for the gas burner will be liquefied hydrocarbon gas, namely a propane-butane mixture, which is contained in red cylinders.
Changing the design and switching to gas provides the following advantages:
- ease of use increases;
- safety increases;
- the scope of application is expanding;
- operating costs are reduced.
When working with a blowtorch, you are holding in your hands not only a torch, but also a reservoir with a flammable substance. The weight of a 2-liter blowtorch with a full tank is about 4 kg. The height and width are more than 30 cm and 20 cm, respectively. With such characteristics, the maneuverability of a hand tool is extremely low.
Unlike a blowtorch, a gas torch has compact dimensions, is light in weight, fits well in the hand and is therefore convenient for carrying out a variety of work that requires an open, adjustable flame
A gas burner does not require a tank. By removing the bulkiest part of the blowtorch, you will get a compact and lightweight device that will help you perform various types of work, including in hard-to-reach places.
However, you do not have to hold a container of gasoline or kerosene in your hand directly next to an open fire, since thanks to the long hose you can place the gas cylinder at a sufficient distance from the workplace.
At ambient temperatures above -20 °C, the gas burner does not require preparation before use. It is enough to open the valve on the gas cylinder, adjust the flame strength and you can cook, solder, warm up... Even in a 5-liter cylinder, the gas reserve is enough for many hours of continuous work.
Unlike a gas torch, a blowtorch requires preliminary preparation, regardless of external conditions. It is necessary to pour gasoline or kerosene into the bath and set it on fire to warm up the evaporator. Only with sufficient heating will the first portion of liquid fuel entering the evaporator turn into a gaseous state.
Liquid fuel consumption is 0.6-0.8 liters per hour. Considering that a 2-liter blowtorch can only be filled to ¾ of the tank’s volume, the fuel supply will last for at most 2 hours. Then you will have to take the canister again and add fuel to the tank, but before that you still need to wait until the lamp has completely cooled.
Let us remind you that you cannot open the tank of a lamp that has not cooled down, otherwise there will be contact between the hot burner and gasoline vapors, which can lead to ignition and explosion. Only after waiting for the lamp to cool down can you pour fuel into the tank and tray and repeat the entire preparatory procedure, including warming up and pumping air, which will take about 10 minutes.
During normal operation, a blowtorch emits the smell of gasoline, which is not only unpleasant, but also harmful. When working with liquid fuel, soot and soot quickly clog the holes in the burner and settle on external surfaces, staining hands and clothes.
Gas is the cleanest type of fuel, so the gas burner needs to be cleaned less often. In principle, there should be no smell of gas during use of the burner, and its appearance indicates a malfunction of the device, which requires immediate cessation of operation and elimination of the causes of the leak.
Homemade gas burner from a blowtorch
A gas torch is a useful device; it can be useful for forges, soldering, and in many other cases.
This device can be bought, but a homemade gas burner works just as well, and it’s not that difficult to make.
It can be made quickly, the main thing is to follow all the rules so that the finished equipment is completely safe.
Of course, you will not be able to obtain the same power as industrial equipment, but for repairs and a number of small operations such a burner is quite suitable.
How to modify the burner?
To control the fuel flow, you need to install a control valve and a flame divider on the soldering device. The tap mechanism can be installed both on the device itself and on the tube coming from it. It is important to install it so that it is not difficult to use.
It is optimal to install it approximately 2-3 centimeters from the handle. The faucet can be removed from any suitable device or purchased a new one. It is most convenient to place it at the connection point of the tube, additionally sealing the connection to avoid leakage.
The divider can be made of brass. If you have a cylinder-shaped piece with a hole for the tube on one side and a smaller hole on the opposite side. Such a workpiece will require minimal processing and will work as efficiently as possible.
When installing the divider on the tube, make sure that its edges are a couple of millimeters in front of the edge of the nozzle. This position will not only protect the flame from being blown out by the wind, but will also ensure a stable flow of oxygen and maximum combustion power.
You can make a divider in a simpler way. To do this, you will need a brass tube of a slightly larger diameter than was used to make the burner itself.
In this case, parallel mounting should be used.
An area of low pressure will appear at the outlet of the nozzle, so air will be attracted to it and improve combustion.
Conclusion + video
A homemade gas burner is a simple device. It is similar to the primus used by tourists and at dachas. They differ only in size and type of fuel used.
There is no need to pressurize the device to an increased level - the cylinders already have sufficient pressure for high-quality work. It is best to prefer cylinders with propane or a mixture of butane and propane.
If you make it in accordance with all the recommendations given, the device will be reliable and will serve you for many years.
Do-it-yourself gas burners for soldering: instructions for making them using improvised materials
When repairing a car, sometimes you have to resort to soldering various metal parts.
The burner required for this is one of those tools that does not have to be purchased in a store - you can easily make it yourself.
Such skills can be very useful, because it is not always possible to go to a construction supermarket, and interruptions in finances are quite common.
Soldering allows you to make a permanent, hermetically sealed connection of two metal parts by a kind of “gluing” of them with some molten material - solder. The latter must exhibit high adhesion to the metals being joined, that is, be very “sticky”, and have sufficient strength after hardening.
The melting point of the solder must be higher than the operating temperature at which the soldered product is operated; and at the same time lower than the melting point of the base material.
A gas burner is precisely what is needed to heat the solder and thus make it sufficiently viscous.
Obviously, for ease of operation, its torch must maintain a stable shape and temperature.
The advantage of this tool is its ability to process areas with a large area - an electric soldering iron will not be able to handle such a task.
At the same time, you can make a simple, low-power burner with your own hands without much hassle.
With the help of a homemade burner you can do a lot of useful things. Its capabilities will be quite sufficient for soldering copper and brass vessels included in radiators, intercoolers and heat exchangers, as well as for soldering using hard solders.
In addition, only with the help of this tool can you disassemble the radiator in order to replace its core, as well as replace the honeycombs in it.
Waste oil furnace
Considering that petroleum products are expensive, it is beneficial to use a forge using waste oil. To make the forge during mining, parts that have served their useful life are used. After processing the furnaces, a significant drawback emerged - the spent mixture did not ignite well. To eliminate this problem, an additional compartment was built into the mining forge. Here the oil is preheated with coal or wood. To improve combustion, waste fuel passes through filters and diesel fuel or gasoline is added to it.
As a result, the mining forge has the advantages of a yellow flame and stable temperature.
Read also: Laser cutting machine for wood plywood
You can make it yourself:
- It is made from fireclay bricks, dimensions: 85×48×40 cm.
- The vault is made in the form of an arch to maintain temperature.
- The body is completely covered with sheets of iron. A thickness of 1.5 mm is used on the sides, and the top and bottom are lined with 2 mm sheets.
- The supports are made from angles based on the weight of the structure.
Air is pumped into the chamber by a fan. A waste tank is installed on a hill. From it, the oil enters the chamber through a pipeline, where it is picked up by air, which moves under a pressure of 2 atm. The waste is broken up and fed into the nozzle.
Scheme of the furnace during development:
Burner using a blowtorch: video instructions for making it yourself
Furnaces and boilers running on waste oil have long taken their rightful place among heating appliances. Exhaust is a cheap and sometimes free type of fuel; it is often used for this purpose in car repair shops and garages. Many craftsmen, when choosing a design, ask the question: is it possible to convert a gasoline blowtorch into a burner for mining?
Is it possible to make a blowtorch work during mining?
The principle of operation of a conventional blowtorch is to ignite gasoline vapors, which are pushed out under the action of compressed air. This effect is achieved by forcing air into the burner fuel tank.
What happens if you pour used oil into a blowtorch?
Oil itself, even under pressure, does not evaporate well - it needs to be heated. Due to poor atomization, the flame will be uneven and it will be difficult to ignite the burner.
The oil burns with the formation of a large amount of soot and soot, so the jet will quickly coke, its cross-section will decrease, and the lamp will fail.
Increasing the cross-section of the nozzle will also not give the expected effect - the oil will be sprayed in large drops, which will not allow obtaining a uniform flame of the torch.
In addition, used oil often contains impurities: diesel fuel, gasoline, antifreeze and even water, which can lead to flashes inside the lamp. To use waste as fuel for a blowtorch, you will have to install a filtration system, which will further complicate the task.
Considering all the difficulties, using a gasoline blowtorch as a burner during mining is difficult and unsafe. Therefore, it is necessary to modify or completely change its design.
How to make a burner for mining yourself
For successful combustion of oil, you must either preheat it to the evaporation temperature - approximately 300 degrees Celsius, or finely spray and enrich the oil vapors with air.
You can heat the oil to such temperatures using powerful heating elements, but this will increase energy costs. An oil aerosol can be created by applying a stream of compressed air through a layer of oil.
This effect is realized in the Babington burner - a device, an analogue of which you can assemble with your own hands from available components.
Babington burner - an alternative to a blowtorch
The Babington burner was originally patented to run on diesel fuel.
Later, having made minor changes to the design, the craftsmen changed the design with their own hands and adapted the burner for burning waste machine and food oils.
The degree of oil contamination does not matter much, since the fuel channels of the unit are free of bottlenecks prone to blockages.
Unlike a blowtorch, where the fuel-air mixture is sprayed under pressure through nozzles, in a Babington burner oil is pumped from a reservoir using a low-power pump and flows in a thin film along an inclined or spherical surface, and the oil-air mixture is formed by blowing a thin jet of compressed air air through this film.
The spraying effect is clearly presented in the video:
- The Babington burner consists of several functional blocks:
- Fuel - reservoir, pump and pipes for supplying fuel.
- Air, it consists of a compressor and an air tube.
- A hemisphere with a small diameter hole where the air stream mixes with oil.
- A nozzle that directs the flame in the desired direction.
The standard design can be modified with your own hands, increasing its efficiency. To do this, the fuel tank is equipped with a heater that heats the oil before the burner starts operating, which makes it possible to increase its fluidity. In addition, a fuel channel made of a metal tube can be wrapped around the nozzle - this way the oil will heat up while the burner is operating.
The burner nozzle is directed into the boiler, where the fuel chamber and water jacket are heated. You can also use the device to melt and heat metals.
Advantages of a DIY Babington burner:
- wide choice of fuel - used machine oils, lubricants of any viscosity, diesel fuel, fuel oil, any vegetable oils, including food waste;
- the presence of impurities in the fuel;
- simplicity of design - you can do it yourself.
Flaws:
- difficulty setting up the burner, especially often when changing the type of fuel;
- smell and dirt - the burner cannot be installed in residential premises, a boiler room is required;
- The use of the burner involves an open flame, so fire safety precautions must be observed.
There must be a powder or salt chemical fire extinguisher in the boiler room!
DIY Babington burner
You can assemble the burner yourself from simple components; for this you will need:
- A hollow ball or hemisphere with such a wall thickness that you can drill a hole with a diameter of no more than 0.3 mm. You can use any metal objects of a similar configuration, for example, a spherical brass door handle, nuts with plugs. The main condition is the possibility of reliable fastening of the air duct.
- Metal tube for supplying compressed air from a compressor, diameter - 10-15 mm.
- A compressor, for example, from a refrigerator, with an operating pressure of 2 atm, a maximum pressure of 4 atm.
- Fuel tank with a built-in heating element of 0.5-1 kW made of non-corrosion metal.
- Fuel sump and pipe to drain excess oil back into the tank.
- Copper tube, diameter - 10 mm, wall thickness - 1-1.5 mm for the fuel channel.
- Oil pump from a car or motorcycle with an electric motor to drive the pump. It is advisable to equip the pump with a filter with a large mesh at the inlet.
- The nozzle is a 200-400 mm long nozzle with an external thread of 2 inches.
- Crosspiece for two-inch metal pipe with internal threads.
- A 1" threaded drain and a 2/1" adapter to drain excess fuel into the sump.
- Adapters and fittings for connecting the fuel line, air duct and nozzle.
Preparing burner components for assembly
- The main and most important task is to make a hole of a given diameter in the spherical nozzle.
The power of the burner depends on its size. For example, a boiler with a thermal power of 10-15 kW requires a burning torch obtained by operating a burner with one hole with a diameter of 0.2-0.25 mm. To obtain more power, you do not need to widen the hole - this will result in larger droplets. It is better to make 2-4 holes with a diameter of 0.1-0.3 mm with a distance between them of 8-10 mm, otherwise the torches will be mutually extinguished. Fuel consumption can be calculated as follows: through one hole of 0.25 mm, 2 liters of waste are sprayed per hour.
on how to make small diameter holes in a metal hemisphere:
- The tank is made of corrosion-resistant metal. A heating element is built into it with a thermostat set to turn off the heating element at a temperature of 70 degrees Celsius.
- It is necessary to make a fuel sump from the same material, equipped with a pipe with an overflow. Through this pipe, oil from the sump will flow back into the tank. To drain dirt from the sump, you can provide a plug in its bottom.
- Assemble the burner body: connect the nozzle from the squeegee to the 2-inch cross in the front part, then adapters: from the top for oil supply, from the back side for air. From below, a 2/1-inch adapter and a squeegee are connected to the crosspiece, through which excess oil will drain into the sump. The adapters are made of plugs with drilled holes into which the fuel and air channel tubes are inserted.
The housing can also be made from a tee, in which the air duct is inserted into the upper part, having previously drilled a hole of the required diameter.
- The fuel path is made of a copper tube, one end of which is wound around the nozzle three times, and then led through a plug adapter into the housing at the top. The fuel pipe is connected to the pump, a coarse strainer is installed and the other end of the pipe is inserted into the tank. The fuel path can be equipped with a valve. The pump is connected to an electric motor operating from a 220 V network.
- An air duct made of a metal tube is attached at one end to a hemisphere with a hole, having previously installed a plug adapter at the required distance. The hemisphere should be positioned so that the oil from the fuel tube evenly flows onto the rounded part of the nozzle, and then into the lower part of the housing and into the sump. The other part of the air duct is connected to a compressor, which is also connected to a 220 V network.
- Since the installation will have as many as three consumers of electricity, which are not turned on simultaneously, it is advisable to equip the burner with a control panel: install a separate toggle switch or button to turn on the heating element and a separate toggle switch to turn on the compressor and pump. If desired, you can equip the remote control with a light signaling system made of diode lamps.
- You can equip the burner with a controller that automatically turns on the units in accordance with the selected mode. Electric ignition is realized using spark plugs, and to extinguish the burner it is enough to turn off the oil supply.
— burner assembly diagram:
Preparing fuel for the burner
Almost any waste oil can be used in a Babington burner. Automotive waste with a large number of foreign inclusions is filtered before being poured into the tank through a mesh and mixed with cleaner oil. Oils with a small amount of impurities can be poured without preparation.
When using edible vegetable oils, such as deep frying, it is recommended to let it sit for several hours and carefully drain off the residue.
These oils are sufficiently fluid at normal temperatures, so they can be heated in the tank only when the burner is started.
When using fuel oil and other thick materials, they must be heated to a temperature of 70 to 90 degrees, otherwise the pump will work with overload.
Security measures
- A burner using oils and other GSPs can be dangerous if installed and operated incorrectly. To avoid a fire, a number of measures must be observed:
- floors and walls made of flammable materials are sheathed with metal or asbestos sheets;
- fuel reserves are stored at a safe distance;
- oil leaks must be removed in a timely manner;
- electrical elements of the installation must be carefully insulated to avoid sparking in the oil spray area;
- The burner must be placed out of reach of air currents and drafts.
A burner with an open nozzle must not be left running unattended!
The Babington burner, unlike a blowtorch converted for working in mining, is a reliable and durable unit that does not require complex maintenance. It is enough to periodically clean the fuel system, tank and sump, blow out the air duct in idle mode, and also monitor the serviceability of the compressor and oil pump. A working burner is a reliable and economical unit with a long service life.
Structural parts and gas used
A gas soldering iron consists of a gas reservoir and a burner on which a soldering nozzle or tip can be installed. Gas soldering can be carried out either using heated air, when only a torch is used, or when using a nozzle.
The gas reservoir can be replaceable and connected to the burner using a hose, or it can be portable, made in the same design as the burner and refilled from a cylinder, which are often used for refilling lighters.
The latter design is more common and preferable for domestic use because of its compactness and high mobility.
But in production shops, and especially in car repair shops, you can also see large gas soldering irons running on propane coming from 50-liter cylinders.
Various gases are used for operation: propane, butane or a mixture of gases - mapp gas. The latter contains methyl acetylene, propadiene and propane in a certain proportion.
Mapp gas is very effective due to its combustion temperature reaching almost 3000℃. But the main advantage is that with the same performance of a gas soldering iron, it will be required eight to ten times less in volume than acetylene.
What you need to remake a blowtorch
Firstly, we cannot do without a gas hose 5-10 meters long. Secondly, you will need small fittings with clamps, as well as fum tape for winding the threads. In addition, you will need a propane-butane cylinder and always with a reducer. Attention! Under no circumstances should you connect a blowtorch to a gas cylinder without a reducer.
The tools you will need are a wrench, a grinder, and a welding machine. We will need a welder to weld the nut to a metal tube, which will serve as an adapter (from the blowtorch to the hose). Let's take a closer look at the process of converting a blowtorch to use gas (propane-butane).
The most efficient devices of 2022
The most efficient certified boilers and gas burners this year:
- Bosch Greenstar series. The boiler is small, very quiet, environmentally friendly and uses economical condensing technology providing an AFUE rating of 95%. Greenstar is available in two models - combi for spatial and point-less water heating or space heating, which can be used with domestic hot water tanks. It is equipped with a heat exchanger with a 5-year warranty.
- Bradford White Brute Elite Series. The boiler with 95% efficiency has a condensing multi-pass stainless steel heat exchanger with an advanced modulation system. Innovative design features make Brute Elite easy to install in both new and existing heating systems.
- Bradford White Brute Elite 125 Series. Customizable combi based heating only models are 95% efficient with a combi unit providing heating and hot water from one unit. Requires only one gas connection, one ventilation system and built-in expansion tank and boiler pump, and is easily accessible for repairs.
- Buderus GB142 series. Condensing gas boiler. Using state-of-the-art condensing technology with 95% AFUE, the Boer Buderus GB142 wall-mounted condenser maximizes the heating value of every m3 of natural gas or liquefied propane.
- Boiler Alpine Series. This is a natural or liquefied gas condensing hot water boiler with a stainless steel heat exchanger. Equipped with Sage2 boiler control system. 1 TM, which supports multiple firing speeds, is also equipped with an external reset and a touch interface.
- Carrier BMW Performance Series. 95% AFUE. Stainless steel. The modulating condensing boiler is equipped with a unique vertically oriented stainless steel heat exchanger, 5 to 1 ratio, compact design with light weight, compact wall mounting, primary and secondary piping, with a 15-year warranty.
Having familiarized yourself with the design and operating principle of gas burners and popular models, you can easily choose exactly what suits your needs.