Preparation of the workplace
Organizational issues, of course, are the main task on the path to success. Thanks to careful thought and collection of all the preparations, it will be possible to properly coordinate actions and not waste unnecessary time in the process.
If your work involves sewing a soft toy or accessory, you need to get a fabric owl pattern; the documents can be easily found in this article. If it is a wooden structure, then you need to visit the nearest sawmills or sort through the boards that have accumulated in the yard.
Often people don’t even realize what useful items are lying in the pantry or garage.
Guided by imagination and having a creative mindset, any master will be able to get enough options from which to make a copy; the list will include:
- Natural materials.
- Leaves from trees.
- Various fabrics.
- Paper or cardboard.
Important! When thinking about how to make an owl from wood with your own hands, it is worth remembering that you will need carpentry supplies at any time, and you also need to be able to use them.
Felt owl
It is very easy to sew such a toy. Depending on the size, the craft can be a small owl - a keychain or a comfortable sofa cushion. A bright owl made of felt with your own hands is made according to a pattern.
To work you need to prepare:
- felt of different colors;
- filler;
- fabric for finishing the belly and wings;
- needles, pins, scissors.
Description
An owl, like many felt toys, is easy to sew using a needle-forward stitch, in which the lengths of the stitches and gaps are equal.
Using pattern templates, we cut out all the elements from felt and fabric. Sew colored details onto the felt wings. We will hide the knot of thread between the felt and the fabric. For convenience, the fabric can be secured with a pin before sewing.
We design the face of a felt owl. Referring to the pattern, we place and sew on the eyelet details. Please note that from the edge of the main part to the eye, as well as between the eyes, the distance should be about 5 mm.
As an alternative, you can choose to glue the eyes.
Then we sew on the tummy, having previously secured it with a pin.
We attach the claws, beak, dark parts of the ears. We embroider the tail on the back side.
We fold the two main parts, insert the wings between them and secure with pins. We sew a seam around the circumference, leaving a small part unsewn.
We fill the owl with padding polyester or any other filler. Sew up the hole.
At the entrance to the house
For production you will need a minimum of time and components:
- Cardboard;
- Tree branches;
- Small things for decoration.
Hot glue is applied to an oval-shaped base cut out of thick paper and a wreath is folded from natural material, giving the owl a silhouette; you need to carefully monitor the application of the liquid; excess smudges are immediately eliminated, otherwise the appearance will be untidy.
Wings can be constructed from dry fallen leaves; they perfectly convey the essence and will be a good addition to the autumn landscape. The eyes and beak are attached to the upper part of the composition; under them there will be a hook on which the product is subsequently hung.
Note!
- Autumn crafts for the autumn holiday from leaves, fesalis, plasticine, vegetables - come up with a creative name, create masterpieces
What craft materials to use for creativity: non-traditional, foamed, soft or natural pieces made by yourself
- New Year's crafts from pine cones: what you can make from pine cones with your own hands, a guide with step-by-step master classes
Advice! A wreath in the shape of a beautiful bird will be an excellent autumn composition; it can be hung on the door and then the arriving guests will be in the mood for a favorable conversation and discussion of pressing matters from the very threshold.
At the bottom, a small inscription with a greeting for guests or the postman looks beautiful and harmonious. It will be just a smiley face or a couple of words, securing a black dense surface. In the future, you can write on it with chalk; this solution will allow you to add new phrases every morning.
Primitive and simple methods greatly diversify not only the appearance of the home, but also add joy to the lives of the owners and the people around them. A positive mood has the ability to be transmitted and spread over distances.
Owl on a toilet paper roll
A whole series of master classes where an owl is made using a bushing. Thanks to this, the owl’s figure is voluminous and very original.
In this tutorial we will need:
- Toilet paper roll
- Paper cupcake liners (any color)
- Yellow, black and orange paper
- Scissors, glue
Cut one edge from the sleeve in an arc, as shown in the photo. Take 3-4 paper muffin cups and cut them in half.
Glue the mold half to the sleeve as shown in the photo. Be sure to glue the insert with the wrong side facing you so that the bright side is on the front of the figure. Glue the second “wing”, overlapping the first.
Now we turn the workpiece over and begin to lay out the owl’s plumage in the foreground. This craft took me 4 layers.
Make the eyes separately. Glue white on the yellow circles and then black pupils. Add an orange beak and the craft is ready!
More crafts from the same series:
For relax
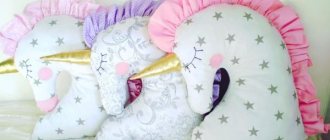
Fans of sewing and knitting will appreciate all kinds of life-size owl pillow patterns. A voluminous item will not only highlight the interior of the room in an original and unique way, but will also become quite practical.
After a difficult day at work, sometimes you just want to come home and lie down on the sofa, and when a soft and fluffy pet is waiting for you, then a trip on public transport will fly by in an instant.
Reading books or magazines will be more convenient if you place a small support in the shape of a bird under your head. To start crafting, you don’t need to buy a mountain of fabric; unnecessary scraps of a suitable shade will come in handy in such works.
Everyone dreams of successfully recycling leftovers and getting a beautiful scops owl pillow with their own hands.
From the large number of proposed options, you can find very modern and cute specimens, for the design of which beads or large beads are used. When experimenting with the front of the owl pillow, it’s worth adding something of your own.
A person’s preferences can be different, whether it’s a decorative camera sandwiched between the wings of a bird or a bright ball, the craft will look cute and fresh.
Crib pillow
In our master class, the owl has a blue shirtfront.
If you are sewing a pillow for a girl’s crib, you can make an owl in pink tones. For needlework you need:
- cotton fabric in two colors;
- pieces of felt for the eyes and beak;
- black beads or buttons for the pupils;
- ribbon for decoration;
- lace;
- filler;
- needles, pins, scissors, threads, sewing machine.
Description
Print out the pillow pattern in full size.
Cut out all the parts of the toy from the fabric.
For the bow, cut out a rectangular piece 8x16 cm and a square with a side of 45 mm.
We attach the lace and beak, making a zigzag seam along the contour. The lace should lie in the center of the body, between the wings.
Using the same seam we attach the wings and eyes. We manually sew on the pupils - beads.
We fold the two parts with the right sides inward, pin them together, and sew along the contour. At the same time, do not forget to leave an area for turning and stuffing.
We make notches on the convex areas so that the shirt front with wings does not puff up after turning it inside out.
Turn the pillow inside out and iron it. Then the main part, that is, the shirtfront, is filled with filler.
Sew up the hole using hidden stitches.
Now let's start decorating the owl. We fold the square blank for the bow into a strip (see photo) and iron it. We sew the rectangular piece with an allowance of 1 cm.
Turn the bow inside out and gather it in the center. We cover the place of gathering with a strip.
We sew the decoration onto the ear of the pillow toy.
We make a bow from a narrow ribbon and sew it on. If desired, you can also decorate the pillow with buttons.
Making crafts with children
Young masters must also take part in the process and create their first creation. Photo diagrams of simple figures will be clear even to beginners, and with the help of parents, the constructed things will take the appropriate place on the wall in the nursery or the baby’s playroom.
A soft toy owl that fits on your hand, the pattern of which can be easily found at the bottom of this article, will be the reason for an exciting trip to the land of forest animals with friends or relatives. Making it yourself will allow you to adjust the size to the child’s hand, and an abundance of crafts will provide each guest with a personal accessory for entertainment.
In this way, you can easily sew a pot holder for a frying pan and give it to your beloved grandmother. Such signs of attention will not remain without the responsiveness of an elderly woman.
And from a young age, children will get used to making nice souvenirs for loved ones and will develop in creativity, using the example of how to sew an owlet; other specimens from fabric will no longer raise any questions regarding production.
Owl based on a paper bag
With this craft you can decorate a gift in an original way. Place candy, cookies or small toys inside and hand it to the recipient.
To work you will need:
- Paper bag
- White, black, brown, orange and colored (at your discretion) paper
- Scissors, pencil, glue
Print the template, transfer the shapes onto colored paper and cut out all the fragments of our future owl.
Take a paper bag and form a triangle at the top as shown in the photo below.
Now let's move on to the eyes. Collect them from our blanks:
Now we glue the hearts onto the bag, then the eyes and lastly the beak. Fold the top of the bag down and your craft is ready!
Another owl based on a paper bag:
Let's start by painting the bottom of the paper bag in the color of your choice.
While the paint dries, let's move on to the eyes. Cut out three circles of different radii and paint them black, white and yellow. Glue the circles in the order as shown in the photo.
Fold the sides of the colored bottom of the bag to form a triangle. Color the bottom of the triangle with a black marker to create a beak. Glue on the eyes and then fold the triangle down.
To make the wings, trace your child's hand, cut out the print and paint it the color you want. Glue to the sides of the bag.
Using a black marker, draw feathers between the wings. The craft is ready!
Another owl craft, only here we make the package ourselves:
. Despite the fact that the instructions are in English, this craft is easy to make and can be understood simply by following the diagram.
Applications with diagrams and drawings
Here we have collected ideas that can inspire you to create your own.
From improvised objects
When designing at home, you need to look at the things on hand. A regular plastic drink bottle makes an excellent base for a bird.
Milk cartons can easily be turned into cute feeders, and if you think carefully about how to sew an owl and stretch it onto the product, you can give the appearance a unique look.
An old large refrigerator box will make a pretty comfortable house for kittens. All compartments must be covered with warm woolen cloth, then the animals will not leave their new home, even when they become adults.
Any small items from shelves or cabinets will also be useful for decoration. After a good rummage through your things, you can find decorative feathers or sparkles. Design using such available materials will be the highlight of the finished structure.
With the help of master classes, all stages of work will be clear to everyone who has decided to try their hand at creating a textile owl, and the production of the chosen toy will not take much time and effort.
Application made of colored paper
This original and beautiful craft is easy to make, but requires some additional tools, which are sold in craft stores.
An owl can be made using a variety of techniques and from different materials. The pattern can be adapted for other crafts: sew a keychain from felt and leather, make an applique on a patchwork quilt, sew a pillow and even a handbag.
For work we will need:
- Multi-colored construction paper of your choice
- Small pins
- Scissors, pencil, glue
- A punch hole puncher will greatly simplify the work.
- Other additional materials for decorating the craft: felt (red and white for the Santa hat), glitter foam, ribbon (anything you want).
Choose the colored paper you will use for your work. Prepare the necessary materials. Download and print the template (large owl diagram, small owl diagram). Cut out the contours of the shapes and transfer them to colored paper.
Glue the parts according to the drawing, with the exception of the wings.
Place the wings on the owl to get the desired position, make a small hole through the wing and body using the sharp tip of a pair of scissors. Install 5mm pins to secure the wings to the body. Place 8mm pins in place of the owl's eyes. Glue Santa's hat to the owl if this is a New Year's craft.
Attach a few small foam squares to the back of the owl and secure the owl to the base. The craft is ready!
Practical and simple
It doesn’t matter whether it’s a pillow or a figurine on the bedside table; any changes in the interior of the house will be noticeable from the first minutes of introducing them into the environment, and comfort and good mood are very important in every room.
Minutes of rest should be enjoyed and promote relaxation. A comfortable and useful owl created with your own hands will not only please the eye, but will also become an excellent assistant in the household, and the experience gained must definitely be shared with the younger generation.
Pillow decoration in the shape of an owl (option 1)
To sew a pillow in the shape of an owl with our own hands, we will need a standard pillow and a cover for it. You can sew it yourself or find a ready-made one.
We will also need scraps of fabric, scissors, tailor's chalk and felt. You can get by with other fabric, but this pliable material is very good to work with. It is flexible, easy to sew even by hand, and its edges do not fray.
Note!
- How to make wooden shelves with your own hands - original design options
- Kinusaiga technique for beginners: what is it, a description of creating paintings from threads
- How to weave a figurine from rubber bands: how to learn to weave animals, toys and what you can make from rubber bands on a slingshot
DIY owl craft: photo examples of beautiful crafts for children and adults
Please repost
0
Owl – photo frame
- Let's start by selecting and printing an owl template from paper, which we carefully cut out along the contour of each part, including those transferred to cardboard.
Let's circle
- Now we make the bird’s eyes - for this you can use ready-made ones, rotating, on special pins. If you don’t have such eyes, just cut them out of paper (you will need white and black circles) and secure them with wire.
We fasten
- And the finishing touches: we attach the body with wings, add a beak and eyes to it, and place a photo of the baby in the central, widest part of the abdomen. Such an original frame will delight both the child and all the guests of your home.
Add a photo
Sewing a bunny pillow
Step-by-step instructions will help you make a soft toy in the shape of a hare yourself. For work you will need the materials that were used to sew the owl. The fabric can be used orange, white, black. Performing operations:
- Cut out a pattern of a head with long ears from paper - the basis of a bunny pillow.
- Transfer the contours of the template onto the fabric using pins, and make 2 blanks.
- Sew both halves, leaving an unstitched area.
- Fill the shell with synthetic padding and sew up the hole.
Kids will really love the bunny toy pillow you sewed.
The paws are sewn to the finished pillow - the head of the hare, and appliqués are glued on, depicting the elements of the face: eyes, mouth, nose.
Attention! Before stuffing with filler, the shell is turned inside out to hide the seams.
In conclusion, ready-made patterns for sewing animal pillows and birds speed up the process of making a useful toy, but making your own blanks makes the decor original. Especially if a child is involved in the creativity.
Decor features
When making a toy pillow, it is not necessary to strive for anatomical accuracy. It is better to use dense fabrics - they hold their shape well. Owl decorations:
- fringe imitating feathers;
- embroidery on shell material;
- buttons, beads for the image of eyes;
- lace, bows, tassels on the ears.
This way we will have a wonderful and useful decorative element for the room.
Felt owl pillows will look good in the interior of a children's room.
An original pillow that evokes positive emotions is a stylish detail designed to decorate the interior.
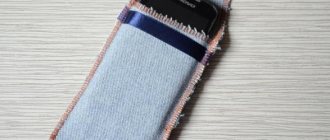
An interesting solution for the living room: a pocket for the TV remote control under the owl’s wing.
The size of the product and its appearance depend on the type of pattern and material used.
What crafts are made from seeds
Having collected cones on a walk, having saved watermelon seeds from the summer, it’s worth finding out what kind of crafts you can make from seeds for children?
- Applications. You can lay out paintings according to a pre-marked template or create an image right away.
- Volumetric figures. They are made only from seeds or with the addition of other materials - plasticine, cardboard.
- Decor. Seeds are used to decorate frames of photographs, drawings and paintings, watches, jars and bottles made using the decoupage technique.
- Decorations. The seeds are used as beads. They are used to make beads and necklaces, pendants for the New Year tree, window and mirror decor.