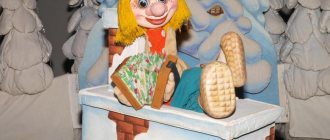
Cheerful snowman made of cotton wool
In further subheadings there will also be a master class on crafts for the New Year. You will be able to clearly master the technique of performing them and present the necessary materials.
You will need the following materials:
- strong Whatman paper;
- cotton wool;
- glue gun;
- buttons, 3 of which are orange;
- double-sided blue paper;
- scissors;
- black gouache.
Execution technique
To make a funny snowman, you need to do the following:
- cut out 3 circles of different diameters from white paper - large, medium, small;
- Using small bases, attach the circles in ascending order to each other;
- then apply glue to the circles one by one, except for the smallest circle;
- Glue pieces of cotton wool in small pieces to two circles;
- use glue to attach the number of buttons you need to the belly of the snowman;
- make a nose from orange buttons in the same way;
- draw the snowman’s eyes and nose with black gouache;
- cut out a thin rectangular leaf from blue paper;
- wrap it around the snowman's neck, securing it with glue.
Kanzashi cone on the Christmas tree
Kanzashi cones for the New Year tree.
To create such a craft you will need multi-colored ribbons. New Year's decorations made of satin ribbon strips will serve as an excellent gift. Making toys using this technique is a pleasure.
Required tools:
- board;
- scissors;
- lighter;
- bright satin ribbons – width (2.5 cm);
- white ribbon strip – width (5 cm);
- fastening for a toy;
- glue gun;
- tweezers;
- monofilament;
- long needle (thin);
- plastic ball;
- silver cord (thin);
- a simple pencil;
- tape (thin);
- ruler.
An example of kanzashi crafts for a Christmas tree.
Progress:
- We cut the satin ribbons into squares. To keep them straight, use a ruler. These should be squares, not rectangles.
- One square is glued to the ball. To prevent the base from rolling anywhere, you can pick up the jar and put the ball on top.
- Now we wrap all the remaining squares so that we get triangles. The most convenient way to do this is with tweezers. Using a lighter, melt the edges of the triangles.
- The first row is made of silver triangles. Using a gun, we attach each one so that the corners look at each other, and the distance between the triangles should be 2 cm.
- The second row is also made of silver triangles. They are attached on top of the first row, as if in a checkerboard pattern.
- The third row is made in a similar way, also from silver triangles.
- The next 2 rows are performed with blue figures. And so we continue to lay triangles every 2 rows, alternating colors.
- At the end we cover it with a blue square and place 4 silver triangles on top.
- We take a wide white ribbon, singe the sides and baste along one side with a seam “forward with a needle”, and pull it together. Glue the bow to the thread.
All that remains is to make a loop and hang the toy on the Christmas tree.
Kanzashi snowflakes on the Christmas tree.
Lush spruce made of paper ribbons
If little readers have difficulty handling scissors. Adults can help you by cutting paper strips. The main method is the usual fastening (gluing) of these parts.
Necessary materials:
- stripes;
- glue; cardboard sheet;
- multi-colored;
- scissors.
How to do the craft
Making a paper tree includes the following steps:
- roll the cardboard sheet into a cone, cutting off excess parts;
- prepare colored strips, starting from the shortest and ending with the longest ribbons. They can even be with sparkles;
- fasten the two bases of the strips to each other, forming a semi-oval;
- In ascending order, start gluing the strips to the cone, from top to bottom;
- The fasteners should be placed close to neighboring ones so that there are no gaps;
- At the end, cut out a small star-garland from a shiny yellow ribbon and glue it to the top of the resulting Christmas tree.
How to decorate a Christmas tree
Ribbons are effectively adjacent to the bows on the spruce tree. They can match or differ. The easiest way is to go down diagonally, in a circle or in a zigzag. Diamond weaving will require dexterity and skill. Small ribbons are often knitted at one end, and natural materials such as pine cones, cinnamon and nuts are attached to the other. Small trees are often decorated with ruffles and lace.
There is one “but”: beloved pets, as a rule, are not indifferent to such luxury.
Decorating the Christmas tree with bows
So, the style has been chosen. It's time to try it on. If spire and star isn't your story, start at the top. Place a voluminous bow on it with falling ends. Next, move from top to bottom in a circle or spiral. Catch and knit on the edges. It's better if it's not colorful. Place the decor evenly: do not concentrate them in any one part. The picture must be complete.
New Year's crafts from ribbons
The possibilities here are endless. Turn on your creativity at full capacity. The obligatory minimum for a self-respecting artist is a Christmas wreath. The rods can be covered, pasted over or intertwined. Then hang pompoms or an openwork snowflake, a beaded bunch of rowan berries and a felt bullfinch.
Embroiderers will surely love the idea of ribbon embroidery. You can create a winter panel, boots for gifts, a festive dial for a clock mechanism.
New Year's bows made of ribbons are a traditional addition to table setting. You can decorate with napkins, cutlery, glasses and, of course, champagne.
Satin bouquets and compositions will bring comfort and a bright atmosphere. Well, a DIY ribbon Christmas tree will become a source of pride for any housewife.
Magic garland of stripes
This garland in the shape of hearts will envelop your Christmas tree like a charm, creating a unique image for it.
Material used to make the craft:
- multi-colored graceful ribbons;
- glue, preferably a stapler.
New Year's souvenirs from pine cones
You will need:
- a few cones;
- small, flat plate;
- glue moment;
- green gouache paint;
- various examples of decor for decoration;
- thin white tinsel or cotton wool.
Method of implementation:
- color the cones green;
- after the paint has dried, glue the cones to the bottom of the plate;
- attach white tinsel or cotton wool with glue, thereby creating snowdrifts and grass strewn with snow;
- decorate the cones with various small garlands, rhinestones, you can sprinkle them with finely chopped paper, creating an imitation of snow;
- the craft is ready!
House
This is a single-layer simple felt craft with a thickness of approximately 5 mm. It can be plain, and then you can use many different decors, for example, make a window and door from rhinestones or beads.
Or the facade will be green, and the roof will be white, as if it was covered with snow. The edging is done using a buttonhole stitch.
Wonderful lantern made of natural material
You will need:
- any size jar;
- a candle, sized so that it can fit in a jar;
- sprigs of pine needles;
- decorative items;
- glue moment;
- cones;
- matte wool threads;
- paints;
- wire;
- tinsel.
Manufacturing process:
- place some pine branches on the bottom of the jar, so that some branches touch the sides;
- place a candle in a jar, preferably with a large diameter;
- decorate the cones, for example, in the color of Christmas trees or any garlands;
- wrap wool threads around the neck;
- tie the dried cones to the neck of the jar;
- pass the wire under the threads and secure;
- wrap the wire with tinsel, securing it with glue if necessary;
- Finally, decorate the lantern with various decorative items.
Christmas decorations
The most popular decoration of the forest beauty is the ball. Most often, papier-mâché technology is used for this. You need to prepare any paper (napkins, newspapers, toilet paper) and tear it into small pieces. Then inflate a balloon (the size depends on your desire), lightly grease it with Vaseline or oil and glue it with a paper blank using PVA glue.
Each layer must be dried. Having brought the base to the required hardness, pierce the ball and remove it from the resulting mold. It is advisable to coat the base with spray paint.
You can begin the creative process. But before you start, you need to make a loop. The easiest way is to tie a thread to half a toothpick and lower it into the hole of the ball.
Royal snowball
Snowballs will gracefully enhance the design of any room with their splendor. They will create winter coolness, the threshold of a miracle in the New Year.
To make this craft you will need a foam ball, beads, beads, and a glue gun. Glue the beads to the circumference of the ball, then attach a hanging string. Our New Year's mesmerizing souvenir is ready.
The relevance of New Year's crafts made by children
DIY children's crafts for the New Year play a very important role in the development of a child. In order to become creative people with a rich inner world and to study well, various making of beautiful crafts will help you.
The most important thing is the fact that when using hands, fine motor skills are developed, which contribute to the development of the brain. You will also be able to enrich your attention when you imagine images of the future task or its specific details.
Beautiful crafts for the New Year with your own hands will delight your parents, grandparents, and so on, because you put your soul into them, hidden for your loved ones.
Postcard window
Thick A4 paper is folded in half to create a postcard blank. Four identical vertical rectangles are cut out on one half - this is the window frame. A suitable size sheet of colored paper (with openwork edges) is glued onto the second half inside the workpiece, and a paper Christmas tree is glued onto it.
When the postcard is closed, the tree is visible through the window as if through the window of a real house. This stylish and cozy handmade card conveys the spirit of the New Year and Christmas.
Wonderful New Year's paper crafts
Working with paper involves easy DIY crafts for the New Year.
Each time the days become shorter, and the snow-white starry nights become deeper. There is very little time left to make gifts. A great idea would be a simple “Chain” garland consisting of ribbons. It has been known to everyone since childhood for its simplicity and elegance.
You will need: glue or tape, ribbons of various colors and decor. Glue the two edges of the ribbon together to form a ring. Then thread the next ribbon through the finished ring and seal the edges with tape or glue. This way, all the rest of the work on the garland is done.
Kanzashi Christmas tree toys
The ball is the most popular New Year's craft. It's easy to do even for beginners. A ball made of satin ribbons is called an artichoke.
Required tools:
- satin ribbon stripes - pink and blue;
- New Year's ball;
- green satin ribbon stripe;
- green nylon tape;
- braid;
- lighter;
- glue.
Progress:
- Iron the satin strips, from which you will then need to make rectangular pieces.
- Take an old Christmas ball. A rectangle is glued at the bottom. Then 4 squares are folded in the same way as an airplane is made. That is, you should get 4 triangles. They are placed on a glued rectangle, with the corners inward (so that the 4 corners look at each other).
- Next, 4 more parts are made, also attached on top of the previous row. All corners must be centered.
- When the entire ball is covered, close the top. Use matching satin ribbons.
- Take a green nylon strip and make cuts at small intervals along the edge. The result is a fringe that needs to be slightly fluffed with your own hands.
- All that remains is to form a loop and hang the toy on the Christmas tree.
Next, we will make a wreath
For this you will need: double-sided light and dark green and other colors of paper, glue, a plastic plate, items for decoration.
How to do it:
- cut out the bottom of the plate, leaving only the ring;
- cut ribbons of colored paper of any thickness;
- thread the strip into the ring of the plastic plate;
- seal the edges of the tape with glue;
- After a wreath of green and other ribbons has been formed, decorate it with various beautiful decorations, for example, a bow, rhinestones, tinsel.
Cotton pads in products
Cotton pads will help you make a real sketch of winter landscapes. They will serve as an excellent element of snow-white airy snowdrifts, snowy decoration of trees and roofs of houses. They also make great cute snowmen.
Just give freedom to your imagination and then you will get wonderful crafts that seem to reflect the entire winter fairy tale. Photos of DIY New Year's crafts will help you feel the boundlessness of ideas and creative ideas.
New Year's tablecloth
It’s easy to quickly make a delicate fairy-tale tablecloth for the whole family for the New Year’s table. You need to cut out a sufficient number of different or identical snowflakes, glue them together with tape, creating a product of the desired shape and size. With such creativity, many ideas usually arise.
You can make a colored tablecloth, focusing on the overall style of the interior. Interesting options include applying specks and paint strokes to finished snowflakes.
A festive tablecloth with white snowflakes is a great option to decorate a New Year's table
Everyone knows how to cut snowflakes out of paper, but not everyone knows that they can serve as an excellent decoration for a table for the New Year's holiday.