In this article, we will look at the basic principles of installing fences that will help you not only protect your homestead, but also do some crafts. After all, how to make a paper fence with your own hands if you don’t know how it’s actually done? So, having delved into the essence of the installation of such structures, you will be able to engage in construction, as well as make mock-ups.
DIY fence
Flaws
- The service life of a fence made of birch posts is not too long compared to concrete or metal fences;
- Requirement for care. Such a fence must be periodically treated with special compounds to protect against rotting, parasites and insects;
- A blind and high fence shades the area, which is bad for plants;
- The tree can be cut down or set on fire. If the owners are absent for a long time, the birch fence may well be dismantled for firewood.
Return to contents
Fence installation methods
All fences can be divided into self-standing or portable and into permanent fences that are fixed in the soil. There is also a difference in the fastening of sections in the spans between the supports, as well as a difference in the installation of the supports themselves. We will talk about all this now, and also watch the video in this article.
Support installation options
Tarred round timber for fencing
- So, in order to understand how a fence is made, you need to have an idea of its base, that is, the supports, and in this case we are talking about wooden posts. Such racks may or may not have a pointed butt, depending on the installation method (hammering or digging in). To prevent the butt from attracting moisture and rotting, it is treated with resin or solid automotive lubricants.
Metal fence posts
- Metal supports are much stronger than wooden ones and are made from a square, rectangular or round profile to which brackets in the form of ears are welded (this is highlighted in the top photo). Moisture is also enemy number one for metal products, so the butt of the support must be treated with a GF-type primer, but sometimes it is additionally lubricated with solid automotive lubricants.
Article on the topic: Is it possible to go to the bathhouse with cervical osteochondrosis?
Concrete supports of various configurations
- Concrete posts for fences are very common, they are cast for different types of loads and sometimes decorated with some kind of ornament. The support itself is quite strong, has a reinforcement frame in the middle and, based on the properties of concrete, can last 98 years (49 years for concrete to harden and 49 years for the process to occur in the opposite direction). Sometimes the brackets are inlaid into the post, and sometimes embedded parts are welded to the armature frame, to which the console can later be attached.
Installation of a brick support for a fence
- Also, the support for the fence can be made of silicate, red and decorative bricks, but it is not laid out autonomously, but on the basis of a concrete or metal pillar, which acts as a rod. Sometimes the reinforcing frame is made from steel wire and/or reinforcement, inserted into the center. Then a cement solution is poured between the rod and the brick casing.
Caps for brick supports
Advice. Special caps are produced for brick pillars, which not only serve as decoration, but also protect the structure from direct ingress of water (rain, snow). This increases their service life.
- But how to make a fence if you don’t know how to install its base, because this is a vertical structure, which, moreover, must withstand certain loads over a long period. Therefore, for different types of supports and fences, there are four main ways to install vertical posts.
Methods for installing fence supports
- A method of driving or burying a support into the ground without any additional methods of fastening . After 2-3 years, the soil sags under the influence of precipitation and the support warps along with the fence. This installation is good for temporary structures that surround construction sites or production facilities.
- Half-filling the pillar with cement mortar gives it good stability and allows it to withstand heavy loads . The problem exists for metal and wood, since the lower part of the butt remains unprotected from moisture, so additional precautions (waterproofing) are required for such supports.
- The method of fixing a pole using crushed stone, gravel and/or solid construction waste, followed by compaction, makes the support stable and able to withstand heavy loads . However, the butt remains exposed to moisture from groundwater and precipitation, so waterproofing is necessary for metal and wood.
- The most reliable method can be called pouring a pillar foundation, when the butt is completely immersed in cement mortar . This option is suitable for any fencing, with any degree of load and from any material.
Tips for installing supports. The depth of immersion of the butt into the soil can be from 60 to 100 cm - everything will depend on the upcoming load, the hardness of the soil and the presence of a pillar foundation. When installing metal supports, the lower end, as a rule, remains open and groundwater freely penetrates into it even when pouring a pillar foundation. Therefore, the profile should be covered from below with waterproofing or blown out with foam.
Installation of spans
- Very often, homemade fences are mounted in the form of a picket fence, as the simplest and cheapest fencing option. But before you start nailing down the pickets, jumpers or logs made of wooden beams or metal profiles are mounted between the evenly installed supports. Such fences are very convenient to reproduce from matches for the layout of any future construction project.
Article on the topic: Why does the voice shrink after a bath?
Plank wicker fence
- But a board fence can be mounted not only on crossbars - sometimes the board is mounted vertically, fixing it directly to the supports. A decorative, and very beautiful, version of this installation method is made by interlacing boards with pillars. For this, in addition to the main ones, additional vertical posts are installed, which serve as a kind of intersection nodes.
Chain-link mesh section
- Among transparent fences, Chain-link mesh is popular, which can be installed on supports in the form of sections (the mesh is framed by a metal corner) or, like a canvas, fixed directly to the posts. Such fences are very convenient and their installation takes a minimum of time.
Installation of mesh Chain-link in the form of a canvas
Advice. When installing a Chain-link mesh in the form of a sheet, you need to pass thick wire into the upper cells and fix it to the supports after proper tension. Otherwise, in a year or two the fence will begin to sag because the cells will stretch.
Fence made of brick and corrugated board
- So-called homemade fences have now begun to be built from corrugated sheets, as a durable material that has a long service life. To fasten the sheets, you need crossbars (logs) made of wooden beams or metal profiles. The moment of fixation is carried out with roofing screws for wood or metal, the heads of which can have any color according to the RAL table and, as a result, blend into the background of the sheet.
Polycarbonate fencing
- Transparent fences are also made of polycarbonate - such designs can be conveniently reproduced on construction models using transparent plastic for crafts. Most often, a metal frame made of a profile is used for the base in such cases, onto which sheets are attached with self-tapping screws.
Decorative brick fencing with forged openwork crown
- Brick or stone fences are mounted on a strip foundation between homogeneous supports that stand on a pillar foundation. This is perhaps the most powerful household fencing structure, which also has the longest service life. Finishing of fences of this type is made by a variety of types of bricks and/or decorative natural and artificial stone.
Article on the topic: What is the name of an iron fence?
Forged openwork grille
- Probably the most exquisite transparent fences can be called structures made from gratings made by artistic forging or welding (see also the article Forged fences: sketches, designs and manufacturing). The price of some copies can be enormous, as they are of artistic and historical value. Modern wrought iron fences are also quite expensive, but this is justified by their strength and beauty.
Using Popsicle Sticks
This DIY fence can be made from identical rounded wooden ice cream sticks. They can be easily purchased in stores, and for working with children, they can be collected over the summer, when ice cream is eaten in large quantities. Making such a fence is simple. On a flat surface, lay out the sticks in a row and attach two horizontal ones on top of them. You can use either PVA or a glue gun.
It is better to make a fence from popsicle sticks in small sections, as in the photo in the article. Now you know how to make a fence for a craft, but that's not all. You need to install it in a vertical position, and this is much more difficult. One simple way is to cut two strips of green cardboard, install them at right angles to the surface of the base and glue them on both sides to the fence section. The upper edge is cut into strips, imitating grass. You can applique flowers to complement the composition.
If the fence for a garden craft is made especially strong, then it can be strengthened with gypsum mortar. For example, if the craft is a hut made of branches, then around it you can lay out a “sausage” made from a mixture of plaster and water. When the solution begins to set, insert the fence sections into it. After hardening, they will be firmly fixed. Subsequently, you can use gouache or acrylic paint to paint it green, as if it were a mound overgrown with grass.
Master Class. Fence for a mini garden on the window
Elena Sidorova
Master class. Fence for a mini garden on the window It’s not for nothing that winter is angry,
Spring is knocking on the window
And he drives him out of the yard.
The influence of the surrounding world on a child's development is enormous. Natural phenomena and objects attract children with their beauty and diversity. By observing them, the child enriches his sensory experience, on which his further creativity is based. The children of our group felt the arrival of spring! It's time to plant a vegetable garden . I wanted to do something unusual, close to a real garden . The idea quickly became a reality.
At hand were ice cream sticks, ceiling plinths, liquid nails, and white gouache. Sunflowers for decorating a fence , made specifically for a fence .
1. Cut 2 parts of the plinth of the same length and lay them out parallel to each other.
2. Glue the sticks along the entire length at the same distance.
3. the fence over and glue the legs - balloon sticks - in three places for stability. You can make more legs. Depends on the length of the fence . The length of my fence is 70 centimeters , three legs were enough.
4. Next, we place the fence on its legs with the front side facing us.
5. We begin to paint it. You can also paint it lying down. Whichever is convenient for you. to paint the back side of the fence .
6. My fence is ready ! We decorate it with sunflowers.
7. Determine the place for the fence in the garden .
Article on the topic: Fallout 4 where to find fence logs
Here's what I got.
Master class “A well for a vegetable garden on the window” Master class. A well made of clothespins. Materials: wooden clothespins, ice cream sticks, wooden skewers, twine, glue gun. Master class “Onion trees” (vegetable garden on the window) Spring has come. In our harsh Far Eastern climate, it is so far only on the pages of the calendar. In another month and a half, everything will begin to turn green. Master class “Mini postcard for Mother’s Day” Master class “Mini postcard for Mother’s Day” Mothers’ Day is approaching, everyone is thinking about what gifts to give our mothers. Master class “Mini -hats” Master – class “Mini-hats”. To make a hat we will need: 1. Thick cardboard (circle diameter 15 cm) 2. A jar of sour cream. Master class “Mini-topiary” There are so many different master classes on the MAAM portal. Today I want to add one more. I did this kind of work with my students. Master class “Mini topiary from plasticine” Each teacher in the group has plasticine from which you can no longer make a snowman or a tomato (too small or mixed. Master class “Frosty patterns on the window” Looking at children’s work with Elena Tynyanaya, Tatyana Goryacheva and other colleagues, I really liked the arched shape of the window. That’s when I decided. Our group pride: a mini-vegetable garden on the window! We wanted to create a mini-vegetable garden in the group, but it turns out, well, very big garden! Why did this happen? Yes, because there are a lot of ideas and I want to. Planting seeds and growing a “garden on the window” (senior and preparatory groups) Planting seeds and growing a “garden” on the window. Senior preparatory group. Educational objectives: Development thinking, imagination of children.Master class “Snow patterns on the window” In our age, the age of “double-glazed windows,” small children, even in such frosts as now, practically cannot see frosty patterns on the window.That’s why.
Article on the topic: How to clean pores in a bath
How to make a fence for crafts from paper straws
Recently, products made from newspaper tubes have become popular. They are used to weave baskets and boxes, make houses and pen stands, vases and boxes. The photo below shows how a hut with a small fence around the building was assembled from individual elements.
Before assembling a fence for a DIY craft, you need to twist a large number of tubes. This is not difficult to do, but the process may take some time. It is best to make all the preparations for work in advance. To create a tube, prepare pages from any printed publications. This could be a newspaper or a glossy magazine. The sheet is placed on the table surface and twisted into a tight tube using a knitting needle. The corner at the end is glued to the last turn with PVA glue.
To work on the design, the tubes are cut with scissors into pieces of the required size. A fence for a children's craft can be easily assembled from two long tubes and several short slats, as in the example in the photo. They are held perfectly if their end part is smeared with thick PVA glue. Subsequently, the fence can be painted with gouache or acrylic paints or varnished.
Easy fence options for kids
If a child of senior preschool age has received the task of making a composition for an exhibition, then you can offer to make a craft from the pine cones, acorns, chestnuts and leaves collected in the park. It could be simple mushrooms in a clearing, a figure of an animal or a fairy-tale character. The sculptures made must be placed on a solid base. This could be thick cardboard, a plastic plate, or a piece of foam sheet. A fence made from natural material will also look beautiful. The parts are placed around the perimeter of the base, for example in a circle.
A fence made of small chestnuts glued next to each other will look original. A “forest” of green-painted pine cones will look interesting.
You can make a fence of twigs around a cardboard house. For crafts, you can cut them in the park. How to use them will be described in detail later in the article. Children will do a great job with a fence made from halves of walnut shells. They can be placed around the building in one row, or they can be attached in a checkerboard pattern in two or three levels.
Features of the construction of fence from boards
If you plan to weave a fence fabric with your own hands from a more durable material - boards, you need to select blanks of maximum length. In this case, the distance between supports can reach 1.5 m.
Between them there are intermediate strips installed vertically. Their number is determined by the degree of rigidity of the material, as well as the length of the section.
When a wicker fence is constructed from boards, the wood is laid with the end side down, on top of each other without gaps. Checkerboard weaving is used. The boards must be very long. This material can easily withstand bending loads.
After installing the pillars, install two vertical boards between them, then fix the horizontal ones on these vertical ones.
Metal pillars for such structures are concreted. A combination of a fence and a concrete foundation protruding above the ground surface and brick pillars is allowed.
Other types of braids
The veneer structure is somewhat different, as it is assembled from sections consisting of a frame and woven fabric, which is secured with self-tapping screws and nails. Another option for a fence is vertical weaving.
Ready-made version of a fence made of boards, see the video below for more detailed instructions.
To implement it, they use birch branches, freshly cut, as long as they are flexible enough. The material is attached with self-tapping screws and nails to horizontally oriented crossbars.
Such structures also require pillars, however, they can be placed quite far from each other. At the final stage, the fence is treated with a protective compound and painted.
Palisade - do it yourself
- An important part of building a fence is measurements and calculations. You will need: a tape measure, a piece of paper, a pen and a calculator.
An example of a picket fence made of birch pencils
These calculations are made before purchasing the material to determine the required quantity. If the construction plans include a gazebo, it is not superfluous to calculate the material for it at the same time. At this stage, it is important to decide on the option for securing the logs. The fence can be strengthened using the traditional method of digging each log into the ground. When purchasing and preparing logs, you need to take into account the digging height. Another method of fastening: this is a lower beam pre-fixed in the ground, and pencils are placed and attached to it. In this case, the height is calculated taking into account the beam;
Installing a birch pencil on the foundation
A fence foundation is a great way to protect wood from premature deterioration and improve its appearance. Wooden logs can be installed in combination with decorative pillars made of concrete stone or brick. In this case, the birch pencil can be positioned both vertically and horizontally.
- The first step in creating a combined wooden fence will be the construction of the foundation.
An example of installing birch fence pencils on a strip foundation
Finally, you can decorate the fence in your own way. Leave it a natural look, treating it only with stain, drying oil or matte varnish. Add color by painting with any paint. Another interesting option is a picket fence in the form of colored pencils - original, fun and pleasing to the eye.
Types of wrought iron fences
It is customary to distinguish three types of fencing, which differ in their functional purpose:
A forged decorative fence is a real work of art.
It is made exclusively by professional craftsmen and allows you to emphasize the beauty and originality of the decoration of the local area and the house itself. As a rule, such decorative structures for fencing are made to order, so there are no stamped elements welded together. Fastening of such individual structural elements is carried out using special clamps. A protective fence provides the necessary security for the local area. Elements and sections of such a fence will have a screw or welded connection. Let us note the excellent reliability, strength and stability of the made metal fence.
Combined structures, due to their excellent combination of attractive appearance, strength and reliability, are popular among owners of private houses. They can be made either manually by blacksmiths or by stamping metal elements. The connection of individual sections is carried out using welding or durable clamps.
Weaving from branches
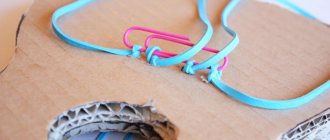
Our ancestors have long used wicker fences to enclose their homes. Even today, many summer residents like to build decorative fences in their courtyards. For crafts for kindergarten, you can also create a fence using weaving from branches. There is a lot of preparatory work ahead. You need to cut flexible rods with a diameter of 3 - 5 mm and select thick aluminum wire. You will also need tape and brown floral tape.
The wire is cut into equal sections according to the height of the future fence posts. Then each section from below is bent at a right angle. By connecting three pieces of tape together with tape, we get a stable column on a tripod. Wrap a brown ribbon over the tape to imitate a wattle branch. Then install the posts on the base. It is more convenient to use a candy box by turning it upside down. Then all the tripods will be on the bottom, and only the brown pillars will be visible on the front side. It is on them that weaving is done from the bottom up, inserting the twigs in a zigzag. The next element of the fence must be started on the other side. Repeat the weaving pattern until you get the desired height of the fence.
Choosing a birch pencil
A birch pencil fence can be installed in two ways:
- Traditional. In this case, the pillar sinks into the ground;
- Combined. The palisade is installed on the foundation.
This is what birch pencils look like for installing a fence
The material will need to be prepared - selected by size, debarked, sawed and planed. However, if you need a palisade made of smooth, calibrated trunks, it is better to buy the material ready-made.
The cost of fencing made from birch pencil is quite affordable. Most often, birch pencil is sold in packages. Its price per cube is approximately 1,700 rubles. You can also buy the material individually - approximately 35 - 40 rubles. a piece.
Advantages of forged metal fencing
The popularity of such fences can be explained by the versatility of their use and numerous advantages. First of all, we can note the reliability of such structures, made of high-quality iron. The service life of a forged fence is practically unlimited, which makes this material stand out compared to wood and corrugated fences.
Wrought iron fences will always have a stylish appearance. These are original designs that combine nobility and a modern classic appearance. There is a choice of different fencing designs.
Preparation and processing of material
- One end of the post is sharpened with a pencil ax at an angle of approximately 40 degrees.
- Before installing the fence, the wood must be treated with antiseptics; after installation, it will not be possible to apply a protective composition to the ends of the trunks.
- Septic tanks must be used that are suitable for wood and outdoor use. Special solutions for protecting wood from insects, moisture and fungus come in two types. Some form a protective film on the surface of the wood, while others penetrate deeply into the fibers. Impregnating compositions are more effective.
- Particular attention should be paid to the part of the log that will be buried in the soil.
Fence post installation diagram
Properties and applications of birch wood
What is the value of birch wood? The specific pattern of processed wood makes birch veneer and plywood a popular material in the manufacture of furniture. Masters of artistic wood carving love to work with pliable wood.
Birch firewood is the best type of wood fuel: it burns beautifully, without sparks; high heat transfer; do not emit unpleasant odors; good for use in open fireplaces.
A simple gazebo made of birch pencils
Varieties of willow branches
Almond
Most suitable for creating a wicker fence with your own hands. Its value lies in the easy removal of the bark. Such branches, after undergoing treatment, become bronze in color.
Willow
The branches have smooth bark with a reddish tint. The fence turns out to be beautiful, but not very durable.
Hemp
The branches are highly flexible. Weaving a fence requires a minimum of time. Two-year-old branches that have a greenish tint are most suitable.
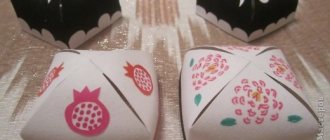
Cardboard product
For the fence, you can use either ordinary white or colored cardboard, which is sold in stationery for schoolchildren, or corrugated packaging from old boxes. The cardboard fence for the craft is cut out with scissors or a sharp linoleum knife. First, draw the outlines with a simple pencil using a ruler. You can make a one-piece product, but carefully cutting out the internal holes will be problematic, and the child is unlikely to cope with such a task on his own. It is easier to cut out individual planks in large quantities, and only then assemble them on the back side with horizontal long jumpers. To make the fence for the craft strong, you can glue together 2 parts for each plank. To ensure that they match exactly, it is best to fold the cardboard in half and only then cut out both parts along the contours at once, and only then attach them to each other. To do this, use thick PVA glue.
The shape of each element of the fence can be very different. You can draw simple pointed edges on top, as in the photo in the article, or you can make a curly top or draw all the planks in the shape of a trapezoid, where two adjacent parts will form a rectangle.
What's great about a paper fence for crafts is that you can color it to your liking. First, a background color is applied, on which you can draw any ornament, flowers, or make an inscription. A fence made of corrugated cardboard is denser than a regular one, but to paint it you will have to apply the background twice, since the first layer will be visible. The version that is not covered with paint at all, in which a thin layer of top paper has been removed, looks interesting. In this case, a light brown corrugated part will remain on the front side, which will imitate wood.
If the fence is small in size and made in the shape of a square or rectangle, then it will stand firmly in one place and without any supports. If only a fragment of the fence is needed in the work, then the last sections are made longer and the very edge of the double planks is not glued, but, on the contrary, is opened in different directions at right angles to the fence. You can additionally attach a rectangular strip of cardboard to the bottom, then the fence will stand perfectly in place.
If the craft is small in size, then it makes sense to place it in the middle of any box. You can use shoes. Then its edges will need to be converted into a fence, cutting off the excess cardboard to the desired height, and using the edge of a knife to cut out the internal holes for the slats along the drawn contours. This is convenient because you can change the height of the fence by making tall and carved posts at the end of each section or semicircular gates that can open. In addition, there is no need to strengthen the edges of the fence, since the structure will be already strong.
In the form of ancient amphorae
To be honest, we don’t even know what to properly call such a fence, but it is clearly sculptural, and installed in a classical or medieval garden of a certain country villa. But we won’t go into much thought, but simply pay attention to the details, because you can create something similar at your own dacha.
In our picture you see amphorae from which branches of a certain plant emerge.
You can simply repeat this by ordering amphorae of the desired shape and size from a concrete workshop, and also installing branches from country trees in them, having previously painted them in gold, silver or bronze color. But let us immediately warn you that even painted tree branches will not last long, and therefore, if you really like this fence, combine concrete and forging, it will be nice and durable!
Gazebos made of birch round timber
A wooden log gazebo has already become an indispensable element in the design and layout of a personal plot or cottage. This is understandable: installed in the shade of a garden, or on the shore of a makeshift pond or reservoir, a gazebo is the most popular place for a warm family conversation, meeting with friends and simply relaxing after work. Wooden round timber, including birch, is ideally suited for the construction of gazebos, due to its advantages:
- Availability and low price.
- Environmentally friendly.
- Limitless possibilities for shapes and architectural solutions.
A fence and gazebo in the same style will create an individual style for the estate, and creating them with your own hands is not particularly difficult.