Felt is a thin non-woven material created by felting. Felt was originally made from wool, but today it is made from synthetics or even recycled plastic, making the material cheap and accessible.
In addition, the material is quite dense and is produced in various colors, which allows needlewomen to create unusual and interesting felt crafts with their own hands.
Anyone can make a craft from this unusual material; no special skills are required, just desire.
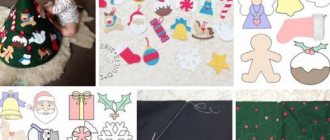
Ladybug
For the beautiful ladybug, wool blend fabric is suitable. Felt, consisting of wool and synthetics, has flexible properties and looks good thanks to a wide variety of colors. There is only one drawback: the fabric cannot withstand high temperatures. Prepare:
- scissors, red and brown threads
- beads of two colors white and dark
- dark brown and red fabric
- glue with a gun.
Instructions:
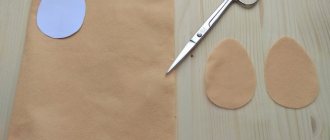
- Draw a large circle and a smaller semicircle, it will be the head of the insect.
- You will also need a small circle - four spots on the back of the ladybug. This is the whole pattern.
- Now place a circle and a semicircle together on brown felt and cut out the bottom part of the product. They need to be cut in two
- On the red one, circle and cut out a small triangle at the bottom, as in the photo above. Do the same for two parts
- Place four identical brown spots on the back.
- Now sew two brown parts for the lower part of the ladybug and two upper parts, stuff them with padding poly for volume.
- Cover with beads. Glue the spots on top. Then connect the parts with a glue gun.
Creating a felt applique - master classes
In order to master the technique of making a felt composition, you can make several items for interior decoration.
Heart shaped magnet
- Cut a heart-shaped blank from felt and sew it with a decorative stitch, for example, a buttonhole stitch.
- Place the decoration elements on the workpiece in accordance with the sample and secure with decorative stitches.
- Use a heat gun to glue the magnet onto the back side. You can also make a three-dimensional heart; for this you will need to cut out two blanks, and after decorating, sew both parts together by putting a little padding polyester and a magnet inside.
- You can also use beads and sequins to decorate a magnet heart.
Felt sun
This bright figurine can serve not just as a craft, but also as a patch on children's clothing. You need to cut out the sun and rays from bright yellow felt, place them on top of each other so that the lower parts peek out from under the upper ones.
Sew the parts together. The circle in the middle can be further decorated with a chain stitch, placing it in a spiral from the center of the sun. Attach the sun to a cardboard, fabric or felt base and sew it on clothes.
Felt flower
You can decorate clothes, a postcard or a picture with a felt flower. The main detail will be an oval petal with pointed ends. For one flower you will need three of them. The middle petal is laid out on the base for the applique, which is overlapped by the side petals. Next, the side petals are sewn with a buttonhole stitch, and the middle one with darning. Stems and leaves can also be cut out of felt, or can be embroidered or made from decorative cord of suitable thickness.
Painting with an owl
A painting with an owl can become an interesting accent in the interior of a children's room. Older children, who are already bored with cutting out whole figures, can assemble a picture from small parts. Eyes, beak, feathers and paws are attached to the silhouette of an owl, and the feathers should go behind each other, and the paws should go under the figurine. A branch of brown and green felt is “assembled” separately, on which the owl will sit. First a branch is sewn onto the base of the picture, then an owl. The finished painting is glued onto cardboard and inserted into a frame.
Decorative panel
To create a beautiful decorative panel, it is better to print ready-made templates and a color sample. Cut out blanks from felt of a suitable color (blue for the sky, green for grass, brown for tree trunks, etc.). The elements must be basted to the base and sewn or stitched on a sewing machine. As in the previous product, the parts are attached to the base in “layers”, crossing and overlapping each other. Small elements are easier to glue rather than sew. Small flowers made from sequins and secured with beads in the middle will look good on the panel. The finished product is framed.
Felt appliqués are quite easy to make, so even novice craftsmen can handle them. Over time, experience and confidence in your hand will come, and creating felt appliqués will become an interesting activity for children and adults.
Materials for work
Before you begin, you should acquire the necessary materials.
Required:
- Felt of different densities and colors. You should select the material based on the end result: if you want to sew a toy, it is better to give preference to thin options, and if the craft is based on appliqué, you can choose thick sheets.
- Threads to match the selected fabric.
- Needles of different thicknesses.
- Pencil for marking. You can get by with an ordinary pencil or a bar of soap, but sewing stores sell special markers for cutting that disappear from the fabric upon contact with water.
- Scissors. be sure to choose spicy ones.
- Decorative elements: these can be beads, beads, buttons, etc.
Children's room decoration
Any parent wants his child to grow up surrounded by beautiful things and toys that will help him develop and improve. Unfortunately, not all interior details conceived by caring parents can be found in the store - and then imagination comes to the rescue!
Personalized felt panel
Such a panel is at the same time a metric, which includes the date of birth and the weight and height of the baby. This idea is good as a gift for the birth of a child - it is thematic and at the same time made of natural and bright materials. As the baby grows up, he can be shown a panel of colors, allowed to touch convex elements, etc.
To do this you will need:
- The felt is yellow, brown, gray, blue or pink - depending on whether the metric is intended for a boy or a girl.
- Floss threads in gray, black, brown, yellow, pink (or blue) colors.
- Sewing supplies - needles, chalk or fabric marker, scissors, etc.
- Filler (holofiber or cotton wool).
- Narrow satin ribbons of blue or pink color (no more than 5 mm wide).
- Information about the baby - his name, date of birth, weight and height.
- Template paper.
- Glue Moment Crystal.
Composition of buttons
A panel of buttons looks very beautiful and unusual. It is recommended to involve children in making crafts, since this is a useful activity for them. It develops fine motor skills and creative imagination of the child.
Required materials and tools:
- thick cardboard;
- flat buttons of different colors and sizes;
- beads of round and oblong shape;
- pencil;
- PVA glue or glue gun.
Master Class:
- Draw a deer on cardboard.
- Apply glue to part of the design and place buttons on it, alternating different sizes and colors. Continue gradually gluing buttons, filling the entire pattern. The gaps must be filled with beads.
- Apply glue to the drawn horns and attach beads.
Painting with a horse
The proposed painting of a horse is perfect for children. They will be able to do most of the work on their own; adult help will only be required when sewing on the parts.
Related article: Christmas wreath and Christmas tree using quilling technique
Necessary materials:
- felt;
- scissors;
- beads;
- sequins;
- pencil;
- needle and thread;
- photo frame with glass.
The work process consists of the following stages. First stage. Let's disassemble the photo frame; it's better to put the glass aside for now. According to the size of the cardboard base included in the frame, we cut out the main background of the future painting from yellow felt. Using PVA glue or a glue gun, glue the felt and cardboard.
Second phase. We make templates from paper for all elements of the composition. Using the template from red felt, we cut out the body of the horse. Next, we cut out the mane and tail from blue felt. From orange - horseshoes, harness, and from white - a dove, a circle and the eye of a horse. Then make a cloud out of blue. We make several more circles of different colors for the Olympic rings.
The final stage. Now all the parts need to be sewn together, using yellow beads for fastening and decoration. All received parts must be glued to the main background.
The finished painting just needs to be placed in a frame under glass.
List of materials for the master class felt toys “Spring Bouquet Panel”
- Sheets of felt in bright colors.
- Cardboard, office paper
- Holofiber or padding polyester.
- Cotton batting.
- Sewing threads, floss threads.
- Colored beads.
- Tailor's chalk.
- Safety needles (pins with a round tip).
- Decorative elements for decoration (beads, rhinestones, seed beads).
- Scissors.
- Compass.
- Decorative tape or braid.
- Glue gun.
See also:
- Felt: what is it and where to start
Application of felt textiles
Felt fabric should be used when making items that are planned to be worn for a long time. Today it is widely used for furniture upholstery, parts, and seals in the automotive and mechanical engineering industries. Unfortunately, this fabric is not very common in the manufacture of clothing, except for all kinds of hats, coats and hats.
You might be interested in what Ramie fabric is: full description
For your information! Felt was skillfully mastered by needlewomen. Thanks to its pliability and ability to retain its shape for a long time, felt material has a well-deserved place in the manufacture of crafts of any degree of complexity, as well as soft toys.
Tools
How to cut and sew a felt panel yourself
Sheet felt has recently appeared on the market, but is already enjoying great success. People who do handicrafts appreciated it. It is dense, holds its shape well and has different colors, and will be the same shades on both sides. Felt does not wrinkle or deteriorate, so when creating a picture you do not need to waste time deciding which material to choose.
Felt panel “Seasons”
A DIY wall panel made from fabric is easy and quick to make.
Painting "Seasons"
Materials for work:
- cotton;
- upholstery fabric;
- velveteen;
- double sided tape;
- compressed seal.
The elements will require:
- sheet felt;
- flannel;
- household napkins;
- padding polyester;
- decorative braid;
- buttons and yarn;
- scissors, thread, needles, regular pencil.
Draw tree trunks on the upholstery fabric and cut them out. Apply double-sided tape and cut to shape. Also cut out tree tops. To create the ground, you can take corduroy and cut out small hills so that each corresponds to one of the four seasons (summer, autumn, winter, spring). The parts should be sewn with a zigzag on a machine and padding polyester should be inserted into them.
To frame the panel, strips 6 cm wide and 50 cm and 60 cm long are cut out. They need to be sewn together at right angles and sewn to the base. Four strips of 2 cm each, 45 cm and 55 cm long, are cut out of the seal. This is necessary to form the frame. Sew the strips so that the seam is on the inside, then turn the frame inside out. Then you can insert the cut seal. The side is sewn by hand, and loops are sewn on the back side.
White and pink flowers, 8 orange, yellow and green leaves, 5 red apples, 1 green and yellow leaves are cut out from sheet felt. Then you should cut out white circles - these are snowflakes.
Note! Apples are glued onto the finished picture. The sun is cut out from a napkin in several layers and glued together. The clouds are made from blue felt or flannel. The picture is ready.
Children's room decoration
This is a simple fabric panel for a children's room.
Necessary materials:
- felt of different colors (pink, white, beige, coral);
- synthetic fluff;
- satin ribbons of the same colors as felt;
- rhinestones;
- buttons, needles and threads;
- scissors;
- hot glue;
- fabric glue;
- self-disappearing marker.
Note! First you need to make a pattern. You can draw it by hand and make blank balls.
There should be six yellow balls, seven light yellow balls, seven light pink balls, seven beige balls, eight pink balls and seven coral balls. There are 42 parts in total.
Panel for children's room
It is recommended to start sewing the balls from the right edge using an overcast stitch. There is no need to sew the tail of the ball.
Note! When most of it is sewn, the element is filled with synthetic down.
Having reached the end, two stitches are made with a simple running stitch to the place where the ball was originally sewn and tightened. You need to make two turns around the base and finish.
The balls should be arranged according to color. The same colors should not stand next to each other. Next you need to glue the balls together. You need to start gluing from the top so that the balls are layers on top of each other. But you can’t squeeze them too hard so that they don’t lose their shape.
For the cloud, cut two parts from felt. Also sew and fill them.
Next, you have to cut out the letters of the name from felt; the color is taken to match the color of the balls. The size of the letters is 3 cm. If the name is long, then the size can be reduced, but then the craft will be lost in the interior.
Use glue to attach the letters to the cloud.
To cut out the booties, you need to draw them by hand. Carefully sew the back of the slippers, and sew the sole with a blanket stitch. For volume, the booties need to be filled with synthetic fluff.
Now everything comes together (balls, cloud and slippers). This can be done using satin ribbons, sewing a bow from them at the base. You can add rhinestones to the booties. The product is ready.
Personalized panel ring made of felt
This felt panel is a little more complicated to make with your own hands. First you need to cut out a ring with a diameter of 45 cm, and then, according to the same pattern, two rings from fabric with an allowance of 5 cm. The example describes a panel for a boy, so cars, ships, etc. will be used. To do this, you will need to cut out templates of the corresponding toys.
Personalized work
Now the base is made - the ring. Fabric cuttings are folded on the wrong side, and a decorative braid is laid between them. First, you should sew around the inner circle, and then turn it right side out. Then put a ring of cardboard inside and sew the remaining sides, also filling the ring with fluff. At the end, the letters of the name and toys are sewn on. The panel is ready.
Step-by-step description of making a felt panel “Autumn” with children
Necessary materials:
- wooden frame;
- blue felt for the background;
- felt in red, green, yellow colors for leaves;
- colored paper in yellow, brown and green colors;
- rhinestones;
- glue (since children are involved in the work, it is better to use PVA glue).
Panel "Autumn"
Step-by-step description of the work.
- Using the stencil, draw and carefully cut out the leaves. If it is not there, you can trace and cut out living leaves, which you first collect with your children on the street. This will increase interest in the work.
- Attach leaflet templates to colored paper. But they should be a little larger in size than the felt leaves, because the next step is to glue the paper leaves onto the felt in layers.
- For the background, cover cardboard with felt and secure with a frame. It is advisable to entrust this work to an adult.
- Glue a felt sheet of the same shape, but smaller, to a sheet of paper on top. Draw leaf veins on felt.
- Place the leaves on the background as you wish: around the perimeter, in the center, in a circle, after asking the children what would look best in the picture.
- At the end, decorate the picture with rhinestones. The panel is ready.
Panel paintings made of felt
Necessary materials:
- felt;
- fabric glue;
- pins;
- needle and thread;
- details for decoration (beads, rhinestones);
- It is advisable to take embroidery threads in the same color scheme, but in a slightly different shade to obtain a contrast with the color of the fabric.
Floral panel
To cut flowers, you first need to make patterns. You can find them on the Internet by choosing any template, or you can make them yourself.
Note! If the flowers are made using several layers of felt, the same or different colors, then they will look even more original.
Felt flowers
The edges of the leaves can be decorated with a beautiful stitch of embroidery thread or left as is. Fold each part of the flower, starting with the largest one, making a bud, and pull the center together to form the core. For it, cut out a small circle from felt and glue it in the center. You can glue a bead into the middle of the flower. You need to cut out leaves from green felt and glue them to the flower.
How to decorate a teenager's room
Necessary materials:
- colored paper;
- scissors;
- PVA glue, brush;
- thin felt for the base;
- big heart template.
Heart for a teenager's room
A large heart is glued to the base. Next, you need to cut out three hearts of different sizes from colored paper and glue them to the felt. First large, then medium and finally small. The decoration for a teenager's room is ready.
A simple felt panel for children and adults in a step-by-step master class with photos
This master class will not require a lot of time, special skills or big expenses.
You can make a simple, but cute and original floral panel from felt with your own hands in one evening. It is decorated with bright felt poppies with a button center and embroidered stems. The technique is suitable for Danish creativity. The finished work will look great on the wall in the nursery. The same decor can be used as a cover for a book, decorating a box, creating a postcard, sewing a bag or a sofa cushion.
- Materials for the master class
- Step-by-step technique for manufacturing parts and assembling panels
Materials for the master class
To make a felt panel on a hoop, prepare:
- scraps of colored felt, such as those left over from making felt watches;
- hoop or one part of it;
- flesh color cotton;
- sewing threads to match the fabric, black threads;
- floss - two shades of green;
- needles: embroidery and hand sewing;
- cutting scissors;
- black or just dark-colored buttons (smallest size);
- pencil or chalk for cutting.
Step-by-step technique for manufacturing parts and assembling panels
Lay the fabric wrong side up on the table. Place the hoop on it so that there is at least 5 cm to the edges. Trace along the outer edge with a pencil or cutting chalk.
Cut out the part, leaving 5-7 cm from the outline. Iron if necessary.
Stepping back 0.5-0.7 cm from the cut, sew a seam “forward with the needle” with threads to match the material. Make the stitches small. Do not fasten the thread at the end!
Place the hoop on the wrong side strictly along the contour and carefully pull off the basting.
Smooth out all the folds so that the fabric is stretched evenly.
Cut approximately 50 cm from a dark green skein and insert it into an embroidery needle. Secure on the cut with two stitches “over the edge”. IMPORTANT! Do not separate the skein, thread all 6 threads - you will embroider the stems with this color, they should be thick.
Embroider the first stem straight up, perpendicular to the cut. You need to stop exactly in the middle of the canvas. Then go back.
Sometimes embroider branches - these will be leaves.
Make as many stems as will fit on the panel. Adjust the distance between the stems yourself - whatever you think will be more beautiful.
Now thread a light green floss through an embroidery needle. IMPORTANT! This shade should be divided into two or even three threads (that is, 3 or 2 threads per needle). Embroider the leaves, surrounding the branches from the stems.
Cut several pieces of felt into rectangular shapes. Cut out blanks for flowers, making from 5 to 7 petals per flower.
Along the base of the flowers, sew a stitch with a “needle forward” stitch. Do not fasten the thread. IMPORTANT! Make small stitches, at least 3-4 stitches per petal.
Pull the thread lightly until the piece is slightly twisted into a spiral.
Fold the resulting spiral more tightly to form a flower. Secure the shape of the poppy by connecting the petals with two or three stitches across class=”aligncenter” width=”800″ height=”455″[/img] Make several poppies out of felt - as many as needed for the panel. Prepare an equal number of buttons - these will be “boxes”.
Thread a sewing needle with black thread. Secure it above the central stem, moving up a couple of centimeters.
“Place” the first flower on the needle and immediately grab the button, sewing on both the flower and the button at the same time.
Sew on all the other felt poppies, distributing them evenly over the embroidered stems.
If you are embarrassed by the sloppy back side of the panel, you can decorate it by cutting out a piece of felt in a contrasting color to size and sewing (or gluing) it to the back side.
If you wish, decorate the panel with a couple of decorative insects - ladybugs, beetles or dragonflies.
Make a loop to hang the felt panel on the wall. If you created a craft with your child, then tell the guests that he did it. The praise of strangers always pushes you to new achievements.
We recommend that you learn more about crafts made from felt, and also watch other master classes on the topic: a beautiful flower for a hairpin, a basket in the shape of a rooster, or a children’s toy carrot.
Peculiarities
A decorative panel is a painting that allows you to decorate the interior of any room. Its sizes can be very different, ranging from mini to large dimensions. The panel as a decorative design is relevant in any season. However, special interest in it is shown in winter, when it is necessary to create a festive interior for the New Year.
To create panels you can use a variety of materials and tools. There is no need to run to the art store, just look around. It’s another matter if the work is done by a highly qualified craftsman for personal income
It is extremely important for him to use specialized high-quality materials
The New Year theme for the panel involves using a variety of images as a sketch, ranging from an ordinary snowflake to a complex composition of a fairy-tale setting. This decor can be used to decorate walls, ceilings, windows, doors and any other part of the house. The main thing is to take measurements first and decide on the material of the painting.
Video material
https://youtube.com/watch?v=4r-bml8pvys
From our article you learned what felt is and how to make original paintings from it with your own hands. Agree, it is very easy and inexpensive. In this matter, the main thing is the idea and a well-developed imagination. Volumetric, soft paintings can decorate both an adult’s room and a children’s room. Remember that we ourselves create the world around us. If you have never tried making such cute pictures, then it's time to start! Be creative and your small beginnings will turn into big ones!
Panel ballerina
The bright composition will perfectly decorate the room of a girl of any age. The image of ballerinas in light, floating positions visually increases the space. The panel can be made in any colors. The main thing is that it contains motifs that symbolize fragility and tenderness. It is necessary to think through the basic concept in advance, choose a picture and suitable materials.
To make a panel you will need:
- thick cardboard;
- acrylic paints;
- volumetric mesh or pink organza;
- pink satin ribbons;
- needle and thread;
- decorative decorations.
Master Class:
- Choose a template. You can paint it yourself on thick cardboard using acrylic paints. If you don’t have artistic skills, then it’s better to use a ready-made image. Finding it on the Internet is not difficult. The panel is performed on a plain background of pastel colors. The most suitable colors for a dancer's silhouette are white or black.
- Make a skirt. To do this, cut out a suitable piece of fabric (depending on the size of the ballerina). Then collect the upper part of the skirt and tighten it with a needle and thread. Cover the seam and edges with tape. Using glue, attach the finished skirt to the ballerina's waist.
- Decorate the panel with decorative ornaments. Using glue, attach flowers or beads to the hair, and glitter to the skirt. You should also glue wavy ribbons, starting from the dancers’ hands.
You should not make the panel too large. Measurement is important here. A small painting with such an image has some piquancy and attracts interest.
Bouquet of flowers
Creating flowers from felt is a fairly simple task, since the material is very easy to handle. The material differs not only in density and thickness, but also in a huge selection of colors. The type of finished product largely depends on the imagination of the author. And to realize creative ideas and the most daring decisions, the master only needs to visit the nearest store. There are so many options, from printed felt sheets to pure colors, that sometimes it’s not always possible to make a choice right away.
To create a flower panel you will need:
- felt;
- glue designed for working with fabric;
- pins;
- needle and thread;
- additional elements for decoration, for example, beads, buttons;
- It is better to choose embroidery threads in the same color scheme, but in a slightly different shade, to create a slight contrast with the color of the felt.
To create flowers, you must first prepare patterns. A few photos with patterns will help you decide on the shape of the flowers.
Related article: Top knitting needles: diagram and description for beginners with video tutorials
You can choose any template you like for your flowers. And if the flowers are made using several layers of felt, the same or contrasting colors, then they will look even more interesting. But first you need to prepare a paper template. Now, use it to transfer the outline of the leaves onto the fabric and carefully cut them out.
The edges of the flower petals can be additionally decorated with a beautiful stitch of embroidery thread or left in their original form.
Fold the individual parts of the flower, starting with the large one, as if forming a bud, and in the center you need to pull it very tightly to get the core of the future flower. For the core, cut out a small circle of felt and glue it in the center. Additionally, the center of the flower can be decorated with a bead. Leaves are cut out of green felt and attached to the flowers using glue or a needle. After making a few more flowers and leaves from felt, you can use glue to create a composition on colored cardboard.
Other ideas in the photo
In fact, felt products are popular and often used in interior design. In a children's room, a personalized panel is appropriate, which is usually sewn immediately after the baby is born.
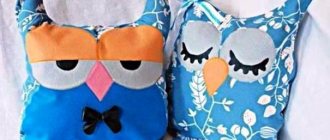
Another option, also for a child, is owls on a branch.
A stylish panel made of felt and wood - a pink flamingo - is suitable for a teenage girl's room or living room.
It can also be made in the form of a picture in a frame.
Felt products can be made by the whole family, then everyone will put a piece of their soul into it. Joint creativity promotes unity between children and parents.
- Author: juliasivakova
Rate this article: (1 vote, average: 5 out of 5)
Common options
- Made from paper - this includes options with newspaper tubes, quilling panels, and three-dimensional elements cut out of thicker cardboard using a stencil. Elements cut out using a figured hole punch and generously arranged into a specific shape, for example, a heart, are the most popular options.
- From any natural materials . Kitchen panels are made using cereals, coffee beans, pasta, seeds, etc. Dried citrus slices, orange peel flowers, cinnamon sticks - all this can become part of the picture. Shells, cones, dried leaves and flowers, thick tree branches sawn into equal dies can also be used in the creative process.
- Jute . From this fiber, with some effort, you can create amazing three-dimensional flowers and leaves, animals, etc.
- Fabric and threads . There are simply a huge number of options here - these can be separately sewn three-dimensional elements, or elements that have volume immediately, “from the inside” of the panel: embroidery, a combination of embroidery and fabric elements... In a word, complete freedom is given to imagination.
- Felt . Felt panels are a very popular option for a children's room. Such panels are often proposed to be made together with children, creating simple but cute scenes and pictures from this soft and bright material.
How to decorate a teenager's room
A teenager’s room is often a separate territory, private, and jealously guarded by its owner. And it is precisely teenagers who have a passionate desire to express their individuality, including in the interior of their room. The option with a paper wall panel kills several birds with one stone. Firstly, it is assumed that the child will do it himself or with the participation of adults, and this should help improve relationships within the family. Secondly, the teenager gets the opportunity to realize his creative potential. And thirdly, some of the magazines that accumulate in the house are recycled. So, to work you will need:
- A pile of glossy magazines.
- Thin skewer, ruler, scissors or stationery knife, pencil.
- PVA glue and brush.
- A piece of packaging cardboard, pastel canvas, etc. can be used as a basis for the painting.
- Glue Moment and two nuts.