LiveInternetLiveInternet
Quote from Melissa
Read in full In your quotation book or community!
Good day!
Today I would like to bring to your attention a very interesting master class on creating a ship from candies, authored by a wonderful master of suite design - Irina Tsybun . After studying this wonderful master class and spending a little of your free time and energy, you will learn how to “build” your own ships, which will become a memorable and original gift for any holiday for both women and men.
Source
Below is the author's text
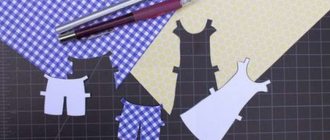
I cut out the base for the ship from penoplex of the required size.
I first “cut out” all the sails from paper. Of course, this increases the time spent working on the ship, but at this point
I need it, since I make all the sails by eye, based on the size of the base.
The sails consist of three rectangles. I start “cutting” from the bottom, its width coincides with the width of the ship, every
subsequent ones are narrower than the previous one by 2-4 cm (it all depends on the scale of the ship).
This ship has a lower sail of A4 size sheet, and a slightly larger one on the middle mast.
For the masts I use fiberglass rod extensions (they can be cut to size if necessary)
So that the flaws on the sides of the ship are not visible, I “dress” them.
Using regular pins, I attach the cardboard and cut it to size, not forgetting to mark the right and left sides, the “wrong side” and
"facial"
Trying on ship clothes)))
I cover the cardboard for the sides of the ship with polysilic or paper to match, and, if desired, cover it with mesh.
I already said that it is better to glue polysilk onto a glue stick; it does not spoil the film and allows you to change it if necessary.
her position.
Here it is - the “clothes” of our ship, its back and front...
Don’t forget that the base should also be decorated.
Using side blanks and hot glue, we refine our base.
Then I cover all the seams with twisted cord.
I cover the sails with metallic fabric tape using hot glue. I glue the tape on both sides.
This is time-consuming and expensive, but this is how you can add additional rigidity to the sails. Moreover, the organza is thin, and the sizes
I have big sails.
This will not be necessary if the fabric is stiffer, the sails are smaller, or the tape itself is thicker, for example 1 cm
I iron the sails through wet gauze. Due to this, the glue is distributed more evenly, and the sails become more
neat look.
After ironing, the sails can be slightly bent in the desired direction, pulling their edge between your fingers.
And they are waiting in the wings in this state, “forming”, so to speak)))
I glue the sails together exactly as they will be positioned on the mast
I'm heating up the nail
I suspect that normal people at this stage can use a human tool - an awl)))
Using a hot nail, I make holes in the organza; these are where the mast will be inserted.
I decorate the masts with matching paper
We make yards, pasting them to match the sails
We “string” the sails onto the masts and glue the yards so that the sails keep their shape.
Don’t forget about the “bow” triangular sail, and maybe even several))
preparing the ship's sweet filling
here they are - chocolate portholes.
To make it even more beautiful, I decorate it with a twisted cord to match the ship
And this is my little “trick” when attaching medals.
The thing is that placing medals on glue is not always convenient, because the glue can bounce off the foil. That's why I'm "cunning"
So:
1. I glue a piece of double-sided tape onto the medal (it definitely doesn’t have any problems with attaching to the foil)
2. I glue a piece of paper onto the tape, and woo-a-la))
A little work, imagination, TIME)))
and here it is - the result))
“Love is an unknown country, and we are all sailing there, each on our own ship, and each of us on our own ship is the captain and leads the ship in our own way...”
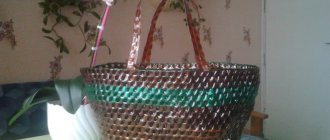
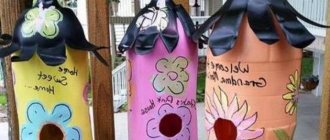
Handicraft piggy bank
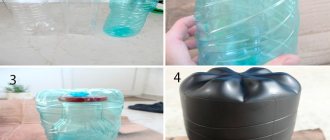
DIY bottle cup
The next very original and easy-to-make option is a do-it-yourself cup made from a plastic bottle.
You will need:
- bottles with a capacity of 1 l and 5 l;
- CD;
- construction adhesive;
- peas or coffee beans (for decoration);
- scissors;
- lighter or matches;
- aerosol enamel of golden color.
First, cut off the top of both bottles, as shown in the photo. We don’t throw away the lower parts; they will still be useful for decoration.
We make a round hole in the cork of a five-liter bottle, equal to the diameter of the cap of a small bottle.
We connect both bottles by screwing on the cap.
Using construction adhesive, glue the bottom of the liter bottle to the disk.
We take the cut parts of the bottles set aside and cut out flowers, plants, and circles from them. When heated with a lighter or matches, you can give decorative elements an interesting shape.
Glue the resulting decorations. You can also use coffee beans, peas, and nuts.
Cover the cup with an even thin layer of enamel paint. Ready!
What is a ship of wealth in Feng Shui philosophy?
According to Feng Shui, a sailboat is a kind of talisman that brings financial well-being to all those who install it in their home.
A ship with sails made of banknotes has become a symbol that bestows success in the financial sector, thanks to the legends of ancient seafaring merchants. Sailors were some of the richest and most successful people of the time. Perhaps this is why the sails of such a talisman ship are a kind of magnet for good luck and prosperity.
To become a truly rich person, it is not enough just to acquire a beautiful attribute. In addition to the fact that according to Feng Shui, a money ship should be filled with various natural expensive stones, it is necessary to choose the right direction in the room where the “magnet” for money will be installed.
How to give newlyweds money in the bank and what to say
The original presentation of banknotes is to roll them into a jar, like cucumbers. Making such a present is very simple. Even a schoolboy can do it.
Banknotes of the same denomination look more impressive.
All design elements depend on your imagination.
Options for inscriptions on a gift jar with money:
It is better to present such a gift with congratulations. Below are several options for an accompanying speech for presenting money at the bank.
Magic jar! Looks like a pickle. But vegetables and berry jam are not stored in it. It contains different reserves, long-term storage. If you don't open it right away, but be patient.
I give you a jar, a jar of abundance. And I want to wish you Money and an idyll.
Our harvest today is not edible at all. But the gift turned out to be simply incomparable.
It is permissible to throw some small change into the money jar, as well as packages with wishes.
Destroyer "Silent". Model making master class
Hi all!
You are on a channel about ship modeling, where I not only show cool ship models, but also master classes on how to make them!
Today I have a wonderful topic for those who love the fleet of the Russo-Japanese War, assembled plastic models themselves, or made them from scratch.
We are talking about the destroyer "Silent"
"Kit" class destroyer
Russian Imperial Navy. According to the rules of the old spelling, the name of the ship was written with a “z” - “Silent”
Ordered under the shipbuilding program “For the needs of the Far East”. On January 23, 1899, she was included in the list of ships of the Russian Navy, and on March 29, 1899, she was laid down under the name “Kasatka” at the shipyard in Elbing. Launched on March 3, 1900, entered service on July 12, 1900. On March 9, 1902, it was renamed “Silent”. After the tests he went to Kronstadt, where he arrived in July 1902.
During the Russo-Japanese War, the destroyer was in Port Arthur, took part in the battle of destroyers, and was blown up by mines. After the battle in the Yellow Sea, he broke away from his pursuers and went to Qingdao, where he was interned by the Chinese government.
– Present under glass
You can present cash gifts for a wedding in another, no less interesting way - in a frame, for this you will need a photo frame. You need to hand it over with the words: “Now you have this glass, breaking it, you will instantly solve your material problems and regain happiness.”
We wanted to give you a painting,
But we thought - what if there really is? Then there were arguments about the car... And there were countless proposals!
We decided that we’ve had enough questions, We’re already tired of thinking, And we simply give this money, So that you can choose everything for yourself!
Cool congratulations on the wedding with the presentation of money
Previously, it was customary to present newlyweds with services, but now the most popular gift is banknotes. Some people don’t like to give banknotes as gifts due to the lack of effect and because they are trivial. Cool congratulations on a wedding with the presentation of money will change the way you look at this type of gift. Original ways of serving will pleasantly surprise you, the newlyweds and your guests. Your congratulatory speech will definitely end up in the photo and video archive.
In the article you will find the best options for accompanying words (in prose, in verse). As well as ideas for presenting the funds themselves. You can give money in the usual way - in an envelope. And a cool congratulation will add effect to the presentation. Or present the banknotes in an unusual form (see the article), saying a couple of touching/funny wishes. Or combine an original presentation with a cool congratulatory speech.
Surprisingly, even a small amount can be given effectively. To do this, change large bills. The more banknotes you get, the better.
Get ready to do some handicrafts and learn lines of wishes. Long quatrains, of course, can be read from a piece of paper. Better yet, write down the necessary words on a beautiful postcard.
What should a money ship look like according to Feng Shui?
When choosing a mascot, you do not need to give preference to models of warships or boats. You should buy a sailing ship - a real symbol of Feng Shui. Please note that military paraphernalia is not a favorable talisman. It is advisable that the money boat you choose be assembled without nails.
The material that goes into making a Feng Shui souvenir is extremely important. It should bring powerful positive energy to your home. Ideally, a money sailboat should be metal, if possible gold. You can cover your ship with gold. As an option, the talisman can be made of wood, since this natural material has positive energy. However, let us remember that metal is the most effective.
– Money in the bank
Various gifts are given at weddings, but there are very few funny presents. If the newlyweds have a good sense of humor, prepare money for them in the bank. It's best to do everything yourself. The procedure is very simple:
- Roll each bill into a tube, then tie a thread around the banknote and tie it.
- Place everything in a jar, you can add large coins.
- Now cover the jar with a beautiful piece of fabric with embossed edges and tie it with a rope. You can decorate such a surprise with an original label with a cut out heart. It seems that this is the most original option among the many ideas that involve a cash gift.
- Finally, decorate the jar with a cabbage sticker. When presenting a jar, in addition to the banal “congratulations,” you can recite a beautiful poem. Give it special significance with a solemn intonation.
We invite you to choose any of the wishes below.
I give you a jar!
It is for storing anything, or maybe jam!
Let it come in handy in your household. And it won’t break, And it won’t get dusty!
Please accept this gift. It’s so modest. It’s just a jar, But it’s with soul!
Of course, money doesn't buy happiness!
And no one knows what it is... But if you have money in your hands, then this “tone” raises your tone!
This gift is perfect
And it is universal for everyone, take money as a gift and buy whatever you want.
Or save it carefully And multiply them a hundredfold, Or maybe even 1000 times, We will be happy only for you!
Creating a dream boat
Materials and tools you will need:
- two pieces of polystyrene foam measuring 35x16 cm and 16x10;
- corrugated paper of different colors;
- mesh or rigid fabric measuring 1×1.5 m;
- two types of braid 5 m long and 1 cm and 3 cm wide;
- twisted cord 6-7 m long;
- wooden skewers for canapés (small and medium length);
- glue and glue gun;
- candies of various shapes;
- gift bottle (optional);
- double sided tape;
- sewing machine (or thread and needle).
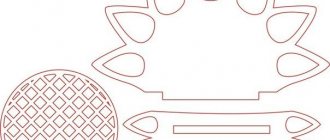
It is necessary to outline the layout of the future ship on polystyrene foam. The size of the product depends on the selected bottle. The width of the hole in the upper part is equal to the width of the bottle, the width of the ship is at least twice as wide. The third blank - the stern of the future ship - should be as wide as the previous parts, and about 10-12 cm long.
Step-by-step photos will help you create a ship.
Deck construction
When the details of the base of the ship are ready, we move on to decorating the hole for the bottle. From corrugated paper it is necessary to cut a rectangle 2–3 cm larger in width and length than the hole. Glue the resulting blank onto the second part. Using paper of the same color, cut out a triangle to cover the bottom of the hole.
Note! The width of the workpiece must be wider than the hole so that it is possible to bend the edges.
Using scissors, carefully make cuts along the corners of the workpiece and glue the edges of the paper to the ship model.
Align the resulting parts and glue them carefully. It is important to let the glue dry thoroughly.
Sanding parts
To give the product the shape of a ship, take a breadboard knife and carefully remove any unnecessary angularity. Also carefully narrow the bottom of the stern, bringing your design closer to the real ship. The main thing is not to overdo it - the ship must remain stable.
Ship decoration
Use crepe paper to decorate the base of the ship. The width should be a couple of centimeters greater than the height of the workpiece.
It is better to paste it on the sides first to make a joint at the bow of the ship. Make several cuts on the tails of the remaining paper, carefully bend it and glue it to the bottom.
From paper of the same color you need to cut out decor for the top and bottom of the ship. Please note that these parts should be a couple of millimeters smaller than the places where they need to be glued.
Preparing the base
Use tape to hide the seams. For these purposes, take transparent glue.
The edges of the bottle opening can be trimmed with twisted cord. Don't be afraid to add some interesting elements along the way. For example, you can lay out the cord in a fancy way.
After the main part of the product is ready, it is necessary to prepare the feed. To do this, cover the third part with the same paper as the main layout. Then glue the stern well to the base of the ship.
Sweet decor
Let's move on to the most delicious part of the master class - decorating with candies. Using glue or double-sided tape, place several candies of suitable shape and size on the sides of your ship. Sweets in the form of coins and small domes are ideal.
The stern can be completely decorated with rectangular candies, and small square goodies can be placed around the perimeter of the upper part.
Creating a mast
It is necessary to make three sails from mesh fabric; depending on the density of the material, you can use it in several layers. A large sail should be slightly larger in width than the ship, while a small one should be approximately equal to the width of the base. The third piece must be cut in the shape of a triangle.
After the mast models are cut out, you need to trim them with braid along the edges and in the center. This can be done by machine or by hand, the main thing is to use small stitches.
The sails must be folded and carefully ironed. The big one folds into four, the small one into three, and the triangular one into half. Then you need to sew braid to the folds of the triangular sail, just don’t forget to leave room for the rope cord. Place another mast from a small skewer on the bow of the ship.
To secure the sails, you need to take two long skewers and carefully thread them through the fabric (do this with a large and small sail). Then place the large sail in front of the stern, and the small one just behind the bottle slot. The triangular sail must be carefully pulled with a cord from the mast with a small sail to the mast at the bow.
To hide the tip of the bow mast, you can place a small flag on it.
So, the ship is almost ready to set off on its big voyage, all that remains is to place the final details. For example, you can place a treasure chest on the deck, which can be imitated by chocolate coins. Well, don’t forget to put the bottle in the hole provided for it.
That's all, the ship is ready. We are sure that such a product will not leave anyone indifferent.