What it is
A toy pillow is an interior item most often found in a children's room. It gives the room a unique style and becomes its decor. More often, pillows have the shape of an animal, a bear, a unicorn, a cat, a car, or a doll. The toy is suitable for people of any age.
Pillow toy
Note! It is recommended to make the product from modern, high-quality, environmentally friendly materials.
To realize the idea, the craftswoman will need a little creativity, creativity and imagination. Toys can be located not only in the nursery, but also in other rooms, having different shapes.
Stores selling children's toys and interior items have been offering for sale various options for pillow toys for a long time. However, even a novice seamstress can easily sew an original, beautiful product that will be better than a store-bought one.
DIY pillow toy
Do-it-yourself scops owl toys patterns: quickly and very inexpensively
Based on a very simple pattern of a Scops Owl toy, you can very quickly sew for your baby the animal that he likes most.
Some people love cats, while others would like a scops owl or a bunny owl. It’s nice to make Scops Owl toys with your own hands. The patterns for them look like an ordinary rectangle, but at the end these soft, cozy toys can be very different.
You can sew them together with the kids and sew so many of them that there will be enough for both girlfriends and brothers and sisters. The activity is enjoyable for both adults and children. And we won’t even talk about the benefits of joint creativity. It is obvious.
DIY scops owl toy step by step
What you will need:
- a piece of fleece or an old soft scarf, or a soft old blanket or stole
- Threads, needle
- Plastic eyes or beads (optional)
- Holofiber or padding polyester for stuffing
The size of the Scops Owl toy will depend on your idea. It can be small, almost pocket-sized, or medium-sized so that you can carry it on your hands. Or it can be large, like a sofa cushion or a home decor item.
In any case, in order for the Scops Owl’s pussy to be proportionately harmonious, the length of the workpiece should be approximately 6-7 times longer than its width. With these proportions, your toy will look almost like a real sleeping cat. Somehow I got tired of the unidentified ugly creatures from primitive modern cartoons,
Cut out part for a toy. For the ponytail, a rectangle of the required length from the same fabric is cut separately.
Where the neck of our toy will be approximately located, we make an incision through which we carefully turn the workpiece inside out so that the seams are inside. Through the same cut we will stuff the scops owl with holofiber or padding polyester.
Necessary tools for creation
Before implementing the idea, you need to determine the necessary tools and materials that will be durable and strong.
Tools:
- textile;
- regular and zigzag scissors;
- synthetic filler;
- sewing machine;
- iron or steamer;
- marker for applying a pattern to fabric;
- lace, buttons for decoration;
- hook;
- threads
Sintepon for filling pillows
Preparing materials for work
Before sewing the product, you need to choose the color and type of fabric. When talking about colors, it is impossible to accurately recommend a shade, since it depends on the personal tastes of the household and the interior of the room.
Additional Information! To decide on a pillow design, it is important to determine its function. To decorate a room, you must match the pillow with the color of the furniture. However, if the main function of the pillow is a toy for a child, then the most fun, unexpected options will do.
You might be interested in Ready-made patterns and the order of sewing warriors with your own hands
Types of fabrics for pillow toys:
- fleece;
- jeans;
- drape;
- linen;
- silk
Listed above are the types of fabrics that will not lose their shape or appearance after several washes.
You can also choose various fillers:
- feathers;
- fluff;
- foam;
- synthetic fluff;
- padding polyester
The padding material must have hypoallergenic properties.
Recommendations for preparing materials:
- choose the appropriate content;
- sharpen scissors;
- wash the fabric, check for deformation;
- set up your sewing machine.
Fleece fabric
Master class: sewing the “Splyusha” bunny in the Tilda style. Part 1: bunny body
I would like to invite you to sew a cute and charming “Splyusha” bunny in the Tilda style. Today, a textile toy can become not only a faithful friend for children and adults, but also an exclusive and wonderful gift for your family and friends, which will emphasize your individuality and good taste. This is how handsome it should turn out 
For work we will need:
- cotton fabric 100% beige (Lenda) 58 x 50 cm - for the body, fabric for the inside of the ears measuring 28 x 16 cm;
- 100% cotton fabric - for clothing;
- filler (holofiber);
- decorative ribbon and butterfly for decoration;
- buttons and thin elastic band;
- floss for embroidering a nose;
- fabric paints for eyes.
We start with the pattern. The pattern is given for printing on A4 sheet. My bunny is 40 cm tall.
Print out the pattern and cut out the details.
Fold the cotton in half, right side inward, and trace the pattern pieces. The product must be cut along the grain (that is, on the side where the fabric does not stretch). Body 2 parts, arms and legs 4 parts each, ears 2 parts made of fabric for the body and 2 made in any color you like.
We sew all the details of the pattern on a machine, leaving unstitched places in order to turn our parts inside out. Afterwards we cut out all the details.
We do not stitch the ear parts, but cut them out and connect them with two other colored ear parts.
Our next step is to make cuts in the recesses, not reaching the line 1 - 2 mm. This is done so that when turning, the seam is even and does not pull.
Now turn all the parts right side out, I use a roll stick.
When all the parts have been turned out, it is necessary to correct from the inside where parts of the body are rounded so that everything is beautiful.
This is what happens.
After this, we begin to slowly stuff all parts of the body. For stuffing I use ball holofiber.
Today, holofiber is practically the most popular material, characterized by springiness and softness; this filler is also hypoallergenic.
You can stuff all parts of the body with chopsticks, tweezers and any available items. I have handy tools - these are scissors and an indispensable stick for rolls
First, I stuff the bunny’s legs and arms - this is the easiest, the legs don’t need to be stuffed too tightly at the very end (in the place where they will be sewn to the body), you need to leave them unstuffed so that they can bend and our Tilda- the bunny could sit.
Then we proceed to stuffing the body of our bunny; it is worth considering that each textile toy has its own “problem” places for stuffing. I’ll tell you a little secret of stuffing the neck, as well as the waist and other places similar in shape to an hourglass (elongated, narrow and long): very often when stuffing these places, folds or “cellulite” are formed, since the stuffing is always trying to slip out of the narrow places are wide, and these folds spoil the appearance of the toy.
Personally, through trial and error when stuffing the body, I came to the conclusion that the most effective and quick way to stuff the “problem” areas of my little bunny is as follows: I stuff the neck tightly, then, holding it tightly with my fingers just below, we pierce the stuffed part with needles, as if fixing the filler so that it does not slip out of the neck. Then we continue to stuff the rest of the body, but I would like to note that from time to time you can also pierce the stuffed part with needles, which will allow the filler to be evenly distributed. At the bottom of the body, where we sew in the legs of the tilde bunny, there is no need to stuff it too tightly, otherwise the doll will not be able to sit.
With this method of stuffing, the holofiber or padding polyester bodies lie very tightly and without wrinkles.
This is what it looks like.
Now carefully sew up the sections of the legs and arms with a hidden seam.
Now let's move on to assembly. We turn the lower edge of the body inward by 5 - 8 mm. We connect and split the middle seams to avoid unevenness. We insert the legs into the resulting holes, deepening them by 5 mm, and pin them together with pins, making sure that their lengths match.
We begin to sew the legs to the body with a hidden seam. Take a longer thread. From one leg we immediately move to the second, sewing the distance between them with the same hidden seam.
After the legs have been sewn, we secure the last seam with a knot.
Next, we insert the needle into the place where this knot is located, and bring the needle through the body, pull it a little and cut it off. Unfortunately, I didn’t capture this moment.
Now let's move on to the paws: take the paws, fix them with needles to the body and sew them with the same hidden seam.
After the legs and arms are sewn on, we move on to the ears. I already wrote earlier that the details of the ears consist of two different fabrics. We stitch them and turn them inside out, then take the eyelet and turn the cut inward by 5 mm and sew it up with a hidden seam. It turns out very neat.
Then we secure the ears with needles on the bunny’s head as you like and begin sewing the ears on with a hidden seam. First we go along the upper tier, and then along the lower one.
Since our ears are already ready, now we paint the eyes with acrylic paints (I paint with a regular synthetic brush, the color I use is black), embroider a nose with a mouth and apply the usual blush that you use in everyday life to the cheeks. Sometimes I use oil pastels as blush.
The sweetest creature, it pleases my eyes
Well, this completes the process of creating the body of our Tilda-bunny “Splushya”. It's time to dress him up. As you can already see from the photo, this will be night pajamas, consisting of panties, a blouse and a cap... Continued in the second part of our master class.
I hope that I described the process of creating a bunny in a very accessible and understandable way. Enjoy your viewing and creative success!
Tilda Bunny toy pattern
To create a pattern, you need to transfer the diagram presented below onto the fabric.
Important! If you are unsure, you can first try to redraw the diagram on a sheet.
When creating a pattern, you need to pay attention to the position of the grain thread and the fabric pattern, if there is one. It is recommended to transfer the diagram onto the material using a special marker. To create a symmetrical pattern, you can fold the fabric in half along the grain.
The life-size scops owl bunny pattern depends on the size needed.
Bunny backfill pattern
How to sew a tilde toy yourself, the Scops Owls hare with a heart
Instructions:
- Transfer the pattern diagram onto the fabric folded in half.
- Redraw all the details.
- Add seam allowances of 7-8 mm.
- Cut the product from fabric.
- Iron the parts
- Sweep the ears, head, body, paws, and heart by hand with the outer side inward.
- Turn out the parts.
- Fill with filler.
- Sew the head to the body.
- Add other details.
- If you wish, you can sew clothes for the hare.
- Dress the toy in tights, a dress, etc.
- Sew a heart into the bunny's hands.
- Decorate the pillow with lace and decorative buttons.
- Add a nose and eyes using threads.
DIY bunny pattern
Getting ready to create it yourself
Half the success of creating tilde dolls with your own hands is a good choice of materials. And in order to select them correctly, you need to know what the most important features of the tilde are, what exactly makes it stand out from other products.
- So, the first thing is straight lines. Tilda bunnies are always lush. If the tilde shows any animal (cat, dog, elephant or bunny), its silhouette in any case will become soft, comfortable, without harsh lines.
- The second is the convention of the face. Or faces. Dotted eyes are most often embroidered with “knots” or created with a marker; the nose is also small, can be flat or large. And, most importantly, it's blush. Blush, by the way, is created using the most ordinary “human” cosmetics or watercolors.
- Third – Color and shades. The color scheme for the tilde is most often bright, but calm. Toys made from pastel-colored materials look very interesting. If you take the fabric as a sprint, make sure that the pattern is not too large - the pattern should fit the size of the doll. And it is important not to overload the toy with serious variegation. If in doubt, you can only take two different fabrics - one for creating the body, the second for clothing the product.
Now that we have studied the theory a little, we can move on to practice and create a Scops Owls bunny with our own hands.
Materials for the master class
The fabric from which the body of the toy is sewn. In most cases, tildes are made from natural materials such as cotton or linen; you can take calico. It is very comfortable for beginners to sew the body of a bunny from fleece; it is a fairly soft fabric that will hide all errors, if any. There is also a special material for sewing tildes, but it is very expensive.
If we take unbleached linen or cotton, if desired, we can easily tint it ourselves. To do this, take strong tea or coffee and add table salt to it at the rate of one tbsp. l. per liter of solvent. The salt will set the color.
Then put the material in this infusion and “cook” it for twenty minutes over low heat, stirring occasionally. After “cooking” the material will need to be rinsed in cold water, dried and ironed.
Be careful - you need to dry the fabric without kinks, otherwise the shade at the folds will be more saturated than on the rest of the product.
The fabric from which the bunny's clothes will be made. You can use the same linen, cotton or fleece. It would be great if the fabric had a small pattern.
Threads of the same tone as the material. Threads are also needed to embroider the nose and eyes (floss).
Padding material.
Various buttons, beads and other cute little things.
If you wanted to create a standing hare tilde, the pattern will also require the wire itself. The wire should not be very thick and should bend quickly. If desired, bunny ears can also be made erect with your own hands using wire.
Sew the body master class, pattern
- We cut out the patterns from the paper and place them on the fabric, which has been previously folded in half. You can trace the patterns with a pencil, but then the material will need to be washed after stitching so that traces of drawing are not noticeable. A good option is to take a special marker; its traces on the material disappear the next day after use. This marker can be purchased at specialized sewing stores.
- We need to transfer the body, arms (2 pieces), legs (2 pieces) and ears (one common part) to the material. The ears can be created from various fabrics, that is, one piece can be sewn from fabric of the same color as the body, and the second from the toy’s clothing material. It will turn out that the inner side of the hare's ears will differ in color from the body, it looks just great.
- If you want the hare's ears to stand up and not droop, you need to cut the piece in half (to sew them to our head) and insert a wire into them.
- Be careful - the pattern is given without seam allowances, so you need to “add” five or ten mm. When cutting parts from material, create cuts at certain bend points.
- We sew the pieces by hand or stitch them on a machine. To prevent the material from moving, you can secure it with pins.
- Let's turn out the stitched parts. It is more comfortable to do this with a pencil or sushi stick.
- We will fill the parts with padding polyester or holofiber. We stuff the legs and arms loosely so that they can be bent.
- If we create a standing hare, we need to insert wire into the legs.
- Slowly sew the legs and arms to the body.
We have a blank, to which all that remains - the most important thing - is to add details and, of course, sew clothes. If you want to make a rabbit, you can follow the same master class.
myhobby.guru
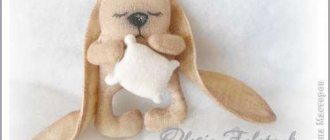
A toy with which you can fall asleep while cuddling is called a Scops Owl. The Scops Owl toy's eyes are always closed.
Pattern of a Scops Owls hare
Put it next to you, And cover it with a blanket, You’re favorite toy. Your soft animal. And, snuggle it quickly, Your nose will become warmer. All the kids are already asleep, And it’s time for you, baby!
hm-notes.ru
I'll show you how to make this or a similar Scops Owl animal.
You need to draw an approximate carcass, then fold the sheet in half and cut it out. Or you can just cut it out, symmetry is not necessary. It will be a bunny)
But maybe a cat. A bear, a dog, a fish, etc. Who do you want to sleep with?