Cutting round holes in plywood
Often, when repairing or installing various wooden products, it is necessary to drill a perfectly round hole.
In this article we will try to highlight all the ways in which such a hole can be cut. Options with the use of special tools, as well as without them, will be considered. How to cut plywood
A hacksaw with a very narrow blade, a jigsaw, a drill saw and a round file are among the hand tools that can be used to cut curves.
It is the narrow blade that provides maneuverability to the hacksaw, but for the same reason it is extremely difficult to operate. You must have a steady hand and an attentive eye to prevent deviations from the markings. However, do not try to work quickly. On the contrary, it is better to advance in small spurts. This will help you hold the saw handle more confidently and guide it exactly along the given line.
It is better to cut out small round or oval holes and “narrow” curves using special tools - a drill saw and a round file, which can also be used to clean out curves.
However, the most suitable tool for cutting rounded parts and holes is an electric hacksaw. Its advantage is not only that it saves energy and time. The included set of interchangeable blades with different teeth allows you to choose a blade for sawing almost any type of workpiece, be it wood, plywood or chipboard. In other words, an electric hacksaw can rightfully be called a universal tool.
Round corners of furniture
You can even get injured by hitting a sharp corner of the table. Therefore, we recommend cutting corners where possible. For homemade furniture, they need to be rounded from the very beginning.
Cutting circles and curved lines is no more difficult than making an absolutely straight cut on a workpiece, but under one condition: you have the right tool in your hands and you are good at it.
Mark missing parts
It may happen that the holes that you drilled to insert a narrow blade with a hand or electric hacksaw will end up in useful areas. To avoid such mistakes, you should mark all missing parts of the workpiece with shading.
What is suitable for the template
You can make a circle on a workpiece not only with a compass. Any object of a similar shape is suitable for this purpose. This could be a pan, plate, cup or bowl. However, when starting work related to the repair of furniture or some piece of furniture, calculate in advance the need for parts with rounded contours or with round holes. It may be enough to make only minor changes to the design.
How to choose and what to pay attention to
Choosing a high-quality circular drill is quite easy. The main thing is to know the main points that you should pay attention to first, but also not to lose sight of the little things.
The design is a very important point: a wood ballerina comes with one chisel or two or more. For frequent use, it is better to purchase an option with two or three cutting elements. It is easier to work with such devices and the quality of the processing performed will be at an acceptable level.
It would not be superfluous to be able to replace individual parts. Inexpensive circle drills can have a solid shank with a permanent center drill and rod.
Metal, its quality determines its strength and ability to withstand workloads. High-quality tools are made from high-strength steel or alloys. The shank and cutter holders are shaped using a machine tool. The rod is usually stamped and made of the same metal.
Cheap options often use soft metal or alloys, which can be brittle. Under load, parts may become deformed or break. Such a tool will not last long and it will also be difficult to achieve accuracy from it.
The quality of workmanship, the main feature is the absence of backlashes and distortions. All parts must fit together and be securely fastened with fixing screws.
The markings of a high-quality ballerina's barbell are stamped. Sometimes the divisions are highlighted with bright paint for better visibility.
Cutters and high-quality cutting elements are made from hardened tool steel. They are secured to the holders with rivets or soldering. Solid cutters with holders (made of the same metal) quickly become dull and are not durable.
Manufacturer, when choosing any tool and consumables, preference should be given to well-known and long-proven brands and brands. The most common are Topfix, Stayer, Irwin, Strum.
Purchasing an adjustable circular drill for use at home, or if you need to drill several holes, is completely worth it. This eliminates the need to purchase an expensive tool that may only be needed a few times.
Source: prosto-instrumenty.ru
Instead of a compass
A school compass can also be useful in a home workshop, but its range of action is small. What if you need to draw a circle of large diameter?
An easy way is to do this with string, a nail and a pencil. The nail is carefully driven into the workpiece, the rope is secured to it at one end, and a pin is secured to the other end. The length of the rope determines the radius of the circle being drawn. The only condition is that the rope must be taut along the entire path of the pencil. Then the distance from the center (nail) to the circle in all sections of the marking will be the same.
Strip of cardboard or slats
An equally simple, but more reliable way is to use a strip of cardboard or, even better, a wooden plank instead of a rope. Drill two holes in this bar (strip) - one, smaller, for a nail, the other, larger, for a pencil. The distance between their tips should correspond to the radius of the desired circle. All that remains is to install the nail in the right place and rotate the bar around its axis.
Two sharpened nails and a wooden strip or a strip of thick cardboard can replace a compass.
Features of working with the tool
The principle of working with a circular drill is simple. A hole is drilled using a centering drill, and then the cutters are put to work. They gradually make a narrow groove, gradually cutting through the material in a circle to the full depth.
The materials used in working with the ballerina are varied: wood, fiberboard, chipboard, MDF, plasterboard, plastic. One common point is that the thickness of the part should be no more than 15-20 millimeters. This parameter is limited by the length of the incisors. Usually the manufacturer indicates the maximum drilling depth on the packaging. If you try to drill into thicker material, you may experience problems with ragged edges.
The use of a tool with one cutter is characterized by runout. This is caused by a lack of balancing relative to the longitudinal axis of the drill. The beating will be especially noticeable when cutting large diameter holes. Cut holes using a drill at low or medium speed. When working on a drilling machine, such problems do not arise.
Also, a laminated or veneered surface can cause inconvenience when working. After passing through the decorative layer, drilling proceeds without problems.
A feature of the circular drill can be considered the ability to adjust the diameter. The distance between the cutters can be set using a scale on a rod or more accurately using a caliper. This is convenient if you need to make a hole without gaps for a pipe or round part.
The spacing of the cutters relative to the center is adjusted individually. It is necessary to align the cutting parts as accurately as possible. This will eliminate unnecessary effort during operation and extend the life of the tool.
How to draw ellipses
An ellipse is a rather complex shape, but to draw it on paper, you only need two thumbtacks, a piece of string and a sharpened pencil.
Attach two buttons to the surface of the workpiece at some distance from each other. Take a piece of rope, tie both ends into a knot and hook the rope onto the button heads. Now, with a pencil, draw a line that the stretched rope allows you to describe. You can change the shape of the ellipse at your discretion.
The distance between the two focal points of the ellipse is indicated by buttons. If you guide a pencil within the boundaries assigned to it by a rope, then the outline of an ellipse will appear on the paper.
The ellipse shape can be larger or smaller, thicker or narrower, depending on the distance between the buttons and the length of the rope.
How to make a wooden scratching post with your own hands
What do you need
- Sisal rope or jute;
- liquid dye for fabric - optional;
- wooden block;
- round wooden blank;
- felt-tip pen, pencil or pen;
- drill;
- wood paint - optional;
- brush - optional;
- screws;
- hot gun;
- construction stapler;
- pompoms and yarn - optional;
- top for timber - optional.
How to make a scratching post
If desired, give the rope a different color using the instructions on the dye package. In this master class, sections of rope were painted in three different shades.
Place the block in the center of the round workpiece and circle.
Shot: @Cuteness / YouTube
Divide the rectangle drawn in this way with two perpendicular lines. Inside you will get four identical smaller figures. Divide them with diagonals - at the intersection of the lines there will be points into which you need to screw the screws. Place the same marks on the base of the block.
Shot: @Cuteness / YouTube
At these points, drill four holes on each part.
Shot: @Cuteness / YouTube
The round base can be painted without affecting the center of the workpiece.
On the reverse side, screw the block to the round piece with screws.
Shot: @Cuteness / YouTube
Place the future scratching post on the base. Glue sisal rope or jute to the bottom and secure the end with a staple gun. You can screw in a screw instead.
Shot: @Cuteness / YouTube
Wrap the rope around the beam, gluing it to the tree on all sides. If you change different colored segments, additionally secure the tip of each of them with a stapler.
Shot: @Cuteness / YouTube
When the surface for sharpening is made, you can also attach pom-poms on threads and a beautiful top.
What other options are there?
This cat scratching post is similar to the previous one. Only the base is additionally trimmed with fabric, and on top there is a simple house made of a small shelf:
The authors of this video made a removable scratching post that fits on upholstered furniture:
Here's the simplest option:
Templates
Shot glasses, cups, plates, pots or baking dishes - in any household there are many round-shaped objects that can be used to mark a circle. If you are making something and decide to give your product a rounded shape, then first look to see if there is a suitable template among the household utensils. To be sure, select a few items and take them to the workshop. There you can immediately try them on the workpiece and determine what is most suitable. With some practice, you will be able to make rounded lines from several round objects with different radii. Arcs of a circle can be drawn sequentially, or bridges-transitions can be made between individual arcs.
Preliminary drawing
Before attempting to trace a curve on a piece of paper, design it on a large piece of paper or piece of corrugated cardboard. Only after the result is satisfactory in all respects can you cut out a template from paper and make markings on it on the workpiece.
You can draw circles and fragments of a circle using a cup or plate by simply tracing them with a pencil.
How about a simple jig that makes great circles every time?
Photo via Wooden-Box-Maker.com
How do you do circular pruning?
It's very simple.
Start with a piece of 1/2" or 3/4" plywood (or MDF) that covers your band table by folding it an inch or so. Size is not essential. My table is 15" x 19", so I cut the plywood to 16" x 20".
Start from the back
Attach the slide to the back of the plywood base. You want it to fit into your miter slot so you can easily slide the base into the blade with wood on both sides. I used a piece of plywood for my slide so I wouldn't have to worry about seasonal movement. I cut it on the table to fit my slot and then screwed it to the back with countersunk screws.
With the slide in place, feed your base into the blade and stop about halfway (see photo of the finished clamp). Then add a block to the back of the clamp to act as a stop so you can't cut past that point.
That's it for the back.
Move up
With your saw in place, flip your jig back onto the table and push it in until it reaches the stop you just made. Mark a line on the front of the blade and extend it perpendicular to the blade towards the clamp as shown in the photo below.
Now remove the jig and make a groove, centered on the line you just made, from the side of your jig to where the blade stops.
I used 1/2" plywood for my clamp, so I made a groove around 3/16" deep x 3/4" wide. If you want, you can mark some distances from the blade on your jig.
Make the slide fit into this groove long enough to just hang over the edge (to make it easier to grab). I cut a piece of wood 3/4″ wide and sanded it to a smooth fit.
Make sure your slide is flush with the surface of your clamp. Your workpiece will sit on top of the jig and you don't want the slide to get in the way.
Finally, drill a hole for the pin at the end of the slide. I used a 1/4" birch dowel, but if I were to do it again I would use a 1/8" metal dowel because it is smaller and stronger. You want 1/4″ or less of protrusion above the surface of the jig.
Make sure your slide can slide smoothly. That's all. All is ready.
To use your jig, set the pin to the radius of the circle and place the hole in the bracket on the back of the workpiece. Attach the workpiece to the pin and carefully feed it into the blade.
Inserting a sink according to a template
The sink is one of the most important elements of kitchen equipment. If you decide to cut your sink into your kitchen worktop yourself, the first thing you need to do is prepare an exact template.
First, transfer the outer outline of the shell onto a thick sheet of paper. Next, measure the width of its sides, which will rest on the tabletop. Usually this is 2-3 cm. Now step back from the outline drawn on the paper, inward by the width of the side and draw a parallel line. This will be the cutting line.
When applying markings, make sure that the position of the template itself on the plate is correct. Of course, if all the corners of the sink are symmetrical, then nothing bad will happen if, according to the markings, it appears to be in a mirror image. But if the sink has the shape of a trapezoid and the roundings at the front corners differ from the roundings at the back, then under no circumstances confuse the front and back parts.
Use a similar pattern to make templates and cut holes for wall lights or loudspeakers mounted on wood panels.
The line drawn around the sink is auxiliary. The second, drawn parallel closer to the center, is the sawing line.
Design and its features
Each jigsaw has a so-called support sole. It always rests on the part that needs to be sawed. Due to this, the accuracy of work is noticeably increased.
The soleplate can be easily rotated to make bevel cuts. Some manufacturers produce in which the main tool is fixed only at a certain angle.
The file acts as the main cutting tool. Tooth spacing, sharpening method, size, shape, materials - literally every model has its own. 75, 85 and 100 millimeters are the most suitable lengths if you need to cut materials of low density. The saw step size also becomes a fairly important parameter.
- Metal requires a pitch of 12 millimeters.
- For wooden products it is from 2.5 to 4.
Electric hacksaw
If you need to cut a round-shaped part and saw a round hole in the workpiece, then an electric hacksaw is the most suitable tool. With its help, you will save effort and time, since such a saw has great advantages over a manual one. Thus, the blade of the electric hacksaw is narrower, which provides increased maneuverability. Further, it has replaceable blades with different teeth, which allows you to process workpieces of any type, that is, wood, plywood, chipboard (it is no coincidence that the tool is also called a jigsaw).
To cut a section inside the workpiece, a hole is first drilled for a hand saw. But if you have an electric hacksaw, then this is not necessary. The tool is brought to the workpiece with a slight tilt forward and turned on in this position. The saw will cut the hole itself. Just don’t put too much pressure on the body - this can lead to breakage of the saw blade.
Lead in a circle
This device, simple in design, makes cutting out round holes or arcs much easier. It is enough to mark the center of the circle on the workpiece, fasten the device along the mark and connect the rod coming from it with an electric hacksaw. The divisions on the rod help set the saw blade at the required distance from the center of the circle. As a result, without preliminary marking, you can cut a circle or saw an arc with a radius of 5 to 20 cm.
The device (more precisely, its “sole”) is attached to the surface of the workpiece with screws. They should be well tightened. If the fastening is not rigid and starts to wobble, then an even circle will not work.
Suitable for lefties too
Left-handers can also use the device, since the guide rod is attached to the movable unit both on the left and on the right. So cut at your own discretion - clockwise or counterclockwise.
Using such a device, you can cut a round hole with a diameter of 10 to 40 cm in the workpiece without preliminary marking.
How to cut a circle in plywood without a tool
Usually, in order to cut an even circle from a piece of plywood or board, craftsmen resort to various kinds of routers, use hand or electric jigsaws, and, at worst, take up a hacksaw. Meanwhile, with the help of a simple device, you can cut an absolutely even circle with a circular saw. How to do this in practice, read and see the detailed step-by-step instructions. Before cutting an even circle with a circular saw, make sure you have the necessary materials. You will need very little of the latter:. Step 1: Take a meter and measure the depth, length, and width of the groove on the working part of the table saw. Based on the obtained parameters, cut a block from a piece of plywood of suitable thickness. Step 2.
Jigsaw
When cutting holes or curves in small workpieces, sometimes you can’t do without a jigsaw. Replaceable blades with teeth of different shapes and locations allow you to work with wood of different densities. However, it should be taken into account that the depth of the cut is limited by the arc of the jigsaw, that is, the saw blade will not be able to move further than 30 cm from the edge of the workpiece.
Very thin, narrow saw blades can be easily damaged if the jigsaw is used incorrectly. The saw must be operated with careful, methodical movements. The main thing is to prevent the canvas from skewing. Otherwise, small and light workpieces will begin to move with the saw, which may ultimately lead to the blade bursting.
The thinnest jigsaw blade will “master” the narrowest curve, but only in small workpieces, since the advancement of the blade is limited by the arc of the jigsaw.
Conclusion
We hope that thanks to the information presented above, the question of how to cut a figure from plywood will not cause you any difficulties. Of course, figured carving on sheet material requires a certain skill and accuracy, but if you have a suitable tool, even a beginner should not encounter any particular difficulties. In the video presented in this article you will find additional information on this topic (also find out how to make a box from plywood with your own hands).
Source: fanera-info.ru
Drill saw
Neither a hand saw nor an electric hacksaw will help if you need to cut a small hole in the workpiece - less than 10 cm in diameter. A jigsaw may also be useless if the workpiece is large. In this case, the most suitable tool is a drill saw. With its tip it bites into the wood like a drill and thus makes a “starting” hole for further cutting. Externally, the saw is similar to a round file with the difference that its shaft is surrounded by a spiral around the cutting edge.
Drill saws are available with interchangeable attachments of various diameters, designed for processing both soft and hard wood, as well as a variety of materials made from it.
The working body of a drill saw is a metal rod with a cutting tip, like a gimlet, and a cutting edge that goes around the rod in a spiral.
This is what the narrowest of hand saws looks like. Thanks to the fastening unit, the blades in the hacksaw can be changed depending on the nature of the material being processed.
Drill attachment
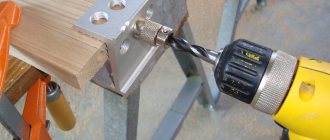
One of the most popular and convenient options for cutting a hole is a special attachment for a drill. It is made in the form of a crown comb and has a rounded shape. With this attachment, cutting holes occurs quickly, and they turn out quite smooth.
drill bit for holes
Nozzles come in different diameters, which allows you to cut a hole of the required diameter. If you have already prepared a hole, we can advise you to try your hand at options trading.
Drill
You can also cut a large hole using a drill. To do this, it is necessary to pre-mark the outline of the hole to be drilled. Next, use a small drill to drill through holes along the contour prepared in advance. Next, using a jigsaw or a very sharp knife, we cut off the holes, thereby connecting the holes. After which you can smooth the circle using sandpaper of various grain sizes.
Chisel
You can also cut the required hole using a chisel. It is enough to remove the wood layer by layer along the contour. This option is the least suitable for interior decoration. The hole must be smooth, which cannot be achieved by using improvised and unsuitable materials for the job. The best option would be to use a drill bit. The hole is even and has smooth edges.
Thus, to summarize, it becomes clear that you need to choose a tool for cutting a hole based on your goals. If you need a high-quality cut, then you cannot do without a special tool.
Cutting Tips
Selecting a tool
When starting to work with sheet materials, many craftsmen only have an idea of how to cut in a straight line. Therefore, the question of how to cut an even circle from plywood can confuse many. And indeed, a regular or circular saw cannot cope with the task. Figure cutting is most often done using the following tools:
Hand jigsaw
- Hand jigsaw. The simplest device used for sawing. With the help of a jigsaw, even the most delicate work can be done with your own hands, but for thick material or long cuts it is practically not suitable.
- Jigsaws. There are two types of devices you can use here:
- regular, with a vertical file;
- artistic, in which the role of the cutting element is performed by a steel blade.
Ordinary jigsaws will come in handy when working with thick plywood, for example, when making a bed with your own hands. But if you are looking for a way to cut letters out of plywood or make other complex elements (for example, parts of a children's construction set), then it is best to use a model with a band saw. Model for artistic cutting
Advice! Naturally, for each type of jigsaw there are several types of files and blades. The correct choice of cutting element is a necessary condition for high quality of the product.
- In addition to jigsaws, you can use a furniture router for curved cutting. Despite how difficult it is to operate, it is many times superior to most models of plywood saws in terms of the quality of the holes it makes. Using a router, you can make a wonderful rocking chair from sheets of plywood with your own hands.
Conclusion
We hope that thanks to the information presented above, the question of how to cut a figure from plywood will not cause you any difficulties. Of course, figured carving on sheet material requires a certain skill and accuracy, but if you have a suitable tool, even a beginner should not encounter any particular difficulties. In the video presented in this article you will find additional information on this topic (also find out how to make a box from plywood with your own hands).
Source: fanera-info.ru