Good day, dear readers of Alexey Shevchenko’s blog “Healthy Lifestyle”. Today I want to continue the topic of preparing Easter decor. One of its interesting elements is the Easter nest.
Strictly speaking, this is an ordinary nest, which is used as a plate for colored eggs, or as an interior souvenir. Making it yourself is quite simple, and it looks very picturesque.
There are also nests that are baked from dough and become an addition to Easter treats.
Product options
Shapes and sizes can be very different: from a pocket gift nest to a full-size nest with the purpose of attracting storks to a summer cottage for nesting. Numerous photos of branch nests posted on the world wide web will help you make such crafts yourself.
Before starting work, you should decide on the purpose of the nest. Further instructions will help you understand how to make a nest for a stork with your own hands without outside help.
Required materials:
- tree shoots;
- bird feathers;
- hay, straw;
- thin rope or thread;
- glue, scissors;
- plastic plate or foam.
A finished decorative nest, intended for placement in the garden, can be painted, quail eggs, devoid of contents, can be placed inside, and then installed on a tree.
Where can I place it?
After the process of making the craft reaches the finish line, you can think about placing the product. So, the following options are offered:
In the house. You can decorate any room in an apartment or house with a nest - the personification of comfort, family and warmth. The decoration looks especially good with a container of cereal or painted eggs placed in it.
On the street. A decorative nest for the garden is an interesting addition to any fence or a custom feeder for outdoor birds. You can try to find new residents by hanging a nest on the top of a tree.
As a present. A standard packaging box with a bow or a boring package is nothing compared to a bird's nest design. To give it a festive look, all you have to do is sprinkle the craft with glitter and add a shiny ribbon to the weave.
A decorative nest is one of those crafts whose simplicity of manufacture hides originality, practicality and incredible aesthetics. All that remains is to find suitable branches to decorate the interior of the living room or garden with an original accessory.
Beginning of work
The basis can be a round plastic blank made from a disposable plate or polystyrene foam. Small branches are attached to it using glue, which are attached to the base with a thin thread.
Then bundles of hay or straw are placed and glued on top of the branches, which are held together with threads for strength. Using scissors, the nest is trimmed, the inner surface is smeared with glue and a layer of hay is placed on it.
For authenticity, you can place bird eggs or their imitation in the nest. In particular, quail eggs look good, the contents of which can be blown out or eaten.
For a fabulous effect, walnuts painted with gold or silver paint, as well as table tennis balls, are suitable.
Round-shaped stones are also suitable for these purposes. You can buy small chicks in the gift shop and place them in the nest along with the eggshells.
Metal threads and feathers of fantastic birds taken from hairpins are also used.
Candlestick
To make such a product, you will need some materials, namely prepared twigs, a low glass, a glue gun, pruning shears and a candle. The first step is to trim the branches with pruning shears so that they are the same length in relation to each other.
Next, take a twig, apply a small amount of glue to it and press it tightly to the glass, hold it for about a minute until the glue dries and the structure sets. Each subsequent branch must be glued in the same way, close to each other, so that there are no gaps between the branches or so that there are none at all.
The step-by-step process of making a craft with your own hands is almost complete; to do this, you need to insert a candle in the middle of the glass and secure it there so that it does not dangle. Remember that the candle should not be higher than the glass, this will be safe and will look more neat.
There is another variation of the candlestick, when the branches are not cut to the same height at all, but are painted gold or bronze and glued directly to the glass or directly to the base of the candle, using a spacer between them.
This approach will allow you to create a more harmonious craft, and when lit in the dark, it will shimmer on colored branches, which looks very cool.
Popularity of storks in Ukraine
Another legend says that these birds brought bunches of grapes to the Zaporozhye Cossacks in Tatar captivity and thereby saved them from hunger. There are similar legends in Moldova, where this bird is a symbol of viticulture.
- A DIY mailbox is a beautiful decoration and a useful addition to a suburban area
- A house for children is a place where a fairy tale becomes reality, we create it ourselves
- Bridges for a dacha - a picturesque element of the landscape in a suburban area
Sculptures of storks have recently become increasingly common in cities, villages, courtyards and dachas. The sculpture of a stork on the site not only serves as decoration, but is also a way of self-expression for the owners of the territory.
The variety of compositions with storks allows you to choose the one you need, showing your taste and aesthetic imagination.
Interesting ideas from branches for the interior
Wood is an environmentally friendly material that is great for decorating eco-friendly and rustic interiors. This material is easy to work with. Many natural elements do not even require additional processing. Wood is versatile.
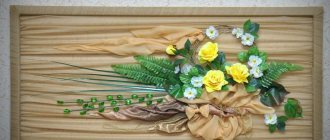
This is a wonderful basis for creating unusual wall decor, original chandeliers and all kinds of decorations made in accordance with the atmosphere of the natural style.
An important advantage of such raw materials is availability.
Making a nest for a stork
Creating an imitation nest from branches with your own hands is quite simple. Such a composition, when using real branches, will look much more attractive than a sculpture purchased in a retail chain.
Through this process, which requires patience and focus, true creative satisfaction can be obtained.
The following description will help you understand how to make your own nest from branches. Young branches that do not break and are more flexible than old or dried ones are more suitable for making a nest.
It should be noted that there is a ready-made metal base on sale, to which you can easily attach a vine, and its design includes parts that secure the lower part of the sculpture. To give special stability to the figure, its metal legs are welded to the base.
The sculpture can be placed in the following places:
Roofs. The nest is attached to the rafters using nails or screws.
Trees and stumps. Trees can be cut down not at the root, but higher from the ground. On such a high stump, the figure of a stork will make an indelible impression.
After installing the nest, you should attach the stork figure to it using fishing line that will not be noticeable. In strong winds, the sculpture should be secured with additional supports.
Easter ritual to attract your own home
There are many beliefs and rituals associated with Easter. Of course, the church strongly does not approve of them, but this does not stop many. One of the most innocent rituals is attracting housing with the help of a nest. It does not require any ungodly actions or spells.
The scheme for “attracting housing” is as follows. The first thing you need to think about is what kind of housing you want to have. The plan must be clear: is this a house or an apartment? how many rooms?
After the attracted housing is described in all details, they begin “nesting”. For the ritual, you can use any nests: souvenirs, purchased in a store; made independently using any technology (twigs, wires, paper, scraps, and so on). You can even take empty real nests that have been abandoned by birds, but this should not be done for hygienic reasons.
After all, birds abandon their old nests because parasites are infested in them, or because the chicks or clutch died from disease. In addition, the main “construction glue” in real nests is bird droppings. So picking up an empty nest is very unhealthy.
So, to attract housing, a nest must be made of such a size that it can accommodate as many eggs as there should be rooms in the desired home, or one more than the number of people who will live there. That is, if a family of three “attracts” a two-room apartment, then you need to take four (3+1=4) eggs. If a family of three “attracts” a three-room apartment, then three eggs are taken.
The eggs are selected as large as possible and colored as brightly as possible. In addition to these eggs, another set of exactly the same eggs is made. That is, if there are 3 eggs in the nest, then you need to paint 6 eggs.
On Holy Saturday you need to bring to the temple a nest with eggs-rooms, a duplicate set of eggs, and all the other Easter treats that have been prepared (Easter cakes, Easter cottage cheese, colored eggs). All this is consecrated in the usual manner. Backup eggs must be left in the temple. There is nothing unusual about this; leaving some of the treats in the church is an old tradition, so no one will even suspect that you are “attracting” something. (But if the priest finds out that a ritual is being performed, then you cannot avoid a severe scolding.)
The blessed treat is brought home, the table is set, but the eggs from the “attractive nest” are eaten only by members of the family that will live in the house, so it is not placed on the common table.
Features of the placement of the stork figure
On the ground, it is advisable to place the sculpture in a well-lit place, not far from the bushes.
If there is a pond on the site, then the sculpture of a stork will give it additional attractiveness.
A stork in a nest personifies family values and therefore such a sculpture should be installed in the place where the family spends most of its time.
The figure should be positioned so that the stork's head is directed towards the house, not away from it.
Technical features
Products turn out beautiful and well-groomed only if the material used is of high quality and not damaged.
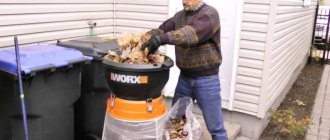
The thing is that insects often eat up the bark of branches, so they are no longer suitable for making crafts. To do this, it is necessary to collect branches either in early spring or late autumn, when insects are not so active. When the branches are collected, it is necessary to dry them, for this it is important to wait about two weeks until completely dry or use a battery to speed up the process by a few days.
To complete the preparation of the material, it is important to cover the branches with wood paint and varnish so that the treated surface does not react with the external environment.
Let's look at a small master class on crafts from branches. This is required because not everyone can take a decorative element and make it right away. You need to start small, then after a few sessions you will learn to create beautiful masterpieces that you are not ashamed to show to your loved ones.
Nest
For many peoples, the stork symbolizes good luck, peace and prosperity. Therefore, rural residents have always sought to attract storks to their yard to hatch chicks.
If there are no conditions for nesting storks in your area, you can make his figure yourself.
To attract storks, a nest should be built no further than 1-2 km from its feeding areas (swamps, water meadows) and no closer than 0.2-0.3 km from existing nests, to avoid conflicts between birds.
The place for the nest should be chosen so that nothing interferes with the stork’s approach. The nest is built at a height of 4-10 m as far as possible from power lines. In this case, the socket support must withstand a load of 30-40 kg.
The frame for the nests can be bicycle wheels, welded steel reinforcement, platforms made of poles, boards.
On the platform, it is necessary to make an imitation of an old nest from dried branches in a layer of 0.2-0.3 m, and place straw and dried manure in the center.
Bunches of brushwood can be secured next to the nest, and the edges can be sprayed with lime to make it look more like droppings.
In the Non-Black Earth Region, storks nest mainly on trees and poles.
In trees, nests are placed on sawn-off tops or on a large side branch near the trunk. Branches that interfere with the approach should be cut down.
At the top of a tree that has a fork, you can cut off the branches at the base and make a platform at the fork.
Simple DIY crafts
If you have never done handmade before, then start with something easy. For complex compositions, the initial spark may not be enough, while simple products will give experience and increase the desire to continue. Here are a few examples of original things that can be made from scrap materials.
Ikebana in the interior
Vase decor
Crafts in green
New Year's decor for the interior
Origami
Ikebana fans should experiment with paper flowers. Corrugated paper is ideal for making a one-piece bouquet. Individual flowers can be used to decorate a wall.
Wood cuts in the interior
Interior decor in eco style
Shell wind chimes
Unusual crafts from napkins
This is a great decoration not only for the table, but also for the wall. To achieve the best effect, use decoupage napkins. Although even from the samples used for table setting, you can make an elegant figurine or vase.
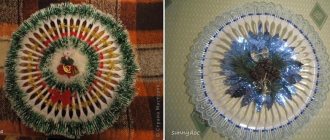
Crafts from disks
The discs are suitable for creating interior items due to their round shape and shiny surface. In addition, they are easy to cut with scissors and glue to different surfaces. For example, you can decorate a mirror by making a sparkling frame.
Craft for the New Year
Wooden shelves in the interior
Stand for decorations
Decor made from plastic bottles
It is difficult to name a cheaper and more convenient material for creativity. Plastic bottles are easy to cut and firmly glued together. Together with your child, you can create animals and birds, trees and flowers from them.
Popular articles Picture-amulet “Horseshoe”
A great idea is to create a stylish candlestick. A plastic bottle, decorative stones and scissors are all you need. From the same raw materials it is easy to build a vase, dessert bowl or pot for a houseplant. Even from multi-colored lids it is easy to make a beautiful picture.
Beautiful lampshades in the interior
Letters with shells for interior
Decor in the hallway
Pasta decoration
Not every craft is created in order to be eaten. Pasta of different shapes, sizes and colors is an excellent material for panels. All you need to do is find a suitable embroidery pattern, select the pasta, color it accordingly and glue it to the canvas.
Handmade masterpieces made from tubes
You'll be surprised how many interior accessories you can make from cocktail straws. Moreover, these are not only funny trinkets, but also useful things. From this simple raw material you can make a lamp that will bring a touch of originality to any room.
It is enough to decorate an old woven lampshade with pipes. For such a lamp you may need two hundred tubes. Bend them in half and thread them through the holes you made.
Clock decor in the interior
Chandelier made of cassettes in the interior
New Year's crafts from jars
Cool crafts from pine cones
It's easy to create a fashion accessory out of pine cones. They can be used in their natural form or painted. If you don’t have time to create complex art objects, then simply fill a glass vase with pine cones.
This natural material also makes excellent paintings. To create them you will need:
- fir cones;
- frame;
- acrylic paints;
- a small piece of plywood;
- hot glue.
Armed with a hot glue gun, you can easily attach the colored pine cones to the plywood. It is better to cut off the tops first. The finished painting can be safely hung in the hall.
Crafts using quilling technique for the interior
Painting in the interior
Crafts from flowers for the interior
Shell frame
A photo frame made from seashells is a great way to preserve memories of a seaside holiday. In the process of creating a masterpiece, in addition to small shells, you will need a frame, glue and any additional decorations, such as beads, crystals or corals. To make the photo product look more impressive, cover it with varnish or glaze.
A photo frame decorated with seashells will give you wonderful memories of a holiday spent at sea
Porcelain frame
Decoration from painted cones in the interior
Plates on the wall
Nest designs
- Pillars made of any material can serve as support for the nests.
- The wooden base for the roof nest is made from boards nailed to the crosspieces and then attached to the roof ridge.
- On top of this base, a platform, grate or wheel is attached with nails.
Only professionals can arrange a site for black stork nests.
Wooden half frame
Another option for making a photo frame using wood. Such a product can fit into more modern designs, and its manufacture does not require special skills. It is enough to follow all the rules and recommendations.
Tools and materials
To create a half frame, prepare the following:
- photo in the size you choose;
- two light wooden strips;
- a piece of fabric;
- natural rope;
- special eye screws large enough to pull the rope through;
- some polymer clay;
- stapler;
- universal glue;
- scissors;
- pencil and knife.
Making a wooden half frame
You also need to prepare a ruler or other measuring instrument. Once everything is ready, you can start working.
Instructions
Step 1 . Set the recommended temperature to preheat your oven to make polymer clay. Then, using a knife, cut the clay into two even pieces. Roll them in your palms to form smooth balls. Use a pencil to make a hole. The diameter of the hole should be slightly larger than the thickness of the rope. Place the finished clay on a baking sheet and bake for a few minutes until the material hardens.
A hole is made in the ball
Step 2 . While the clay is baking, use a cloth to rub the varnish or stain into the wood, giving it a deeper shade. Don't forget to add old sheets of paper to avoid damaging your home surface. Leave the wood until completely dry.
The wood is given a deeper shade
Step 3 . Take one of the wooden strips and, measuring about 3 cm from both ends, make marks with a pencil.
A wooden strip is marked
Step 4 . Screw both eye screws into these points until they are tight.
The eye screws are tightened
Step 5 . Place the top of the photo or painting face down on the top strip of wood (with screws). This will be the back of the picture. Carefully align the paper so that it is centered and straight. Then secure the canvas with a stapler and glue.
The paper is neatly aligned
Step 6 . Place both clay balls onto the rope and thread the end of the rope through one of the eye screws. Tie a tight knot and then do the same on the other side. Remove any excess rope and use all-purpose glue to secure the edges. This will protect the clay balls from wearing out and the knot from coming undone.
The edges of the nodes are fixed with universal glue
Step 7 . Now all that's left is to hang your new wall art in a place of honor.
The finished frame is hung on the wall
Photo half frame
Another photo of the craft
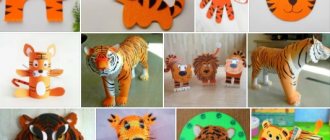
Stork made of plastic bottles
Templates for the body and wings of the stork are cut out of plywood. To work, you will need plastic bottles of dark and light colors, screws and electrical tape.
- The templates are fastened with screws.
- Strips of white plastic, simulating feathers, are cut from milk bottles.
- The feathers are glued to the stork's body.
- Black stripes are used for the tail.
- The beak is wrapped with red electrical tape.
- The material for the legs can be wire, and the eyes can be purchased at a specialized store.
Making a stylish art object from ordinary things
Today we will assemble an art object from the most banal things. You will need a furniture panel, a glass jar and a regular clamp. Also prepare acrylic paints, wax, stencils and a bit of courage
The first step is to prime the shield, but we will skip this step. Let's take a couple of beautiful red shades of kraplak and English red.
By mixing them in different proportions, we will create colorful “scorches” for subsequent wax shabby. After drying, we delicately rub the paint with wax. The photo already has a hole for future fasteners, you can make it later, when you decide on the composition and location of the vase jar.
We notice a rich green shade using dark yellow and forest greens.
Let's paint the entire surface of the panel quite thickly. Let it dry well and settle.
Using soft sandpaper, remove the paint from the waxy areas and go over the entire area.
The wooden surface became vintage and interesting. Our board has a couple of small holes. We did not mask them, since they do not contradict the general idea of the aged work.
We will prepare and select motifs for implantation into the varnish. The drawings should be mirrored, for example, as in the Base of Art decoupage cards from the French chic series.
Be sure to mark the middle of the motif on the back side so that our pattern is in the center of the board. Let's do the classic “face vlak” implantation
Popular articles Congratulations on the May holidays
While the implantation is settling and securing, we are preparing a couple of text stencils. Our stencils are hand-cut to ensure the lettering fits the size of the work.
After a couple of hours, you can roll up the excess paper using your fingers and water.
The motive fits our idea perfectly. Black color sets a certain rhythm and looks very stylish.
Using a stencil we will make bright yellow inscriptions.
Additionally, we will support the black color and decorate the work with stamps.
Spray a little yellow paint and varnish the work after all layers have dried thoroughly.
Now we have to do the mechanical part of the work. First of all, the hangers are nailed on the reverse side. Then the clamp is drilled, fixed, put on the can and fastened to the wooden base.
This is the downside of the job.
And here you can see in detail how and what is held together
After a close inspection, a decorative pendant was added to the work. The work is ready!
You can put fresh or decorative flowers in a vase. You can even secure a small pot with a small plant inside. Our jar will be filled with artificial flowers, so we will additionally decorate the stems. A piece of fabric, sisal or other floral items will be suitable for this.
It’s impossible not to admire the details. Experiment with different colors and fillings. This vase is beautiful in any way! We couldn't stop and choose the best one
Polyurethane foam stork
- The body parts are attached with tape to a plastic base.
- A beak is made from a nail.
- The legs of the figure can be made of steel reinforcement, electrodes or wire.
- The base is covered with polyurethane foam.
- Excess foam is then cut off.
- The figure is covered with acrylic paints.
- A nose made of wood is attached to the nail.
- The tail and wings are covered with feathers.
A stork sculpture is made in a similar way from a plastic canister, bottles and foam.
Crafts for interior decoration
Original and simple crafts made from twigs can add pleasant variety to any interior.
A flower pot made from branches is easy to make.
For work you will need branches, a saw or jigsaw, a ball of twine, and burlap.
- The branches must be aligned to length using a saw.
- Connect them together using twine. You can tie it through two branches or secure the twine with a knot after each one.
- Wrap an old flower pot in a piece of burlap and secure it with glue.
- Wrap the pot with the finished twig product and tie it with twine.
An interesting element of home interior decoration is ready. Using this simple technique, similar additions can be made to a pencil holder.
Picture frame
To implement this idea you will need twigs or twigs, a wooden base, and a glue gun.
- Using a glue gun, the branches are attached to a wooden base. It is better to think through the design of the frame in advance.
- If desired, you can supplement the product with additional decorative elements (moss, wood slices, beads, and so on).
In this way you can decorate a mirror. Or use wood slices for decoration.
Wreath made of twigs for home
A simple step-by-step master class will help you make a decorative wreath to decorate your door.
To work you need wire and twigs.
- You need to make a circle from the wire, the diameter of which corresponds to the diameter of the future product.
- Tie the prepared twigs into identical bundles using wire.
- Secure the bunches of branches to the wire ring using wire.
- You can complete the wreath by painting it with paint.
- The product can be supplemented with cones, bells, ribbons, and beads.
This way you can make an original decorative decoration for Christmas.
Unusual compositions
To create a non-trivial decor, you can choose floating wood. Similar branches and snags are washed up on the coast. Due to their exposure to salt water, they acquire a special beige and grayish tint.
Such material can be hollow inside, which ensures its lightness.
From driftwood of an original configuration, you can create a colorful composition from natural materials. It uses moss, plant twigs and unusual cones. Similar decor can be used in marine-style interiors.
How to make a lampshade for a floor lamp or lamp - master classes
Floating wood features natural and uncluttered lines. Light shades of the material allow it to be used in any interior. Wood can also be combined with other natural materials, such as pebbles and shells.
interesting from ordinary branches . A bunch of branches is tied with ribbon.
From large branches you can create an intricate partition. Using a screen made of natural materials, you can zone a room. A curved partition looks especially stylish. To do this, you need to make the base of a curved configuration.
Wood elements go well with unusually shaped stones. You need to pick up several flat stones and place them on top of each other, and place sprigs of greenery on top. You can place a small piece of wood nearby and add some greenery to it.
Non-standard compositions include hanging variations. Wood of different sizes is hung on a rope.
You can make a custom craft in the form of a bow. You can alternate small elements of wood and beads on the rope. You can create a similar decor together with your children.
Frames for wall decor
Unique frames can be made from knots . This decoration is suitable for decorating photographs and inspiring quotes. The original solution will be a wonderful decoration for the walls. You need to take several tree branches and drill holes in them for threading ropes. Photos can be attached using decorative clothespins.
Wood goes well with natural materials such as pebbles and shells. Using simple raw materials you can create a luxurious mirror. Small shells and branches of different configurations are used for decoration. A similar option is used to decorate a marine style in the interior.
For the frame, you need to choose a suitable base on which twigs and shells are glued.
From small branches you can create a heart-shaped frame.
Shade
You can make beautiful designs for lampshades from natural materials. Individual wood elements are attached to a metal base. The wood can be pre-coated with a special varnish.
You can hang light bulbs on the branches. And hang the base from the ceiling. You will get a chandelier of a non-standard configuration.
The photo shows another colorful option. Individual elements of wood are attached to each other, and round lamps are suspended from them.
Designer design (decoration and finishing) of the nest
So, the base of the artificial nest is ready. Professionals advise: for a small decorative nest, quail eggs will work wonderfully, in which you need to make a neat hole in the center and blow out all the contents.
Birds spend the whole day searching for scraps or pieces to make their nest cozy and secure. Of course, it won’t be very difficult for a person to do this much faster, but don’t rush and you will get great pleasure from searching for delightful objects in the forest, in nature and in the area of your home.
Materials and tools
There are no strict requirements for what materials a bird's nest should be made of. Flexible twigs and twigs are ideal for creating crafts - you can collect them on the street, in the park, or in your own garden. You can buy hay at a pet store - this material can be easily used to form a souvenir of any size.
Handmade craftsmen use thick paper, cardboard, threads, raffia fibers, sisal, tufts of grass, feather grass and fluffy yarn in their crafts.
What you may need:
- for work – glue gun, scissors, transparent glue;
- base – cardboard, polystyrene foam, plastic plate;
- fixation - threads, twine, wire, yarn;
- finishing - pebbles, feathers, leaves, shavings.
You can decorate the work with decorative plastic eggs or put quail eggs inside the formed nest, after blowing the contents out of the shell.
Also, compositions are often supplemented with decorative birds, flowers, and figures of ducklings.
Unusual decor for a nursery
To decorate a children's room, you can make decor from boats. Floating wood is an excellent material for creating original compositions. With the help of such elements you can decorate the interior with a marine style.
Let's consider another option for an ensemble of homemade ships.
This option is also suitable for a child’s room. Sails can be made from multi-colored fabric and from different elements.
Wall panels
All kinds of panels are used to decorate walls. They may have an unusual configuration. For example, in the form of a decorative anchor. Individual elements can be painted in different colors, and the decor can be complemented with shells, starfish and rope ropes.
An original wall hanging can be made from shells, twigs and a piece of wood. Beautiful flowers are made from shells.
Another unusual composition is made from wooden branches of different sizes. The elements are attached to a solid base.
For this panel, you can choose old boards. Such elements with an antique effect will be an excellent addition to decorative decoration. Various inscriptions are applied on top and shells are glued on.