Machine for processing glass edges: drawings, principle of operation
Why and in what cases do you need to grind the ends of the glass?
If you are familiar with glass cutting, then you probably know that after operations with a glass cutter, the cut part has sharp, traumatic edges, and has an unpresentable appearance. After this, the resulting parts can be used without being enclosed in any frame - for example, for wall mirrors, glass doors, cabinet shelves, display cases, table tops.
Therefore, the edge of the glass must be processed. This process is familiar to many - we could sharpen, grind, grind steel, wood, and plastic parts using abrasive sanding wheels of various types.
The ends of the glass are processed in the same way. However, this material differs from others in its specific structure and properties; it is harder and more fragile.
Therefore, it must be processed with a tool specially designed for this purpose.
In most cases, glass is treated with diamond.
The machine itself is an emery machine with a specific design.
Why do we process glass carefully?
There is hardly a person in the whole world who does not know what glass is.
For a long time it was believed that the discoverers of glassmaking were the ancient Egyptians, but several archaeological finds have confirmed that more ancient cultures also knew how to make it. Working with glass is a painstaking process, because it is a rather fragile material. It can be cut, tinted, sanded, painted, made into stained glass and much more. When working with it you will need a considerable amount of diligence and patience. Not so long ago, cutting was the last stage of its processing at home, but with the advent of new equipment and technologies, glass and mirrors began to be dulled, ground, and polished. Processing of the glass edge is carried out when glass is used as doors, shelves, walls of an aquarium, and so on, that is, when the edge is directly in sight.
This is done for safety reasons, since sharp edges can cause injury. This treatment gives the material an aesthetic appearance and reduces the likelihood of chips and cracks; moreover, untreated glass does not have much commercial value. If you need to insert it, for example, into a door, then there is no need to process it.
Components and parts of a direct grinding machine
1. Bed.
For its manufacture, a metal corner 50x50x4 was used.
2. Desk.
To get a desktop, we took a frame from a metal corner 25x25x3. A sheet of cellular polycarbonate with dimensions of approximately 1000x600 is fixed to the frame, on which a strip of carpet is fixed.
To be able to process the straight edges of the glass, we attach a special ruler separately.
3. Machine drive.
The drive is an asynchronous 3-phase AC motor, it is mounted vertically on the frame. Engine power: 2.2 kW, 1500 rpm.
4. Drive on/off system.
The block with the “Start/Stop” button and the engine starter is enclosed in a sealed housing and fixed in the upper part of the frame, above the working space of our device. The system must be grounded.
We definitely pay attention to safety precautions. The coolant used to operate the machine is water. Therefore, it is necessary to reliably insulate electrical components so that water does not get into them, and so that the person working on the machine is not shocked by electric shock.
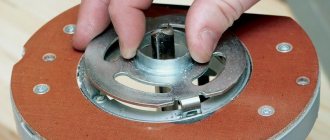
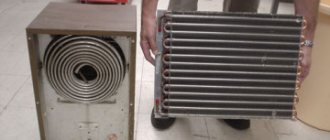
5. Work unit.
The working unit is a planar washer mounted on the shaft of an electric motor. An abrasive diamond wheel is attached to it.
The plan washer is made in the form of a flange with a thrust flange. We put the circle on the plan washer and press it with a clamping ring with six holes for M6 bolts - the plan washer has threaded holes for them. We put the plan washer on the motor shaft (there is a hole with an M6 thread on the shaft) and clamp it with a washer and a bolt. Since the force on the plan washer is small, a key is not used.
6. Cooling.
The device uses an open cooling system in the form of a container (tub) 1500x400x350. They are welded from sheet metal 2 mm thick, and have a half-cover on which a pump from a 1K62 lathe is mounted. From the pump, water for cooling flows through a rubber hose to the grinding wheel to the place where the part is processed.
How does a quick cutter work?
The glass is separated by a working roller with a certain sharpening angle - for quick-cutters it is 138º, although for thinner glass rollers with a smaller angle are used. Resharpening of rollers, the material for which is a hard alloy based on cobalt and tungsten carbide, is impossible. Manufacturers do not disclose the secret of the alloy used, but judging by the conditions of use, it is an alloy similar to domestic brands VK3 or VK5. When the rollers become dull, the working head is removed and a new set of cutting equipment is installed there.
A special feature of quick cutters for glass is the constant lubrication of the cutting area. It is carried out by supplying a special liquid that performs several functions:
- cools the rollers;
- wets the glass surface;
- reduces the load on the cutting edge, promoting wedging of the material.
If there is no working fluid, it can easily be replaced by ordinary kerosene, to which a few drops of Industrial-12 oil (or similar) are added to increase the viscosity.
The main problem that arises when using a conventional glass cutter is ensuring that the roller moves perpendicularly relative to the glass surface. High-speed cutters do not have this problem, since this parameter is monitored by a guide system. Therefore, the master can only carefully set the width of the glass to be cut using the measuring scale on the rod.
We polish glass with ease - it couldn't be easier.
Sometimes it becomes necessary to remove scratches from glass, and many people have no idea what means and how to do this. I have sanded and polished glass many times, and not only glass, but also plastic and plexiglass. The principle of operation is the same everywhere, so let’s figure out what is needed for this and how much it costs.
First, we need to have a tool with which we will polish and grind the glass. After all, removing a scratch from glass means “removing” it, polishing it, so to speak. Therefore, it is necessary to use abrasive materials. But first you need a power tool. If the area from which you need to remove scratches is large (at least 50*50 cm), then you need to have an angle grinder with adjustable speed. If less, then a mini-drill will suffice; this is a tool better known as an engraving machine. You can read about the professional model here.
So, we have a power tool, now we need to purchase attachments for it and diamond paste.
Nozzles If the scratches on the glass are shallow, then it is quite possible to remove them without abrasive attachments; just a felt wheel will be enough. I remember we were removing scratches from the glass of a wristwatch; we only needed one felt tip on the engraver and a little bit of diamond paste. By the way, you can look at the photo of the engraver attachments.
If you are removing scratches over a large area, you will need attachments for the grinder. These can be like turtles (AGShK) - if the scratches are very deep, or again a felt circle on which diamond paste will be applied. You can read about diamond flexible discs here; they are also used for grinding granite and marble. Well, glass can also be processed with them.
Diamond paste is a necessary tool for grinding and polishing glass, plastic or plexiglass. It is inexpensive, about 80-100 rubles for a small jar, which will last for a very long time, since it is consumed slowly. By the way, you can also try polishing with GOI paste, which has several types of grain.
When grinding and polishing glass, it is necessary to maintain a certain speed of rotation of the tool, as well as pressure force. Or rather, it’s better not to put pressure on the glass at all; the weight of the power tool is quite enough. It is better to keep the speed of revolutions low, on an angle grinder with adjustment - 1 or 2 position of the regulator. The engraving machine is more resourceful, so set it to the lowest possible setting.
Start polishing the scratches from the edges, gradually moving towards the center; you should not drive quickly, do everything slowly. Polishing glass is a slow procedure; it may take more than one hour to remove one scratch of a couple of centimeters. So be patient.
Source: https://bezhelme.ru/instruktsii/kak-ubrat-tsarapinyi-so-stekla-shlifuem-i-poliruem-steklo/
Mirror edge: beauty and safety
Glass for our mirrors is a ready-made material, which, of course, must be processed so that in everyday life it does not cause harm to the objects and people around it. Existing standards for flat sheet glass for creating special elements do not always accept one form or another for the interior. But we will now resolve this issue: mirrors are cut on special machines, the processing of their reverse side is changed, thereby obtaining a mirror made of reinforced, laminated, tempered and other types of glass.
Glass cutting is done with a diamond tool - a glass cutter. This household and fairly simple tool consists of a handle-holder and a diamond roller secured to it. To cut circular glass, you will need a compass tool, but it is best to buy a cutting table with a full automatic mode and carries out work with an accuracy of half a millimeter.
After cutting the mirror, you will need to grind its edges and then polish them.
Let's understand the process of grinding an edge with a coarse-grained material, which results in a rather rough surface with a matte finish. It’s ugly, of course, to hang such a mirror on the wall, especially since a processing angle of forty-five and even ninety degrees turns the product into a rough blank.
Roughness is removed by polishing, and this process is carried out on glass of both curved and rectilinear shapes. At the same time, the processing angle remains the same, but a fine-grained image is put to work. Step by step, the perimeter of the mirror is polished, and the work is done until the sides of the product become transparent.
Read also: Do-it-yourself sleigh with a motor
With modern equipment, any polishing of a mirror is done using grinding wheels, but they have a diamond coating. The latest grinding machines not only work according to a given program, but are also ready to create contours such as a flower, a butterfly, a curved trapezoid, and so on. If you are familiar with the cascade mirror, then you now understand what we are talking about. Grinding of such products is carried out on a modernized washer machine. How? It’s simple: a mirror is placed on a disk rotating in a horizontal plane, and a stream of water is applied to its edge under pressure, to which either a formative powder or sand of a certain grain size and composition is mixed.
But mirrors are brought into proper condition on tape machines. Here the edges of the mirrors fall into the power of rotating rollers mounted on a special tape. To protect the glass from overheating, the edge is also cooled with water and abrasive powder. Such a machine produces only straight-line products, allowing you to significantly reduce its cost.
Processing the ends of both glass and mirrors allows the manufacturer to reduce residual stress on the product, sending products that are safe for living beings to the retail counter. In addition, the above procedure is always carried out before tempering any glass. Now not only is the edge quite strong, but the whole mirror is too.
Mirror polishing, like its grinding, is visible on display shelves, numerous counters, coffee and dining tables, aquariums, terrariums, bathroom shelves, and so on. Ordinary glass is polished more easily, using rotating grass brushes, which are pre-impregnated with pumice-water emulsion.
There is another way of polishing, for example, by dipping into a composition of two acids - sulfuric and hydrofluoric, and then into clean water. The number of such dips depends on the technological requirements for the product in its final stage and the degree of gloss of the edges.
Grinding and polishing glass at home
In order to properly process the glass edge, it is necessary to sequentially carry out two types of work - grinding followed by polishing.
To work you will need:
- grinder or drill (necessarily with adjustable speed);
- waterproof grinding wheels with varying degrees of grit;
- felt or felt circles for polishing;
- cerium oxide for polishing (you can buy it here - https://zm-tools.ru).
Quick cutter for glass. Unusual "mop" of a glazier
When cutting a large volume of glass, the performance of a conventional glass cutter ceases to meet the labor intensity and quality requirements. A special quick cutter for glass is required, which among specialists is also called a “mop” or a glass thicknesser. In the article you will learn the operating principle of a high-speed cutter, its advantages and the names of reliable manufacturers of this tool.
Glass edge polishing
In order for the edge to become transparent and perfectly smooth, it must be properly polished. For this purpose, use a special felt or felt circle.
Apply a paste made from cerium oxide and water (the consistency is liquid sour cream) to the polishing wheel and carefully polish the glass at low speed. Then we gradually increase the speed to 1500 - 1800.
Polishing must be continued until the edge becomes shiny and transparent.
In this simple way you can process the edge of glass at home.
Source: https://remontyes.ru/4548-obrabotka-kromki-stekla-v-domashnih-usloviyah.html
How to remove small scratches on windows and watch crystals
- Toothpaste is a kind of folk method. Contains a sufficient amount of abrasive substances if it has a whitening effect. It should not be confused with gel, as it is not intended for such purposes. You can work manually, without any tools. Take a cotton pad with paste and start making circular movements in both directions. After the paste has dried, all that remains is to wash it off;
- Car glass polishes are a very effective way to remove even deeper scratches. Before use, it is recommended to test in a less visible area to ensure that the window glass reagents contained there are safe. The reason is the large number of similar polishes. As for the technique, it is identical to that described above;
- Paste of the State Optical Institute (GOI). An old polishing product that we inherited from Soviet times and first hit the market in the early 30s of the last century. A universal tool that can be used to grind not only glass, but also polymers, metals and much more. In the USSR and Russia, entire generations used this paste. However, it is now more difficult to get it, as there are many fakes on the market.
How to make a grinding machine with your own hands: instructions with step-by-step photos
The cost of a factory-made grinding machine is quite high. If you can't afford a power tool, you can try making one yourself. On such a machine it will be possible not only to grind wooden workpieces, but also to sharpen the tool. There are three types of grinding machines you can assemble with your own hands: belt, disk and drum.
We polish watches, glass, resin, metal quickly with our own hands without tools
During use, any glossy item acquires battle wounds in the form of scratches, grooves, and dullness due to abrasions.
In my case, the watch is “bolt” style. They are massive, look large on the hand and attract not only attention, but also door jambs, tables, walls, they especially love rough-worked walls - concrete, finished in the form of decorative plaster. And how they gnashed joyfully when they met the metal gate!
The battle scars are there. Operation 5 years.
We take 3 sheets of sandpaper with grain size 800, 1200, 2500, GOI paste and masking tape. The larger the sandpaper number, the finer the grain and the smoother the surfaces are sanded.
If there are no deep scratches, then you don’t have to take 800.
Option for manufacturing a band press
To assemble a belt-type grinding machine, you will need an electric motor, a durable frame and rollers on which the belt will rotate. Be sure to have a drawing or detailed diagram on hand indicating all components and dimensions. We offer an example of a diagram of a machine with a wooden bed in the photo.
The following photo shows the finished design of the machine. In this embodiment, the arrangement of the three working shafts is designed so that the moving belt forms a vertical grinding plane. A belt drive is used as a drive.
The machine design can use four rollers. One of them is the leading one and is mounted directly on the electric motor shaft. The photo shows an example of such a design. Installing four rollers allows you to get two grinding planes: horizontal and vertical.
The wooden frame smoothes out the vibration of a running electric motor, however, wood is short-lived. It is optimal to cut a workpiece measuring 50x18 cm from steel 2 cm thick. One edge of the frame is made perfectly flat in order to attach a platform for the electric motor to it. For the next part, you will need steel 1 cm thick. The area is cut out 18x16 cm in size, and then secured to the frame with a bolted connection.
A large electric motor power is not needed for such a machine. A motor from an old washing machine will do. If greater productivity of the grinding machine is required, then it is advisable to find an electric motor with a shaft speed of 1500 rpm with a power of 2.5 to 3 kW. High-quality grinding can be achieved by moving the sanding belt at a speed of 20 m/s. To achieve such parameters, working drums with a diameter of 20 cm are used. If you make the rollers thinner, you will have to reduce the speed of the motor shaft using a gearbox, which is extremely inconvenient.
The drive drum can be mounted on the motor shaft. If this option is not suitable, a separate unit is made. The drive shaft with bearings is fixed to the frame. A belt drive pulley is installed at this end, and a drive drum is installed at the other end. Then a pulley is also mounted on the electric motor shaft and a V-belt is put on. The driven rollers rotate freely on bearings.
The belt drive pulleys will have to be turned on a lathe, and the rollers can be made from square pieces of chipboard measuring 20x20 cm. The plates are stacked on top of each other until a total thickness of 24 cm is obtained. A hole is drilled in the center of the square plates, a threaded pin is inserted and the plates are pulled together tightly on both sides with nuts. The square blank is machined to form a drum with a diameter of 20 cm.
When grooving the roller, a thickening is provided in its central part. In relation to the edges of the drum, the difference should be 3 mm. Due to the thickening, the belt will not move off the rollers. The surface of the wooden drum is covered with rubber. An old bicycle tube will do. Rubber will prevent the belt from slipping on rollers.
To make a sanding belt, cloth-based sandpaper is suitable. You can cut a solid strip of the required length, the edges of which are glued end-to-end. If there is no long strip of sandpaper, cut a strip of durable fabric and sew it into a ring. The sandpaper is cut into rectangles and then glued onto a strip of fabric. When making a sanding belt, it is important to choose high-quality glue so that the sandpaper does not peel off.
Tabletop glass cutter
To work you need to prepare:
- wooden board;
- glass cutter;
- small diameter plastic pipe;
- self-tapping screws;
- metal ruler;
- furniture guide;
- L-shaped bracket;
- epoxy resin;
- wood varnish;
- several neodymium magnets;
- a piece of felt.
Let's get started:
| Illustration | Instructions |
| Step 1. Preparing the base To begin with, you can open the wooden plank, which will serve as a platform for the cutter, with varnish. This will make the product more attractive and protect the wood. | |
Step 2. Creating videos
| |
| Step 3. Processing the glass cutter Remove the handle from the glass cutter and drill two holes in it for further attachment to the board. | |
| Step 4: Preparing the Guide Make another hole in the standard cabinet rail. Expand it with a large-diameter drill to “sink” the head of the screw. This is done so that during operation the self-tapping screw does not scratch the glass. | |
| Step 5. Installation of pipes Screw the prepared pieces of plastic pipe to the base. The distance between them will depend on the size of the bottles you want to trim. | |
| Step 6: Installing the glass cutter Attach a glass cutter to the side of the board. Using a “test” bottle, determine its optimal tilt and position.
| |
| Step 7. Installing the guide Attach the guide to the front side of the board using self-tapping screws. | |
| Step 8. Preparing the Ruler So that while using the cutter you can conveniently determine the size of the segments, you can install a ruler on it. Cut the ruler so that its length is equal to the length of the guide. | |
| Step 9. Installing the ruler Using epoxy resin, glue the ruler to the guide and place some weight on top. Wait for the resin to dry. Using a ruler, you can cut glass circles of the same width. | |
| Step 10: Create a Lock Slider To prevent the bottle from moving during operation, you can make a locking slider. For this:
|
The magnets will slide freely along the ruler, but at the same time will not allow the bottle to move during processing.
How to use the cutter
Your homemade cutter is ready. Now is the time to check its operation (for the first time, you should try cutting off an unnecessary bottle).
Before fully using the machine, you should practice a little on unnecessary bottles
Source: obustroeno.com
Manufacturing of disc grinding machine
The disk machine is considered the easiest to manufacture. The principle of its operation resembles an ordinary electric emery. Assembly of the grinding machine is presented in instructions with step-by-step photos:
- The power plant of the machine is a three-phase electric motor. This choice is not accidental, since changing the phase when connecting allows you to organize reverse. The motor can be connected to a 220 V network via capacitors.
- The working disk is cut out of plywood 1.5 cm thick. Two identical blanks are glued together. The result is a disk 3 cm thick. A hole is drilled strictly in the center, the diameter of which is equal to the thickness of the electric motor shaft.
- To assemble the frame, it is better to use an edged board, and the guides and work table are cut out of 1.5 cm thick plywood. Wood is better suited for making the machine than metal. Wood dampens engine vibrations.
- The working disc can be used for grinding and even sharpening. It is important to choose the right abrasive materials. They must be Velcro and fit for their purpose. If you need to grind a product made of stone or granite, stick a “Turtle” diamond wheel onto the working disc.
- To sand a wooden workpiece, glue a circle of sandpaper to the working disk.
- There are similar Velcro circles for metal. This disc can be used to sharpen knives, axes and other tools.
When designing a disc sander, it is important to consider safety. The rotating working disk is covered with a protective arch on top. An adjustable heel is provided on the work table, which serves as a stop for the workpiece.
The table top of the machine should not be varnished or painted. Over time, an unevenly worn coating will create difficulties in moving the workpiece being processed.
Types of machines
Each industry relies on different types of processing machines that allow certain operations to be carried out much more efficiently than manual labor. Automation brings enormous benefits and reduces waste to a minimum. Existing types of machines can be characterized as follows:
1. Machine for processing glass edges. Allows you to round off sharp edges so that they cannot cause injury to people working with them. Glass is often used in schools as an accessory to be placed on the teacher's desk. Therefore, you need to think about the safety of children. The unit operates using a large number of grinding elements, which remove the sharp layer and leave only smooth edges. Thanks to high-precision positioning sensors, no area is missed. In turn, machines of this category are:
Making a drum machine for sanding boards
To make a drum machine, a frame is assembled. You will need hardwood timber. An electric motor with a pulley is attached to the bottom of the frame. A drum with bearings will come from a used conveyor. The sandpaper is cut into strips and wound tightly end-to-end on the work roller. Along the edges of the drum, the paper is secured with clamps.
The work roller is attached to the frame from above. The machine table top will be located under it. A pulley is mounted on the drum shaft and a belt drive with a motor is created. The tabletop is made adjustable with screws so that you can sand boards of different thicknesses. To avoid vibrations of the machine, it is advisable to fix the legs of the bed to the floor.
If you try and make an effort, then any unit considered will work no worse than a factory-made grinding machine.
Source: https://instrumentiks.ru/sovety/kak-sdelat-shlifovalnyi-stanok-svoimi-rukami
Tools used for manual glass cutting
Well, let's see: what does the civilized world use to cut this damn glass?
First of all, I’ll say right away about the prices: they are very, very high. Those. For a home or family, such an instrument is an absolute luxury and excess. But for those who constantly deal with cutting glass, it is simply a godsend!
To begin with, I would like to dwell on the devices for. so to speak, “transporting glass to the cutting site,” namely, to the table. There are suction cup handles for this. They are very reliable and can withstand heavy shear loads (80-150 kg). They come with different numbers of suction cups:
| with one (very powerful) | with two suction cups | with three suction cups |
Well, now let's move on to the glass cutters. For thin glass (2-8mm), a glass cutter TC-17 from the Japanese corporation “Toyo” is suitable.
It is very convenient, has a spring-loaded head that rotates 60′, and a lubricated roller. Oil for cooling and lubrication is poured inside the handle. Price: about $40
For thicker glass (10-15mm), a different type of glass cutter is required. The TC-600 model is still the same
It differs from the model described above in a more comfortable handle, which implies greater loads, and in the sharpening angle of the roller. Price: $50-55
In order to break off a narrow strip from a piece of glass of large thickness, you will need the so-called Toyo glass breaking pliers known to you.
With their help, you can easily separate even a very narrow strip without much effort:
You don’t want to stop there and want to cut glass thicker than 15mm? This does you credit, but I must warn you: very thick glass (19mm and above) is cut completely differently. Those. the principles and cutting techniques are almost the same, but the glass does not want to break. Therefore, in order to ensure a reliable cut, a completely different glass cutter is needed. This is Silberschnidt-2000 German
It has a stationary head body, inside of which there is a 360′ rotating carriage with a roller:
There is a completely different sharpening angle of the roller, a special two-valve system for supplying oil to the head, and additional equipment with a special handle attachment to add more force when pressing.
The tongs for breaking glass are also special here.
They are no longer as flimsy as the Japanese ones. Made from milled metal, they weigh almost 1.5 kg! But they also break glass much better. The truth is, their price is already an order of magnitude higher, or at least two. Price: $400
To confidently cut large pieces of thick glass, a special carriage is used, which fits onto a ruler and slides along it on bearings. It provides confident, uniform guidance of the glass cutter and good pressure:
For obviously reliable breaking of thick glass, a special “strike” is used.
It is used to tap the glass along the cut line on the reverse side, which leads to the appearance of a through crack at the cut site:
It has adjustable impact force, making it suitable for different glass thicknesses.
If you have to cut out complex shapes, especially “inside” glass, then you will need a special press.
By moving it along the cut line, you turn the screw to slowly and carefully move the crack creeping along the cut line, thereby avoiding the danger that it will go to the side:
Now a little about rulers, templates, etc.:
For ease of cutting, there are special rulers with suction cups that attach the ruler to the glass. Well, we won’t talk about them - everything is clear here. I will dwell on some devices used for more complex things. However, it is worth mentioning the precision squares and sliding template frames for mass cutting of identical parts:
| Price about $130 - 200 | Price about $150 |
Template for cutting out ovals. Use special ring bits of different sizes on the glass cutter to cut out ovals of different diameters.
Or a more complex device that provides a wider range:
A compass device for cutting out circles and semicircles. It has a suction cup, which is fixed in the center of the intended circle, and millimeter markings on the rail along which the glass cutter with a clamp runs.
If you made a mistake somewhere and the thick glass broke off and left an ugly “fang”, or you need to cut out an internal corner, but it is not possible to do this with a glass cutter, a glass sawing machine (like machines for cutting metal) will help you:
It has a diamond-coated disk and a water tank (any glass processing, including sawing, requires abundant cooling of the surface being processed and the working surface of the tool).
If the “fang” is relatively small, or there is no special machine, or you just need to break off a small piece of glass, then there are special “pliers” designed specifically for such purposes:
Now a little about glass processing, namely, about drilling and grinding edges:
Glass is drilled using tubular drills with diamond coating on the edges:
This is best done on a machine. Having drilled to approximately the middle of the thickness, the glass is drilled from the back side. This avoids chipping when drilling through. A constant water supply is required. Large diameter holes are drilled with a special sliding ballerina drill.
Prices for drills vary enormously, so I won’t list them.
Finally, for rough grinding of glass edges, you can use surface grinders with an abrasive belt and machines with soft abrasive wheels:
That's all for now. More complete information about all the tools used for manual cutting and processing of glass can be found on the website
Source: www.aqa.ru
How to cut: instructions
First, prepare the glass surface. It should be washed well, removed from grease and dried. If stains or streaks remain on the surface, the cutting tool may slip, resulting in a crooked chip. It is better to choose a table or a piece of chipboard as a working surface. You can lay a piece of thick fabric (tablecloth, sheet) or linoleum on it.
After preparing the surface and materials, markings should be carried out. If you need straight edges, it is better to draw them using a thick ruler; for smooth lines, you can use patterns. To prevent the item from slipping, you can secure it with pieces of electrical tape from the inside out. Then, using a file, grinder or other cutting tool, a smooth, clear line is drawn.
When the cut is ready, you should break the glass. Place a small object (match, nail, pencil) under it and lightly press with your hands on both sides. You can also split the mirror on the edge of the table, or tap it from below with a small hammer.
Important! If you can't break the glass, you don't need to use brute force or push very hard. It is better to make a second cut at a distance of 2 cm from the first.
Recommendations:
- When you do finishing work, it is better to use old tools, as their surface deteriorates greatly.
- Instead of a whetstone, you can use a block of wood with sandpaper attached to it.
- Initially, tools with a coarse-grained surface are used, then they switch to a fine-grained one.
- Do not rush, as slipping of the tool may cause deep scratches on the surface.
Tools
Various glass cutting devices are designed to cut a single sheet into fragments of the required size and shape without chipping, cracking or destruction. Such tools are indispensable for those who work with glass, and can also be useful for home use, for example, if you want to cut a mirror or glass shelf.
Glass cutting tool
Glass cutting tools include the following:
- Diamond glass cutter. This tool is the first glass cutting device ever invented. It is equally successfully used for professional glass cutting and for domestic purposes. It is designed as follows: a medium-sized natural diamond is mounted in a special holder with a handle. The holes in it make it easy to align the glass along the edges. This tool allows you to cut glass with a thickness within 10 mm. There are some models whose design allows you to rotate the diamond if one of the sides is dull.
- Glass cutter with artificial crystal. This tool differs from the one described above only in that it cuts using an artificial crystal - corundum. This crystal is similar in quality and hardness to natural diamond, but is less effective. The thickest glass that can be cut with it is 5 mm in thickness.
- Roller glass cutter. It is also a common and effective cutting device, which is carried out using a special roller consisting of a very hard alloy. It is mounted on a holder with a handle. Different models can have from 1 to 6 rollers. They cut glass up to 4 mm thick. This type of glass cutter is convenient because it is possible to replace or sharpen the rollers and continue to use the tool.
- Oil glass cutter. Its distinctive feature is a special lubricant supplied from a container built into the handle. It is needed in order to reduce friction during operation of the tool. The design of such glass cutters provides for the possibility of completely replacing the head if the cutting unit becomes unusable. An oil glass cutter is capable of cutting glass up to 20 mm thick. Some of its models have movable heads, which are indispensable if curved cutting of glass is necessary. They are used to trace patterns along smooth lines.
- Glass cutter compass. This glass cutter comes to the rescue when a regular oil cutter is powerless, namely, in cases where it is necessary to cut a piece of glass in the form of a circle or oval. The simplest model of this type is a suction cup, a rod equipped with a scale, and an oil glass cutter. It is designed for cutting circles. To cut ovals, there is a more complex model equipped with several rods. There are also universal models that have an even more complex design.
- Quick cutter This tool is used to quickly cut glass in straight lines. It is equipped with an oil head that lubricates the cutting lines with a special liquid. The quick cutter also has a scale on which the cutting width is set, and thanks to this, cutting is carried out at high speed. The tool makes it possible to cut glass several times faster and more conveniently. It also minimizes the risk of making errors when cutting.
Rules for working with glass cutters
When working with glass using special tools, haste and carelessness are unacceptable. You need to be careful and focused on your work, do not forget about safety precautions and follow a number of simple rules:
- Work must be carried out on a table that has an absolutely flat surface, without bulges or roughness. The glass itself must first be cleaned of dirt and dust, because even the smallest particles falling under a glass cutter can very quickly damage it;
- cuts are made by lightly pressing the tool, using a pre-prepared pattern of parts;
- the scratch left by the tool should not be crooked or deep;
- If you use a roller glass cutter, you need to apply more force than if you use a diamond cutter. But with its help, a deeper cut remains;
- cutting the glass should be done in one motion. If the first cut is unsuccessful, running the instrument over it a second time is unacceptable;
- glass that has a cut is broken off along the edge of the table or along a ruler;
- to make breaking easier, lightly tap the cut with the head of the tool on the back side of the sheet;
- narrow strips of glass are broken off along the cut line using the side holes in the glass cutter head;
- To prevent the glass cutter from jumping off the glass surface during cutting and damaging the cutting element on its edge, a few millimeters before the end of the cut line, you should reduce the force with which you apply pressure on the tool.
Glass cutting equipment
In addition to glass cutters, there is also equipment designed for the same purposes, but making it possible to cut a much larger amount of material during the day. It is intended for industrial production. This includes tables for cutting glass, as well as laser, sandblasting, and waterjet machines. Let's take a closer look at each of these types of equipment:
- Laser machine. One of the main advantages of cutting sheets of glass using a laser is the speed with which the master can work. It is many times higher than the maximum speed possible with manual cutting. Using a laser is also a more economical method, due to the fact that there is practically no waste left during the work. After cutting the sheets, the parts do not need further processing of the edges, as with the manual version. They are melted with a laser and become more rounded.
A laser installation is capable of converting electrical and light energy into powerful radiation with a narrow focus. Its main advantage is that a beam of enormous temperature is focused into a point having a micron in diameter. Using a laser machine, cutting is carried out with perfect accuracy, because... All her actions are controlled by a computer, reducing the risk of errors to a minimum.
The laser machine cuts out the most complex contours, and the thickness of the glass can be any.
- Sandblasting installation. In this case, cutting is performed using a powerful jet of air containing abrasive grains. A sandblasting machine is a device that includes a chamber for placing abrasive material and a chamber for mixing it with compressed air. Next, high pressure is created in it, under which air with abrasive particles moves through the hoses and is thrown through the sandblasting gun into the surface being cut.
- Waterjet installation. This method is very similar to sandblasting, only it uses water instead of air. A waterjet machine supplies water containing abrasive particles to the cutting line under high pressure. As in the previous case, they mix with each other in the installation chambers and gain enormous speed, making high-precision cutting possible. The operation of the device is controlled by a computer, which monitors the parameters and sets the trajectory. This method allows cutting out parts of the most complex and unusual shapes, for example those with broken lines and internal cavities. Some types of products can be manufactured exclusively on this equipment.
- Glass cutting tables. They are divided into several types: tables without a bridge. They are usually used by small window production enterprises, which produce from 50 to 100 double-glazed windows during the day. Such tables are equipped with lifting tabletops, along which the glass moves using rollers. Glass is cut manually using glass cutters and quick cutters. The design of the tables provides for the presence of longitudinal and transverse glass break bars;
- semi-automatic tables with manual bridge. This option is acceptable for larger organizations with a production volume of up to 200 units per shift. Such tables can be equipped with special rulers for measuring along the X and Y axes; they can move the glass along their surface using a pneumatic cushion or pneumatic rollers. They are also equipped with levers for lifting the tabletop, with gas shock absorbers, strips for breaking glass on cuts, and digital devices that control dimensions. In addition, the glass cutter is automatically lubricated, and its pressure on the glass surface is also regulated;
- automatic tables. During a working day, 400 double-glazed windows and more are produced. Cutting parameters are loaded into them, after which cutting is carried out in a fully automatic mode, by moving the bridge. In this case, breaking along the lines of cuts in some models occurs on the same surface, while in others it moves to a separate table. Most automatic tables are equipped with special sensors that react to foreign objects entering the cutting zone. In this case, the process stops immediately;
- automatic lines. They are capable of producing more than 500 units per shift. The lines consist of automatically operating mechanisms that load, cut and break off glass. This happens as follows: the device responsible for loading the glass uses special suction cups to take the glass from the pyramids in which it is stored and places it on the table. The bridge precisely places the glass on the table, guided by the previously loaded parameters, and makes the cut. At the same time, the loading device is already taking the next sheet. The cut glass is transferred to the breaking surface, which frees up space for manipulation of the next sheet.