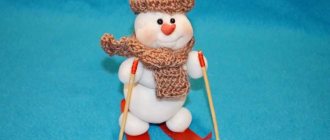
Figurine based on papier-mâché
The fake man made from paper is designed for early adolescence (11-12 years). But preschoolers and primary schoolchildren are recommended to work together with adults.
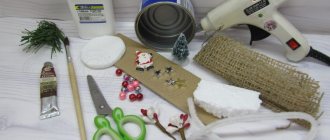
To create the product you will need:
- leatherette or wire at least 0.5 meters long;
- pliers;
- liquid paper glue (preferably PVA);
- toilet paper or paper napkins of any color;
- paints for painting, brush, container with water.
Paper origami patterns for children
Origami for children is a great way to develop logical and spatial thinking, stimulate creativity by activating mental processes.
The origami technique was very popular in ancient times. The history of its creation goes back centuries, but even today, folding paper crafts interests many people, regardless of their age.
Thus, children really enjoy watching how a simple flat figure turns into a three-dimensional model, artists express their creativity, researchers create new product models, architects explore geometry. This article presents paper origami crafts for beginners.
Step-by-step photos will help you master the entire process of creating simple models. Well, stock up on square pieces of paper, choose the craft you like and start folding it. We wish you fun and creative inspiration!
There are several types of origami:
- classic (or simple) - performed by repeatedly folding a sheet of paper to obtain three-dimensional figures, the most famous example is the figurine of an oritsuru crane;
- modular origami - composite structures from simpler elements, folded according to classical principles and connected to each other by ordinary folding, without glue;
- kirigami (created using cutting with scissors), kusuda (volumetric structures assembled using threads and glue), aerogi (well-known airplanes with many manufacturing options), “wet” origami (paper is wetted to give clearer shapes), etc. . - These are modern types, sometimes not very reminiscent of classic origami.
As usual, first we will prepare the materials and working tools. In this case, it is:
- paper,
- scissors,
- glue (regular PVA or glue stick),
- sharp stationery knife or cutter,
- pencil
- ruler.
Preparing the base of the product
The most difficult part of the work is forming a solid frame. Use pliers to shape the wire into the shape of a human skeleton. To prevent the fake from being fragile, all limbs should consist of two parts of wire. This will happen as a result of its bending in the area of the feet, palms, and head.
Create the little man in the pose in which you plan to see him as a result of your work.
Work details
If desired, you can fashion a hat, elements of a coat, glasses, an umbrella and other accessories. Separately, you can prepare a chair, bench or pet.
It is easier to form additional objects, because only part of the production will need to be molded. Papier-mâché covers the seat of a chair/bench, individual parts of an umbrella and an animal.
Photos of the man's crafts can be seen on the website.
Add color
It is not recommended to use watercolor - the product turns out pale and loses color faster. When using gouache, the color will turn out bright, matte, and lightens as it dries.
However, there is a high probability of unwanted mixing during subsequent application. Acrylic adds shine to the product, as its structure is similar to oil paints. It dries quickly, which reduces the possibility of mixing shades, but darkens as it dries.
We recommend reading:
- Craft bullfinch: detailed description of how to make a bird with your own hands (115 photos)
Crafts from vegetables: 100 photos of the best crafts for children and a review of recipes for adults
- Craft ship: 120 photos, templates, drawings and step-by-step instructions on how to make a boat
To apply the palette, it is recommended to have a medium to fine brush. This will help convey the details of the character's image.
Parsley - French
0
The cheerful puppet character Petrushka appeared in Russia in the 17th-19th centuries (according to various statements). The origin of Parsley is associated with the French Polichinelle - a puppet character who amused the public at French fairs (appeared in the 16th century). He fooled the audience, promising to reveal his secrets, which were already known to everyone. These secrets became household names and were called the “Open Secret.” French Polichinelle
0
Polichinelle has an Italian brother from Naples - Pulcinella, who hooligans and gets out of difficult situations by showing his common people's ingenuity. Italian Pulcinella
0
The ancestor of Parsley can also be called the French Guignol glove doll, which appeared in Lyon at the end of the 18th century. This doll was invented by weaver Laurent Mourguet, who was also a local “dentist” (dentistry was at that level at that time). To entertain frightened patients, he came up with a hand puppet that greeted them and told funny stories. Guinol
0
The townspeople liked this entertainment, and Murge began giving separate performances in coffee houses. The character Guinol appeared in 1808. After the death of Laurent Mourguet, the puppetry business was continued by the descendants of the puppeteer. Very often, Guinol's jokes ridiculed the authorities, for which the Murge family theater was banned under Napoleon III.
Sculpting the body
Choose a piece of plasticine of your favorite color and roll it in your hands so that an oval is formed. We make a cut along the oblong part (1/3 of the total size of the workpiece). From the resulting two halves we sculpt the legs. The future limbs need to be moved apart a little and given a roundness.
To make the arms, we fashion 2 cylinders that will decrease at one end. Then we press the workpieces to the body so that they are firmly secured.
Couple in love
At the end of our story, we will show readers another unique picture, collected from both vegetables and fruits. Many details are made from berries. These are strawberries and blueberries.
Flat plates are cut out of white radishes, from which the characters' heads, necks, arms and legs are then made. The remaining details are three-dimensional, assembled from cut out pieces of strawberries and apples of different colors. The girl's hairstyle with dark berries and a bright bow looks great. The picture turned out cute and tender.
Additional items
There are many master classes on making figurines, but if you understand how to make a person, fakes are easy. Departing from the subtleties of the instructions, the figure can be diversified with glasses, a scarf, a vest, a dog on a leash or a parrot on the shoulder.
You can make a scarf from a long flat plasticine “canvas”. It is twisted 2-3 times and wrapped around the neck. To make the figure stand firmly, they make boots. To do this, just make 2 ovals and flatten them a little.
A cheerful company of vegetables on a plate
To create such a funny picture you will need artistic skills and a sharp small knife, since many small details are made by cutting out. We used both vegetables and green leaves. There are small parts that are ready-made, for example, peas and corn kernels. The arms and legs are made from thin branches of greenery.
The center of the boy's costume is carved from an orange bell pepper. The belt was made of corn. The hands and feet are cut from peeled carrots using a knife. All elements are chosen from vegetables of bright colors, so the image turns out sunny and joyful. All the characters smile broadly.
Eyes can be cut from garlic or white radishes. The pupils should be dark. In our sample, we cut a tiny floret of boiled broccoli, but you can also cut them from black olives. If the picture was just decorative, then you could use raw eggplant, cutting out pieces for the eyes. But our work of art is completely edible, so you can serve this portion to your child as a salad with porridge and meat.
Alternative option
In addition to the invented character, the child will be delighted with the crafts of Spider-Man, the Little Mermaid, Shrek and even a doll. Thus, completing the task will provide not only the student’s self-development and silence for the parent, but also high motivation to complete it.
Spider-Man is made according to the above procedure, but the bottom part should be blue and the top red. It is not necessary to make a nose and mouth; instead, the emphasis is on the large white eyes.
If a student is interested in history, primitive people will arouse a lot of interest. Crafts of a historical nature require accuracy and diligence.
The basis will be plasticine, from which leather is made (white, pink, brown). The body is made according to the above procedure, but the area where the arms are attached must be greased so that it is not visible. To do this, the attachment point is smoothed in the direction from the arm to the body.
The palms do not come off the hand; to form them, it is enough to press the end of the hand until a plane is formed. The legs and feet are done at the same time. You need to make the limb longer, bend it and flatten it at the end to form a foot.
Features of the body proportions of primitive man are shortened legs and long arms, as well as an elongated jaw. In order for changes in the usual shape of the head to be successful, one part of the oval must be made larger than the other, and then extended on one side. This will give you a massive chin.
Paper garland of people | SCRIBBLE
In this article we will tell you how to make different paper garlands from people: simple, complex and very complex. Simple garlands can be cut by preschool children if they are confident with scissors. Complex garlands - for children 9-10 years old.
And very complex garlands, where people have folds cut into their clothes and shoes on their feet, are more likely entertainment for mothers and grandmothers. Keep in mind that the smaller the figures of the men, the more difficult it is to cut through them. It is also difficult to cut through many layers of paper or thick paper.
The equipment for this craft is very simple: you only need paper and scissors (or a paper cutter for a very complex garland).
Simple paper garland of people
Fold a sheet of paper like an accordion.
Take the height of the paper about 2 cm larger than you are going to get the garland. Place the template on paper. The size of the template should be the same as the accordion segment. Staple all layers of paper (including the template) at the top and bottom with a stapler.
In this case, you don’t have to use a template, but draw the little man yourself, by hand. But it’s still better to chop the paper. This way the paper does not “travel”, does not move, and it is more convenient to cut, and the result is more accurate.
Cut out the figure. It is better to cut the side triangle first, then the top, and then the legs. The result was a garland.
Don't try to fold the paper in too many layers. It will be difficult for a child to cut them out. If you want a long garland, it is better to cut out several short fragments and then glue them together.
Complex paper garland of people
The principle is the same as when cutting with a simple garland. Here, too, you need to cut with scissors, but with manicure scissors. And you can’t do without a pattern template. Using a stapler, heat the figure not only from above and below, but also between the prince and princess figures.
A very complex paper garland of people
- This garland cannot be cut with scissors alone - you need a paper knife to cut through folds and other “internal” details.
Source: https://www.karakyli.ru/2014/03/16/bumazhnaya-girlyanda-iz-chelovechkov/
Photo diy man
0