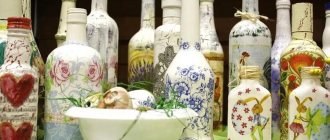
How often can you see beautiful artificial flowers that decorate various holidays and celebrations. Artificial jewelry is used for interior decoration, and they are also often used as costume jewelry. Creating flowers from foamiran is a whole direction in needlework. It is no coincidence that it has become so popular: this process is very exciting, and ready-made flowers are sometimes indistinguishable from real ones. Foamiran is often compared to plastic rubber. In this article we will look at what foamiran is and offer options for entertaining master classes.
What is foamiran and where can you buy it?
Foamiran appeared on the market of materials for creativity and handicrafts a long time ago. Its name is consonant with the name of the manufacturer - “Foamlran”; it is often supplied to Russia from Iran. The material has gained popularity due to its unique properties: with slight heating, foamiran can be given absolutely any shape. At the same time, it is environmentally friendly. The material is also rich in color palette. All these characteristics made it so popular for creating flowers, jewelry and toys. He rightfully earned the love of many needlewomen. Foamiran can be purchased at art and craft stores. Online stores offer a large assortment at quite attractive prices, and they also deliver goods to any region. Craftswomen who have at least once created jewelry from foamiran know how easy and pleasant it is to work with it. The material is pliable, the products are bright and neat. So that even novice craftswomen can create charming flowers, we have made a selection of master classes. For clarity, step-by-step instructions with photos.
About the material
Foamiran is a velvety looking and touching material with a foamed structure. The polymer contains vinyl acetate and ethylene. These substances cause sheets of plastic suede to have a pungent odor while they are packaged.
The production of foamiran started in Iran. Gradually, it was adopted by entrepreneurs from China and other countries. Due to its ease of processing and variety of uses, revelur quickly became popular. Its main advantage is flexibility. The material softens and becomes ready for use under the influence of low temperature, for example, the warmth of human hands.
You can buy foam rubber at any craft store. More often you can find sheet foam, the standard size is 40 x 60 cm. The thickness of the plates varies, depending on the manufacturer, does not exceed 3 mm. Roll form is also possible. Thin sheets are sold rolled up without packaging.
The flexibility and ductility of the material increases due to the degree of foaminess. Quality determines ease of use. The more air bubbles there are in it, the easier it is to roll out and pull out different shapes after heating.
Types of foamiran
Marshmallow Silk
Glitter Foamiran with flock Foamiran with a pattern Perforated
3D foamiran
Foamiran with adhesive base Textured Decorative Embossed Velvet
Gorgeous rose
You will need: red and green foamiran, ruler, scissors, glue gun, iron, instant glue, foil, green and black pastels, tweezers, lighter, floral wire, tape tape, plastic mold sheet, stationery knife.
Master Class
- Cut 25 rectangles of red foamiran measuring 3x4 cm.
- Fold the rectangle in half and cut off the corners. Do this process with all the pieces.
- Heat the petal by holding it near the iron for 5 seconds, then stretch it in all directions so that the foamiran becomes thinner and twist the edge of the petal outward. Make a fold, pinch with tweezers and secure with a lighter. Repeat this process with all the blanks, forming petals.
- Prepare a rectangle of foil measuring 10x15 cm.
- Shape the foil into an oval shape and glue it to the end of the floral wire.
- Apply glue to the bottom of the petal and wrap it in foil.
- Glue the petals to form a rose.
- Wrap the wire with tape, securing it with glue at the beginning and end of the stem.
- Cut out 3 leaves from green foamiran.
- Cut out a square of green foamiran measuring 7x7 cm.
- Fold the square in half 2 times.
- Give a leaf shape at the edges where there are no folds, then unfold the sepal.
- Make small shavings with a stationery knife from black and green pastels, mix them and darken the edges of the sepals with a sponge.
- Warm up the leaves and press them onto the mold.
- Heat and mash the sepals to give them a realistic look.
- Glue the sepal to the base of the bud.
- Glue the leaves.
A gorgeous foamiran rose is ready!
Wreath of small roses
Miniature roses can be assembled into a composition and placed in a vase or pot, placed on the rim in the form of an original wreath. The work is expected to be simple, but painstaking. You will need to prepare foamiran of a suitable color for the buds and leaves, thin wire, tape, adhesives, nail scissors or a figured hole punch.
We cut out the blank petals and tint them if desired. After heat treatment, we give them the desired realistic shape and use molds for the leaves. We divide the wire into several equal parts, attach a foil base to the end of each and collect the petals into closed roses, attaching the leaves. In this way we make 10-15 blanks on wire legs. The quantity depends on the rim collection pattern. We attach the blanks to the thick wire and wrap them with tape.
Exquisite peony
You will need: foamiran in light pink, dark pink and green, scissors, tape, acrylic paints in yellow, green and pink, thick and thin floral wire, glue gun, thread, tassels, foam sponge, foil.
Master Class
- Take a close look at the pattern of the flower details presented below.
- Prepare foamiran and cut out the blanks according to the pattern: A – 10 light pink petals; B – 10 light pink and 5 dark pink petals; C – 10 light pink petals; D – 5 dark pink petals; E – 5 dark pink petals; Z – 3 green leaves; M – 6 green leaves; K and L – 5 green sepals each; F – 1 light pink blank in the shape of a sun.
- Tint the petals with pink paint.
- Draw the structure of the leaves using green paint.
- To give a realistic shape to the petals, take blanks A, B and C.
- Fold the petal into an accordion, twist and unfold. Do this process with all petals A, B and C.
- Take petals D and E, then give each of them a concave shape. To do this, place your thumb in the center of the petal and stretch the foamiran along the edges.
- Fold the sheet in half, then accordion-fold and unfold. The edges can be curled. Give a realistic look to each leaf in the same way.
- Roll out a circle of foil with a diameter of 1.5 - 2 cm.
- Make a small hole in the balls, fill them with hot glue and insert a thick wire as a stem.
- Place the sun-shaped blank F onto the stem and tie the rays with thread.
- Paint the tips of the rays yellow to create the stamens.
- Glue 10 petals A with a glue gun. It is worth noting that the petals need to be glued in a circle, placing them in a checkerboard pattern.
- Glue petals B, then C, D and E.
- Glue the sepals L and K.
- Glue thin wire to all the leaves.
- Connect the leaves together and secure the tape with tape, making branches.
- Glue the branches to the stem.
The foamiran peony is ready! I recommend watching this video!
Peonies from foamiran DIY Tsvoric Peonies from foma
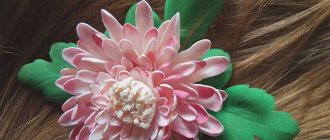
Tea roses for decoration
Small foamiran roses are ideal for decorating wreaths, hoops and hairpins. Choose foamiran of one or more adjacent shades and cut a lot of small round petals about 1.5 cm in size. You will need from 6 to 10 pieces for one flower - so count the number in advance.
Place each petal on the sole of the iron for a couple of seconds and immediately curl it. Then you need to straighten them and shape them with your fingers: bend them a little in the middle and stretch the edges. For the frame you will need a thin wire with a loop at the end - according to the number of flowers.
Begin to tightly wrap each wire with petals in a spiral and form buds. Glue each next circle less tightly and bend the edges manually, with a toothpick or tweezers. If necessary, you can then add small leaves and sepals.
Photo: copytsvet.rf
Photo: posudaizkamnya.ru Photo: teplo-orenburga.ru
Did you like the post? Subscribe to our channel in Yandex.Zen, it really helps us in our development!
Tulips
You will need: foamiran in bright colors, green foamiran, floral wire, dry pastel, wet wipes, tape, floral buds, glue, scissors, ruler, iron, cardboard, toothpick.
Master Class
- Draw a tulip petal 6 cm high and 3.5 cm wide in the center on the cardboard, then cut out the template.
- Draw a tulip leaf 25 cm long on cardboard and 3.5 cm wide in the center, then cut out the template.
- Trace the petal template onto foamiran with a toothpick and cut out 6 petals.
- Trace the leaf template onto green foam paper with a toothpick and cut it out.
- Tint the petals and leaves of the future tulip using a damp cloth and dry pastel.
- Heat each petal by applying it to the iron, then give them a realistic shape by stretching them in width and length.
- Heat the tulip leaf and fold it in half lengthwise.
- Glue 3 petals to the flower bud, completely covering it.
- Glue the remaining 3 petals, placing them in a checkerboard pattern.
- Glue a piece of floral wire into the leaf.
- Wrap the stem with tape and attach the leaf.
- Make a whole bouquet of tulips in the same way.
Foamiran tulips are ready!
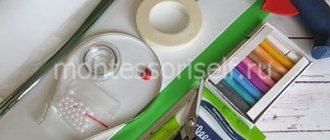
Necessary tools for working with foamiran
It is easier to work with decorative foam sheets with special tools. You will also need to follow some rules and stock up on stencils and templates. To create various elements in the form of flower stems, petals, leaves, you will need the following materials and equipment:
- Colored crayons, paints. Used for tinting and adding naturalness to various prefabricated elements. Dry, oil pastels are more often used;
- Tape. The main purpose is to process stems, decorate twigs and legs. Thanks to the adhesive base, when stretched, it is perfectly fixed on wire, wooden sticks, and plastic;
- Flock powder. Using a special powder, a velvety effect is created. It is useful in the manufacture of velvety sheets and anthers on stamens;
- Heating elements. To prepare the material for work, to thin it, use an iron, candle fire, burners, and your own hands;
- Scissors. Regular stationery or tailor's cutting tools will do. Small nail scissors are useful for cutting out small details. Sometimes edge processing is carried out with figured products;
- Molds. With the help of such devices, the workpiece is given the natural texture of living plants. Realistic casts are cast from plastic, giving them a deep, rough, rough surface;
- Shaped hole punches. They will be indispensable when working with small parts. They are used to make small flowers, leaves, and various decorations;
- Bulki. They help create deep petals, like those of peony plants and bush roses. The balls are perfectly smooth and come in different sizes;
- Floral wire. This is a special wire wrapped in paper. It varies in thickness, color and length;
- Glue. To collect voluminous bouquets or create crafts from many parts, you will need strong glue and a hot gun.
creative flowers
You will need: textured foamiran in bright colors, glue stick, glue squares, cocktail tubes, shaped hole punch (optional).
Master Class
- Cut the foamiran into 12 strips of the same size.
- Glue the ends of each strip together to form a drop.
- Glue 12 droplets together to form a flower.
- Prepare 2 circles of different diameters of foamiran of a different color. For convenience, use a figured hole punch.
- Glue a larger circle as the core, and attach a smaller circle on top, through a glue square.
- Glue a tube on the back of the flower as a stem.
- Seal the place where the tube is attached with a circle of foamiran.
- Cut out leaves from green foamiran and glue them to the stem.
- Make a few more daisies in the same way.
Creative foamiran flowers are ready! I recommend watching this video!
Hair bands Simple Flowers made of foamiran
What is needed for plastic suede floristry
To make flowers from foamiran yourself, you don’t have to buy special equipment and tools. You already have everything basic at home:
- Scissors – necessary for cutting parts, preferably sharp ones. It is convenient to cut small petals with nail scissors.
- Iron – needed to form curves and create volume. Under the influence of heat, the form becomes plastic, it is easy for it to give the desired shapes, volumes and bends. After cooling, the shape remains, the part seems to freeze. It is important to dry well so as not to lose what has been achieved.
- Glue gun - useful for joining parts. Some crafts require clear superglue or silicone craft glue.
- Molds make it easier and faster to create realistic petals and leaves with many veins and plant-specific patterns. Molds must be selected taking into account the flower being produced. Otherwise you will end up with a rose with chamomile petals.
- Foil - required for making the base for assembling the bud; it is light, so it does not weigh down the product.
Additional materials often found in MK include:
- wire for forming a stem;
- tape to hide the wire;
- stamens - to decorate the center of the flower;
- beads, seed beads, various accessories.
Chrysanthemum
You will need: glitter foamiran, scissors, glue gun, soft green wire.
Master Class
- Fold the foamiran sheet in half lengthwise, then cut it.
- Take one piece and apply glue along the edge.
- Fold in half and glue the workpiece.
- Cut the fringe along the entire length of the strip.
- Apply glue and twist the strip to form a bud.
- Apply glue to the back of the bud and insert a soft wire as a stem.
The orange foamiran chrysanthemum is ready!
Making a lamp
Use the skills of creating beautiful roses to create a spectacular lighting fixture. Such a lamp is created from an ordinary round lampshade, a wire is drawn to the bottom of which, and the section with the socket is installed in a protective box.
The wire must have a switch for ease of use of the lighting fixture.
The lampshade is covered with roses or daisies over the entire area. A foil of a suitable shade is glued to the bottom side of the box and to the sides.
Any blanks depicting one or another type of ornamental plants are suitable for decorating the lampshade, the main thing is that they are light. The petals are tinted along the edges so that they resemble real flowers.
Having mastered the technique of using foam, you can create more complex products:
- dolls;
- complex bouquets;
- three-dimensional paintings;
- costume jewelry;
- fashionable hair accessories.
The plastic material is easy to work with, it can take any shape, and it is easy to draw the necessary details on it. If desired, a hobby can be turned into a profession if you learn how to make beautiful crafts from foamiran. They can be used to decorate home interiors and create fashionable looks.
Lily
You will need:
- sheets of foamiran green and white;
- paints (preferably acrylic);
- sheet of cardboard;
- stamens (they can be purchased at a craft store);
- heat gun;
- wire (for the stem);
- iron;
- brown felt-tip pen and pencil;
- toothpick;
- scissors.
Master Class
- On cardboard we draw the outline of a lily petal, 6 cm long, and cut it out.
- We apply this template to white foamiran, trace it and cut it out. To create a lily we will need 6 such blanks.
- We tint the petals on both sides. A light pink or lilac color will look more natural.
- Next, heat the petals on an iron. While they are heated, use a toothpick to press out the veins. This will make our flower whiter, more textured and more realistic.
- We also heat the edges of the petal to give them wavy curves.
- On each petal we draw the bottom and dots with a brown felt-tip pen, making it look like the petals of a living flower.
- We glue the prepared stamens to the wire.
- On a sheet of green foamiran we draw 3 oblong leaves for the lily and cut them out.
- Heating with an iron gives texture to the petals.
- We assemble the flower: first glue 3 petals around the stamens, glue the remaining three next row, observing the checkerboard sequence.
- The last step will be gluing the green leaves.
The foamiran lily is ready! I recommend watching this video!
Flowers from foamiran
Choosing what color and paint to paint foamiran
Foamiran is sold in a wide range of colors, but different situations require a certain shade. This is easy to fix, as this material can be easily painted, but you need to know what mixtures are suitable for effective application and fixation. For this reason, there is a need to correctly paint over your own work.
When buying paints, take into account the following points:
- Palette of smudge pigment.
- How is this pigment applied? It should lay down easily, evenly, and with high quality.
- Durability of the coating.
- Is shading possible? Because sometimes blurry, unclear contours are needed.
- Final drying time.
It is optimal to use acrylic, oil paints and pastels.
Poppy
Poppy made from plastic suede turns out very bright and beautiful. It is not difficult to create even for beginning craftswomen. For clarity, we offer you a master class on making red poppies.
You will need:
- red and green foamiran;
- sheet of cardboard;
- toothpick;
- black threads;
- glue gun;
- scissors;
- 20 cm wire;
- bead with a diameter of 2 cm.
Master Class
- Draw patterns of poppy petals on cardboard and cut them out. You can make several templates of different shapes to make the poppy more realistic.
- From green foamiran we cut out a circle with a diameter of 6 cm.
- We insert the wire into the bead and secure it by twisting it. This will be the stem of the flower.
- Using an iron, heat the circle and wrap the bead in it. The edges are secured around the wire.
- We wrap the resulting ball with black threads, as shown in the photo.
- Next, cut out the red poppy petals using the templates.
- To give the petals a wavy texture, fold them like an accordion and twist them, squeezing them with your fingers.
- Next, glue the red petals to the stem. It is enough to make two rows to make the flower lush.
- Cut out leaves from green foamiran. To make the leaves realistic, we make cuts along the entire edge and roll them between our fingers.
- Cut the wire and glue the leaves.
Foamiran poppy is ready!
What a novice florist needs to know
Beginners need to keep in mind that:
- Foamiran is a plastic and stretchable material, but it can be stretched no more than 10%, otherwise it will be unsightly or tear.
- Pencils and pens should not be used when cutting. You need to trace patterns and draw details with a thin, but not sharp, object. For example, a knitting needle or a toothpick. The pressure should not be too strong.
- Plastic suede melts at high temperatures and contact with fire; this must be remembered when heating workpieces. The iron is heated at the lowest setting to 100 degrees maximum (“silk” or “wool”). And the parts are applied for 1-2-3 seconds to form a small bulge.
- For stitching, you must choose a thin needle with a thickness of no more than 1 mm, so as not to tear the foamiran.
Chamomile
Chamomile has long been considered a symbol of family. Despite its simplicity, it is a very sunny and bright flower. It is no coincidence that weddings are so often decorated with daisies. To easily create a charming daisy from foamiran, we suggest using a step-by-step master class and photos.
You will need:
- white, yellow and green foamiran;
- sheet of cardboard;
- protractor;
- ruler;
- pencil;
- glue.
- thin stick for the stem or wire.
- iron or candle.
Master Class
- We cut out 4 circles of different diameters from white foamiran (for example, 9 cm, 8, 7, and 6 cm). To make the circles even, use a protractor.
- Using scissors, we make the shape of the petals around the entire circumference, then cut them, leaving about 3 mm to class=”aligncenter” width=”700″ height=”920″[/img]
- We heat the ends of the petals and give them shape.
- From yellow foamiran you need to cut a long strip (about 27 cm) 2 cm wide. This will be the center blank.
- We make cuts along the entire length of the strip with scissors to create a fringe.
- Next, lubricate the strip with glue and twist it.
- We attach the core to the wire.
- Next, we string the petal blanks onto the stem, starting with the smallest circle, and do not forget to lubricate with glue.
- For the backing from green foamiran, cut out a circle and make cuts. It will be the final row in creating the chamomile.
Chamomile from foamiran is ready!
DIY crafts
Options for crafts can be gleaned from the surrounding reality, and then try to make crafts with your own hands.
People with a developed wild imagination create truly masterpieces. It is quite possible to create fairy-tale characters, transfer them to an unreal setting, dress them in unusual clothes, all this can be done from synthetic suede.
The crafts turn out to be soft, airy in appearance, and incredibly beautiful things. Handmade crafts, a wonderful gift for significant dates, necessary accessories and decorative items displayed on shelves.
Tender rose
Rose is the queen of flowers. A flower beloved by many women can be made from foamiran; moreover, it will not wither and will please the eye for a long time.
You will need:
- green and pink foamiran;
- scissors;
- glue;
- a piece of foil;
- thick wire.
Master Class
- From foamiran we cut out two types of petals of the future rose, identical in shape. But different in size. You should get 5 petals of each size.
- Place each petal on the iron and use your fingers to stretch the edges.
- We make a small ball from a piece of foil and attach it to the wire.
- Glue a small petal around the ball.
- So we glue petal by petal in a circle, forming a bud.
- We make leaves from green foamiran and glue them to the stem.
The foamiran rose is ready! I recommend watching this video!
Realistic rose from foamiran, flowers from Thomas Tsvoric
An easy way to create a rose for beginners
A charming flower can be created in many ways. Beginning craftsmen can form a rose from several individual petals or prepared petal parts. The second method is simpler. The next master class will be devoted to exactly this method of collecting flowers.
To work you will need pink or red foamiran and a small green piece for the leaves. You also need a set of standard tools and several suitable paper templates. We prepare patterns for the petals - we cut out three different circles from paper, divide them into five parts, and form a rounded petal from each sector.
We apply the templates to the foamiran and outline the contours with a toothpick. Cut out one piece of each size. If desired, the edges of the petals can be tinted. Heat the iron and apply the pieces one at a time, using stretching movements to create a bulge, and curl the edges in the opposite direction.
We make a bud from several petals. Roll a ball out of food foil, put it on a toothpick and begin gluing the petals. We put the smallest petal part on a stick and glue it at the base. Now we fix the petals to the central bud in a checkerboard pattern. When one row is completed, we proceed to the next detail and proceed by analogy with the previous petals.
Ranunculus
You will need:
- red foamiran;
- scissors;
- foil;
- glue gun;
- wire for the stem.
Master Class
- Cut out red petals of different sizes. To make the flower lush, it is better to make as many petals as possible.
- We twist a small ball of foil or other material and attach it to the wire.
- Next, we form the flower: starting with the smallest petals, glue them one by one, overlapping. Before doing this, give them a wavy shape.
Ranunculus from foamiran is ready!
Glitter and beauty
Shiny foamiran is a chic, sparkling material for crafts, generously endowed with a sprinkling of sparkles.
Crafts made from it are distinguished by sophistication and extraordinary charm. It is used to make decorative bows for girls, to create Christmas tree decorations, fantastic flowers, butterflies, hearts, decorating hairpins and headbands.
As an addition to an evening dress, flowers made of shiny synthetic suede are distinguished by their beauty and grace.
The practicality and pliability of the material makes it indispensable in use.
Applied creativity has attracted people's attention since ancient times. For some it was entertainment, an interesting way to spend leisure time, for others it became a hobby for life, which also brought additional income.
In any case, this is a useful and very exciting creativity that develops in people an aesthetic perception of the world around us.
Sunflower
Using foamiran you can create a wide variety of flowers. Hydrangea and sunflower also turn out great. They are made approximately according to the same principle, the only difference is the color of the foamiran. We invite you to create a sunflower using our recommendations.
You will need:
- foamiran (white or yellow, black, green);
- thick paper;
- paints (can be acrylic);
- green floral ribbon.
- toothpick or wire.
Master Class
- We cut out petals from foamiran in four different sizes, 12 pieces of each.
- If you use white foamiran, then you need to paint all the petals with yellow paint. To skip this step, you can take yellow right away.
- We make green leaves: either from white foamiran followed by painting, or directly from green.
- We twist the black strip of foamiran, having previously cut the edge along the entire length, and glue it together. The length of the strip is about 1 m and the width is 2 cm. The result is the core of a sunflower.
- We heat all the petals and then glue them around the center. We complete the process by gluing green leaves.
The foamiran sunflower is ready! I recommend watching this video!
Foamiran flowers, elastic band with chrysanthemum / DIY TSVORIC
Other master classes on floristry from foamiran
We also have step-by-step lessons on our website that tell and show in detail how to make flowers from foamiran and various accessories with them. Check out these tutorials and be sure to make something yourself.
A lush peony made of bright fox will decorate a hat, clothes, a bag, and even a refrigerator if you attach a small magnet to the back.
Daffodils made of white and yellow foamiran 2 mm thick. A very simple technique for making hairpins for every day.
Delicate spring composition of snowdrops made of foamiran 1 mm thick. An interesting brooch for a hat, cardigan, coat or handbag.
Bright blue cornflowers for children's rubber bands made from Iranian foamiran. The flower template is very simple and suitable for beginner needlewomen of any age.
Foamiran orchids are ideal for beginners; even children can make these flowers with their own hands. An interesting decor that will decorate the hallway or bathroom, because it is not afraid of humidity.
Lilies made of plastic suede cannot be classified as simple flowers, but the result looks professional. Lilies can be used to make large hairpins or brooches.
And this flower for a girl is made using the kanzashi technique, which is not entirely typical for plastic suede. The author of MK Svetlana, a master of kanzashi, conducted an experiment and was pleased with the result!
What did you like most? Start with this! And if something is not clear, carefully study the master class again, everything will definitely work out!
Flowers made from foamiran are durable and can even be washed carefully. However, it is recommended to store products and material away from heat sources, trying not to wrinkle them.