Examples of paper gazebos
Before creating a paper gazebo, you should clearly determine its size and the desired type of frame.
The low resistance of paper is often a limiting factor when creating large layouts. Long ceilings and support posts cannot always support the weight of the roof and additional decorative elements.
To get around this feature, there are several technologies for creating paper structures:
- Gazebos are created using additional reinforcing materials: matches, toothpicks.
- Each element is strengthened with a liquid adhesive, which gives even an ordinary sheet of paper sufficient strength.
- Craft designs are being developed in which each load on the load-bearing supports is clearly calculated. With proper weight distribution and the presence of additional supporting elements, you can get a fairly durable craft.
Adhesive technology for creating layouts allows you to develop small round frames.
Thanks to gluing, the entire process of assembling the craft takes a short period of time. After the fastening agent has dried, the gazebo can be decorated immediately.
If wooden sticks, matches or toothpicks are used during assembly, then the structural complexity of the layout increases significantly.
Another qualitative indicator—the strength of each element—grows in direct proportion. Thanks to solid sticks, you can create entire paper palaces that will withstand almost any weight of additional decor.
Types of gazebos
There are many types of gazebos. If we talk about the material taken for construction, the buildings can be wooden, brick, iron or concrete.
Some come up with original versions of buildings, constructing them from pallets, plastic pipes and other materials that are at hand.
By design, gazebos can be open or closed, simple or complex. They can be disassembled or be a single structure attached to one place.
There are a huge number of types of gazebos, and to find the right one, you need to take into account what materials you have, how much space for construction is available on your site and other factors. It is also worth taking into account personal preferences and desires.
Drawings for self-assembly
Before creating a paper craft, as in the case of real buildings, it is necessary to develop the correct drawing. The more details and technological features are reflected in this plan, the better the final result will be.
At the preliminary stage, it is necessary to imagine how to make a paper gazebo strong enough using the simplest means at hand. After developing the basic concept of the layout, a set of tools is thought out, and the amount of materials is calculated.
Before starting assembly, you should specify the following details of the craft:
- Her size.
- Frame shape.
- The type of roof and the type of its attachment to the base.
- The presence of windows and their number in the craft.
An important aspect of planning is the complete development of a separate plan for decorating the assembled layout.
Many handcrafters consider the technical design plan as an insignificant template step. In this case, they assign the main role to the unique decoration of the craft.
You can develop one general drawing, which indicates the smallest nuances of the future structure. With this approach, you should take time to work on each floor and even a minor individual element.
Construction of the base and frame of the gazebo
Assembling the base of the gazebo
Saw off the sides of the base boards, calculating their length using the formula above, and saw off one of the ends at an angle of 45 degrees to facilitate the joining process. Perform assembly using self-tapping screws.
Octagonal gazebo base
The outer board should have a cross-section of 250x50 millimeters in order to hide the ends of the floorboards.
Having assembled the perimeter frame of the gazebo and installed it on the support bars, fasten inside it a cross made of paired boards and several parallel ones, installed on the edge for greater strength. Connect parts end-to-end in the same way using self-tapping screws, screwing them in at an acute angle. You can further strengthen the base of the floor using steel corners.
Gazebo manufacturing technique
If there are a large number of animals in the vicinity and to prevent them from penetrating under the base of the structure, secure a fine-mesh steel mesh from the inside of it using a construction stapler or nails. The lower, free part of the fence can be sprinkled with large crushed stone.
Flooring
The next stage of work is flooring. To do this, prepare pre-treated boards and select the future laying pattern. In our case, the floor consists of four mutually perpendicular segments. To increase ventilation, a small gap of about 5 millimeters is made between the individual boards, which is adjusted by inserts of equal thickness, for example, made of plywood or sheet plastic.
Flooring in the gazebo
Fastening the floor parts is also done using self-tapping screws. In this case, the installation sites of the fasteners are pre-drilled with a drill, the diameter of which is equal to the diameter of the screw head, to a depth of about 10 millimeters. After installing the fasteners, the hole is decorated with round plugs machined from waste.
To prevent blood-sucking insects from penetrating through the gaps between the boards into the gazebo, we recommend installing an anti-mosquito plastic mesh directly under the floor parts during installation.
The pile of installed floorboards is covered around the perimeter of the base with a narrow plinth made of the same material.
Installation of vertical racks
Having completed the installation of the flooring, we proceed to installing the gazebo posts. They are made from 50mm thick boards of equal length, joined in pairs to give maximum strength.
We additionally connect each of the installed stacks with bars in the upper part, thus closing the frame of the gazebo.
Assembly and installation of the rafter system
The next, rather complex stage of work is the installation of an eight-pitched roof. To manufacture it, it is necessary to prepare eight rafter beams, the length of which will depend on the angle of inclination of the slopes and the amount of the roof extending beyond the outer boundary of the walls. The lower part of the rafters is attached to L-shaped brackets located directly above the ends of the posts.
Roof design options
In the upper part, the ends of the boards are attached to a special octagonal element made from a square section of timber by cutting off all the corners by a certain amount, which is determined from the formula for determining the length of the side of an octahedron.
The ends of the rafters can be joined using inserted round tenons, placing them at different distances from each other to maintain maximum strength characteristics.
After installing all the rafters and securing them at the bottom and top, secure the lintels approximately in the middle of the parts.
Model made from wooden toothpicks
Creating a paper model reinforced with toothpicks will require “iron” patience.
Attaching small wooden teething sticks to paper bases and walls is considered a very tedious job, for which not every person has enough time. To create a durable frame, in addition to paper sheets, cardboard with different textures is used.
Professional craftsmen who assemble crafts with their own hands use specialized cardboard designed for appliqués. It has a multi-layer structure, is sufficiently resistant to tearing, and resists getting wet.
The great advantage of applique cardboard is its color variety, which makes it possible to create colorful layouts.
The use of toothpicks in the construction of crafts gives them realism. A woody structure appears, which enhances the naturalness of the homemade object.
Toothpicks can decorate every element of a craft while improving appearance and structural strength.
Source of the article: https://besedkis.ru/material/raznoobrazie/besedka-iz-bumagi
There are many advantages to this type of fence
The main one among them is the ideal evenness of the pickets, ensured by such quality of wood as slimness. In addition, among the useful properties the following can be noted.
- High strength and durability - the service life of the fence is calculated in decades.
- Eco-friendly and natural – this is 100% natural material.
- Simple and quick installation - if desired, you can do it yourself.
- A unique and colorful design that will appeal to many people.
One should not lose sight of the relatively inexpensive cost, due to the use of waste material for their production and the elementary technology of producing birch pencils.
Paper gazebo mockup
Paper is an excellent material for creativity. Even very complex architectural compositions can be created from it. One option for using unnecessary waste paper is to make a gazebo out of paper. In this case, a paper gazebo model can be made in several different ways.
Much depends on the scale of the plans and the configuration of the future layout of the paper gazebo.
Mini pencil sculptures (video)
Pencils are an excellent material for creating various design products. When working with them, the main thing is to be patient, then everything will work out.
Preparatory stage
Regardless of what kind of paper gazebo you are going to make, you need to prepare properly. First of all, you need to imagine a paper gazebo in your own imagination. You should specify the image as much as possible, coming up with all the details. This applies to size, layout shape, roof type, presence and number of windows, and so on.
When the concept of the future layout is ready, you should draw the project. Without design, you won't get a good layout. The work will have to be redone many times to achieve the desired result.
It is recommended to draw the project both as a general plan and to work out each element of the gazebo separately. A do-it-yourself paper gazebo model, created according to a detailed design, will meet all your wishes. It will be a durable and beautiful design, and the process will be a fun time.
Which geometric shape of the structure to choose?
When a decision is made on a suitable form, first of all it is necessary to determine the dimensions of the future structure. The choice and arrangement of furniture depends on this.
Recommended room height - 2.3-2.7 m. Area - from 10 to 20 sq.m.
Popular types of geometric shapes for summer buildings are given below.
Square
The same dimensions of walls and other elements simplify the creation of the structure.
Budget options for square-shaped wooden and plastic gazebos can be purchased ready-made in disassembled form. The assembly process will take a couple of hours.
Those who want to build with their own hands will not have to spend a lot of effort. Even beginners can handle this. To simplify the work, it is worth drawing up a construction diagram in advance and calculating the dimensions of all parts.
The frame is made of metal and wood. The roof is covered with flexible tiles, ondulin, and metal tiles. The walls are decorated with forging and carved wooden figures.
Rectangular
This form is more common than others.
Average area - 10 sq. m. You can put a barbecue or oven.
A simple rectangular gazebo has maximum free space, making it possible to conveniently place furniture and separate the kitchen and dining areas.
They are made from:
- wood;
- bricks;
- metal frame covered with polycarbonate, corrugated sheeting;
- plastic;
- forging
Several people can comfortably fit inside - this is a good place for summer celebrations and celebrations.
Round
Quite a rare form due to the complexity of construction.
Popular materials:
- forged metal;
- brick;
- tree.
Creating an original design yourself will not be easy. If you have the funds, it is better to prepare a sketch and invite specialists who will do it turnkey and quickly.
The photo below shows an example of a wooden building - an open gazebo.
It is installed on a paved tile platform. The lower part of the walls has been replaced with carved wooden planks. The roof has tiles on top of the sheathing. Feature article: “Construction of a round gazebo.”
Polygonal
Despite the fact that the gazebo has many angles - from 5 to 12 - its shape resembles a round one.
Making every detail yourself is difficult. Therefore, such structures are often sold prefabricated with segments already selected to size. This design can be assembled quickly and easily by craftsmen.
pentagonal
Many companies offer portable pentagonal modular gazebos. The material is:
- wood (boards, picket fence);
- metal frame covered with polycarbonate;
- forged metal;
- plastic.
Convenient for seasonal country holidays.
Photo: a mobile pentagonal gazebo made of wood is a great place for drinking tea
The disadvantage is poor capacity. Not intended for large numbers of people. More suitable for family tea parties.
hexagonal
This can be either a summer shed or a glazed garden house with a stove and chimney.
The hexagonal shape and original decoration give the building an impressive appearance and emphasize the status of the owners.
The photo above shows a budget hexagonal design, where benches are attached to the walls to save space.
octagonal
This form is characterized by having more free space inside than previous types. A dining table with chairs can fit here. A convenient place for celebrations in nature.
Can be decorated in different styles.
On large areas, a gazebo combined with a swimming pool, bathhouse, and summer kitchen looks interesting.
What do you need for work?
To make mock-ups of gazebos with your own hands, you need to have the appropriate equipment. You will need thick paper. You can use special cardboard for applications. This is a multi-layer material that is tear-resistant, can withstand wetness and has an even texture. In addition, this craft cardboard is sold in several color options. This will allow you to create a colorful gazebo layout, as well as combine different colors.
To connect individual structural elements, you can use regular PVA glue. It is ideal for paper work as it dries quickly and provides an equally fast and strong adhesion.
To work directly with cardboard, you need to have small and sharp scissors. In some cases, the technology for creating such layouts involves the use of sticks. They are used to give the structure strength. In fact, they imitate the support pillars of a real gazebo.
Simple paper designs
To create a simple round arbor, you can use adhesive technology. With its help you can get a beautiful layout in a short time. Thick cardboard can be used as a base. The structure will be installed on it after the work is completed.
To make the structure, it is necessary to prepare the adhesive composition by diluting the glue with water in a basin. The specified composition should be thoroughly mixed until a homogeneous mass is obtained. You need to put a sheet of cardboard of the required size into the mixture. After a few seconds, this sheet will be saturated with adhesive. After which, you just need to roll it up, getting a cylinder. The dimensions of the gazebo will depend on the size of the sheet of cardboard. The main thing is to carefully connect the ends of the sheet to form an even circle.
When the cylinder is ready, you need to let the adhesive composition dry. This will take 10 – 15 minutes. The windows can then be carefully cut out.
If desired, you can cut out most of the sheet, leaving the base of the gazebo. The result is a semi-closed structure.
Choosing a roof for a gazebo
The shape of the roof is selected depending on the shape of the gazebo. Simple square and rectangular structures have single- and double-pitched roofs. If desired and with an unlimited budget, the structure is completed with a hip or hip roof.
There is also a dome that suits rounded gazebos like a Mediterranean rotunda. Inside such a gazebo there is no fireplace or it is open. Other designs include a chimney that exits through an opening on the side, the center or the roof slope.
In addition to the shape, you will have to choose the roofing material. It is customary to finish the roof of the gazebo:
- Flexible tiles;
- Profiled sheeting;
- Polycarbonate;
- Tarpaulin.
All of these materials have one significant advantage - light weight. They can also be easily and conveniently dismantled.
DIY cardboard gazebo
Nov 15 • Uncategorized • 154 Views • No comments on DIY cardboard gazebo Contents
Almost any creative craft can be made from paper. With its help, even the most complex architectural models are created for demonstration to the general public. From unnecessary waste paper you can make a small paper gazebo, which will be an excellent decorative addition to any three-dimensional layout.
There are several ways to make a paper holiday house.
Properties and applications of birch wood
What is the value of birch wood? The specific pattern of processed wood makes birch veneer and plywood a popular material in the manufacture of furniture. Masters of artistic wood carving love to work with pliable wood.
Birch firewood is the best type of wood fuel: it burns beautifully, without sparks; high heat transfer; do not emit unpleasant odors; good for use in open fireplaces.
A simple gazebo made of birch pencils
A fence made of birch pencils is a worthy alternative to stone fences, a concrete fence, or a metal mesh fence.
What are the advantages of timber for this type of work?
This material, unlike boards or logs, is characterized by the absence of unpleasant defects and there are no cracks in it. All the bars fit in size and this helps in working with them. Due to these features, timber gazebos are highly valued by Russians and are often created for various purposes.
But it is necessary to purchase a really high-quality version of the timber. The most commonly used wood for its manufacture is pine, larch, cedar or spruce. Any of these options is suitable for creating a gazebo. But timber comes in two slightly different types:
- Profiled, created from a single piece of selected wood. It is environmentally friendly and recommended for use in the process of creating a gazebo;
- The glued version, which is created using a press and gluing various parts of wood. In general, this version is also considered suitable, and even offers increased functionality, but formaldehyde is used for gluing, which is considered dangerous to human health.
If there is too much of it, then this may affect people’s well-being, especially in the summer, since the heat will become a catalyst for its release into the environment. It can even be absorbed into meat used to create barbecue.
Designing a gazebo using the program
If you want to create a full-fledged gazebo project in 3D, then we recommend that you use the Planner 5D . It is shareware, you can work online, and its functionality is more than enough to model a gazebo.
The program has many possibilities. First of all, we create walls of certain sizes, for example, 3 by 3 meters. In the future, we build walls, make window openings, select a roof, and so on.
I would not say that it is easy to use, but it is intuitive at the button level. At least I made the window box in 2 minutes. .
Examples of paper gazebos
Before creating a paper gazebo, you should clearly determine its size and the desired type of frame.
The low resistance of paper is often a limiting factor when creating large layouts. Long ceilings and support posts cannot always support the weight of the roof and additional decorative elements.
To get around this feature, there are several technologies for creating paper structures:
- Gazebos are created using additional reinforcing materials: matches, toothpicks.
- Each element is strengthened with a liquid adhesive, which gives even an ordinary sheet of paper sufficient strength.
- Craft designs are being developed in which each load on the load-bearing supports is clearly calculated. With proper weight distribution and the presence of additional supporting elements, you can get a fairly durable craft.
Adhesive technology for creating layouts allows you to develop small round frames.
Thanks to gluing, the entire process of assembling the craft takes a short period of time. After the fastening agent has dried, the gazebo can be decorated immediately.
If wooden sticks, matches or toothpicks are used during assembly, then the structural complexity of the layout increases significantly.
Another qualitative indicator—the strength of each element—grows in direct proportion. Thanks to solid sticks, you can create entire paper palaces that will withstand almost any weight of additional decor.
Decorating a built gazebo
Board railings installed at an equal distance from the floor and attached to the posts will help divide the vertical space of the gazebo.
The octagonal gazebo itself looks very elegant, but the arched door and window openings add additional originality to the product. To make them, you can use bent parts that are purchased at hardware stores, or you can make them yourself. The radius of curvature is quite large. Having made a template from cardboard, fiberboard, sheet plastic or plywood, mark wide boards 30-40 millimeters thick and cut out the arcs with a jigsaw or on a band saw. A hand router is suitable for chamfering.
To protect the gazebo from moisture and provide additional decoration, cover all wooden surfaces with two layers of some kind of protective coating. For these purposes, you can use both a brush and a paint roller. It will be especially convenient when covering rafters and sheathing.
Option for decorating an octagonal gazebo with bars
In the summer, the door and windows can be covered with mosquito netting; in the fall, the openings can be blocked with glass by installing an artificial fireplace inside.
Unusual home
When the couple found out the prices for country houses, they were horrified. The average cost started from £16,000. The family didn't have that kind of money, so Dona and Darren decided to go a different route. They decided to create their own house using a container.
After working hard on the project during lockdown, the couple managed to create the stunning home for just £5,700 - much cheaper than other similar listings.
“Our daughter has a rare genetic disease,” says Dona, who takes care of her daughter. “She often sat outside in her little playhouse. We wanted to do something more convenient for her. While searching for ready-made options, we came across a video of people converting shipping containers into real homes. In many other countries they are used for cheap living quarters.” So the couple came up with the idea of purchasing a similar container for their daughter.
I cool everything I can and take a cool shower myself to fall asleep in the summer.
Italians heard Grigory Leps for the first time: their reaction to his singing style (video)
My neighbor was surprised when she saw a fountain in my yard: she made it out of bottles
“As soon as she came up with the idea, she started convincing me,” Darren says. “But I really didn’t like the containers: they were ugly!” I couldn't imagine such a big metal thing would look good in our garden."
Gazebos with stove or barbecue
Everyone loves cooking over a fire - this is perhaps the most favorite pastime in the country. Take the grill outside, arrange chairs and tables, and gather family and friends together. But bad luck - it started to rain, a strong wind blew, or perhaps annoying insects prevented you from concentrating on what you love. You can, of course, take care of a temporary canopy, but why put so much effort into it? Having equipped your garden gazebo with everything you need, you can always enjoy cooking outdoors in good company.
To begin with, we note that the gazebo should be open or semi-closed. It is recommended to use reliable materials that do not smoke too much. Brick is ideal for this not only in terms of characteristics, but also in appearance.
Choose the fireplace for the gazebo yourself: grill, grill or barbecue. In any case, you need to take care of safety by closing the fire from the wind and installing a hood.
It is important to properly equip the cooking area. Designate a place to store coal or firewood and install a cutting table. For convenience, it is better to organize storage areas with dishes.
Drawings for self-assembly
Before creating a paper craft, as in the case of real buildings, it is necessary to develop the correct drawing. The more details and technological features are reflected in this plan, the better the final result will be.
At the preliminary stage, it is necessary to imagine how to make a paper gazebo strong enough using the simplest means at hand. After developing the basic concept of the layout, a set of tools is thought out, and the amount of materials is calculated.
Before starting assembly, you should specify the following details of the craft:
- Her size.
- Frame shape.
- The type of roof and the type of its attachment to the base.
- The presence of windows and their number in the craft.
An important aspect of planning is the complete development of a separate plan for decorating the assembled layout.
Many handcrafters consider the technical design plan as an insignificant template step. In this case, they assign the main role to the unique decoration of the craft.
Conclusion
Sufficiently detailed drawings of rectangular gazebos can be found online on our website. At the same time, independent construction of a diagram is also quite within the capabilities of anyone who has at least a minimal understanding of engineering graphics.
Guided by the tips given, as well as by watching the video in this article, you will be able to master this technology and draw your future gazebo on paper or in a design program.
Did you like the article? Subscribe to our Yandex.Zen channel
Sketches of gazebos with drawings and dimensions
Available sizes can be proportionally increased or decreased. It is important that you understand that with a significant increase in size, the frame requires a more powerful one. Don’t forget about this, and everything will work out for you: a gazebo made by yourself will be beautiful and reliable.
Simple wooden gazebo
Almost the same project, but with different dimensions: the top point of the roof is raised higher, which makes it seem visually lighter. The gazebo is also quadrangular, the roof is hipped.
Square wooden gazebo for a summer house or garden
When installing such a roof, the most problematic ones are the two places (nodes) indicated by circles. How to make them, see the photo below.
Problematic components when installing a hip roof on a gazebo
Approximately this is how you can mark it in height and stuff the sheathing under the roofing material
Chinese style gazebo (with drawings and dimensions)
Project with all dimensions, foundation markings, roof truss system, etc. Arranged in a photo gallery.
Exterior view of a wooden gazebo in the Chinese style. Main facade - height from floor to top frame 2,160 m Main facade without roof: vertical posts 150 * 150 mm Side view. The fence (railing) is 740 mm high, raised 150 mm above the floor level. The height of the railing in the gazebo is 890 mm. Cross-section of a wooden gazebo. In the photo on the right - how to make raised ends of the roof. Longitudinal section. Plan for the arrangement of columns under the gazebo. Bottom trim. The locations of the racks (beam 150*150 mm) are marked with crosses. Top frame Installation of floor beams (numbers are the designation of the material from the specification) Rafter system Detailing of node 2 - how to install racks How to make steps to the veranda - node 2 Attaching the rafter system to the top frame - on wooden pins Detailing of the fence Specification with the dimensions and volume of necessary lumber for this wooden gazebo project Specification with the dimensions and volume of necessary lumber for this wooden gazebo project
Large gazebo on the foundation
Before you build this gazebo, you need to make a strip foundation. Its parameters depend on the soil, the material you are going to use for the frame: metal or wood, and what you are going to use to glaze it. In general, the width of the tape is about 20 cm, the depth is 20-30 cm deeper than the level of the fertile layer. On heaving soils it is better to make a pile foundation.
Large glazed gazebo
Drawing of a gazebo-swing
The swing gazebo requires special attention: it is fastened very firmly so that the resulting variable loads do not loosen or overturn the structure. To do this, you can extend the legs downwards, dig a hole under them, fill them with crushed stone, compact them, and then fill everything with liquid concrete mortar. If you make the frame from a pipe, no questions arise; for wood you can use “U”-shaped fasteners with a pin mounted in the lower part. Here you can bend it and fill it with concrete.
For even greater reliability, crossbars are attached to the legs, which are slightly recessed into the ground. They are nailed in with U-shaped staples.
Using this drawing you can build a gazebo-swing with your own hands
You can read about making ordinary swings of different types here.
Step-by-step instructions for building a gazebo
Heavy gazebos include structures made of brick, timber and logs. On the other hand, lumber can be used as load-bearing posts for an outdoor gazebo or a load-bearing frame.
The complexity of constructing a gazebo mainly depends on its seasonality and foundation.
Conventionally, construction can be divided into several stages:
- Drawing a sketch;
- Drawing up a drawing according to the sketch;
- Clearing the area;
- Digging trenches, holes or pits for a specific foundation;
- Directly organizing the foundation - filling the recesses with a drainage layer, installing formwork, reinforcing and filling with cement mortar if necessary;
- Construction of the lower trim;
- Installation of load-bearing vertical pillars or stacking building materials on top of each other;
- Construction of the upper trim;
- Organization of the roofing system - installation of rafters on top of the top frame, fastening of the sheathing, laying of waterproofing and roofing material;
- Wall finishing except for openings for glazing and doors;
- Installation of doors and windows if necessary.
If the gazebo has a barbecue, then the latter will have to be erected before building the walls or frame. An appropriate approach minimizes damage to the structure when carrying bricks, and also allows you to build the kiln itself in good natural light. True, the furnace can be mobile metal.
Model made from wooden toothpicks
Creating a paper model reinforced with toothpicks will require “iron” patience.
Attaching small wooden teething sticks to paper bases and walls is considered a very tedious job, for which not every person has enough time. To create a durable frame, in addition to paper sheets, cardboard with different textures is used.
Professional craftsmen who assemble crafts with their own hands use specialized cardboard designed for appliqués. It has a multi-layer structure, is sufficiently resistant to tearing, and resists getting wet.
The great advantage of applique cardboard is its color variety, which makes it possible to create colorful layouts.
The use of toothpicks in the construction of crafts gives them realism. A woody structure appears, which enhances the naturalness of the homemade object.
Toothpicks can decorate every element of a craft while improving appearance and structural strength.
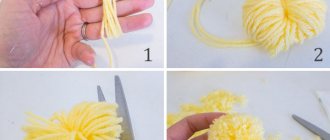
The gazebo model consists of three parts. For work, use thick brown or yellow paper. The development of the gazebo is made from a sheet measuring 100X245 mm. It is better to mark the markings along parallel horizontal lines, on which the required dimensions are found and the necessary lines are drawn. Windows are cut out with small scissors. You can make a simplified version by making windows using blue or light blue paper appliqué. To do this, cut out five parts measuring 30X40 mm. The development is bent along the resulting lines and glued together. A cutout is made on one part, which forms a doorway (Fig. 13, a, b).
Then the roof is prepared. Draw a circle with a radius of 60 mm, then take a compass solution equal to 50 mm, mark six segments on the circle, connect the points found, leave a flap for gluing and cut out the workpiece. Make folds along the marked lines, glue the part and mount it on the base. For the stand on which the gazebo is attached, use a circle of thick paper or thin cardboard.
Paper is an excellent material for creativity. Even very complex architectural compositions can be created from it. One option for using unnecessary waste paper is to make a gazebo out of paper. In this case, a paper gazebo model can be made in several different ways.
Much depends on the scale of the plans and the configuration of the future layout of the paper gazebo.
Chinese roof
To build a house in the Chinese style, it is enough that the building is crowned with a corresponding roof, which is distinguished by upward-curved corners. To a non-professional builder it may seem that this type of roofing is typical only for buildings in the Middle Kingdom. However, to a professional architect such a building does not seem so unique. European architecture can be proud of half-timbered roofs, otherwise called Dutch. Such roofing models can be considered analogues of Chinese roofs.
According to the classification of Western architecture, a Chinese roof is simply a hip roof with a broken slope. In addition, the eastern roof can be compared with a half-hip model if the roof windows and gables are located on two opposite slopes. However, there are also fundamental differences between the Eastern and Western models. That is why, before starting to build an unusual roof, it is necessary to decide whether the roof will only imitate or become an exact copy. It is much easier to build an imitation. To reproduce a Chinese roof, the entire building will have to be built according to the Chinese canon.
The roof of a resident of the Middle Kingdom could tell about the wealth of the owner of the house. If bamboo, cypress or shingles are chosen as the covering, this is a poor man's dwelling. If the roof is covered with clay tiles, wealthy gentlemen live here. It is not advisable to use cypress or shingles. Shingles won't be cheap. Metal sheets or soft bituminous materials can be used as a coating.
Different approaches
The easiest way to explain the difference is using hanging rafters as an example. Tightening in such a design will not allow the rafters to push outwards from the supporting walls, and the rafters themselves will not move apart. The main part of the roofing load will be placed on the struts. In Chinese roofs, the load will be transferred through horizontal tie rods to vertical supports. Pillars were not used because the Chinese used materials such as paper or bamboo to build load-bearing walls. Tightenings serve to create a bend. The bamboo trunks used in construction were easily bent upward, forming the desired bend naturally. Gradually, this form of roofing became canonical. It began to be used even when other roofing materials were used.
5c918198bc4b7d6a2387792c6b4a8679.jpe
2c11d0370f11ff247c77553d133b83f4.jpe
cc42ca295f625cb9f94b95828791b33f.jpe
While European architects preferred the roof load to rest on a triangle, the Chinese preferred a rectangle. A classic Chinese roof will have many specific features that separate it from similar European options. In addition to the bent corners, one can note the steep slope of the roof in the upper part. The eastern roof is often multi-tiered. The roof must have a frame structure. Its overhangs extend far beyond the perimeter of the external walls of the building, which helps protect them from the effects of precipitation. The room will be protected from excess sun. Part of the overhangs are used to move moisture.
Gazebo ideas from centuries past that are applicable today
The gazebo is not an invention of our time. Already in the Middle Ages, a shady resting place with openwork walls entwined with vines formed by trees planted in a circle was valued. In Renaissance gardens, arbors were primarily made of trellises covered with vines. In a magnificent Baroque garden, gazebos were most often made of stone. Such structures were erected in a circular or polygonal plan, located in key places in the system: at the intersection or end of the compositional axes. In landscaped gardens, the space of which was stylized, gazebos took the form of rural huts, ancient temples, Gothic chapels, Chinese pavilions or pagodas. In nineteenth- and twentieth-century gardens, gazebos were built according to historical designs. Today you can easily build one of the options for gazebos presented above in your garden. Retro style is very relevant.
Photos of original wooden gazebos without drawings
This is an option - both stone and wood. On columns made of rubble stone there are supports made of timber
Wooden gazebo in a modern style For lovers of non-standard solutions, there is also a gazebo made of round timber, in the interior of which two trees fit perfectly. Also interesting: a gazebo made of bottles
The style is the same - withered trees are used as supports. And a completely fairy-tale style: a gazebo that looks like Baba Yaga's hut
This is easier to implement, but only for those who have a good spatial imagination. For lovers of solid buildings: a gazebo made of stone. An original gazebo made of octagonal wood. A gazebo decorated in Chinese style.
Preparatory stage
Regardless of what kind of paper gazebo you are going to make, you need to prepare properly. First of all, you need to imagine a paper gazebo in your own imagination. You should specify the image as much as possible, coming up with all the details. This applies to size, layout shape, roof type, presence and number of windows, and so on.
When the concept of the future layout is ready, you should draw the project. Without design, you won't get a good layout. The work will have to be redone many times to achieve the desired result.
It is recommended to draw the project both as a general plan and to work out each element of the gazebo separately. A do-it-yourself paper gazebo model, created according to a detailed design, will meet all your wishes. It will be a durable and beautiful design, and the process will be a fun time.
Instructions for creating homemade gazebos: drawings and diagrams
To properly build the necessary gazebo, you can simply find a diagram on the Internet, choose the model you like and get to work.
Today there are a huge number of drawings, thanks to which it is not difficult to build such a structure.
Simple gazebo
Even an inexperienced craftsman can handle this simple design. In the drawings of such buildings, everything is always described in detail so that beginners can easily complete the task.
A simple gazebo can then be decorated in an original way so that its design is original and individual, decorating the suburban area.
Open gazebo
This type of building is erected more often than others when compared with others. It is not difficult to build it if you strictly adhere to the diagrams and carefully follow each step.
An open structure has the following advantages:
- It is not at all difficult to make such a structure yourself, without having any skills;
- You can sit comfortably in the gazebo even in rainy weather, escaping drops from the sky. Or you can climb there in hot weather and hide in the shade from the bright, scorching rays of the sun;
- Thanks to the open type, you will have access to all the delights of nature: fresh, pleasant air, the chirping of birds.
Despite the presence of advantages, the product has disadvantages:
- The structure will not be able to protect from the wind, so in particularly windy weather you will not be able to sit inside;
- A comfortable stay inside the building is possible only in the warm season;
- Sitting in a gazebo, you are not at all protected from insects, which is very unpleasant for many.
Closed gazebo
This option is similar to the previous one, but has one significant difference: a reliable wall that can protect against gusts of wind. The product has the following advantages:
- It is comfortable to sit inside such a house both in summer and in winter;
- While in the gazebo you are protected from strong winds and annoying insects.
However, this variety has disadvantages:
- The space will be closed, fenced off from nature, which is why the rest will no longer be the same;
- You won't be able to cook a barbecue, shish kebab or anything similar inside. If you want to have this opportunity, you will have to install a special chimney.
In addition, constructing a closed structure will be a little more difficult. It’s easier for beginners to start with something simpler, and then start building similar buildings.
Collapsible gazebo
This design can be easily folded if necessary and moved to any convenient place. With each rearrangement, the perspective and appearance of the area will change. The gazebo parts can be easily stored in the garage or covered with something. Such a building will definitely become an original, unusual decoration for your garden.
Building your own gazebo yourself is not as difficult a task as it might seem at first. The main thing is to find a scheme that you understand, and then just strictly follow its instructions. And then the result will turn out exactly as it should.
What do you need for work?
To make mock-ups of gazebos with your own hands, you need to have the appropriate equipment. You will need thick paper. You can use special cardboard for applications. This is a multi-layer material that is tear-resistant, can withstand wetness and has an even texture. In addition, this craft cardboard is sold in several color options. This will allow you to create a colorful gazebo layout, as well as combine different colors.
To connect individual structural elements, you can use regular PVA glue. It is ideal for paper work as it dries quickly and provides an equally fast and strong adhesion.
To work directly with cardboard, you need to have small and sharp scissors. In some cases, the technology for creating such layouts involves the use of sticks. They are used to give the structure strength. In fact, they imitate the support pillars of a real gazebo.
Simple paper designs
To create a simple round arbor, you can use adhesive technology. With its help you can get a beautiful layout in a short time. Thick cardboard can be used as a base. The structure will be installed on it after the work is completed.
To make the structure, it is necessary to prepare the adhesive composition by diluting the glue with water in a basin. The specified composition should be thoroughly mixed until a homogeneous mass is obtained. You need to put a sheet of cardboard of the required size into the mixture. After a few seconds, this sheet will be saturated with adhesive. After which, you just need to roll it up, getting a cylinder. The dimensions of the gazebo will depend on the size of the sheet of cardboard. The main thing is to carefully connect the ends of the sheet to form an even circle.
When the cylinder is ready, you need to let the adhesive composition dry. This will take 10 – 15 minutes. The windows can then be carefully cut out.
If desired, you can cut out most of the sheet, leaving the base of the gazebo. The result is a semi-closed structure.
The main difficulties, as a rule, are caused by creating the roof of the layout. The simplest option would be a round roof with a pointed end. It is also rolled up from a sheet of paper soaked in adhesive.
Inside the gazebo you can install furniture made of cardboard or sticks and toothpicks.
Layouts made from paper and sticks
Using sticks complicates the design, but also makes it more beautiful and realistic. The sticks act as supports for the gazebo. These sticks are installed along the edges of the doorway and the corners of the gazebo. At the same time, the sticks also strengthen the structure, making the layout more durable.
It is necessary to highlight several rules for creating such layouts:
— for detailed development you need a sheet with sides 24.5 by 10 cm;
— marking is carried out along horizontal lines parallel to each other;
- the radius of the roof should be 6 cm, and the opening of the compass should be 5 cm.
To decorate the layout, you can use various applications and combine colors.
There are no similar posts
Unique vases and frames
What can you make unusual out of pencils? A great option is vintage vases or unusual frames. You will need several packs of pencils, a basic frame, or a wooden or plastic vase. The base for the product can be cut out of thick cardboard. The process of creating a masterpiece will be very simple.
- Pencils are placed around the perimeter of the vase or throughout the entire frame. Products can be decorated either with whole sticks or with their fragments.
- Then it remains to make sure that the resulting color result is satisfactory and place the pencils on the glue using a special gun.
- To obtain frame or vase angles of 45 degrees, you should use sharpened components.
- All you have to do is wait until the finished product dries and you can use it.
A simple gazebo in 1 day
A gazebo is simply an extremely necessary thing at the dacha to have a normal snack, drink tea, and just hide from the rain. As most people think: building a gazebo is a very long and labor-intensive process. Of course, there is some truth here, but it still depends on the design of the gazebo. I will show you a gazebo that is absolutely possible to assemble in 1 day or 7-8 hours. Its advantage is not only that it is very simple, but also that it does not have a stationary foundation. And if desired, you can manually transfer it to any other place in no time without much effort. You can use any boards to build a gazebo. As I already said, the gazebo does not have a foundation and is placed either on bricks or on the remains of paving slabs. But if you wish, you can dig trenches and pour a concrete foundation. I won’t write down the dimensions of the gazebo, because I don’t know them, since I did everything by eye. First of all, I decided on the perimeter of the rectangle and assembled it. I placed each corner on the tile. I then assembled two sides on the floor in the form of a pentagon, only without the bottom - the bottom board was already at the base. Notice that the pentagon secures a small piece of board at the very top. Without it, the whole system will fall apart. Attach the pentagons to the base. It’s better for two people to work here: one holds, the other pins.
Next we nail the longitudinal guides. Here I used a stepladder, but in general the roof can be assembled on the ground, and then put on the gazebo - as you like. We hammer the floor out of smaller boards and make benches. With this the entire frame is ready. The structure is stable and does not wobble. I covered the gazebo with polycarbonate, but you can use a special roof covering, such as corrugated sheeting. But I decided to choose a cheaper one, although corrugated sheeting is better, due to the fact that it does not allow the sun’s rays to pass through. In general, what to cover is again up to you. You can make such a simple gazebo not only for a summer house, but for a private home; the design is simple and unpretentious, and looks great.
Source of the article: https://vseumeyka.ru/na-uchastke/besedka-iz-bumagi-shemy.html
The relevance of a homemade gazebo
Before you build a gazebo, you need to find out how relevant it is. The main purpose of the thematic design is protection from precipitation, heat, onlookers and insects.
But the walls and roof can serve other purposes:
- Organization of barbecues in winter and summer;
- An extension to a house to disguise a worn-out facade or protect it;
- Successful completion of the landscape;
- Use as a supporting base for climbing plants;
- Providing children's entertainment.
The secondary purpose of the gazebo influences the choice of its type no less than the main one. For example, for children it is enough to create a small playhouse in the shape of a steam locomotive or a car.
Climbing plants welcome an outdoor wooden pergola, deck or wrought iron equivalent. The presence of a barbecue affects the level of complexity of the foundation and roof.
Moreover, instead of a barbecue, you can use a full-fledged oven (especially if the gazebo is closed and year-round).
Houses
The houses will help make the recreation area safe for the child. It is much better when your baby plays at home on his own territory, rather than running far from home along roads or construction sites.
To make your child’s leisure time as comfortable and fun as possible, you need to carefully and down to the smallest detail think through the design of the future house. It can be small, large, with carousels or a sports corner, with slides, benches, etc.
The location and size of the children's gazebo will directly depend on the wishes of the owner and the space on the site. You can buy a house ready-made or build it yourself. The materials for their implementation can be different - plastic, metal, wood.
Having your own house is every child’s dream. Playing there, the child feels more independent, mature and responsible. In addition, it is worth remembering that children are living people. As adults, they sometimes need to be alone, to think, to dream, or perhaps to feel sad.
The houses can be either portable or “stationary”. It depends on where it will be installed and how often the child will play there. If it is planned at a dacha, where you only visit in the summer, there is no point in installing a permanent house, since it will stand idle and deteriorate from changes in temperature, humidity, and precipitation.
It is important to note that the construction of the house must be carried out taking into account all safety rules. It is recommended to first think through all the nuances to the smallest detail so that the baby does not get injured during the game.
It is necessary to avoid sharp corners, high steps, window sills and other factors that can harm the child’s health.
With fairy-tale characters
Fairy-tale summerhouses can be regarded as an element of landscape design, as they decorate the territory. In addition, fairy-tale heroes and characters attract kids, and they will enjoy playing in a house where their favorite characters are painted on the walls.
To apply a “fairy tale” to the walls, you can use stencils. It is important to apply the design only with environmentally friendly materials so as not to harm the baby’s health. Such an original design will allow your child to feel like one of the heroes of their favorite fairy tale or cartoon.