Our games
Wonderful » Creativity » Crafts from paper and cardboard » DIY glass for pens and pencils
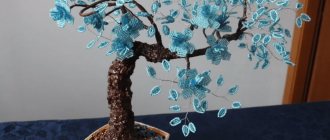
| We all periodically want updates, and updates in almost everything: in clothes, in the house and even in work. An original, creative glass for pens and pencils can easily update the look of your desktop, and, of course, lift your spirits. I propose to make this cute and useful little thing using a minimum of materials that can be found in everyone’s home. To work you need to prepare: 1. Cardboard cylinder from foil or film; 2. Peas (split into halves); 3. PVA glue and pencil glue; 4. Sheet of cardboard; 5. Compass; 6. Simple pencil; 7. Green corrugated paper; 8. Scissors; 9. Yellow acrylic paint; 10. Ladybugs for decoration.
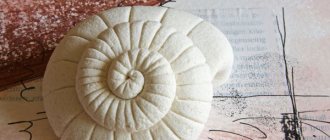
To glue corrugated paper, it is best to use pencil glue; it prevents the thin paper from getting wet and does not deform it. Also, to hide the seams between the leaves, glue a small piece of corrugated paper folded in half to the bottom of the cup. This is what the glass should look like. If you wish, you can slightly decorate our corn cup by sticking a couple of bright ladybugs on it. I hope you had a lot of fun and good mood in the process of creating this unusual cup for pens and pencils. Now your writing and drawing supplies will always be in perfect order. And you can always give such an original handmade craft to your friends - classmates and even your favorite teachers! Good luck to everyone and success in achieving new creative heights! Irina Demchenko © Сhudesenka.ru |
| Category: Creativity » Paper and cardboard crafts | Views: 9329 |
Creativity
Source: https://chudesenka.ru/2307-stakan-dlya-ruchek-i-karandashey-svoimi-rukami.html
DIY New Year's crafts
New Year holidays are ahead.
Gifts for friends and decorations for the home can be bought in any store, but if there are children in the house or you yourself would rather put the warmth of your hands into a gift for a loved one, there is nothing better than a New Year’s craft made with your own hands. In parent chats from school and kindergarten, they also often discuss how best to make New Year's crafts with their own hands.
We tried to collect for you the best tips and recommendations that you can do yourself, with babies and with older children. Let these souvenirs serve as a token of love for those to whom you give them or simply decorate your home before Christmas and New Year.
New Year's paper crafts
Christmas tree made from paper cupcake tins
Did you know that you can make a Christmas tree out of regular muffin tins? This craft can be done together with adults, even by the youngest participants of the holiday! Such paper molds are usually sold in the “Baking supplies” department. The rest, by the way, can be used to make cupcakes.
- Make small triangles from the molds.
- Apply glue to the edges.
- Place one triangle inside the other and secure them with the adhesive side.
- You can decorate the Christmas tree with sparkles. The decor is limited only by your imagination.
https://oneperfectdayblog.net/
Snowflakes from the puzzle
From a puzzle that you just can’t put together, you can make wonderful snowflakes. Don't rush to throw away the game if a few parts are lost. From the rest you can glue together such wonderful New Year's decorations. Don't forget to attach a ribbon to decorate your Christmas tree or interior.
redtedart.com
Santa Claus made from disposable tableware and cardboard
Do you have some disposable plates left over from the party and some colored cardboard? Don't rush to throw them away!
Did you know that the edge of a paper plate makes a great beard for Santa Claus? Don't believe me? It is very easy to glue such a grandfather together. You can cut out the base and the children will use them to assemble the famous fairytale character who brings gifts.
iheartcraftythings.com
Paper plate snowmen
Paper plate crafts aren't limited to Santa Claus.
Great snowmen are made from utensils that you never used! Carrots, eyes and mouths for snowmen can be drawn with a marker, cut out of colored paper or made from other available materials.
Wonderful garland. Each family member can make their own snowman with their own character - cheerful or thoughtful. This is fun for the whole family!
diys.com
— 12 books for Christmas
New Year's crafts from pine cones
Pine cone gnomes
A few large pine cones, table tennis balls and a little glue will help you make wonderful New Year's gnomes that help Santa Claus wrap children's gifts.
Don't forget to make them hats, scarves and fleece shoes. And the eyes can be drawn with a marker.
It is best to use hot glue; regular glue may not hold the “tennis” head of the charming gnomes on the cones.
wordofdecor.com
Christmas tree made from pine cones
A wine cork, a pine cone, some green paint and hot glue will help you make a small keepsake. It won't take long. You can decorate the Christmas tree using sparkles and colored paper - trust the children to do this. They know a lot about decorating gifts!
crazylittleprojects.com
New Year's crafts: Christmas wreath
Christmas wreath made of macaroni
It's hard to believe, but a child can make a Christmas wreath from ordinary pasta bows. To make them look more like green spruce branches, they need to be painted green with paint or a felt-tip pen and placed on cardboard with glue.
Don't forget to add a pretty ribbon! It will be useful for small children to make such a gift with their own hands to develop fine motor skills and, most importantly, with your help, they can easily cope with such a craft.
The joy of Christmas - for the little ones too! Add some glitter to the card for beauty.
craftymorning.com
Pompom wreath
Pompoms are often sewn onto children's clothing. They are literally everywhere: on dresses, blouses and socks. One problem: these pompoms keep coming off and you find them everywhere! Don't rush to throw them away if you haven't sewed them back on. You can make a cute Christmas wreath out of them by gluing them onto cardboard. You can also decorate a photograph as a Christmas tree decoration.
crazylittleprojects.com
DIY Christmas tree toys
Christmas trees made from ice cream sticks
Have you accumulated a few popsicle sticks? Collecting them, however, is not difficult. Who doesn't love this wonderful delicacy? You can make cute Christmas trees from sticks using hot glue, paint or markers.
Glue the sticks on top of each other (for Christmas tree branches it is better to cut off the rounded ends), paint and decorate with sparkles, buttons or a star cut out of colored paper.
This tree can be made into a wonderful toy for decorating a large Christmas tree.
crazylittleprojects.com
— New Year without metaphysics?
New Year's ball with fingerprints
Babies grow so fast. I would like to preserve the memory of how touching they were at the age of three.
Dip their tiny fingers in safe paint to leave a print on a matte Christmas ball (it won't show up on a glossy surface) to commemorate their first or second and third holiday. You can finish drawing the face of a deer or a snowman.
Such New Year's balls will be wonderful touching gifts for grandparents who live far away. After all, on Christmas and New Year the whole family usually gets together!
A few years later, the child will put his hand to the ball and be surprised: “is this tiny finger really mine?”
diys.com
Little foot print
Boot tracks will help you keep as a souvenir not only the imprint of a tiny finger, but also the footprint of your little beloved foot.
Dip your child’s foot in safe and easy-to-wash white paint, let him step on the insole (it’s best to buy woolen ones), add a little decor to the body of an imaginary snowman and feel free to hang it on the Christmas tree! This is a touching memory for life. The child will love this idea.
crazylittleprojects.com
Unusual New Year's crafts
Christmas tree made of buttons
For this Christmas tree you will need ordinary buttons, glue and a sheet of paper. Instead of glue, you can use double-sided tape. You can use unwanted buttons from old clothes or buy new ones from the store specifically for this craft. The main thing is that they match in color.
Buttons of different colors and sizes look especially charming! You can simply stick buttons on a piece of paper in the shape of a spruce or draw a tree and glue the buttons as Christmas toys. These options look equally interesting.
Great idea for a card! And, most importantly, even kids can cope with such a task with a little help from adults.
christmas.365greetings.com
Snowmen made from lids
Such lids can be found in almost every home. If you have already finished drinking mineral water, do not rush to throw them away! You can make wonderful snowmen from the caps.
- Glue the lids together.
- Apply glitter on the inside to create a sparkling snow effect.
- Tie scarves from woolen threads for the snowmen.
- Use a marker to draw or glue carrots, mouths, and eyes on the snowmen.
- Glue ribbons so that the snowmen can be hung on the tree.
This work will take you no more than 10 minutes!
funholidaycrafts.com
Christmas tree made from a dish brush
For some reason the new dish brush was not used for its intended purpose? A little haircut will make it an unusual Christmas tree. The stand can be made from foam plastic. A little patience and in front of you is an unusual New Year's souvenir made from improvised materials.
the36thavenue.com
Suit for a glass of coffee
Sometimes a glass of coffee or tea can be so hot that it is simply impossible to hold it in your hands! It’s great to have a special device with you for this case. You can give it to someone and make it out of... A regular sock (preferably take a new sock). Thick socks made of stretchy material are best.
- Cut off the toe area and heel and leave only the part of the sock that goes around the shin.
- Decorate it with sparkles, buttons or ribbons as you wish.
Now a glass of hot tea won’t scare you; you don’t have to wait for it to cool down and immediately pick it up to go on a winter walk.
parents.com
DIY New Year's crafts - video
Source: https://www.pravmir.ru/novogodnie-podelki-svoimi-rukami/
We use toilet paper rolls
The advantages of this method are the same as those described above - the bushings are an environmentally friendly material, they do not contain foreign impurities, so seedlings can be planted in the ground without removing them from the cups (the latter will rot in the ground without a trace). If the cups will be used for large plants, we can use whole bushings; in other cases, they (the bushings) can be cut in half. The manufacturing process itself is not complicated.
Table. Master class on making cups from toilet paper rolls.
| Steps, photo | Description of actions |
| Step 1 | So, first we prepare everything necessary - these are the bushings and scissors themselves. |
| Step 2 | We take the first sleeve, crush it and cut it into two halves. |
| Step 3 | On one half we make four cuts (about 1/3 of the height). |
| Step 4 | We bend the “blades” that were formed as a result of this and form the bottom of the future cup. Simply put, we make the same bottom as in ordinary cardboard boxes. |
| Step 5 | The bottom is almost ready. |
| Step 6 | The result should look something like this. |
| Step 7 | That's it, the seedling cups are ready for further use. All that remains is to fill them with soil mixture and sow something you need! |
Video - Making cups for seedlings
Lemonade - summer craft
Lemonade - application with drawing elements
In the summer heat, you really want to eat ice cream or drink a refreshing cool drink! Therefore, crafts on this topic are the most summery.
In this article I will talk about how children can make a summer craft “Lemonade” with their own hands.
Application of the Lemonade craft
This children's creative work can be:
- regular applique
- postcard decoration
- a separate craft that can be used in games
If you make a glass of lemonade not from colored paper, but from cardboard, and do not glue it to the background, you will get homemade food for dolls, or a prop for a children's role-playing game to treat guests, in a cafe, or in a restaurant. And so that the glass of lemonade does not lie, but stands on the table, you can make a round cardboard stand for it in the same way as for the “Triangular Christmas Tree” craft.
How to make a summer craft “Lemonade”
Materials and tools
- colored paper or cardboard in yellow and other colors
- scissors
- glue
- white gouache paints
- thin brush,
- water
- a piece of foam rubber (sponge) with a square side
- drinking straw
- Cut out a cup from colored paper or cardboard.
- Apply white gouache to the square side of the sponge and make imprints on the cup.
- If desired, glue the cup onto a background made of colored paper or cardboard.
- Cut out a small circle and several halves of a circle from yellow construction paper.
- On the circle and the halves of the circle, use a brush to paint stripes as in the photo so that they look like lemon slices.
- Glue lemon slices and a drinking straw to the glass.
Summer craft for children “Lemonade” is ready. You can admire or play with it - dolls and guests will love this treat.
Summer craft “Lemonade” from waste material
This version of the Lemonade craft is an applique made from waste material without drawn elements. The lemon wedges are cut from a lemon flavored tea box and the ice cubes are made from a coffee filter. The work was completed for the competition by Anna (6 years old) and her mother Yana from Armavir.
I suggest looking at other crafts using drinking straws or crafts using stamps or prints.
© Yulia Valerievna Sherstyuk, https://moreidey.ru
All the best! If the article was useful to you, please help the development of the site by sharing a link to it on social networks.
Posting site materials (images and text) on other resources without the written permission of the author is prohibited and punishable by law.
Source: https://moreidey.ru/letnie-podelki/limonad.htm
Using a paper cup
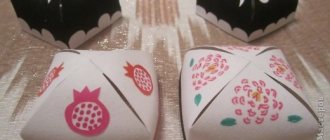
There are different options for using such a vessel made using the origami technique. The first is to add a thread to the side of the product using a needle, on which to place a button. This way you get a game called “sniper” - this is an analogue of the French “bilboke”. There is only one goal - to throw a button into a glass.
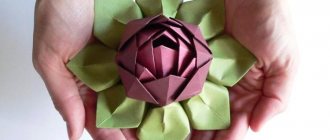
If at the end of folding such a cup the triangle is bent not outward, but inward, then you can get a whole puppet theater for your fingers. Just draw animal faces on it, glue ears and other attributes.
You can make an aquarium from such vessels, decorated like fish and other representatives of the underwater animal world.
If you make holes in a simple glass with a hole punch and cut the triangle into a semicircle, you will get a nice product, and the shape of the semicircle and the uniformity of the holes transform it:
Such cups with painted chicken faces are ideal for Easter eggs.
Options for containers for seedlings
It so happened that various containers that have already been used for food and other products are traditionally used as pots for seedlings. It is extremely rare that gardeners turn to the assortment of stores for these purposes simply due to the fact that the opening of the summer season already brings with it considerable expenses, so if you can save money, it is better to take advantage of this opportunity.
So, containers for seedlings can be:
- Tetra-pack boxes for dairy products, juices and other things.
Such a half-liter bag can be used as a pot for one plant, and if a two-liter box is placed horizontally and the side wall is cut off, then at least three plant roots will fit into it.
- Plastic cups for sour cream and ice cream.
They can be used without cutting. Small cups of fruit yoghurt and various curds are still too small for growing seedlings.
- Disposable cups, both small and “beer” ones.
Due to their different volumes and low cost, plastic disposable tableware is perhaps most often chosen for seedlings.
- Plastic bottles of any size.
Plastic bottles for carbonated drinks with a volume of up to two liters can be cut off by about a third of the height from the bottom. But it is more rational to cut large plastic drinking water cans with a volume of 5 to 10 liters lengthwise and plant more seeds in them.
- Tin cans for food and beer.
When using such containers for growing seedlings, the most important thing is not to get hurt on the sharp ends of the wall.
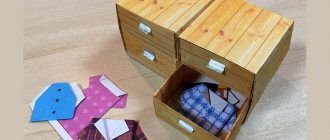
- Shoe or similar boxes made of thick cardboard, lined with polyethylene on the inside.
You can not only plant the plants themselves in them, but also use them as a box or tray for several cups of seedlings.
Usually, from the wide variety of options, those containers that are on hand at the time of planting seeds for seedlings are selected.
Assembly diagram
Below is a diagram of how to assemble an origami cup from the famous Japanese origami master Fumiaki Shingu. If you strictly follow the instructions, then assembling the origami cup will not take much time, and the result will be the same as in the picture. After doing what is described in the diagram several times, you will understand how to make an origami cup quickly and without looking at the diagram.