Setting up a home pond is fraught with difficulties depending on the size of the aquarium and its inhabitants. Many people worry that the stand won't support the weight. But there are cabinets for aquariums that can hold several hundredweight.
Making a stand for an aquarium with your own hands: what to especially pay attention to
Hi all! Many people dream of having a beautiful aquarium at home. But not everyone knows that such a mini water world requires special furniture on which the tank will stand.
Today I propose to talk to you about how to make a cabinet for an aquarium with your own hands, what is required for this and what important nuances are involved in the manufacture of such a piece of furniture.
The main emphasis should be placed on the fact that the cabinet is expected to be exposed to a large load. Even small aquariums weigh quite a lot, and therefore ordinary tables or bedside tables cannot always be used as furniture for an aquarium.
The easiest option is to purchase a ready-made design from manufacturers. But the factory stand is very expensive, and it does not always meet the expectations placed on it. That’s why many people prefer to take production into their own hands. In fact, making a cabinet is not difficult. You just need to perform a few steps, while being extremely careful and attentive.
Equipment
Required equipment includes:
- filter;
- compressor;
- heater;
- backlight;
- stand.
If you are still interested in a round aquarium, you should be attentive to its shortcomings, but not afraid of them. First, decide on the volume. As mentioned above, the average volume of round aquariums is 10 liters, but you can purchase containers of 20 or 30 liters.
You will need special equipment to create cozy conditions. These are a compressor, a bottom filter and a heater. It is also necessary to provide a glass aquarium with lighting, although it will be difficult to install it yourself. In order not to complicate your life, it is better to purchase a container with a built-in lamp.
As for the rest, the heater, filter and compressor are purchased separately. At the pet store you can find special models for round containers - for example, a round bottom filter or a convenient compressor that can be hidden in tight spaces. There are aquariums with a built-in filter.
In addition to the equipment, you will need a lid for a round aquarium. She has several tasks at once:
- prevents fish from jumping out of the container;
- serves as protection from curious cats who may want to eat the fish;
- A lighting fixture is attached to the cover.
Finding the cover separately can be difficult. This is the second reason why it is better to choose a round aquarium with a lid. The aquarium stand is included in the kit, but it can be made to order or purchased separately in the store.
Material selection
Before making drawings, decide on the material that will be used for your cabinet. Here you should largely rely on the size of the aquarium itself, since tanks of 100 liters, 200 liters and even huge tanks of 300 liters can be used. And this, as you understand, is at least 300 kilograms of water alone. Add here various additional equipment and content, and you get a huge number.
And the cabinet must withstand all these kilograms. It is logical to assume that your bedside table or coffee table will not be able to withstand such a load.
The heavier the tank, the higher the requirements for the reliability of the material used. When creating such structures, they usually use:
Whether you make the structure from wood or from timber, from chipboard with a laminated surface or from metal, it’s up to you. But, as practice shows, a frame made of metal profiles, covered with wood or chipboard, looks great and serves well.
The material will not only be subject to weight loads, but will also begin to constantly come into contact with water. That is, the choice of material must be made with an eye to ensuring that it is moisture resistant.
Installation
The resulting bedside table, intended for an aquarium and having high strength and stability, must be installed correctly, for which it is important to determine the optimal location for it. Additionally, the area where this structure will be located must be prepared. To do this, follow these steps:
- the place is carefully prepared, for which it is important to make sure that it is perfectly level and resistant to high loads;
- the area is cleaned and leveled if necessary, since even minor transitions are not allowed;
- the selected area of the room should not be exposed to direct sunlight;
- the necessary equipment for the aquarium is purchased in advance, which includes a filter, compressor and heater;
- a rubber mat or other lining that can withstand significant impacts is laid on the prepared area;
- The product is being installed.
Thus, it is important not only to take care of creating a high-quality bedside table, but also to prepare a place for its installation.
Design
You can take diagrams from the Internet, look for suitable drawings, repeat the manufacturing and assembly procedure using photo and video instructions, or do everything from start to finish with your own hands.
If you do not have experience in making such cabinets, it is better to work with some samples and visual aids, so to speak.
The most popular are 200-liter aquariums, for which a cabinet is made on a rigid frame and covered with sheets of laminated chipboard. Financially, this is the most profitable option, plus the material itself is not afraid of moisture.
Pure metal does not look very aesthetically pleasing, weighs a lot and is expensive. Wood is also expensive, and its moisture-resistant properties are significantly inferior to those of laminated sheets.
As for size, there are several factors to consider.
- The optimal height is considered to be 60-70 sizes. This will allow you not to bend too much, but at the same time not to place the aquarium too high;
- When calculating the height, do not forget about the presence of legs on the cabinet;
- The width directly depends on the size of the tank itself;
- Cabinets whose size is equal to or literally slightly larger than the size of the tank look beautiful and neat;
- If this is an aquarium with a capacity of more than 200 liters, it is highly advisable to make a separate cabinet with a reinforced frame;
- You should not make furniture wider than the container in order to use the space for other things. A more rational solution here would be to install shelving, as well as store things in the cabinet itself.
Please note that the aquarium is an independent piece of furniture in your home. Therefore, you should not use the cabinet as a place where you will store your socks or some tools.
The bedside table is dedicated strictly to the needs of the aquarium. That is, you need to place food there, equipment for filtration and cleaning, and everything else that is directly related to the aquarium and its contents.
Main indicators of practicality
In addition to its pleasant appearance, do not forget that the bedside table for the aquarium must perform a number of functions included in it by the manufacturer. To do this, there is a list of criteria that determine the practicality of the product:
- moisture resistance - each material used in the design of the product must not absorb moisture. The constant use of fish food, the procedure for cleaning the tank and other manipulations lead to water flowing onto the cabinet. Manufacturers try to additionally treat chipboard and MDF with compounds that prevent moisture penetration;
- tendency to deformation - among furniture products there are also those that can crumble into pieces with a slight impact. Keep in mind that the aquarium is heavy, and during operation the cabinet should not deform under load;
- strength - the back wall of the product must be reinforced with metal racks. Using fiberboard alone will not be enough if you plan to use a 200 liter aquarium with a stand. It is best if not only the rear pillars, but the entire product is equipped with metal inserts;
- holes for cords - it’s a good idea if the future bedside table is equipped with additional openings for power cords and tubes. For example, it is very convenient to place a corner aquarium on such a product: you will not need to look for a way out of the situation where to place the protruding connections to the tank;
- doors - think about the fact that all the equipment for feeding and caring for the fish needs to be located somewhere. Most likely, these will be shelves in a cabinet, so it is better that the doors cover them.
It is also worth paying attention to the thickness of the tabletop, on which the stability of the bedside table will depend. The photos presented in our material show that this value should not be small
Taking into account the main strength indicators, you can proceed to choosing a model.
Design elements
It cannot be said that the process of making a cabinet designed for an aquarium is very different from assembling the same chest of drawers. You will have to make drawings, determine dimensions and manufacture components.
In this case, the aquarium cabinet includes several main components.
- Back wall. Here you need to make it as strong and reliable as possible. Therefore, take material with a thickness of at least 22 mm. Typically, chipboard and MDF sheets are used. It is important to understand that the back wall will bear the main load, make the furniture stable and will not allow it to settle under the large mass of the tank. If you build a rear partition between the side partitions, the structure will be even more durable;
- Frame. The internal vertical walls are placed at intervals of about 25 centimeters from each other. They will make the tabletop more stable and will also take on part of the load;
- Tabletop. It is considered one of the most important elements of a bedside table. Be sure to choose smooth, durable and moisture-resistant materials;
- Doors. It is unlikely that you want the entire contents of the cabinet to be in the open position. Therefore, it is worth installing doors on hinges with closers. Do not forget to make markings on the side partitions for the installation locations of the door hinges;
- Legs. You can do without them. It all depends on the diagram and drawings. But it is better to make stable legs from strong and durable material. Aluminum performs well here. Rubber pads won't hurt to avoid scratching the floor.
Everything about the design is very clear.
All that remains is to figure out how to assemble all these components into a single whole in order to be able to install the aquarium itself, connect it and start using it.
Advantages and disadvantages of plexiglass
Organic glass is easy to process. Such material is cut, sawn, drilled, bent, sanded, and glued. Therefore, it is easy to work with him.
The disadvantage of plexiglass is that the material is easy to scratch. This can happen during the manufacturing process of a product, and even when using a ready-made design.
Plexiglas has a low heat capacity. Therefore, when making bent parts, the material can only be heated to 60 degrees.
Manufacturing procedure
The shape of the cabinet can be straight or angular. Rely on the size and shape of the tank itself for aquatic life. The corner option is suitable for those who want to use additional space, or who have a corner container itself.
We are talking about a standard rectangular model. Manufacturing is not the most difficult, but you need to adhere to certain rules.
Tools you will need:
- milling cutter;
- drill;
- screwdriver;
- screwdrivers;
- grinder or circular saw;
- paints and varnishes and means for their application.
Then everything happens in stages, starting from the preparation of materials, ending with the installation of accessories and the placement of the aquarium itself.
In practice it looks something like this.
- First, the material is cut into the necessary parts. If you don’t have tools for cutting and milling, you can contact a workshop or furniture shop. The service is not the most expensive;
- Frame assembly. This is the first stage of assembly. For the frame, timber or metal slats are used. Correct assembly of the frame guarantees the stability and strength of the entire cabinet. Avoid tilting and unevenness. Everything is strictly according to the drawing;
- Tabletop. Experienced furniture makers advise installing it sequentially. First, a pair of holes are made in the corners diametrically opposite to it. Next, the level is leveled. If everything is smooth, the tabletop is screwed on. There is no need to make pre-holes;
- Horizontal shelves, drawers and doors. We can say that this is practically the final stage, since here we are talking about the practicality and functionality of the aquarium cabinet. Use high-quality fittings and always stainless steel. There will be moisture around, and therefore rust can quickly ruin your efforts;
- Legs. When the cabinet is assembled, it needs to be laid on its side, which will allow you to install the legs themselves. They are mounted along the edges of the structure to prevent subsidence and deflection. The legs are additionally equipped with pads to avoid unwanted scratches on the floor.
Some clever gadgets for a fancy new fish home
The work on the aquarium does not end with production and design. There are still some secrets that will help make it truly exclusive. And some of them will even make care easier.
Disinfection lamp for health
A closed-type quartz lamp is quite suitable as such. The main task is to repurpose the UV sterilizer for aquariums instead of household use. To do this, you need to install a small glass container after the filter through which water will flow. It is precisely this that quartz should irradiate.
You need to pass a hose with water from the compressor through such a UV lamp.
Important! Water is irradiated with ultraviolet light after filtration, immediately before it enters the aquarium. Otherwise, no benefit will be achieved from irradiation.
Automatic feeder - what's good about it?
Not everyone is able to feed their fish at a strictly defined time. However, the content of some of them requires just that. In this case, you can make your own automatic feeder for the aquarium. It's quite easy to do this kind of work. The main thing here is to understand the mechanism of its action. To make it you will need:
- old dial alarm clock without glass and minute hand;
- a small container in the form of a plastic bottle with a narrow neck and no bottom;
- metal plate and spring.
You can make an automatic feeder like this. We proceed as follows.
We fix the bottle with the cut bottom to the top so that there is a small platform under the neck at a distance of 1 cm. Near, on the platform, a plate with a spring is attached and an alarm clock is installed. To make it clearer, let us explain the essence of the work. When the hour hand of the alarm clock approaches a certain time, it touches one edge of the plate. Its other end throws a certain amount of feed from the platform. When the arrow moves further, the spring returns the plate to its place. Naturally, the factory one looks more aesthetically pleasing. Of course, there are many ways to create such dispensers, and therefore we do not pretend to be unique.
What is a samp and what is it for?
SAMP is a biofilter for large aquariums. The most convenient way to create an aquarium sump with your own hands is to place another one (smaller if possible) next to it, into which any porous material (for example, expanded clay) is poured.
It is important to know! The sump will begin to work as a biofilter only after 2-3 months, when the necessary microorganisms begin to multiply there.
The sump for a marine aquarium looks impressive
Sprayer and why it is needed
The fact is that oxygen saturation is one of the most important conditions for fish to live in water. This is why making your own aquarium sprayer or purchasing one is necessary. It can be done very simply. By supplying air to the water from an air compressor through a tube, at the end of which any porous material, such as foam rubber, is attached. Such aeration will be quite sufficient. It turns out that if someone says that they made an aquarium aerator with their own hands, one can understand that they are talking about a sprayer.
Aerolift or airlift cleaning
In essence, this is the same sprayer, but at the same time it collects dirt from the bottom, pushing upward water enriched with oxygen. To make your own airlift for aquariums, you need a slightly more powerful compressor. The sprayer is placed inside a larger, finely porous sponge and installed on the bottom so that the air supply is from below.
How to make an aquarium table
We will create an aquarium table with our own hands from materials available in most stores. You will need a good knowledge of the internal structure of aquariums.
By the way, here’s another master class for you: a do-it-yourself aquarium lid! Try making it yourself. Let me know in the comments if it worked for you.
We will need:
- Aquarium for 76 liters of water
- Fluorescent lamps 2 pcs. (70 cm each)
- Mirror table cover
- Extension
- Thermometer
- Light timer
- 4 packs of chair tips
- Wire rack measuring 91 cm by 36 cm
- Black foam
- Water heater 100 V
- Internal filter for 76 liters of water
- Glass beads or transparent pebbles
- Triple adapter
Please note that the structure must support more weight than the nominal volume of the aquarium.
Step 2: Bottom of the Shelving
Many shelving units have the ability to adjust the height using collapsible posts. 36-46 cm is suitable for us. If you cannot purchase the option we need, then buy a large rack and use a hacksaw.
Step 3: Light
Consider in advance where the cable from the fluorescent lamps will go. In our case, everything is located under the rack. Use an adapter and a light timer in the process.
Step 4: Aquarium
We place an aquarium inside the rack. Its size may be slightly less than the height of the shelf for convenience when feeding fish (no need to remove the mirror cover).
Step 5: Top Shelf
Using wire cutters, remove the top shelf of the rack if it cannot be removed without using a tool. As a result, we should only have side and front fences left.
Attach the chair ends to the 4 support posts of the shelving unit.
Step 6: Decor
You may need to install a water heater if you need temperatures above room temperature, as well as an underwater filter. Install them and place the wires under the shelving. After adding water, you can turn on these devices.
Attach the thermometer tube using a suction cup.
Place glass beads in an even layer on the bottom of the aquarium.
Step 7: Completion
Close the lid of the aquarium and place the mirror surface of the table on it.
To hide wires and electrical equipment, place dark foam underneath like in the picture.
Now you can take care of the flora and fauna of the aquarium itself so that the fish are comfortable.
Who can be placed in a round aquarium?
Keeping most species of fish in such a container will have to be abandoned: sensitive fish will quickly die from stress, large (goldfish, cichlids) and fast-swimming fish (barbs, daneos, neons) will not have enough space, and bottom fish (botia, catfish) will not have enough bottom area , because the lower part of the round aquarium is very narrow.
Betta fish and small viviparous fish - guppies, mollies, and platies - can live in a glass ball. Their life will not be comfortable, but thanks to their unpretentiousness and resistance to stress, they adapt to a spherical container. Shrimp, snails and small aquatic plants do very well in round aquariums.
Aquarium table: interior decoration ideas
join the discussion
Share with your friends
Thanks to the advent of transparent polymers and tempered impact-resistant glass, a unique opportunity has opened up to create unusual pieces of furniture for a modern interior, among which the aquarium table is extremely popular. It allows you to view the underwater picturesque world right in the middle of the room; the coffee table with fish looks especially chic. This design can be easily made with your own hands from plastic pipes.
Aquarium care
Plexiglas is a rather “capricious” material. It can be easily scratched if you use hard sponges and scrapers when cleaning. To prevent plaque from accumulating on the walls and hardening, you need to clean it off more often with a soft cotton cloth. Wipe the outer surfaces from dust with antistatic wipes and polish with special products for plexiglass. Regular careful cleaning is a necessary condition for maintaining the attractiveness of the aquarium.
When exposed to sunlight, plastic may turn yellow, and this process is irreversible. Try to prevent such a nuisance - place the tank with fish away from the window. Remember that low-quality, cheap plexiglass will turn yellow or cloudy over time, even without the sun.
Peculiarities
A glass table with fish is a multifunctional piece of furniture that allows you to conveniently keep animals in the house and acts as an unusual accessory in the design of the room. Today, a tabletop aquarium can either be purchased in furniture stores to order, or you can assemble it yourself with your own hands. At the same time, the latter option is more popular, as it allows you to make various designs and choose a design at your personal discretion. The aquarium table has the following advantages:
- suitable for placement in any room, including not only residential buildings, but also business centers, beauty salons and offices;
- low maintenance - it should be used like a regular aquarium on a cabinet, that is, do not place cups with hot drinks or lay out food;
- goes well with other interior items, regardless of the style of the room;
- maneuverability - it can be easily rearranged and transported;
- availability to produce various models using various shapes and sizes;
- the ability to equip with additional elements such as decorations and lighting.
Decor
The specific shape and small volume do not allow creating thematic landscapes with large-scale decoration in the form of ship wrecks or castle ruins. However, when decorating a round aquarium, you can use other design techniques. For example, among the stones you can place a miniature model of a chest from a pirate ship.
Or lay out several fragments of ethnic ceramics. The main principle on which the decor of an aquarium space of this shape is based is minimalism. Otherwise, you won’t be able to see the underwater inhabitants behind all the elements.
The lid for a round aquarium performs several functions: it prevents fish from jumping out, atypical objects from getting inside, it protects animals from children and cats,
and also serves as a place for mounting the backlight. Therefore, it is better to purchase an aquarium with a lid right away, rather than looking for the right model later. A lid for a round aquarium can only be purchased in specialized stores. It is more difficult to find a lid just for a semicircular aquarium.
Place in the interior
Even the simplest aquarium placed in a room can attract attention and fill the space with an unusual atmosphere. As for a table that looks like a transparent vessel with fish, it will not only transform the interior, but give it some chic. This is explained by the fact that the design is not an ordinary coffee table made of chipboard or wood, but a real masterpiece with living sea creatures inside.
This aquarium table can be installed in any room, from the living room to the kitchen.
At the same time, it looks best in the interior of living rooms, where you can watch the water kingdom right on the sofa.
In order for this stylish accessory to harmoniously combine with all decorative items, it is important to pay attention to its internal design and geometric shape. Depending on the size of the room, you can buy an oval, round or rectangular table for your office or living room. In offices and hotels where there is a lot of space, a huge rack-style tank with a built-in aquarium is a good choice.
Such an interior will not leave anyone indifferent. At home, it is beneficial to emphasize the originality of this type of furniture with bright lighting and beautiful interior design of the aquarium.
In living rooms and bedrooms, the aquarium table can be placed either along one of the walls or in the center of the room. If the aquarium is large, then it should be filled with large plants and placed on the side so that it covers the entire wall. The same applies to fish; for the interior of living rooms and dining rooms, it is advisable to purchase them with bright and contrasting backs.
The aquarium table in the interior of kitchens deserves special attention; it allows you to enliven a strict style and promotes relaxation.
Polycarbonate
In recent years, plexiglass has had a worthy competitor. Now many people buy a polycarbonate aquarium for their underwater pets. This lightweight and reliable material with good transparency has certain advantages. Unlike plexiglass, it is impact-resistant, does not scratch, and can withstand large volumes of water better. How to make an aquarium at home from monolithic polycarbonate?
Instructions
Monolithic polycarbonate is a fairly durable material, and therefore tools for working with wood and metal are used to process it. It is not recommended to remove the protective film while sawing material to avoid damage.
The technology for creating a fish house from this material is not particularly different from other techniques. However, all parts of the container need to be assembled together with a special two-component glue.
Polycarbonate begins to melt when heated, so make sure that it is not exposed to high temperatures during operation. And the finished aquarium must be placed on flat, hard surfaces so that its bottom does not sag. Carefully select the thickness of the material.
How to do it?
To create a modern design with a mysterious effect, it is enough to install an aquarium table in the room, which you can buy ready-made or make yourself from scrap materials. If the latter option is chosen, then it is necessary to prepare not only building material, but also tools. In addition, the master needs to have a good knowledge of the internal structure of the aquarium.
To make a basic plastic pipe structure, you should have on hand an extension cord, a 76L aquarium, a mirrored countertop, lights, a thermometer, a light timer, 4 pipes, black foam, a shelving unit, and an internal filter.
For decoration, you will have to additionally stock up on transparent pebbles or glass balls.
The workflow itself will include several steps.
- Decoration of the bottom of the rack. Since most racks are equipped with the ability to adjust the height using disassembled columns, it is advisable to purchase products with adjustable tubes from 36 to 46 cm in length.
- Installation of the lamp. The passage of cables from fluorescent lamps should be provided in advance. And also additionally connect a light timer and an adapter.
- Installation of a glass container (aquarium). It is placed inside the rack. To make it more convenient to feed the fish without removing the mirror cover, the size of the aquarium should be slightly less than the height of the shelf on the rack. Then they proceed to the top shelf, it is removed using wire cutters. The end result is a structure with front and side guards. 4 tubes are attached to them.
- The finishing touch is the decor of the aquarium table. To do this, install a water heater inside the container (if the water temperature is required above room temperature) and a double filter. Wires from installations should be located under the racks. The thermometer is attached to the wall using a suction cup and glass beads are poured into an even layer on the bottom. At the very end, the lid of the aquarium is closed and a table top with a mirror surface is placed on top.
- All that remains is to start populating the aquarium. To do this, flora and fauna are placed in it. If other accessories are required, they are also placed in the aquarium. The main thing is that the fish are comfortable.
Preparation of the drawing
Before the actual work, it is important to make a special drawing according to which all stages of the process are implemented. If you do not have the skills to independently draw up drawings and diagrams, you can use special programs, and it is also possible to find suitable ready-made drawings. During the creation of the drawing, the main issues regarding the future design are resolved:
During the creation of the drawing, the main issues regarding the future design are resolved:
- dimensions, and they must be optimal so that you can easily install an aquarium of a certain shape and dimensions on the product;
- shape, since it can be a standard cabinet or corner, as well as triangular, rectangular or asymmetrical;
- height, and it is advisable to choose this parameter in such a way that the process of cleaning and changing water in the aquarium is simple and does not require removing the product from the stand.
Once the drawing is completely ready, you can begin the actual process of creating such a bedside table.
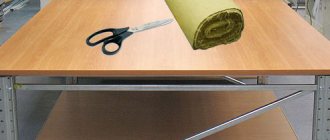
How to make an aquarium table from wooden pallets
The author of the homemade project had a problem where to install the aquarium, which he loves very much. A large aquarium requires a good, strong support, as you understand, this is quite a lot of weight. In a store, such a table would cost the author from 75 to 300 dollars or more. In this regard, it was decided to make it with your own hands from practically waste, free materials.
The material used was old wooden pallets. In most countries you can get them for free. As a rule, such pallets contain a lot of boards, blocks and other useful material. The most important thing is to choose such pallets that they are not rotten, broken, etc.
Materials and tools used by the author:
List of materials:
– wooden pallets; - door hinges; – door handles; – wood screws, etc.; – strong wooden beams for making the frame.
List of tools:
- a circular saw; – roulette; – marker; – screwdrivers, pliers and other hand tools; – oil for impregnation (or paint if desired).
Table manufacturing process:
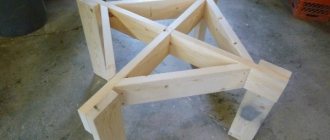
Step one. Making a table frame
Unfortunately, the author did not take many photos of the making of his table. But this is not so scary, because the design is quite simple. The first step is to make the frame; it must be very strong, since the table must withstand a weight of more than 200 kilograms, which is exactly how much the author’s aquarium weighs.
To make a frame, boards from wooden pallets are not suitable; here you will need strong beams. First of all, figure out how long and wide your table should be, and then cut the required number of blanks. In fact, you have to assemble two rectangles, one located at the bottom and the other at the top. Well, you will also need four bars to connect them. These are the main parts of the structure.
Also, for additional strengthening, you can cut short transverse bars.
Once you have cut the required number of pieces, start assembling the frame. Everything is assembled using wood screws. We drill holes for them and then screw them in with a screwdriver. In principle, this is the simplest and most reliable connection method. After assembly, check with a level that everything is level, otherwise the table will stand crooked, and most importantly, that it does not wobble with the aquarium.
Step two. Making a countertop
The table top should also be as strong as possible. For these purposes, the author makes it two-layer. The first layer is made of plywood. We find the required piece and cut out a rectangle from it in the shape of the table. Well, then we attach the plywood to the frame. Here you will need screws and a screwdriver. Do not skimp on the number of screws, thanks to them not only will the plywood hold well, but the frame will also become even stronger due to the rigidity of the plywood. Tighten the screws well so that the caps do not stick out.
Next we make the second layer for the table top. It is made from boards. This layer also gives rigidity, but it also has an aesthetic meaning. We make the second layer from pallet boards. If you wish, you can choose boards of various colors and form a beautiful pattern. The boards must be the same thickness, otherwise you will have to plan them. We align the edges of the boards using a circular saw so that they fit together well and do not form cracks. Sand both sides of the board until smooth.
Once you have prepared the boards, you can fasten them in place. The easiest way is to attach them with glue, since the heads of the screws will spoil the entire aesthetics. Apply wood glue, press and leave to dry. When the glue has dried, sand the surface thoroughly. It should become absolutely smooth and even.
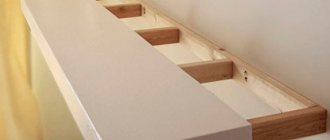
Step three. Making side walls and bottom shelf
The bottom shelf and side walls are made in much the same way as the table top, although the requirements here are not so strict in terms of uniform thickness and so on. But it is desirable that everything be smooth. We cut off the required number of boards, sand, level and sheathe the side parts. For fastening, you can also use glue, or self-tapping screws.
As for the bottom shelf, to form it we attach boards from the inside of the frame. This whole thing is made in a similar way. Finally, we sand the shelf so that it is even and smooth.
Step four. Finishing the front part and installing the middle shelf
According to the author's idea, there will be cabinets with doors on the sides of the table, and an open shelf in the center. First of all, we install two partitions; they will simultaneously divide the inside of the table into three compartments, and the central shelf will also be attached to them. The partitions themselves are made of boards; to secure them you will need four blocks. We fasten the beams at the top and bottom, each wall is supported by two beams. For reliability, the bars can be screwed with self-tapping screws, especially since they will not be visible. Well, the walls themselves can be glued.
Boards are used to make the central shelf. Select the required number of boards by color, cut them and glue them to the partitions. However, the glue will not be a reliable fastening; it is better to screw the blocks to the partitions and install a shelf on them.
At the end, all you have to do is cover the front of the table with multi-colored boards. I think you won’t have any difficulties in this regard. The most important thing is to do everything smoothly and accurately. Boards can be glued.
Step five. We make and fasten doors
You will need two doors in total; they are made from boards and are not difficult to make. First we prepare the boards, sand them, level them, and then connect them. In principle, if you have good wood glue, you can simply glue the boards end-to-end. But it is best to glue or screw the blocks on the inside, this will make the doors guaranteed to be reliable.
To secure the doors you will need four door hinges. When choosing hinges, take into account the weight of the doors so that the hinges do not bend. For convenient use, install handles on the doors. We fasten the doors into place using self-tapping screws.
Step six. Finishing touches
Finally, you can cover the back with boards, but the author did not need to do this, since his adjacent wall is finished with boards.
It is also extremely important to protect the wood from moisture, which is very abundant near the aquarium. Moisture can cause serious damage to wood, such as deformation, cracking, and so on. To protect the wood, it must be impregnated with oil; oils now come in a variety of colors, so you can choose any one that suits you. In general, it is customary to use linseed oil to impregnate wood, and it is best if it is boiled, that is, natural drying oil. It is better not to use artificial drying oils, as they are harmful, smell strongly, and are expensive.
Assembly
The next stage of creating an aquarium product is to assemble the resulting elements, which are components of the structure. This process is considered quite specific, so it is recommended to use the help of a second person, since certain heavy objects will need to be kept suspended for a long time, and it is impossible to perform these actions alone.
The entire assembly process consists of implementing sequential actions:
- special grooves and ridges are prepared for the rear wall, for which they are cut with a saw or electric jigsaw;
- the same elements for fastening are made in the bottom of the future bedside table, in its sides and lid;
- two parts of the upper corner of the rear part of the product are glued together, and the resulting workpiece will be mounted behind a special module designed to create high-quality lighting;
- the planks are tightened with clamps, after which you need to wait until they are completely dry;
- special plinth bars are screwed to the bottom of the cabinet, and to form them it is recommended to use high-quality and properly dried wooden blocks, the thickness of which will be more than 40 mm, since it is on them that the entire cabinet with a heavy aquarium will rest;
- plates are screwed to the inner sides of the side walls to secure the middle cover;
- the front edges of each part must be installed so that they are level with the edge of the middle cover and bottom of the product;
- then take the internal central partition, which is glued to the middle lid and bottom;
- the back wall is inserted into the corresponding groove in the bottom;
- one side wall is attached to the bottom, after which it is fixed to the middle lid, for which dowels and high-quality glue are used;
- the back wall is connected to the side using the existing grooves and tenons;
- a corner is attached to the top of the sidewall, for which dowels set with glue are also used;
- it is on this corner that the upper part of the product will rest;
- the second side of the bedside table is attached in the same way;
- the following steps involve assembling the upper frame of the structure;
- interesting lighting is installed in it;
- the resulting box is fixed to the bedside table, and for this it is recommended to use piano hinges, since they make it possible in the future to simply fold back this box if necessary.
Thus, building a special bedside table designed for an aquarium is quite simple, and this process does not take much time if you approach it really responsibly. It is allowed to use other materials during work, and the procedure will be similar, but the methods of preparing different parts will differ.
Joining workpieces
You must first make holes for the screws
Installation of legs
The frame must be impregnated with drying oil
Shelf holders made from plywood scraps
The holders are attached to the inside of the legs
A hard sheet of plywood is used as the bottom.
Inserting shelves
The structure is covered with waterproof paint
Tips for making a stand for an aquarium with your own hands
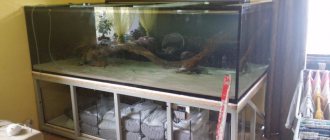
The underwater world and its inhabitants are like a fairy tale for land creatures. The play of light in the water, the glare on the scales, the rapid strokes of fish of different colors and shapes - all this fascinates and captivates. But the larger such tanks are, the more difficult they are to operate. This applies not only to the artificial house, but also to the furniture around it. In particular, cabinets for aquariums require especially careful selection.
If an aquarium cabinet takes up a lot of space, it must be functional
Round aquarium: good or bad?
A round aquarium and a goldfish swimming in it are an invariable attribute of the interior of a small apartment from the last century. But the size of the vessel and its shape impose a lot of unpleasant restrictions on the process of keeping fish. For example, it would be extremely difficult to fit special equipment into it, so people do without it. And the disadvantages of the vessel are too obvious:
- The standard diameter of an aquarium is about 25 cm with a volume of 15 liters. You cannot put a filter in such dishes and the water can quickly become dirty. In order to solve this problem, you will have to change the water daily. This procedure causes stress in the fish, and its implementation is quite troublesome;
- The water surface area is small due to the narrowing of the container upward. This leads to a decrease in the amount of oxygen dissolved in water and the appearance of oxygen starvation in fish;
- the small volume and lack of space for a heater leads to significant temperature fluctuations, and this in turn causes stress in the fish;
- the size of the vessel does not allow placing plants and shelters for fish in it, which would allow them to feel safe;
- also, the small volume does not make it possible to place more than three small fish in the container, which would not be comfortable in such conditions;
- Due to the curved walls, free movement of fish will be impossible. And due to the refraction of light and shadows in them, the illusion of constant extraneous movement outside the vessel will arise, which will also become an additional reason for stress.
- Due to these factors and many other stresses, immunity can be significantly reduced, illness and even death can occur in fish that are placed in a small aquarium. After all, a vessel that holds less than fifteen liters is absolutely unsuitable for containing living beings. And such a common goldfish among hobbyists needs at least fifty liters of water. Some countries, including Austria and Germany, have banned the use of round aquariums, and the very fact of keeping fish in them may fall under the CC article “Cruelty to Animals.”
- Therefore, before buying a round aquarium, you should think twice. After all, few people would want to deliberately torture poor fish in a tiny vase. And keeping this punishment cell clean every day will require a serious investment of time and effort. So it would be wiser to save up more money and buy a good rectangular specimen with a volume of at least 160 liters. In such a vessel, in addition to fish, you can place beautiful underwater plants, various decorations and equipment necessary for keeping aquatic inhabitants.
Types of aquariums and stands for them
It is not always possible to buy a suitable bedside table, because there are a great variety of aquariums, from very small ones of 10-15 liters to giant ones of 1000 or more liters. If you plan to keep more than one fish, but several species, but there is a problem where to place the container, a volume within 100 liters would be a good option.
The larger the size of the future aquarium, the more possible shapes it can have:
- cylinders;
- cubes and forms close to them;
- parallelepipeds;
- prisms with different bases;
- sickle-shaped.
The types of tables or cabinets will differ depending on the chosen aquarium configuration. For example, for a triangular prism, corner stands are good, and for a cylindrical flask, round or square ones with a side equal to or slightly larger than the diameter of the tank.
Aquarium manufacturers do not always provide a stand with it. Therefore, lovers of the underwater world have to make aquarium cabinets with their own hands or order them from a carpentry workshop, since not all furniture can withstand such an increased load.
If you liked the video, share it with your friends:
Who should be placed in a round aquarium?
After equipping the aquarium with everything necessary, you should move on to selecting “tenants”. The classic option is a goldfish, it’s worth discarding right away. She needs space, so a volume of at least 40-50 liters is needed per individual. Before you buy fish, you need to calculate how many inhabitants will fit in the aquarium, taking into account its volume and features.
Fish that can live in a round aquarium: platies, guppies, neons, molynesias, swordtails, cockerels, daneos, corydoras, lalius, ampularia.
The most ideal option is Cherry Shrimp. They only require lighting as equipment, and oxygen and a filter are not necessary for them.
If you decide to place cherry shrimp in the aquarium, place soil, driftwood, and a lump of moss on the bottom. Please note that you will have to change the water every 2-3 weeks.
Design Features
There are a number of characteristic features that distinguish aquarium stands from a simple chest of drawers. If the capacity is small, then the aquarium can be placed on a regular shelf without wasting time and effort on a homemade bedside table.
In the absence of factory options, a DIY aquarium cabinet may turn out to be a little cheaper. But the main thing is that it will be made for a specific tank and will easily fit into the interior of the apartment.
If you liked the video, share it with your friends:
You should start preparing by selecting and developing a drawing. The cabinet for the aquarium must withstand significant loads, i.e., have a good margin of safety. Don’t forget about the convenient compartments that contain cans of food, various care products, etc. There are a number of general tips:
- The structure for containers over 100 liters must be reinforced with a metal frame. For small aquariums, bars with a cross section of 50 by 50 mm are suitable.
- The main load falls on the back wall of the cabinet, so during installation it is recommended to fix it between the side ones.
- Additional stiffening ribs are installed every 30–50 cm of the tabletop length to avoid sagging. The slightest unevenness or distortion of the entire bedside table can lead to the appearance of cracks at the bottom of the container.
- The thickness of the table top and back wall must be at least 22 mm, the side posts and additional ribs - 18 mm.
- Wheeled legs are extremely undesirable for this type of structure. They have the smallest margin of safety, but moving such a colossus still won’t work.
- When choosing legs, emphasis is placed on their strength. These should be metal, but not thin aluminum, height-adjustable legs. The optimal number is twice the total number of partitions and side walls.
- The best option would be to install the cabinet directly on a carefully leveled floor. This will minimize distortions when installing the aquarium.
- An important issue is the choice of height. As a rule, the aquarium is located in a recreational area, which means that it will be viewed from a sitting position. In this case, the height of the aquarium table ranges from 60-70 cm.
The last point is easy to check. You will need a comfortable chair, a three-liter jar filled with water, and an assistant. One person sits in a chair or on a sofa, and the second person changes the position of the jar, into which several balls are added for clarity. When contemplating the balls is most comfortable, measure the height from the floor to the bottom of the container.
A drawing of the cabinet will help you avoid mistakes when assembling it.
When creating a drawing of a cabinet for an aquarium, it is worth thinking about its purpose . As a rule, it houses external pumping equipment and filters, as well as feed that does not require special storage conditions. This means that when designing, it is necessary to lay out openings for communications, and when choosing a location, make sure that there is a power outlet nearby.
As a rule, external filters are hidden behind the doors in the outer side compartments, and open shelves are made in the middle part. However, if the aquarium has few communications, then you can consider the option of installing additional shelves and even drawers.
The final stage in the development of the drawing will be the selection of the external facade. These can be special panels that match the overall design of the room, or simple overhead slats. The latter are especially suitable for country style, where wood dominates.
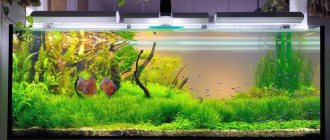
Externally, the aquarium should fit into the overall interior of the room
Advantages and disadvantages
Plexiglas is a synthetic substance consisting of thermoplastic resin. It is only formally called glass. Its chemical composition determines properties and application possibilities that are incomparable to simple glass.
- weighs 2-2.5 times less than silicate glass, with the same thickness;
- can be easily heated and reshaped, and after cooling is retained in the desired form;
- impact-resistant material;
- resistance to moisture, microbial activity;
- ease of machining (cutting, drilling, grinding, gluing);
- high light transmittance - no less than 90%.
Organic glass is warmer than silicate glass. The water temperature in a plastic aquarium remains stable even in the absence of a heater.
It is impossible not to mention the disadvantages of plexiglass:
- tendency to cloudiness, yellowness;
- surface damage (scratches, microcracks);
- highly flammable;
- releases harmful substances during pyrolysis;
- near heating devices, the hardness of the product decreases.
Attention! To avoid deformation of a plexiglass aquarium, it is necessary to place it away from heating radiators and powerful incandescent lamps.
From Optiwhite
Optiwhite is a fairly new material that is gaining popularity and is used to make fish tanks. This is glass, but it has a special characteristic - ultra-transparency and has a soft blue tint. Due to this, Optiwhite aquariums transmit light better and look more beautiful than ordinary glass ones. Their main disadvantage is their high price.
An Optiwhite aquarium does not have the usual greenish tint that is inherent in simple glass products. Due to this, all the colors that abound in underwater flora and fauna will look brighter and more natural. The second property is especially important for lovers of swimming pets.
However, aquariums made from Optiwhite, in addition to the high price, have other disadvantages. This material is quite fragile and scratches easily. It also requires more careful care.
Instructions
Optiwhite aquariums are made both on a frame and frameless. Metal is best suited for the base - it will blend organically with the bluish tint of this glass. Optiwhite aquariums are glued using special silicone (just like regular containers for aquatic inhabitants).
- After making the frame, start cutting the glass. If you do not have skills in this matter, you can ask for help from an experienced person.
- Optiwhite aquariums are made by combining several sheets of this material into a box. The ends of the parts must be polished.
- Be sure to degrease all surfaces before applying silicone. Optiwhite aquariums should be carefully glued - aquarium silicone is used for this.
- Aquariums made from Optiwhite are more fragile than those made from regular glass. Therefore, they are modified with stiffeners and only after that they try to fill them with water.
- Carefully made and well-glued Optiwhite aquariums will serve you for many years. They say that some types of adhesive silicone lose their properties over time, so choose the material for gluing the walls carefully.
To reduce costs, optiwhite aquariums are sometimes made by combining several materials. For example, the bottom of such a structure and the back wall can be made of ordinary glass.