1652 0 0
Anton Sviridov March 11, 2019
Antagonizer from instructables.com shared his experience building a drill press. Further from his words.
I had a drill press, but unfortunately the motor burned out. I was just working on a project, so I didn’t have the funds to replace it, and I had to come up with and assemble a homemade drilling machine from scrap lumber and a screwdriver. As a result, the project was successfully completed, and the machine was permanently installed in my workshop.
Hand generator
To create an alternating current generator from a broken screwdriver, keep in mind that the motor and gearbox must be in working condition. Such a device is suitable as an alternative power source when traveling outdoors or during an unscheduled power outage.
From a screwdriver with an operating voltage of 18 volts or more, with a gearbox torque of 150 rpm, you can get 6-8 V. This is enough to recharge a mobile phone or a flashlight with a USB port.
Electric generator from a motor with a USB connector
In order to make an electric generator from an old screwdriver you need:
- disconnect the battery and disassemble the case;
- disconnect the button and the power element from the motor so that they do not interfere with the transmission of current;
- solder a parallel diode bridge in their place;
- the diode bridge must have a 220 mF electrolytic capacitor and Schottky diodes;
- at the other end of the diode bridge it is recommended to solder a USB port, which will be used as a charging connector;
Example of a handle for a generator
- make a handle from any convenient L-shaped part and insert it into the cartridge.
In some cases, you can do without soldering. To do this you need:
- connect two wires with alligator clips to the terminals inside the housing;
- Observing the correct polarity, supply power to the light bulb or USB port.
This method is simpler to implement, but it increases the likelihood of damaging the device that will be charged from it, and also reduces the efficiency of such a homemade product.
This video shows an example of assembling a generator from an old screwdriver
Bulgarian
If you don’t have a grinder or an angle grinder, you can replace it with a screwdriver or drill. To do this, you need a special nozzle or adapter with a gearbox. Using a stud, nuts and washers whose diameter fits the screwdriver chuck, you can make a homemade attachment or purchase a ready-made one at a hardware store.
The speed of a drill or screwdriver is often lower than that of an angle grinder, and they also do not have special protection. Therefore, this craft can only be used as a one-time option and solely at your own peril and risk, since it is dangerous.
Battery power and types
An important question for builders is how to choose a cordless screwdriver tool? When choosing a cordless tool, be sure to look at the features of its charging. Drills and screwdrivers can be equipped with batteries with voltages from 7.2 to 36 volts. For home repairs, it is recommended to choose a tool with a voltage of 9 to 12 volts. Models with a power of more than 18 volts are suitable for professional builders.
One of the instruments from foreign manufacturers.
The power of the drill/driver depends on the type of electric battery selected. It can be nickel-cadmium, nickel-metal hydride and lithium-ion.
The most inexpensive batteries on this list are nickel-cadmium (NiCd). They are relatively heavy, but such batteries are inexpensive, can withstand about 1000 charge-discharge cycles and operate at sub-zero air temperatures. Such batteries provide stable power and do not overheat.
Nickel metal hydride (NiMh) batteries cost a little more, take longer to charge, are more compact and can also operate at low temperatures.
The lightest and fastest charging batteries presented are lithium-ion (Li-Ion). They charge quickly, and the charging and discharging of the battery is controlled by a special protection system. One of the disadvantages of such batteries is that it is problematic to work with them in winter frosts.
Thus, each type of battery has its own advantages and disadvantages, so it is impossible to say for sure which one is better.
It all depends on the time of year, the object and the type of work you are going to do. Expert opinion Sergey Pochtarev, master, Nizhny Novgorod.
If you are on a small budget, I would recommend purchasing a classic screwdriver with lithium batteries. They are lightweight, charge quickly and last a long time.
Lawn trimmer
To cut the grass on your property, you can make a homemade trimmer or lawn mower from an old screwdriver. To do this, you need to prepare the following materials:
- a piece of plastic or aluminum pipe 1.8-2 m long, which will be used as a handle;
- fasteners (bolts with nuts or clamps);
- motor from an electric drill (screwdriver);
- wires;
- stub;
- battery;
- adapter for a pipe with a diameter of 40-50 mm;
- button;
- plastic bucket or galvanized sheet;
- clothespin clips or alligator clips;
- blade of a stationery knife.
An example of a homemade trimmer attachment with wire
To make a homemade trimmer for home use you need:
- disassemble the body of the old screwdriver and remove the motor from it;
- Markings for fastenings must be made on the plug;
- drill holes using a drill and install the motor in them, attaching it to the screws;
- solder power leads to the motor;
- bring the wires through the pipe, and at its end make a hole for the button to which you want to connect the wires.
- on the motor side, make several holes in the pipe;
- secure a cut plastic bucket or a cut and bent galvanized sheet in them.
Trimmer from a motor from a screwdriver
To power the trimmer, you should use the battery from the screwdriver from which the motor was removed. To secure the battery to the pipe you need:
- cut off the battery connector from the screwdriver body;
- bring the wires to the outputs on the connector terminals;
- secure it to the end of the pipe with screws.
For the cutting attachment you will need:
- 2 bolts and nuts M4-M8;
- a screw that will fit into the cartridge;
- 2 nuts and washers of the same diameter as the screw;
- 2 metal plates (strong tin lids can be used).
Trimmer attachment for a screwdriver
To make knives for a homemade trimmer you need:
- make holes for bolts in the stationery blades;
- drill 3 holes in the metal plates: one in the center for the screw and two on the sides for attaching the knives;
- insert the knives between the plates and secure them with bolts;
- secure the screw to the homemade nozzle.
Using a working electric drill, you can make a collapsible homemade trimmer, for which you do not have to do any soldering. For this you will need:
- clamps;
- protection made of galvanized steel or a plastic bucket;
- a hollow pipe of small diameter for the handle;
- homemade or purchased nozzle with blades.
An example of a collapsible trimmer from a drill
To make a homemade collapsible trimmer you need:
- make indentations on the pipe with which the drill will be attached;
- remove the handle from the drill and attach a protective casing made of a bucket or galvanized sheet in its place;
- secure the network cable to the pipe with tape or clamps;
- If the drill does not have a function for automatically holding the button in active mode, then it can be fixed in the same way as the wire.
Important: such modification of a drill or screwdriver cannot serve as a high-quality and permanent replacement for the factory trimmer, and is also hazardous. Therefore, you should adhere to safety precautions and use this device only as a last resort.
Making a device yourself
You can build a drill stand yourself. First you need to decide on the main parts of the device:
- table top;
- vertical guide part;
- tool mount;
- mechanism for raising or lowering;
- lever.
The stand is made in two possible versions - wooden or metal. For the first version of the device you will need the following materials:
- sheet of wood 20 mm thick;
- a rod for installing a structure for raising and lowering the drill;
- 20 short screws;
- 30 long screws;
- glue for gluing wood;
- hacksaw;
- clamp;
- screwdriver;
- drill;
- sandpaper for sanding the product.
A wooden drill stand is only suitable if you just need to drill holes in objects. Otherwise, it is recommended to construct a metal device. To do this you should prepare:
- bed;
- stand;
- handle;
- additional parts of the device to increase its functionality.
The size of the drill mount depends on the diameter of its neck.
This drill stand is quite easy to make. And if you expand it, it will perform many more functions. Before you begin manufacturing the structure, you need to study the drawings and understand the technological nuances.
Engraver
In order to make an engraver (drill) from a screwdriver without a battery or with a battery, you can use a special adapter, which is sold in a hardware store. You will also need a bit, the diameter of which must match the hole in the adapter.
To make an engraver from an old screwdriver with a working motor you will need:
- disassemble the screwdriver body and remove all the insides from it.
- remove the gearbox from the motor so as not to damage the shaft;
- attach the bit attachment to the shaft.
To protect your hand from the current that can “hit” the motor, you can wrap it with electrical tape or make a protective casing made of rubber (silicone).
Engraver from a motor from an old screwdriver
Garden shredder
Using a drill, you can make a shredder for small wooden debris, such as branches or wood chips, the diameter of which does not exceed 10 mm, as well as for grass. In order to assemble such a homemade product from a screwdriver or drill with your own hands, you will need:
- screwdriver or drill with a power of up to 0.5 kW;
- a threaded shaft that will fit into the cartridge;
- blades (for example, a hacksaw blade);
- a large bucket, pan or boiling pot as a container for branches; it should not be made of plastic.
The cutting part of a homemade garden shredder
To make a garden shredder from a screwdriver you need:
- Drill a hole of the required diameter in the center of the selected container for the shaft.
- Place the container on the work surface. To do this, you can fix it on the edge of the table or build a special frame from a metal corner.
- secure the knives to the machine shaft using bolts and washers (for better performance, it is recommended to install the blades with the sharpening point down);
- fasten a drill or screwdriver under the bottom of the container so that the hole in the chuck coincides with the shaft, and the electrical device itself does not begin to rotate around its axis during operation.
- make a 10x20 cm cutout and insert a plastic or metal sleeve into it to remove recycled waste from the container.
Example of a garden shredder made from a drill
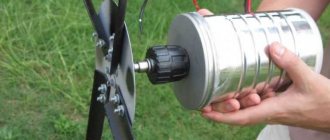
Wind generator
Wind and manual generators work on the same principle, but in a windmill the axis rotates using blades. In order to make such a device you need:
- disassemble the old screwdriver and disconnect the button with the power element from the motor;
- find an axis with a thread that will fit the diameter of the cartridge;
- attach a metal plate no more than 1 mm thick to its end;
- cut 2 plastic pipes lengthwise into equal halves;
- attach homemade blades to the plate using bolts;
- place the clamping clamp on the shaft between the gearbox and the chuck;
- secure the entire structure to a sheet of plywood or thin board;
Wind generator from a motor from a drill
To protect the motor from moisture, the generator mechanism should be placed in a container made of plastic or aluminum. This device can be used as a charger for a mobile phone when going outdoors, if you attach a battery or USB port to the wires. Also, such a wind generator can be installed as a weather vane, so that in the event of an unscheduled power outage, a power source is always available.
Wind generator made from a screwdriver
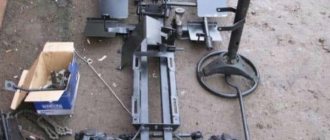
Bench Drilling Machine
To turn a drill into a tabletop drilling machine, you can purchase a factory mount, which is sold in hardware stores. It is made in such a way that the tool just needs to be inserted into the connector and screwed on.
To make a drilling machine from an old drill or screwdriver you need:
- disassemble the screwdriver body and pull out all the insides;
- make 2 clamps with different hole diameters: one will be attached to the motor itself, and the second to the gearbox. The clamps must have an additional small hole in their body into which fluoroplastic bushings must be placed.
- insert a guide rod with a diameter of 10-12 mm made of metal into the bushings. You can use a part from an old printer for it;
- drill 2 holes on the clamps on the left and right;
- fix metal tubes with an axis inside them;
- make 2 bosses from caprolon, in which you need to drill a hole, but not in the center, but with a slight offset to the side to create eccentrics;
- Using another clamp and a threaded rod, the bosses are attached to the main supporting rod and installed in such a position that the backlash minimizes the backlash of the shaft.
Example of fastening a screwdriver
To make a handle you need:
- take wooden blocks: 1 long (30-40 cm) and 1 short (10-15 cm). at one end of the large strip it is necessary to make an overlay from a piece of wood;
- drill a hole on this edge of the handle, the diameter of which will coincide with the sleeve on which the bosses are attached.
- drill another hole at a distance of 10 cm from this hole;
- make 2 holes in the short part along the edges. Using the first one, you need to secure 2 bars together so that the connection is movable. The second hole is required for mounting the short part onto the clamp attached to the gearbox.
- make a spring mechanism from a metal corner onto which 2 short bolts are welded.
Example of fastenings for a working metal structure
- secure it to the bottom of the clamp with the same fastening that secured the limiting post;
- put the springs in loops on the screws, which must be screwed into the long part of the handle between the edge and the lock of the short part;
- assemble a holding stand for the entire machine. It can be made from wooden blocks or welded metal corners together.
The idea of this homemade product is suitable for those who do not have the funds for a full-fledged machine, but there is a need for such a device. With this design it will not be possible to drill metal parts, since there will not be enough rigidity and the applied weight. This machine is suitable for woodworking or drilling thick layers of paper (for embedding diplomas and homemade books).
Do-it-yourself vertical stand for a screwdriver
In this case, it is quite compact, since it is designed for use in conjunction with a screwdriver.
However, you can adapt it for an electric drill by slightly increasing its size. And then you will get a homemade drill stand.
The advantage of this design is that its manufacture requires a small amount of materials. You don’t even have to buy many parts - you can find them in the garage.
We will make the drill stand stand from 20 mm thick plywood. You can also take a piece of board.
First of all, we saw off a blank of the required size from the plywood. Then we mark and drill two holes in it. Using epoxy glue, glue the guides.
We round the sharp corners of the base on a grinding machine. We make a movable platform from wood or plywood.
In the moving part we drill holes with a diameter of 19 mm for the bearings. Lubricate the outer part of the bearings with epoxy glue and insert the bearings into the holes.
We screw an adapter into the drill chuck, onto which we put a round tube. It must not only be put on, but firmly fixed with epoxy glue.
In the moving part we drill seats with a diameter of 29 mm for round bearings.
We put the first bearing on the tube and press it into place from the bottom of the platform. Then we put the second bearing on the pipe and also press it into the seat. For reliability we use epoxy glue.
We put springs and washers on the guides. Then we install a movable platform with a drill chuck.
It will be necessary to press wooden “plugs” onto the upper part of the guides to limit the stroke.
We clamp the shank of the drill chuck in the screwdriver chuck, and then use a crown of a suitable diameter to drill a hole in the base.
At this point, the process of making a homemade product can be considered complete. Then all that remains is to paint everything or coat it with mineral oil. Of all the racks, this option is the simplest and most cost-effective.
You can watch the author's video for details on how to make this device.
Electric car or children's catamaran
To create an electric car for children you need:
- make a frame (frame) from a metal profile or PVC pipes. They need to be assembled together so that you get a small car or a tricycle;
- as an axle for the wheels, you can use a metal pipe or rod, on which you need to attach a large sprocket;
- on the frame under the seat, make fastenings for a screwdriver with a battery and a shaft with a small gear;
- put the chain on the sprockets;
In order for a car to brake, you need to make a gas pedal or handle. The first part can be constructed from a rod with springs, to one end of which a pedal will be attached, and to the second a metal part that will press on the button. This design requires welding skills and a lot of time.
Car made from a screwdriver
To make the job easier, the throttle handle can be made from a set of bicycle rim brakes. To do this, you will need to take a part of a bicycle fork that has mounts for the brakes or make an analogue of them yourself from a metal rod of the required diameter.
A children's catamaran is made according to a similar principle, but its assembly requires PVC pipes. Since the movement of the gears is provided by the motor from the screwdriver or the tool itself, additional protection should be provided for it from water ingress. If the structure is made from a broken screwdriver, then the gas button can be removed with separate wires through pipes, and only its motor can be used as a motor.
An example of a catamaran design made from pipes for children
Important! The motor of a drill or screwdriver is not designed for heavy loads, so this electric vehicle is designed only for light passengers. Also, from prolonged use in this mode, the screwdriver can quickly break.
Flashlight
From an old broken cordless screwdriver you can make a powerful flashlight that runs on battery power. To create this homemade product you need:
- disassemble the drill body and remove the motor, gearbox and chuck from it;
- instead, an LED lamp of the appropriate size with a power of 5-12 W must be installed in the groove. For this you may need a G 5.3 cartridge.
Due to the battery capacity, such a flashlight can work for a long time and is well suited for those who experience frequent power outages.
How to choose material
Before making a homemade product to attach a drill, select the required material. For this you will need:
- thick pine wood board;
- plywood 15 mm thick;
- furniture guides;
- metal profile sheet;
- automotive bushing;
- metal pipe;
- wing nut;
- bolts and screws for fastening parts.
All of the above materials must be prepared in advance so that they are at hand.
Circular Saw
From an old screwdriver or drill you can make a homemade machine with a circular saw. To do this you need:
- make a stable frame from a metal profile or pipes.
- take a sheet of plywood or chipboard with a flat surface for attaching a screwdriver;
- make a cut in the center of the sheet in which the cutting wheel will rotate;
- secure the screwdriver to the work surface using clamps;
- A sheet of plywood is securely fastened to the frame. All parts must have no play, as this will cause the structure to begin to loosen, and vibration can break the fasteners, which will lead to damage to the machine or injury.
Example of a small circular saw from a drill
Practice working with a homemade stand
Some people think that working with homemade machines is very difficult, but this is not so. Such devices, on the contrary, simplify the use of a drill at home.
To use the design, you need to attach the drill to the stand and connect it to a power source. Then you need to lock the power button so that the electric drill starts working. After this, you just need to operate the lifting mechanism and place the parts that need to be drilled on the base. After completion of work, the tool must be disconnected from the rack.
Electric drill stands are often used to make drilling parts easier. People who want to make such structures should familiarize themselves in advance with how to make a drill stand themselves and what will be needed for this.
Sharpening machine
To make a grinding or sharpening machine from a screwdriver you will need:
- cleats or other reliable fastening;
- gear unit from a grinder or sharpening machine;
- attachment for grinding or sharpening, which can be installed in an angle grinder chuck.
In order to assemble such a structure you need:
- connect the gear unit and the screwdriver using a shaft;
- secure all parts so that there is no play during operation;
- Place the grinding attachment in the angle grinder chuck and you can start working.
Drill sharpening machine
Design advantages
Machines for drilling deep holes assembled using an electric drill are distinguished by a range of operational advantages:
- optimal compactness and low weight of the structure;
- Possibility to carry and use batteries;
- obtaining high-quality and accurate hole parameters;
- quick assembly and dismantling of equipment without wasting time;
- performing various works and processing all materials.
For repairs and home maintenance, a machine will be enough, but for a garage and larger-scale procedures it is better to choose a different type of device.
Replacement for various household appliances
A screwdriver in the household can replace a large number of different devices:
- If you attach the mixer attachment to the chuck, you can beat the desired products (eggs, dough) at low speeds.
- There are special brushes made of metal or plastic on sale, which, when installed, can quickly clean surfaces from rust or old dirt.
- If you purchase a round Velcro attachment, you can glue an ordinary kitchen sponge onto it, which you can use to polish a bathroom or tile.
Velcro attachment with a set of sponges
- A special attachment will help you sharpen pencils quickly and on an industrial scale.
- When installing a small drill using a screwdriver or drill, you can make holes in the soil for garden plants.
- There are attachments on sale that make a construction mixer out of a regular drill. The power of this device will be noticeably less, but it is suitable for small jobs.
Mixer attachment for drill