This is probably one of the simplest and most accessible DIY crafts, but in terms of convenience it is not inferior to a factory holster for a screwdriver, of course it cannot compare with it in beauty, and it is unlikely that any professional builder will use one, but for their own needs It is perfect for building a house or a bathhouse, or just renovating an apartment.
To make a holster for a screwdriver I needed:
- Transmission oil canister (choose the canister according to your screwdriver) (3)
- Belt (I took it from an IKEA mattress, it is packed with them) (2)
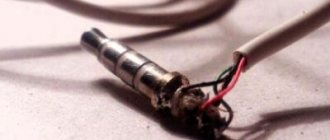
- Wire (1)
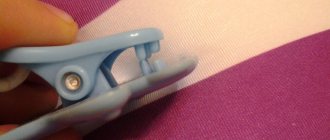
And so I armed myself with a stationery knife and cut it out as in the photo. The green circles show the holes, I drilled them so that the edge would be rounded, and the plastic of the canister would not tear, because the screwdriver is quite heavy, then I connected them with a slot, the width was the same as that of a belt.
Then, having tried how the screwdriver was held in the holster , I realized that it was necessary to fix it vertically, since the battery was pulling on the holster, and it was turned back, in order to avoid such troubles, I secured the wire (1) to the neck of the canister, and tied the other end to the belt at the back (there is a loop there). All.
Screwdriver in holster
I attached it to myself and it weighs just right. Everything suits me.
Here’s a LifeHack, it took about 15 minutes to make a holster for a screwdriver from a canister .
For example, you can see how much similar things cost in China. Here is the link
Actually, I found this one not so expensive
Or this one costs 200 rubles
In general, I am ready to answer questions.
By the way, I attached a bit holder to the same screwdriver with my own hands.
Source: samoblog.com
A tool bag on your belt or how to have the necessary tools with you
One of the most important factors in any repair is having the right tools on hand. Agree, it’s not the most pleasant experience to go down the stairs to get the necessary tool (if the work is being done at height) or to run around and look for a tool that you held in your hand 5 minutes ago, but now you can’t find. To avoid this extra time, you need to get a tool bag. But an ordinary bag is somehow not solid. The best option would be a mounting belt for the tool.
Such a device on the market will cost you about 1000–1500 rubles. There are cheaper options, but the quality of workmanship and materials will leave much to be desired. But, if you don’t want to spend money on such a petty thing, then you can easily make a belt yourself. You will need some material for sewing, preferably a sewing machine, hands in the right place and a few hours of free time. Still interested? Then let's proceed to a more detailed consideration of this topic.
Result
The work took 40 minutes and the device was very inexpensive. I liked what I got and wondered why I hadn't made holders like this before. I think this is a tool that everyone should have, especially if you have multiple screwdrivers.
Original article in English
Homemade tool bag for belt
What tools should you have with you when performing work at height? It depends on what you are going to do. Basically this is a drill/screwdriver, a hammer, pliers, wire cutters, perhaps some open-end wrenches and a bunch of small things: bolts, nuts, screws, a set of bits, drills, terminals and much more. Therefore, a construction tool belt should be multifunctional, durable and comfortable. Let's start making it. Let's look at the whole process step by step.
STEP 1: select materials . To make a bag you need to choose a good and strong material. Leather is good for this. But we do everything on a budget! Therefore, you can take old jeans and use them for a good cause. Denim fabric is very dense and durable, it can easily withstand the load of all tools.
STEP 2: bag dimensions. We decide on the size of the tool bag for the belt. We calculate the number of pockets and loops needed, write down their sizes and begin to cut out the required pieces of fabric. Each tool should have its own pocket.
STEP 3: belt. You can use the belt from the jeans themselves as a belt for your bag. We cut off all the excess from it, and leave only the back of our former jeans. Pockets can also be removed. We make an additional latch to prevent the button or button that is already on the belt from being unfastened.
There are a lot of options on how to make a tool belt. We will look at one of the simplest ones. The pleasure will cost us almost free, with the exception of the purchase of 1 linear meter of fabric and an old belt. So let's get started!
Equipment rack
The stand where the guides for the drill will be located can also be made from a metal or wooden plate. In addition to guides for moving the drill in a vertical plane, a clamp is mounted on the stand, with which the tool is fixed to it. The procedure for assembling the rack can be seen in the training video, and you must adhere to the following sequence of actions:
- a support is fixed on the stand-frame;
- the machine stand is secured to the base using screw connections, which is then connected to the support;
- guides are fixed on the rack, which can be used as telescopic furniture devices;
- a carriage is mounted on the moving part of the guides, where a fastener is placed for fixing the drill.
You can select suitable profile pipes for the rack
When choosing guides for your homemade machine, you should pay attention to ensuring that there is no lateral play in them. The length of the carriage, also made of metal or wood, depends on the size of the drill that you will use to equip your machine
This structural unit, which is equipped with a mobile drill stand, can be made in the following two options
The length of the carriage, also made of metal or wood, depends on the size of the drill that you will use to equip your machine. This structural unit, which is equipped with a mobile drill stand, can be made in the following two options.
With the drill secured using clamps. The clamps used in this design are threaded into holes pre-drilled in the carriage. Clamping of the drill and its reliable fixation on the carriage is ensured by tightening the clamps.
Steel pipe stand
A special block is used to attach the drill. This block is a bracket where the drill is secured. The bracket is made from a wooden plate, which is attached to the carriage at an angle of 90 degrees, for which metal corners are used. To fix the drill, a hole is drilled in the block, the diameter of which is 0.5 mm smaller than the diameter of the tool itself, and a slot is made to allow the tool to be inserted into the mounting hole.
The hole in the block on the machine, intended for installing a drill, is made according to the following algorithm:
- a circle is drawn on the surface of the block, the diameter of which corresponds to the diameter of the drill being installed;
- in the inner part of the circle, trying to adhere to the line that limits it, drill a series of holes of small diameter;
- the partitions that have formed between the drilled holes are cut using a hacksaw or any other tool;
- Using a file or needle file with a semicircular shape of the working surface, the edges of the resulting hole for the drill are processed, making them smooth.
Wooden stand with carriage on furniture rails
Trying to make a tool belt bag with your own hands
Each pocket has its own purpose. A standard belt typically has two large pockets that are located on the front (you can rotate the belt if you prefer these pockets to be on the side or back), and several additional pockets for small items (like nails, screws and staples). We will also need loops for attaching a hammer, pliers or other tools. They can be cut from the waistband of the jeans or remade from fabric.
Well, all the components of our future tool belt are assembled and we can start sewing. To make all seams of high quality, beautiful and reliable, you need to use a sewing machine. Replace regular threads with heavy-duty ones.
STEP 1: Large pockets. To begin, we place large pockets on the belt and securely sew them onto the fabric. It is better to make a double seam so that at some inopportune moment all the contents do not fall out of the pocket.
STEP 2: small pockets. We sew small pockets onto the mounting belt with our own hands for small details. For maximum safety of self-tapping screws, bolts, nuts and other things, you can sew a small piece of a flat magnet into your pocket. Then all the contents will be securely fixed in your pocket.
STEP 3: loops. Sew on loops for the tool. The hinges will conveniently store various screwdrivers, pliers, hammers, and tape measures. The loops are convenient for hanging the tool that is most often used.
Making a belt for installation work is a breeze! The main thing is to have the desire to create!
A well-equipped, convenient, organized tool belt ensures that work gets done more efficiently and safely. Assemble your own personal DIY tool belt as soon as possible. You won't regret it!
Source: rabotai-sam.ru
DIY screwdriver belt
Mounting belts made it possible to solve the problem of carrying and carrying a variety of tools for manual work. These useful devices are indispensable if you do plumbing work in cramped conditions or work at heights.
The vest for carrying tools is equipped with a large number of pockets and pockets, as well as a system of tightening straps. It is this that allows you to adjust the construction tool belt individually to your figure.
Some products are equipped with special Velcro in the shoulder area - with their help, using the vest becomes much more convenient.
Mounting bags for tools can be of three types:
Shoulder. Such models are quite popular because they have a low cost. However, they soon lose their impeccable appearance. Such products are characterized by soft, easily deformable walls, which is why they are not always comfortable to use.
Professional models are sewn from nylon fabric. They are equipped with a huge number of fasteners and pockets. Such a large number of compartments can also be a disadvantage - when fully filled, they make the vest very heavy.
How to make a tool belt? This question worries many masters. Let's try to answer it.
You will need an old leather belt, preferably a military one. We will attach all kinds of fastenings and pockets to it. Straps from an old backpack or bag can be used as compartments for storing pliers and screwdrivers. To be able to attach a bunch of wrenches to the belt, it is appropriate to attach several carabiners to the product.
Before you buy the model you like, take the time to try it on and evaluate all the available possibilities. Carefully inspect the product - the hammer compartment should be located on the side of the working hand. The optimal choice is a belt that contains attachments for power tools, in addition to manual ones.
If, while working, you often have to bend over, then for convenience, the belt can be rotated so that the system of pockets is behind your back.
Source: instrumentgid.ru
Making a steel machine: instructions with step-by-step photos
A metal machine consists of similar units, but they are more difficult to make due to the complexity of processing the material. The advantage of the design is its reliability and lack of play, which is ideal for installing additional components that expand the functionality of the machine.
The general structure of the metal machine is shown in the drawing, and the procedure for manufacturing the structure is as follows:
- For the frame you will need a steel plate 1 cm thick. The dimensions can be taken similar to those of the wooden model.
- The stand is welded from a square or round pipe with a cross section of 32–40 mm. You can weld a sleeve of a larger diameter onto the plate, and insert a pipe into it and tighten it with a bolt.
- The carriage is made from a larger diameter pipe. It should fit freely onto the stand. A steel clamp for a drill is fixed to the carriage.
Now all that remains is to put all the units into one structure and try to secure the drill with clamps.
Drilling machine installation
The drilling machine must be assembled in accordance with the drawing documentation. The mobile version of the drill stand, with high versatility, consists of the following elements and structural parts:
- supporting frame for fastening all the necessary elements of the machine;
- a guide that allows you to secure and move the tool with the carriage in the vertical direction;
- a special handle that controls the vertical movement of the tool.
To improve functionality and performance, additional components and special elements are used. Assembly and installation of the device must be carried out in accordance with the following instructions:
- fastening to the frame is strengthened by supports;
- screwing the vertical stand to the support;
- vertical fastening of a pair of guides;
- mounting on the moving part of the carriage with an electric drill.
For correct operation of the machine, it is necessary to check the guides for any play. The tool can be secured using special clamps or using a block.
Video: homemade drill stand
A tool bag on your belt or how to have the necessary tools with you
One of the most important factors in any repair is having the right tools on hand. Agree, it’s not the most pleasant experience to go down the stairs to get the necessary tool (if the work is being done at height) or to run around and look for a tool that you held in your hand 5 minutes ago, but now you can’t find. To avoid this extra time, you need to get a tool bag. But an ordinary bag is somehow not solid. The best option would be a mounting belt for the tool.
Homemade tool bag for belt
What tools should you have with you when performing work at height? It depends on what you are going to do. Basically this is a drill/screwdriver, a hammer, pliers, wire cutters, perhaps some open-end wrenches and a bunch of small things: bolts, nuts, screws, a set of bits, drills, terminals and much more. Therefore, a construction tool belt should be multifunctional, durable and comfortable. Let's start making it. Let's look at the whole process step by step.
STEP 1: select materials . To make a bag you need to choose a good and strong material. Leather is good for this. But we do everything on a budget! Therefore, you can take old jeans and use them for a good cause. Denim fabric is very dense and durable, it can easily withstand the load of all tools.
STEP 2: bag dimensions. We decide on the size of the tool bag for the belt. We calculate the number of pockets and loops needed, write down their sizes and begin to cut out the required pieces of fabric. Each tool should have its own pocket.
STEP 3: belt. You can use the belt from the jeans themselves as a belt for your bag. We cut off all the excess from it, and leave only the back of our former jeans. Pockets can also be removed. We make an additional latch to prevent the button or button that is already on the belt from being unfastened.
There are a lot of options on how to make a tool belt. We will look at one of the simplest ones. The pleasure will cost us almost free, with the exception of the purchase of 1 linear meter of fabric and an old belt. So let's get started!
Trying to make a tool belt bag with your own hands
Each pocket has its own purpose. A standard belt typically has two large pockets that are located on the front (you can rotate the belt if you prefer these pockets to be on the side or back), and several additional pockets for small items (like nails, screws and staples). We will also need loops for attaching a hammer, pliers or other tools. They can be cut from the waistband of the jeans or remade from fabric.
Well, all the components of our future tool belt are assembled and we can start sewing. To make all seams of high quality, beautiful and reliable, you need to use a sewing machine. Replace regular threads with heavy-duty ones.
STEP 1: Large pockets. To begin, we place large pockets on the belt and securely sew them onto the fabric. It is better to make a double seam so that at some inopportune moment all the contents do not fall out of the pocket.
STEP 2: small pockets. We sew small pockets onto the mounting belt with our own hands for small details. For maximum safety of self-tapping screws, bolts, nuts and other things, you can sew a small piece of a flat magnet into your pocket. Then all the contents will be securely fixed in your pocket.
STEP 3: loops. Sew on loops for the tool. The hinges will conveniently store various screwdrivers, pliers, hammers, and tape measures. The loops are convenient for hanging the tool that is most often used.
Making a belt for installation work is a breeze! The main thing is to have the desire to create!
A well-equipped, convenient, organized tool belt ensures that work gets done more efficiently and safely. Assemble your own personal DIY tool belt as soon as possible. You won't regret it!
DIY screwdriver belt
A tool belt is an irreplaceable thing for any builder; a necessary tool and components should always be at hand during both routine repairs and professional builders. There are several types of tool belts, they differ from each other, let's try to understand their varieties, help you make a choice and how to make a tool belt yourself.
But you can find a photo of the tool belt for a visual representation in our gallery.
Brief contents of the article:
Construction tool belt
The requirements for a construction belt are high; it must be carefully thought out when creating it to prevent the builder from falling from a height in the event of a force majeure situation and allow him to take with him the necessary tool for work.
Oddly enough, there are strict regulations for sewing a construction belt, since this item is often subjected to heavy loads during work. It is imperative that only high-quality and durable elements are used to sew a belt, so there is no need to worry that the fastening is made of light alloy and will not be able to hold the load.
A construction belt without straps, on which a button is attached, prevents you from unfastening the belt while working. A construction belt with shoulder straps is additionally attached to the chest and back, does not limit movement during work and allows you to use a larger number of tools.
The mounting options for construction belts are different: on the side or on the back; choose a belt directly related to the type of work being performed, but the optimal one would be a belt with two fastenings.
The capacity of the tools will depend on the number and size of pockets on the belt; many different-sized pockets mean more capacity for the tools. For example, a dewalt tool belt will be a great help.
Plywood drill stand
We'll tell you how to make a drill stand from durable plywood.
Drilling attachments are very convenient. Consider taking them with you every time you need to use your drill presses. Be sure to fine-tune the height of the workpiece. Use a pencil as a marker and line it up. This way you will know your starting point.
The router attachment turns your rotary tool into an efficient router for small jobs such as shaping decorative edges and cutting straight slots. This dedicated app is great for crafters who use it frequently.
In this post I'll show you how to make a simple router bit attachment for your drill or dremel using plywood and bolts. This milling application is fast and simple.
Parts used:
- Plywood thickness 6 "* 5" 19 mm (2 pcs.)
- 2 x #10mm bolts with nuts and washer (6” long)
- 2 springs (length 2.5 inches)
- 2 pieces of 12mm steel pipe (length 19mm)
- 5/16 Bolt with Nut and Washer (2.5" Length)
- 2 x #3/16 screws with nuts (5" long)
- 1.5" diameter round plywood pieces (2 pieces)
- Laminate
- 10mm electric drill
How to do:
First of all I cut 2 pieces of 19mm plywood to 6*5 inches. For a smooth finish and better appearance I also used Sunmica laminate.
Sand the corner of the plywood pieces and cut one piece of plywood into the shape as shown in the picture.
Drill a 1.5-inch hole on both pieces of plywood using a router bit and make a groove on one piece of plywood for the drill bit holder.
Drill a 10mm hole on both sides of the base plywood and run 10mm bolts through these holes and secure them into these holes with glue. Make sure both of these bolts are perfectly perpendicular to the plywood base.
And on another sheet of plywood, drill 12mm holes on both sides and attach a 12mm steel pipe (19mm long) to both of these holes using glue. Make sure the base plywood bolts fit through these steel pipes easily and there is no gap between them.
Place two springs (2.5 inches long) on the base of the plywood, away from the bolts as shown.
Attach 10mm nuts to two 1.5" round pieces of plywood as shown. This is used to move the drill bit up and down.
Attach two 3/16 bolts (5 inches long) to the plywood portion of the drill bit holder with nuts as shown, which are used to secure the position of the drill press.
Attach a 10mm drill press to the post through the 1.5” hole and secure it with a bolt and nut. Now this drill press app is ready to use.
For better understanding, watch the video below.
Features of the mounting belt
A tool mounting belt can not only help with work, but also comply with basic safety rules when working, this is especially necessary when working at height.
Before choosing such a belt, you need to know exactly the specifics of the work and consult with an experienced consultant who will help you choose a high-quality belt with reliable fastenings and their convenient placement, depending on the specifics of the work.
Particular attention should be paid to the marking of the product; it usually indicates the rating of the rafters and the material from which they are made (“A” – synthetic tape, “B” – steel rope, “C” – polyamide rope, “D” – steel chain ).
All fastenings, tapes and carabiners on the belt must be undamaged, free of rust and not jammed, so it is necessary to carefully check the product before purchasing.
Caring for the mounting belt is not difficult, it is enough to use ordinary soap and water, it is important to remember that chemicals and drying on batteries will quickly cause it to wear out. Periodically inspect the belt for damage or jamming. It is enough to check once every 2 months.
Rating of high-quality inexpensive adapters
DeWalt 200 mm DT-71517 (180181)
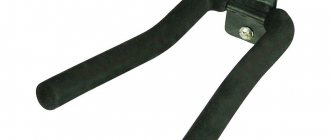
An indispensable attribute for screwdrivers. It is a corner bit holder. Length – 200 mm. Solid type. The shank is designed for a ¼ hexagon. Combined type holder. The number of elements in the set is 10 pieces. There is no shock function. Allows you to quickly and efficiently tighten and unscrew fasteners, regardless of the type of slot. Makes it possible to carry out manipulations in hard-to-reach areas.
The average price is 1849 rubles.
Video review of the nozzle:
The corner nozzle with a combined holder is reliable, easy to use and has a long service life. Shank for ¼ bits. Not flexible. Weight is negligible. Strengthened model. Allows you to tighten fasteners where conventional tools are useless or ineffective. The gear mechanism has increased strength. The torque indicator is 20 Nm. Experts advise performing manipulations with the device at first speed. The reviews are positive. Marriage items are not available for sale.
You can purchase the product at a price of 1149 rubles.
Hammer AB/20 (623053)
Advantages:
- can be used for drills and screwdrivers;
- strength of the material used;
- increases the functionality of the tool;
- ease of use.
Flaws:
- not found.
KWB/1181-00 (242841)
Budget option for corner adapter. Suitable for screwdrivers and drills. The set consists of one element. There is no shock function. The size of the attachment for the equipment is ¼ inches. Weight is negligible. Dimensions – compact. Metal of considerable thickness is used in production. You can order from Ali Express. The products are in high demand among domestic craftsmen. Speeds up the process of screwing hardware in hard-to-reach places.
The purchase price is 995 rubles.
KWB/1181-00 (242841)
Advantages:
- inexpensive product;
- there are no defects for sale;
- versatility;
- reliability;
- compactness;
- durability.
Flaws:
- not installed.
AEG/4932430173 (542052)
Angled bit holder with ¼ inch hex shank. Magnetic type holder. Belongs to the solid type. The set contains 10 items. Weight – 30 grams. Despite its Chinese origin, there have been no complaints about the product. It will become an indispensable assistant for tightening or unscrewing fasteners in hard-to-reach areas.
Purchase price – 1534 rubles.
Video review of the adapter:
Angle attachment with magnetic holder. There is a ¼ inch hex shaft. Suitable for any cordless screwdriver. Changing drills is easy and quick. The tilt angle is 90 degrees. There is no scissor or impact function. The build quality and materials used are excellent. You can purchase it at a specialized retail outlet or order it online in an online store. It will help the master cope with the most difficult task - to carry out manipulations in hard-to-reach areas. The set contains 9 items. Weight – 240 grams.
The average cost is 1419 rubles.
KWB/1182-90 (700825)
Advantages:
- reliability of control when screwing drills;
- energy transmission security;
- long service life;
- reliability;
- wear resistance.
Flaws:
- not identified.
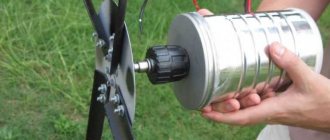
Bison 135 mm (Expert 26754-135) (400696)
Angle adapter from a domestic manufacturer. It is in high demand among those who carry out repair work at a professional level. Specialists are attracted by the price-quality ratio. Length – 135 mm. The holder is magnetic. There is only one element in the set. Weight – 200 grams. There is an additional handle. The reviews are positive. Provides professionalism and comfort to the manipulations performed.
The purchase price is 1119 rubles.
Bison 135 mm (Expert 26754-135) (400696)
Advantages:
- inexpensive model;
- versatility;
- ease of use;
- build quality;
- practicality.
Flaws:
- not installed.
FIT 37853 (188786)
Angled magnetic bit holder. The tilt angle is 105 degrees. Rubberized. Solid. The shock function is not provided by the manufacturer. Suitable for use with any electric screwdrivers and drills. In production, tool steel and impact-resistant (ABS) plastic are used. Supplied in blisters for sale. It is extremely popular among domestic craftsmen.
Retailers offer products at a price of 929 rubles.
FIT 37853 (188786)
Advantages:
- value for money;
- ease of use;
- versatility;
- long service life.
Flaws:
- none.
Metabo/627261000 (267813)
The corner bit holder fits any cordless screwdriver. Equipped with Quick shank. Belongs to the solid type. The weight is light, the dimensions are compact. Allows you to connect elements in hard-to-reach places. You can work with it for a long time. At the same time, your hands do not get tired. There is no need to put in much effort. High-quality materials are used in production. The build quality is excellent.
The average price is 2669 rubles.
About this and other accessories for METABO screwdrivers in the video:
Adapter for cordless drills. Tooling fit is ¼ inch. The tilt angle is 90 degrees. Does not belong to the flexible class. There is also no shock function. Helps to cope with work in hard-to-reach areas. There are no complaints about the build quality and materials used. The reviews are positive.
The average price is 1439 rubles.
Proline 31380/P (261336)
Advantages:
- wear resistance;
- safety;
- functionality;
- ease of operation.
Flaws:
- not identified.
Sturm! PH2, 25mm (1041-02-AD) (547629)
Convenient and practical angle adapter for screwdrivers with combination holder. Length – 25 mm. The set contains 5 items. The shank is a ¼ inch hexagon. There is no flexibility. Allows you to easily and simply perform manipulations in a space limited by width, height and length. Speeds up the process of action by half.
The average price is 563 rubles.
Sturm! PH2, 25mm (1041-02-AD) (547629)
Advantages:
- value for money;
- practicality;
- ease of use;
- wear resistance.
Flaws:
- not found.