Powerful, inexpensive DIY electric bike
Once, while still an ordinary village schoolboy, I saw a small article in a car magazine about an electric bicycle built by some foreign enthusiast, which could accelerate to 40 km/h and had a power reserve of 70 kilometers. After this short note, I gave up unsuccessful attempts to start the old engine from the Druzhba chainsaw and realized that the future had arrived. It was the beginning of the 2000s.
Then there was study at the university, and the first permanent job. The work was not so great, 4-day days alternated with three-day days, there was a lot of time, but little money, and my thoughts slowly returned to the idea of building an electric bicycle. The Internet was not as accessible to me as it is now, and even it, the Internet, was not inundated with so much information on homemade and not so homemade electric vehicles, there was not so much all kinds of components. And crazy ideas and fantastic designs from grinders, electric planes, starters were born in my head... I even remember there was an idea to place neodymium magnets on the rim, and electromagnets on the stays on both sides of the wheel.
The unembodied thought was either forgotten or flared up with renewed vigor, but it took another 10 years for it to begin to turn into reality.
I didn’t go the standard route for many - buy a ready-made kit and install it on the bike. Firstly, because I was not ready to spend significant sums on purchasing a kit, and secondly, it would definitely not satisfy the thirst for design and creation. In general, I initially set a goal to build a bicycle with a power of 1 kW with a budget of 10,000 rubles. Quite an ambitious goal.
So, at that time I already had a Forward Sporting 103 “mountain” bike, heavy, steel, with toothy tread, it rode well on any off-road, even on cobblestones on the side of the road, but rode very poorly on smooth asphalt, making an almost airplane-like noise. a buzzing sound that grew with increasing speed; the tire tread was eating up the roll very quickly. But he has been serving faithfully for more than 10 years. Of course, this is ideal for electrification).
From one useful website about electric transport I learned that a car generator, it turns out, works great in motor mode with cheap Chinese controllers for motor-wheels. There was just an 80 amp generator from a VAZ classic lying around in the garage. The cards aligned, the old dream flared up with renewed vigor, and I realized it was time!
The following were immediately ordered from one Chinese online store:
- Batteries 18650 – 2.6 Ah, 40 pcs.
- Balancing and protection board – 1 piece
- Touchless controller for electric scooters with 1 kW rated power
- Volt-, ampere-, wattmeter with remote shunt
- DC-DC converter that can turn 60 volts into 12
The following were purchased at the local market:
- Ratchet (with rear axle)
- Bicycle chain
- 10 teeth sprocket from F50 bicycle motor
In the garage, a front sprocket from a bicycle was found - 48 teeth, a rear sprocket - 22 teeth, pieces of rectangular pipes, bolts, nuts, wires, electrical tape and other small items.
Initially, it was decided to sacrifice recovery in favor of preserving the coasting and easy pedal stroke; I consider this function more useful in terms of increasing mileage. The front sprocket from a Soviet bicycle has now become the rear sprocket of an electric bike. I couldn’t find the left-hand freewheel, so the usual right-hand ratchet was converted to left-hand rotation - using a drill and a diamond cutter, the seats of the pawls were remade, and the pawls themselves were turned in the other direction.
The freewheel body is slightly counterbored to fit on the left side of the wheel, where the wheel drum extends beyond the flange. Many bicycles without disc brakes have enough space there to install such a homemade freewheel. The pedal of the 48 tooth sprocket was cut off, and the middle part was cut out with a grinder. The star is connected to the ratchet with screws and nuts. This entire structure is attached to the wheel like the rear sprocket of any gas hole - with long bolts through the spokes and rubber gaskets, half washers are inserted into the inter-spoke space of the wheel from the inside and everything is compressed, tightly grasping the wheel flange on both sides.
You need to install a 10-tooth sprocket on the generator shaft; to do this, I welded it to the nut that previously secured the generator pulley. The nut is screwed onto the generator shaft, drilled through along with the shaft, and a long M6 screw with a nut at the end is inserted into the resulting hole.
The sprockets from the bicycle motor had to be sharpened a little with a drill - their teeth are designed for a wider chain.
The 10/48 gear ratio is not enough for a quick start, there will be excessive energy consumption, I already understood this very well at that time. The gear ratio needs to be increased. I didn’t find a ready-made gearbox, I immediately dismissed various solutions based on drill/grinder gearboxes, although they transmit comparable powers, but these powers are obtained due to high revolutions, but I needed to transmit high torque at relatively low speeds - up to 3 thousand per minute – rpm
Therefore, it was decided to make an intermediate shaft.
The originally planned layout with the engine above the rear wheel was scrapped. I didn’t want to lose the opportunity to carry some luggage, or secure a child seat there. It was necessary to fit everything into the triangle of the frame. After numerous fittings, a frame for the engine and intermediate shaft was made.
Large drive driven by a screwdriver
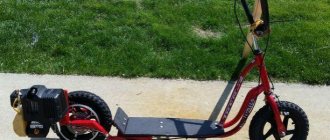
Hello to all those who like to make things with their own hands. Today we will look at how you can quite easily turn a regular bicycle into an electric bicycle. The author used a screwdriver as a power unit. Of course, the battery will not last long, but no one is stopping you from installing a more powerful battery on your homemade product. The design considered is just an example of how you can power a bicycle using a screwdriver. Your child will be happy with this homemade product, just don’t forget to come up with running boards and install a reliable braking system. If you are interested in the project, I suggest you study it in more detail!
Materials and tools used by the author:
List of materials:
- screwdriver; — an old experimental bicycle; — a cable with a handbrake handle from a bicycle; - corner; - bolts and nuts; - round timber; — plastic ties; - spring.
List of tools:
- welding machine; - Bulgarian; - roulette; - marker.
Homemade manufacturing process:
Step one. Experiment
To begin, turn the bike over with its wheels up and remove the left connecting rod with the pedal. We reduce the diameter of the axle using a grinder and grab the axle with a screwdriver chuck. That's all, now we try to spin the wheel. Based on the speed of unwinding and revolutions, you can roughly estimate whether the screwdriver will pull a bicycle, but this is only if you have experience.
Step two. Frame
Next we need to make a separate frame for installing the screwdriver. A grinder and a welding machine will help us in this matter, and we also need to find corners. We weld the desired frame; you can weld it directly to the bicycle frame, or you can mount it with bolts and nuts.
Step three. Clutch
The author decided to make a special lever clutch that will allow you to quickly and reliably connect a screwdriver. The clutch consists of levers, on each axis there are two levers. We weld a nut to the bicycle axle and weld two levers to it. Well, for a screwdriver, we weld the pins to the bolt.
Step four. Assembly
We are assembling a homemade product, for this we need to securely fasten the screwdriver; of course, it is advisable to do everything so that the screwdriver can be easily removed. The author decided to secure the screwdriver using plastic ties.
We also need to arrange the controls; for this we will need a cable and a bicycle hand brake handle. The cable must be installed so that when you press the lever, a loop is tightened around the screwdriver button. To make the loop unclench, the author installed a spring on the cable.
After this, you can test the homemade product, but do not forget to make sure that the brakes are working properly and at least put a helmet on the child. The video shows how everything works, the bike rides without problems, the torque of the screwdriver is quite enough. This homemade project is complete, I hope you found some useful ideas and thoughts for yourself. Good luck and creative inspiration if you decide to do this again. Don't forget to share your ideas and crafts with us!
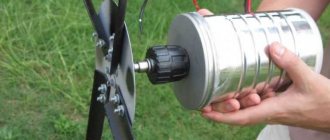
Electric bicycle from an angle grinder
Despite its small size, the grinder hides enormous power. What if you attach this tool to a bicycle? And make an electric bike. But not everything is as simple as it seems at first glance. For this to work well, several problems need to be solved. The first of them is that the speed of this angle grinder is too high. To lower them to an acceptable value, we welded a piece of pipe to the nut and screwed it onto the shaft. To check, simply press it against the wheel. So much power is of course good, but you need to understand that at such speeds the torque will be weak. The bike most likely won't start. To lower them even further, the grinder shaft itself was pressed directly against the wheel. Now it looks like speed will be what we need. For better grip, a reinforced high-pressure hose was screwed very tightly onto the shaft. Now all that remains is to fix the grinder on the wheel and you can test it.
#betterathome. Grocery shopping in comfort: an electric bicycle made from an old screwdriver
What could be more enjoyable than a bike ride in the fresh air on a nice day?
Right. Cycling without having to pedal. But an electric bike is an expensive purchase. Therefore, it’s worth thinking about how to make it yourself using improvised materials. And the author of the YouTube channel Sergey will help with this. Let's make a reservation right away that only the base will be described. Home craftsmen can finish the rest of the little things on their own, to suit themselves. But making such a bicycle with an electric drive will be extremely simple. Read in the article
What can be done with an angle grinder without a gearbox
A grinder without a gearbox is a fairly powerful electric drive with a value rarely less than 0.5 kW. Such a device can be used in home-made machines for performing various types of mechanical processing (cleaning, cutting, grinding and others).
Important: do not throw away the emergency gearbox, but modify it by removing all unnecessary parts, for example, on a lathe, leaving only part of the housing with the bearing assembly. This design of the drive shaft will maintain its rigidity when transmitting load. Next, instead of the drive gear of the angle grinder, a drive pulley of a suitable diameter is fixed and, using a belt drive, torque is transmitted to another driven pulley sitting on the working shaft. The working tool is installed according to the nature of the work performed.
The option of using high speed electric drives for an angle grinder is effective when performing engraving work . Here, no intermediate mechanisms are required to set the working speed, but you only need to solve the problem of how to connect the flexible shaft used in engraving technology with the electric drive shaft. Preserving part of the gearbox housing with the bearing installed in it (the replacement process for which is presented in a separate article) is an important condition for the operability of the design.
Homemade products, what you can do with your own hands, where to adapt the gearbox
A significant number of mechanisms operate at shaft speeds after the grinder gearbox. there are more options for using an angle grinder gearbox for the operation of other devices . Together with non-standard ways of using an entire grinder for homemade projects, masters of technical creativity create interesting compositions . Some are presented by the authors in specially filmed videos.
To the trimmer
Owners of summer cottages and garden plots will be interested in the following video. Many of them use trimmers to maintain the area in proper order. The possibility of failure of the electric motor installed on such a device cannot be ruled out. The author suggests using a grinder instead. Why is a bracket made from waste materials, which is mounted in place of the burnt out engine. In addition to the bracket, you should make an adapter from the angle grinder spindle to the flexible trimmer shafts. A grinder is attached to the installed structure and the trimmer is ready to mow overgrown grass.
The number of revolutions of such a modernized design is about 10,000 rpm . At such speeds, grass mowing is carried out quite efficiently. It is possible that the use of grinders of the minimum power range to reduce the weight and overall characteristics of the trimmer will lead to overheating of the grinders during operation. You should monitor the temperature of the grinder gearbox and take breaks if necessary.
Cultivator drive: Mole and more
Land owners will benefit from the experience of the author of the following video. of the cultivator failed . In its place, the author came up with a mount for the grinder and connected the spindle of the grinder gearbox to the cultivator gearbox . The speed of the grinder is certainly higher than that of a gasoline engine. However, the performance improvement advertised by the author is unlikely to occur. The problem of overheating of the commutator motor will remain and frequent stops, as a protection against it, will remain. Although for owners of relatively small plots the use of such a cultivator will be effective.
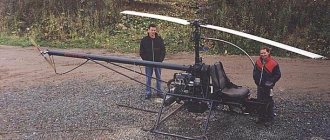
Wind generator
Using a screwdriver engine, you can design a small wind generator for a summer house or personal plot, and be independent of the power supply. It will also help during a power outage.
It will take a little time to create a wind generator. The rotor part is removed from the screwdriver. The motor shaft is attached with a bracket to a plastic plate. We attach the flywheel to the end gear with bolts and attach four blades made from PVC pipe to it. You can use a tea can for the body, carefully sealing the cracks with sealant. The wind generator is ready to provide electricity that costs you nothing.