A high-quality handmade dollhouse is an unusual and memorable gift. Its creation usually occurs secretly from the child, but it can become a pleasant time together, turn into an educational game, a way to learn to better understand and hear each other.
Children remember for a long time and highly value the time spent on creative activities with their parents Source youtube.com
Why is this necessary?
A happy childhood is not so much a room full of toys as it is the love and attention of parents. A gift created by yourself emphasizes these feelings in the best possible way. By making a house yourself, you can:
- do not limit yourself to the capabilities of your wallet (good quality factory products are quite expensive);
- make a structure of any size;
- leave the rooms of the house empty or fill them with furniture at your discretion;
- build a fairytale castle, a forest fairy hut or implement any other idea.
Dollhouse with transparent walls for self-assembly Source pikabu.ru
The production of dollhouses from plywood and other available materials does not require special knowledge or a significant investment of time and effort.
General principles
All dollhouses are produced according to general principles. They must be taken into account in order to make a functional toy that will give the child a lot of impressions and become a reason to be proud of the parents.
- The classic building is not equipped with a front wall to provide children with free access to the objects and dolls that fill the rooms. If desired, the partition can be made removable or replaced with a curtain; it will protect the interior of the house from dust and dirt particles.
Toy homes are usually not covered with a front wall in order to maintain full access to dolls and interior items Source museum-design.ru
- The size of the building is determined not only by the wishes of the baby; age is of great importance. It is difficult for a small child to play with bulky products; it is dangerous to gain access to small parts and prefabricated structures. Older children like large, realistic toys.
- The height and width of the building should be in harmony with the dimensions of the children's room. Too large toys with complex shapes are inconvenient for use in small rooms oversaturated with other interior items.
It is difficult to play with large dollhouses in rooms oversaturated with furniture Source akak7.ru
- It is preferable to choose the material of manufacture based on the age of the children. For kids, it is better to limit themselves to a small soft structure made of fabric; for preschoolers, light toys made of thick cardboard are suitable; for a child over 6 years old, it is permissible to create a house from plywood or old furniture.
The ideal house combines answers to the needs of all family members. The child needs the toy to be bright and entertaining; parents are more interested in the safety of the materials and the strength characteristics of the product. Building such a structure yourself is much easier than finding it in a store.
A bright, reliable house for dolls made from materials that are safe for children's health Source domikdljprodagi.blogspot.com
How to make a roof
If possible, for self-production, it is recommended to choose simpler forms of roofing, with simple fastening.
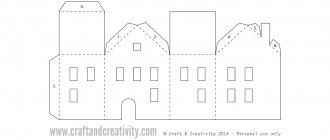
- For a paper house, the roof is cut out and glued according to the diagram.
- In cardboard models with a gable roof, it is better to place the gables at the ends. Then the roof will have reliable support. To make it you will need a large piece of soft corrugated cardboard. To calculate the dimensions, you need to measure the length of the house and the length of the gable slopes. The roof should have small allowances on each side, like real roofs. Almost the entire middle is cut out from the front to provide an accessible view of the upper floor. The sections of the pediment and rear wall are coated with glue. The roof part is placed on top and pressed lightly for better gluing.
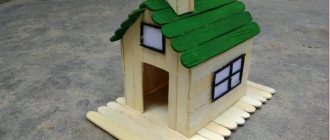
- In wooden houses, shed roofs are popular, which rest on one side wall and go down to the second, shorter one. The back wall also serves as support. This roof is secured with glue or small nails.
- For a gable roof on the top floor, an interior partition is provided, which serves as additional support. In cases where it is impossible to install a partition, the slopes are additionally connected from the inside by a jumper in the upper part of the roof. This method is convenient for cardboard roofs. Heavier materials are more securely reinforced with small-section wooden blocks, which are assembled in the shape of a triangle and, like a gable, support the roof at the front of the house, leaving access to the attic. The ridge of a gable roof is glued or tightened with screws.
When choosing material for a dollhouse, you can use a short table with comparative characteristics. The comparison is very arbitrary, since with a lot of experience you can create a very complex model out of the box, which not everyone will repeat. And make a budget wooden house with your own hands from an old chest of drawers.
Author: Momina Anastasia
Article design: E. Chaikina
Making a fabric toy house
Hanging structures made of fabric stretched over a frame, and handbag houses that fold out like folders, serve as excellent educational toys for children 2–4 years old. To add rigidity to individual interior elements, cardboard sheets are sewn into soft material.
Furniture and other furnishings are marked using appliqué or embroidery. It is useful to make some of them convex by stuffing them with a small amount of cotton wool or padding polyester, like pillows. Beds and wardrobes can be equipped with pockets and opening doors.
Felt dollhouse in the form of an educational book for kids Source youtube.com
Interior arrangement
Before you make a room for dolls, you must think about the interior. At the next stage, you can begin to furnish the house with furniture. It is most convenient to place a crib in the corner, which is covered with bed linen. Pads are placed on top, you can put a toy for the doll. There are chairs and a table around the room.
In order to diversify the interior, you can hang a board on the wall, which is previously decorated with stickers. The board can be made of thick fabric. An organizer with stationery is placed on the table; you can find all this and purchase it in online stores for children's dolls. There you will even find small books for toys. All these little things will allow you to create a single whole - a real room. You can hang stickers in the shape of donuts on the wall. The room should be decorated with flowers made of corrugated paper. You can make such crafts yourself. A basket of toys should be placed in the corner. The ideal house is ready.
Construction of a dollhouse from cardboard
Cardboard is a light and safe material, it is well suited for joint creativity with children. The properties of the raw materials do not limit the size of the structure:
- to make a home for small toys, it is enough to select shoe boxes, an iron, and a hair dryer;
Small cardboard boxes serve as an excellent building material Source b2btara.ru
- For medium-sized dolls, packaging from a vacuum cleaner, microwave or bread maker is suitable;
- To create a toy mansion or cottage, it is convenient to use boxes from large household appliances (refrigerators, washing machines).
If boxes of the required size cannot be found, the home can be assembled from separate pieces of cardboard and small packages. It is convenient to form such a structure into several floors, laying out rooms in the form of ready-made blocks.
For decoration use colored paper, paints, fabric. Properly designed cardboard floors can easily withstand toy furniture made of the same material and plastic interior items.
Durable cardboard frame of a doll house Source youtube.com
common room
Room number 2 is a common room for watching TV. The TV in our house is flat - a large cardboard rectangle was covered with black acrylic paint, after drying, a suitable picture was glued and the whole thing was covered with acrylic varnish.
The main place in this room is occupied by a spacious sofa, which accommodates a large family of dolls.
The base of the sofa is a cardboard blank (photo 10).
The back and armrests are covered with paint and varnish, and the base is glued with padding polyester and fabric. My daughters already had a table - it was a wooden construction set, onto which we glued a piece of cardboard and painted it all together. We see room No. 2 in photo 11.
Video on how to make a cabinet:
On the second floor of our house there is a music room and a kitchen.
Building a dollhouse from plywood
Making your own toy house from plywood requires consistency and patience.
Preparation of materials and tools
Before making a toy house from plywood, you will need to prepare materials and tools according to the chosen work plan.
- You can use ready-made drawings as a diagram. It is easy to develop a sketch yourself, adjusting the parameters of the rooms and the height of the ceilings to the size of the dolls.
- Plywood must belong to class E0; other types of raw materials are not suitable for the manufacture of children's toys and even furniture. To calculate the amount of material, the area of all parts is summed up. A small tabletop house requires about 2-3 sheets, a large one - up to 7 or more.
Plywood sheets for making a durable and safe dollhouse Source strelnawood.ru
- It is preferable to use corrugated cardboard as a roofing material.
- To apply markings, use pencils with a soft lead, a ruler, a corner, a compass, and a tape measure.
- The most functional tool for cutting plywood is a jigsaw, as it helps to quickly and accurately cut workpieces of any shape.
- For temporary assembly and adjustment of building parts, mounting tape is convenient.
- Strong fixation of elements during the manufacturing process is carried out using wood glue.
- Sanding paper with fine grains is necessary for finishing surfaces for priming, varnishing or painting.
Window and door decoration
Windows and doors are designed in accordance with the main material of construction. The stronger the model, the more complex the door fastenings and the more detailed the decor.
- In paper houses, windows and doors are drawn. The front door is cut out on three sides. Windows are cut according to the picture: with sashes or a full opening. It is not advisable to cut openwork grilles and lintels - thin parts will tear very quickly during play, giving the house a sloppy look.
- In houses made of corrugated cardboard, the door is cut in the same way. If the model is assembled from beer or bookbinding cardboard, then the door part is cut out completely. For fastening you will need a small piece of gauze or bandage, strong paper and glue. Insert the door into the opening and coat it with glue, grabbing the part of the wall to which it will be attached. Place a piece of gauze on top and again apply a thin layer of glue. Cut a rectangle out of paper equal to the door and glue it on top of the gauze, connecting the door leaf to the wall. Gauze will add strength to the fastening, and paper will prevent sagging. For decoration, stick an image of a real door on the part. Cut out 2 frames from cardboard and paste them over the doorway on both sides. Window openings are also designed.
- In wooden houses, the doors are secured using piano hinges. The doorway is designed in the same way as in the previous case. The decor can be complicated by imitation brickwork, the presence of a door knocker or a bell. Window openings on the outside can be decorated with “glass” made of transparent plastic. Decorate the top with a wooden photo frame. Make a frame from cardboard on the inside. Using stained glass paints on a plastic window will make the facade bright and unusual.
- Interior doors are usually not installed. An arched opening or installing a narrower wall is sufficient.
The image is created by the details: even the simplest house will become brighter and more interesting if you pay attention to the windows and doors.
Making a realistic model
Older children like toys that are as realistic as possible, which are exact copies of real objects. To create a doll house in this style, materials used for renovation and decoration of residential premises are required.
- Drywall will be an excellent basis for the structure. Its surface is well suited for any type of finishing, including puttying, painting, and applying decorative plasters. To make joints of individual sheets, small corners will be required.
- The remains of tiles, linoleum or laminate, or wallpaper after a real renovation will allow you to perform a realistic decoration of the rooms of the house and even maintain a uniform style of its design.
- The layout of the rooms should be recognizable. Following the usual patterns will make the house even more like the real thing.
Small battery-powered LED lamps and clocks converted from wristwatches to wall ones will fit well into the setting of such a creation. Vertical partitions can be decorated with miniature drawings of a child placed in frames made of thin wooden slats.
Dollhouse made from real building and finishing materials Source youtube.com
Creation of toys with extended functionality
A large dollhouse made of plywood can become a full-fledged piece of furniture if you attach drawers to it on the side, bottom, and equip shelves. In this case, from an adult’s point of view, it will be a convenient storage system for the child’s toys, and the child will enjoy cleaning.
Wooden dollhouse with shelves and drawers Source oozor.ru
If you attach a house to your baby's bed when he goes to bed, he will be able to continue playing. This option will be of interest to those parents whose children have difficulty switching, have difficulty falling asleep and are capricious.
Children's room
In the children's room, the main place is occupied by a bunk bed (photo 25).
She has soft mattresses and pillows. In the room there is a small table (photo 26) and a chair (photo 27).
There is also a cabinet for toys (photo 28).
In this room I did not cut a window, but simply glued a cardboard one to the side wall. The room is decorated with a colorful alphabet (cut from paper packaging from a children's toy). Photo 29 shows a children's room in color.
Almost all the chandeliers in our house are glued together from disposable containers, beads, cockerel sticks and braid.
Only one, which is in the music room, is made of beads, wire and bead fittings.
I also glued a ladder to the house, but we have it attached for now, because I am afraid that if it is glued, it will interfere with two children playing at the same time.