Preparing for the New Year holidays allows you to especially feel the surge of joy and warmth that is characteristic of the New Year. And when there is not enough atmosphere or you want to fully embrace the upcoming period of fun, it is useful to do various crafts to decorate your home or office. Moreover, this activity is suitable not only for children of different ages, but also for adults. And it will be extremely useful for the family to spend time together during the exciting process of making paper houses for decoration.
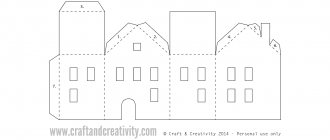
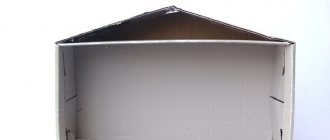
Paper house + template
The templates are printed, folded along the dotted lines and glued into solid products in the indicated places. Finally, they are painted in the most suitable places.
Mini paper lantern house: step-by-step MK + template
The template can be printed or hand-drawn onto paper and then cut out. After that, bends are made in future gluing areas, and multi-colored thin corrugated paper or film is glued to the inside of the house. All that remains is to glue the houses together and put them on electric candles.
Finishing of the finished product
When the house is completely ready, they move on to decorating it. You can cover the craft with stain, paint it in the desired color, decorate the roof with a ladder made from tubes, make flower pots - original house ideas and instructions for making them will help with this.
If you wish, you can make a window in the house: cut a hole in the right place, cover the cut with a pigtail, glue two tubes perpendicular to each other, which will act as a frame.
Making a beautiful house from newspaper tubes is quite simple, the main thing is to understand the principle of weaving.
Log cabin made from paper tubes
An ordinary A4 sheet is cut into 3 parts, rolled into tight tubes and glued along the edge so that they do not unwind. The house is gradually laid out from the tubes, constantly being held together with glue. Then it is complemented with decorative elements in the form of curtains, doors and a roof frame. Thick colored paper or cardboard is fixed on top as a roof. All that remains is to complete the image of the house with additional decor.
Tools for assembling tubes
The material has been selected, in our case it is newspapers, now we need to prepare the tools for assembling the tubes. The most important thing is a stationery knife or scissors, with which the newspapers will be cut.
The second is glue, any glue will do: from construction glue to a pencil. The best option is ordinary stationery PVA glue.
In addition, you will need a thin knitting needle with a diameter of 1-1.5 mm. Our newspaper will be wound onto the knitting needle.
The smooth surface of an ordinary table is not suitable for rolling, so many people choose the option of rolling out mats. They are made of silicone and have a bit of rubber, but large cutting boards made of plastic or vinyl also work well.
Everything is prepared and you can get down to business. The first thing you need to do is cut the newspaper correctly. For this purpose, the newspaper strip is folded in half crosswise and cut along the fibers. After that, fold each half in half again and cut again in the same direction.
The newspapers are ready, you can twist the vines. We take one strip of newspaper and place the tip of the knitting needle about 5 centimeters on the lower right corner, begin to twist while holding the tube.
The upper corner is coated with glue and the tube is glued. That's all, the tube is ready, you need to make a lot of them, they are painted and impregnated with the composition in order to make it easier to weave with them.
House coloring book
It will be exciting for children not only to assemble a ready-made image, but also to bring something of their own to it. To do this, you will need to print out your favorite template or several, or draw it yourself. Then cut it out, glue it and, armed with pencils, paints or felt-tip pens, color it as you wish.
the next stage is painting the paper vine
- The classic option is to paint paper wicker with wood stains; they are now freely sold in any hardware store. We choose the best stain option that will suit us, learning to weave from paper wicker for beginners - water-based.
- It is odorless, non-toxic and can be used in weaving children's toys and for kitchen products.
- You can use undiluted water stain, then you will get dark colors. if you dilute it with water, you will achieve light beige shades.
- But for beginners, I advise you to make your own stain from available natural materials. For example, a decoction from tree leaves, or even from ordinary grass. Fill a pan filled almost to the top with leaves or grass with cold water, place the pan with leaves and water on the stove and cook over low heat for 2-3 hours. If you want a steeper broth, cook longer. At the end of cooking, add a tablespoon of soda. After cooling, strain the broth.
After straining the homemade stain, take 0.5 liters of the broth, pour it into a glass jar and add 2-3 tablespoons of acrylic varnish to it, and you also need to add 1-2 tablespoons of construction primer, then stir it all thoroughly.
In order to learn how to weave from paper wicker, beginners need to learn how to paint tubes with high quality.
Let's start painting - we, learning to weave from paper wicker for beginners, will need a suitable container, slightly larger than the length of the paper wicker, with high sides, and pour the prepared solution into it. In small portions, about 50 pieces, lower the tubes into the solution. Scroll them slowly so that they are all colored evenly throughout. Then we pull it out, gathering it into a bundle with our hands, let the excess liquid drain, and lay out the tubes to dry.
You need to wear rubber gloves when painting tubes.
- .
The second painting option is painting with a construction paint in various colors.
The colors can be mixed together to create the shade you want.
In order to achieve a rich color, add more color to the water, then add varnish and construction primer. The same as in the method of staining with stains, for 0.5 liters. water - 2-3 tablespoons of varnish and 1 tbsp. spoon of primer.
If you want pastel colors, add a little color, and when mixing paint with water, add 2 tablespoons of white acrylic enamel.
Christmas village
To create a multi-component decoration, you can make a full-fledged Christmas village. To do this, the templates of all buildings need to be printed, cut out and carefully glued together. The finished layouts are decorated with paint, pencils or felt-tip pens and arranged into a single composition.
Gingerbread house
Bakery
Church
A toy shop
DIY New Year's houses
- latex primer (optional)
- decorations (tinsel, bells, balls).
1. To get started, download the template from THIS
link or you can draw a house of similar dimensions yourself.
2. Cut out all the parts from paper and glue them to white cardboard using a glue stick or double-sided tape.
3. Cut out the pieces from cardboard. Use a utility knife to cut out doors, windows and other details.
4. Fold all the elements along the fold lines and glue everything together.
5. If desired, you can apply a primer to the paper house to prevent it from deforming.
6. Paint your house and after the paint has dried, start decorating it.
The house can be hung on the Christmas tree using a thread attached to the roof so that it hangs level, or you can simply place it on a flat surface to decorate the house.
Fairytale castle
It will be interesting for a child to make his own fairytale castle. The process will consist of standard printing, cutting and gluing of templates. Then the assembled castle is decorated and complemented with various decorative elements. Particularly relevant will be shiny metal parts, beads and beads, as well as shiny dense threads.
Weaving from newspapers, furniture for dolls - do it yourself - June 5 - 43334687499 - media platform Mirtesen
Rocking chair, armchair and chair made from newspaper tubes. Master classes on weaving country furniture for dolls from the author Kestrel
I immediately lay in the racks for the backrest. Let's fill two tubes in one turn. After four racks we will also fill two more. These racks will be the innermost ones in the back and armrests.
The back and armrests are made with simple (calico) weaving. We braid all the racks in several rows. And then each part separately.
The top of the backrest was braided with uprights - the right one goes through the chintz and the tip is hidden in the weaving, then the left one does the same... The armrests were wrapped and tucked into the weaving. It’s not very easy, I braid it tightly... You can just twist it into a roll.
ROCKING CHAIR
The beginning is the same as that of a high chair. Add bases to the sides and fly in a simple way.
Here I made the base for the back in an arc. Let's braid...
Box house
The craft can be used for good. To do this, print out, cut out, glue and decorate the box house template. Then it can be filled with candies, sweets or other small items that can be given as a gift.
Preparatory stage
For beginners, it is easiest to start with large items that do not require high precision. It doesn’t matter what it will be - a basket, a box or some other item. The main thing is that the planned dimensions are sufficiently voluminous. So what do we need?
- Naturally, the main tool is newspapers. And the more, the better. Always take with a reserve, because a certain amount will be wasted. Of course, the specific quantity directly depends on the size of the product. But, as a rule, the number starts from 200 standard pages.
- Glue. It is better to buy universal PVA with a dispenser - it is more flexible and does not leave marks.
- A knitting needle with a diameter of no more than 2 mm - it is needed to twist the sheet into a tube.
- If you want to change the color of the raw material, then prepare paint, varnish or stain. The color scheme, of course, is at your discretion, but the quality characteristics of the dye should include the coloring of paper media.
- An empty container that will help you more accurately define the shape of the product. Depending on the idea, this could be, for example, an empty box or a vase.
All that remains is to choose a working scheme and you can begin the process of creating your first masterpiece. There are many interesting ideas and schemes on the Internet: from the simplest to the complex. We recommend mastering root weaving. Besides the fact that this technique is quite understandable for a beginner, it is incredibly beautiful in execution.
Advent calendar
Nowadays, Advent calendars or Christmas calendars are becoming more and more popular. They contain several cells with numbers, the opening of which allows you to conduct a fascinating countdown of the days until Christmas or the New Year. The content of such calendars can be anything: sweet treats, small gifts, cosmetics, wishes or even financial resources. The main thing is that every open day brings something new that is not present in any other.
Putting together such a calendar for the New Year is quite easy. To do this, all parts are printed or transferred by hand onto paper, cut out along the contour and bent in the places indicated by the dotted line. At the end, all this is carefully and step by step glued together, filled with the appropriate content.
Let's get started
Here are some materials we will need:
- newspapers or other paper;
- paint (before assembling the house, you should paint the tubes);
- ruler;
- scissors;
- pencil.
We make tubes. To do this, take a newspaper and cut strips the entire length of the sheet. The width is about 5.5 centimeters. We fold the strips not along the width, but along the length.
Assembling the house
The shape of the house will be rectangular, but very similar to a square. We recommend taking exactly the dimensions where the width differs from the length by one centimeter. We took the scale of the house to be 8*9 centimeters. We weave the bottom of the house.
We create the bottom from double racks. One of the racks will be shorter, and the other longer.
In the next photo you will see how it should turn out and how many racks to use:
Now we lift the long racks to the top, but do not touch the short ones. There should be no sharp bend. The tubes should kind of hug the bottom. We intertwine short tubes with string. Three rows will definitely be enough. Close the stand one by one, covering it with glue. Let it dry for 15 minutes. We make the rope itself from 3 tubes. Interlace the row and close. Remove all ends, excess and coat with glue. Secure with a clothespin.
After that, take paper and draw the approximate shape and size of the entrance. The arch shape will definitely fit. Use a utility knife to cut out the entrance. Flatten the cut tubes and seal them. In this way, glue all the existing tubes together. Let's move on to the hole to finish it. We braid four tubes and glue them to the cut point. We continue to weave the side ropes. Row 23 should have been completed.
Note! Height doesn't matter. Weave exactly the way you want.
After that, move on to the triangles. It is impossible to clearly describe how to weave triangles; you just need to narrow the weaving. When you reach the eighth row, weave two racks together. Intertwine three rows of free ones into one tube. Leave 1 tube. A little later we will glue it and cut it. So we glue the second side.
Related article: Openwork socks with knitting patterns: how to knit a warm new thing with video and photos
Finishing the edges
Bend the posts one behind the second, the second behind the third. Using this principle, bend all the posts. Work in one direction only. Bend the remaining tube and glue it.
The house is almost ready. All that remains is to decorate it. You can glue flowers and grass, you can use bows, beads, or make a snowball and snowmen out of cotton wool. Show your imagination!
This house can be used for yourself, when guests come, and as a gift.
Mini house for Christmas tree
A homemade house can even be a Christmas tree decoration. You just need to print it, cut it out, glue it and paint it with colorful paints or even sprinkle it with glitter. To create a unique image, you can also use additional gluing on the model of shiny paper.
Circus
Many people associate the circus with fun and celebration, just like the New Year, and therefore it will be interesting to make a similar craft for New Year's days. The template is easily duplicated or printed on paper, cut out, glued and painted in circus-specific or other desired shades.
the next stage is to twist the tubes
To create a paper vine, and in order to learn how to weave from a paper vine, you need to be able to wind paper into tubes. This is a simple task:
- We take the cut paper that we have prepared.
- We begin to twist the tubes. Take a sheet of paper with a wide end. We place the knitting needle on the edge of the sheet at an angle of slightly less than 30 degrees. We press the finger with the grip of the sheet onto the knitting needle and twist it with both hands. In one hand, the edge with the knitting needle, and with the other hand we push the second end of the tube to the end of the edge of the sheet until it curls completely. Then we take the twists in our hands and glue the tip of the sheet with PVA glue from a tube with a sharp end. You can also lubricate the ends of several sheets in advance. This is if you have already learned how to twist and want to speed up the process. We stack 10 pages on top of each other, moving the sheets ladder down. and coat all the upper ends with glue. Then we twist it one by one and with the second hand we immediately pinch the tip of the sheet with glue.
To weave a quality product, the tubes must be dense and elastic.
Scene in a winter house
Not only for decoration, but also for children’s entertainment, you can print and assemble a template of a room in the house, as well as characters - the inhabitants of the house. The finished work can be easily placed in any place in the house, and children will always be interested in playing with the figures, acting out various scenes. Parents can also join in to spend time in a warm family circle.
Winter city made of paper + template
A beautiful and minimalistic decoration will be the whole image of the city, which can be transferred to paper or printed, then cut out and, bent in the indicated places, installed in any suitable place.
Or this option