At children's parties or matinees at school or kindergarten, one of the popular costumed characters is a magician. The costume of this hero is quite colorful and interesting. There are outfits for both girls and boys. The costume consists of several mandatory elements, which can be varied by playing with a combination of colors and additional decoration.
In the article we will look at how you can sew a magician’s costume for a boy with your own hands, what is included in the components of the outfit, and how to make each element at home.
Military costumes for kindergartens
If children need a uniform for songs or skits, then you can sew a costume based on the original. But if preschoolers dance with lunges, dances and solo numbers, then it is better to make the costume outwardly festive, and the cut simple, comfortable, and loose. Since children 4-5 years old can get tangled in clothes, trip or get caught on something.
The easiest way to make a soldier's costume is to sew shorts, a T-shirt, and a cap from khaki fabric. It is better to make long shorts, like sports pants. You can glue a military-themed decal onto a T-shirt, or sew a star onto a cap.
Find a T-shirt pattern, transfer it to the fabric, sew the back to the front, and the sleeves. Sew the neckline and sleeves. If you don’t know how to sew, then take a ready-made T-shirt that fits the child’s body. Transfer the size onto the fabric, mark the armpits and neckline. Now remove the T-shirt, add 2-5 centimeters to the measurement on each side (depending on the fabric), cut it off. Fasten the parts together. Also draw a sleeve on the T-shirt, and compare the exact size with the new pattern.
General recommendations for creating a grape costume
At first glance, it may seem that making a grape costume for a children's party with your own hands is very difficult and without special skills it will not be possible to do it.
In fact, such a costume can be made without much effort and using only available materials. The simplest option that even a child can make is a costume with a paper mask. To make it, take an image of a bunch of grapes printed on a color printer and glue it onto a hair hoop (option for a girl) or a strip of thick paper, which is wrapped around the head and fastened with a stapler or paper clips (option for a boy).
Important! When making a mask for a child for a matinee, you need to make sure that it does not cover his face or interfere with his view.
Any green clothing will be suitable as the bottom of such a suit. It can be:
- shirt (T-shirt) and trousers (shorts) for a boy;
- sundress, dress, skirt with golf for girls;
- overalls.
Advice! So that such a costume does not seem too boring and is more in line with the given theme, you can give the child a basket with real grapes. Also, as a decoration, you can use artificial grapes made of silicone or polymer clay, which can be bought in handicraft stores or china shops (where they are often used to create various decorative compositions).
Another option for creating a carnival costume could be an outfit consisting of a hat - a grape and a cape with the image of a bunch of ripe berries. To create a grape hat, any dark blue or purple Panama hat is suitable. For greater resemblance, leaves cut out of felt and a twisted vine made of soft wire are sewn onto it.
Advice! A stencil of grape leaves can be made from an image printed on a printer. It is cut along the contour, applied to felt and cut out with scissors. You can draw veins on a piece of paper with a felt-tip pen.
As a cape, you can use a rectangular piece of satin fabric, sewn on the sides so that it can be placed on the child’s shoulders. A cut out paper image of a bunch of grapes is sewn or glued to the chest and back, or a felt applique is laid out. The last option looks much better and more interesting. To create an applique, you need to cut out many small circles or ovals from blue, purple or yellow felt (there are grape varieties whose berries have an oblong-oval shape) and sew them to the canvas so that the end result is a bunch of grapes.
Advice! You can make the process of laying out the appliqué easier if you draw a schematic image of it on the fabric in advance.
After the berries are ready, several leaves are glued to them and a twig or threads of the vine are drawn in with a felt-tip pen or marker. Under the cape, you can wear brown or green clothes, the main thing is that they do not distract attention from the cape and cap.
Advice! If the costume is being created for a girl, the grape hat and cape can be embroidered with green or blue shiny sequins. An applique of felt grapes will shimmer beautifully under the light of the lamps if you glue sparkles or sew rhinestones on them.
Military T-shirt and tank top
Use needles to cut off the shoulder and side sections. You bend it, sew it, if the fabric is not loose and you have an overlocker, sew it with a zigzag. Next, fasten the sleeves with needles and also stitch them. Now cut off a strip (4-5 cm wide) for the neck.
It is better to choose a special fabric (ribana) that stretches. Then you need to subtract a third from the size of the back and front neckline, you will get the required length of the ribana (for example, the neck is 25 cm, then the ribana is 17 cm). You sew the strip into a ring, attach it to the neckline, and sew it on a machine.
If a military suit for a boy is represented by a T-shirt, shorts and a cap, then we decorate the T-shirt with a St. George ribbon, shoulder straps, badges or a special appliqué. Thermal application is especially convenient (apply to clothing, cover with gauze, iron with a hot iron).
If there is a tunic on top, then you can sew a vest. It is suitable for a soldier, sailor, paratrooper. Also transfer the pattern from a tank top that has wide straps to striped fabric. Sew the shoulder and side sections, process the armpit and neckline.
Page Robe
So, you need to make an elegant cape to make a beautiful pageboy costume. Making it with your own hands is quite simple. It is enough to take a rectangular blanket from a bed or sofa and pass a cord through the drawstring along the long side. It is better if it is silky or velvety.
You can, of course, buy fabric specifically for these purposes. Then there is an option to cut out a semicircle, and cut another one with a smaller diameter near the center of the semicircle. This will be the neck of the robe. It makes a drawstring for a cord or satin ribbon, which is tied with a lush bow.
You can embroider a crown with beads on the back of the robe. The ornament lined with golden cord looks beautiful.
Boy's shorts
For the middle group, boys can sew long shorts like sports pants. Measure your hip circumference, length and fit. Find a pattern for shorts, take your measurements, transfer everything to the fabric. Sew each half down to the fly line. Then you pin the resulting two parts with needles and sew them on a machine. Sew on a belt or simply fold the fabric and pull through the elastic.
For children of the older, preparatory group, you can sew trousers. They can be spotted or green, like a wartime suit. Beginner seamstresses will find it easier to sew trousers with elastic; professionals can recreate the original down to the last detail.
In order not to make a mistake with the cut, you can rip out the old pants, transfer them to fabric taking into account the new sizes, baste, and sew. Cut out the back and front halves of the trousers on different sheets at once, since the second half is higher than the first, and if the product is on a belt, then you need to mark out more darts. If you are afraid of making a mistake, then buy the product, and then try it on for your child.
Fluffy leggings: master class
This part of the outfit is optional. That is, a page without pants at all is definitely nonsense. But regular trousers are also quite suitable for the outfit.
However, if the master has the skills of a tailor, then sewing leggings will not be difficult for him. The main thing is that there would be enough time to make delightful, luxurious, fluffy leggings for the pageboy's costume, attracting everyone's attention.
You can make a pattern for them yourself.
- We lay out any panties of the future page on the newspaper and trace the details of the front and back halves along the seams.
- Cut out the pattern pieces. To make the main pattern of the pattern, you need to spread them a little along the side seams to give future leggings a fuller look.
- We cut and sew the inside of the pantaloons from light satin. Stepping back a little from the bottom edge, make a drawstring and insert an elastic band into it. You can sew a lace frill along the edge of the pantaloons.
- Strips of dark satin are cut 5-10 cm wide and a length equal to the height of the pantaloons. Then each two strips are folded face inward and stitched. After this, the parts are turned inside out.
- The edges of the stripes are trimmed with golden trim. Place them on the bottom of the pantaloons and sew them on top and bottom. When the elastic is inserted at the top of the leggings, they are considered ready. When putting on panties, the stripes move apart in the middle part, and the lower light-colored pantaloons become visible between them. It looks beautiful and extravagant.
- In the same way, you can decorate the upper part of the sleeves of the page's outfit.
As can be seen from the article, it is quite possible to make such a carnival costume yourself. You just need desire, accuracy and patience.
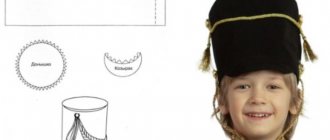
Military headdress: cap
Not a single military men's suit is complete without a cap, a cap, and a cap. You can get by with a store-bought cap made from khaki fabric. Otherwise, select the fabric, find cap patterns, and start sewing. For one product you will need three patterns: large (2 pcs.), medium (2 pcs.), parts and petal (1 pc.).
Pin the patterns to the fabric and trace with a seam allowance. Attach the large part with the petal with the convex side and stitch them. Take the second pattern of the large part and sew it to the other side of the petal. That is, the petal forms the top of the cap.
Along the top edge, sew two middle pieces on both sides. Next, take the cap with the large parts and the petal and turn it onto your face. You also turn the middle parts onto the face, insert them inside the cap, that is, on the wrong side, combining the side and bottom sections. You pin it with needles and turn it inside out. The bottom needs to be basted. Now you stitch everything on the machine.
That is, first you sew on one side of the cap, then the other. Then process the side cuts in the same way. Please note that when sewing the sides, you need to use all layers of the cap so that there are no holes or folds. Turn the finished product onto your face and iron it.
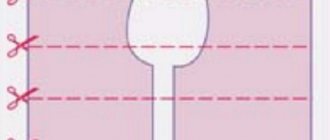
The bow tie
From the remaining fabric from sewing a magician's costume for a boy, it is easy to cut a bow tie. A rectangle is cut out, the length of which is equal to double the size of the future accessory. Width – according to two measurements of the width of the object. On the back side, the workpiece is sewn along the edges with stitches or attached if there is a sewing machine in the house.
The result is a fabric pipe, which is turned right side out with a seam in the middle. The side edges are folded towards the center and stitched together. When sewing, the central seams are located on the back side of the butterfly. Then work continues in the same way on the tie's jumper. When the fabric tube is sewn and turned out, it is wrapped around the first piece and slightly pulled together so that the butterfly is gathered. All that remains is to sew the edges of the jumper and straighten the folds with your hands.
You can fasten the tie with a pin, a metal clothespin, or attach an elastic band with accessories - a clothes hook.
We make soldier costumes with our own hands
Schoolchildren will need military trousers and tunics. Cut the tunic like a regular shirt, only from “military” fabric (khaki, pale or dark green, marsh, light brown). Beginning shirt pattern makers can make a T-shirt with long sleeves that fits loosely on the child.
To do this, fold the fabric in half. Place the T-shirt folded vertically on the inside out. Circle the resulting measurement, lower the shoulder section down a little and extend it a little. This will be the back of the shirt. Add a centimeter to the seams, lengthen and round the bottom (you will get an arc), cut out the measurement. Now apply this measurement to the fabric, make the cut deeper (translate without allowances).
Also outline the sleeves, adding the desired length. Cut out cuffs, collar, pockets. On the pattern, use a pencil to mark the location of all the small parts, so you will see where to start sewing. Connect the front parts to the back. Then you return to the front shelves and process the button strips. Sew on the collar and pockets. Next, move on to the sleeves and sew on the cuffs. Decorate the tunic with small details (badges, orders, shoulder straps with Velcro).
Harry Potter
A minimum of effort is required for the boy wizard costume. By and large, every schoolchild already has this costume. In any case, trousers, a shirt and a jumper will definitely be found in his wardrobe. And now the main accessories are a robe, glasses, and a magic wand. The mantle can be made from a piece of any suitable black or dark blue fabric. And there is no need to sew the same coat with sleeves as the movie Harry. Just make a spacious cape.
You can borrow round glasses from someone you know, just don’t forget to first remove the diopter glasses from them. And if no one has any, then make a frame from ordinary wire and paint it with spray paint. There are no problems at all with a magic wand. Any long knitting needle can easily turn into such a wand if you wrap it with beautiful braid and decorate it with sequins, beads or Christmas tree tinsel. Well, you can certainly draw a scar in the shape of a lightning bolt using your cosmetic pencil.
Quick suit
Some beginning craftswomen do not adhere to standard sewing rules, but imitate military costumes. A photo of the shape helps to imagine an approximate cutting technique. For example, for a military uniform there are breeches. Craftswomen transfer the pattern of ordinary trousers onto the fabric, and then “by eye” widen the measurement in the hip area.
The belt is made with elastic. A tunic is “corrected” from an ordinary shirt by sewing on shoulder straps, pockets, and large metal buttons. For a tunic, buy a regular belt. In principle, such military suits look no worse than uniforms made by professional seamstresses, but even a schoolgirl can master this cut.
Another option is to knit military paraphernalia. Knitters imitate the hats of tank crews, pilots, paratroopers, and sailors. Kids really like these costumes. Shorts and a T-shirt are knitted with matching threads.
For girls, any costume consists of a skirt (semi-sun, pencil or with lining) and a T-shirt, tunic. The principle of cutting the top of the product is the same as described when sewing a suit for boys.
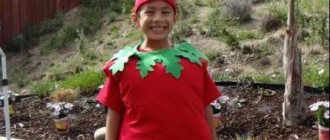
Step-by-step instructions for creating a grape costume for a boy
The only male cartoon prototype of a bunch of grapes is the shoemaker Grape. However, his image may seem too boring and inappropriate for a fun children's party. You can create a more childish and elegant costume for a boy using the following materials:
- dark green satin and gabardine;
- purple or yellow jersey;
- green decorative tape;
- padding polyester;
- wide elastic band;
- fake grape bunch.
Step-by-step description of the work:
- Creating the top. A top is cut and sewn from green fabric (you can use any T-shirt of suitable size as the base). An elastic band is sewn to the bottom and processed with an overlocker. The sleeves are slouchy and lined with purple jersey. As decoration, an applique of knitted grapes stuffed with synthetic padding is sewn onto the front of the top.
- Sewing pants. Pants are sewn according to any convenient pattern, and an elastic band is inserted into the waistband. Grape leaves are sewn onto the knees as decoration.
- Sewing a headdress. A grape hat can be sewn according to the above principle: sew decorations in the idea of vines and leaves to a ready-made Panama hat or beret.
For the youngest children to participate in a photo shoot, you can make a voluminous grape costume from inflatable balloons. The balloons, inflated to halfway (it is important to ensure that the balloon is not overinflated and does not burst), are glued to the child’s clothes with double-sided tape. You can put a matching hat on your head, and the funny grape costume is ready.
How to choose earrings for an off-shoulder dress
Knitted suit for a newborn
Sailor costume
The sailor's military suit pattern includes a visor, collar, white T-shirt and blue shorts for preschoolers. For schoolchildren, blue trousers and a shirt with a solid collar are suitable. The blue color scheme can be replaced with black trousers, a vest or a white shirt with a one-piece collar and cap.
For a cap, you will need three parts: a band, a bottom, and a crown. Measure the circumference of the child's head and cut a strip 3-5 centimeters wide on cardboard. Tape the ends together to determine the size of the cap on your head. The standard size will be a couple of centimeters smaller than the head circumference.
Next, the size of the crown is calculated (its inner radius is equal to the length of the band divided by 2), and the size of the bottom will be seven centimeters larger. That is, you can draw a large circle for the bottom of the visor, and mark the inner radius on it.
If in doubt, make this model on paper, measure it on, and then transfer the measurements to the fabric. The fact is that if the cap is cut incorrectly, it can be large or, conversely, small; The crown can be loose and form folds.
What is an outfit
A top hat is usually worn on the head. It can be either classic black or bright, multi-colored. The lower part of a magician's costume for a boy does not require separate tailoring; it is enough to wear black trousers, which are always in any child's wardrobe, as well as a white shirt. Parents have to work on a bright vest. It is advisable to use colorful, shiny fabric. The bow tie will also be made from the same fabric. The final touch to the magician's costume is a cape in the shape of a cape. It will be interesting to sew it from two layers of fabric: the outer one is black, and the inner one should have the same color as the vest and tie. It can be bright red, light green, turquoise or pink. The main thing in choosing a color is to create a sharp contrast to black. An outfit for a boy will look interesting if you take fabric in a checkered or striped pattern, with polka dots or diamonds.
Sailor's cap
Also use dublin to keep the band and crown in shape. If there is no dublin, then try initially starching the material and sewing a product from it. In this case, we consider a master class on cutting a peakless cap using a dublin.
- Cut out a band on the dublin that is 6-10 centimeters wide, as it will bend in half.
- Glue it onto the fabric with an iron, taking into account the allowance.
- Cut out the resulting band.
- Fold it in half so that the dublin is inside, and steam it with an iron.
- Immediately cut out and glue the patterns of the crown and bottom from dublin onto the fabric, taking into account the allowances.
- You attach the band along the entire length, tucking the sides of the fabric inward.
- Place the bottom and crown together and sew them together.
- To prevent the allowances on the outer circle from puffing up the cap, make notches (triangles).
- Turn it inside out and steam the cap.
- Cut the inner radius and use a washable marker to mark the line of connection with the band.
Peak cap and sailor's collar
We continue to sew a naval military suit for a boy, starting with a cap.
- Attach the headband to the headdress by attaching two satin ribbons in advance.
- Then you sew it on the machine.
- Glue the anchor applique to the front.
Another option for constructing a sailor's headdress is represented by cardboard and fabric. The band consists of cardboard. A cloth is attached to it from the inside so that it covers its inside and head. A strip of fabric is glued to the outside. The result was a kind of cook's hat.
For a striped collar, you need measurements of the half-circumference of the neck, the width of the shoulder and the length of the product itself. On the pattern, mark the beginning of the horizontal measurement, consisting of the neck and shoulder data. To do this, make two more calculations.
- Divide the half-girth of the neck by 3, add 0.5 and divide everything by 3. This parameter will determine the height of the neck bend.
- Divide the neck circumference by 3 and add 0.5. Mark this parameter along with the shoulder length on the pattern.
Koschei the Deathless
The idea for this costume came from film adaptations of Russian folk tales. You only need to pick up a dark tights (pants) and a sweater. You will also need foil, from which you will have to cut out the skeleton parts and cover the crown with it, and black fabric for the cloak and appliqués. Find a picture of a real skeleton and, looking at it, draw (first on a newspaper) two details - the sternum with ribs and the pelvic bones. Make the pattern size in actual size. That is, the drawn bones must correspond to the size of the real skeleton and the height of the child. Then transfer these designs onto foil and cut them out. Glue the finished patterns onto a piece of black fabric, which you then sew to the sweater. Make a cape from the same fabric, and from whatman paper make a crown - a primitive jagged one. Cover the crown with foil, and trim the cape with tinsel on the occasion of the New Year.
Sailor costume
Mark the length of the collar vertically and add a parameter for the height of the neck bend. The result is a square. Now, from the extreme point indicating the size of the shoulder, determine the length of the straps vertically (30 cm will be enough). At the base you determine their width. Now draw an arc from the strap to the point indicating the length of the collar.
Transfer the resulting pattern onto the folded fabric. Sew white stripes on the front side. Next, make the same detail so that the collar on both sides is beautiful. Sew both halves wrong side together.
You can also sew a military suit for a girl. Just replace the shorts with a half-sun skirt. To do this, you will need to measure the length of the product and the waist circumference. On the folded fabric from the top corner, mark the length of the half-circumference of the waist with an increase of 12 centimeters. That is, if the half-circumference is 28 cm, then mark 40 cm on the fabric.
Draw an arc from this point. To ensure that the line is even, measure the specified parameter from one side to the other with a centimeter from the corner of the fabric. If you did everything correctly, the resulting arc will be a couple of centimeters larger than your waist circumference.
Now mark the length of the skirt from the arc and also draw a line. In this case, only one side seam will be needed. Fold the belt and insert the elastic. Sew white ribbon strips along the bottom (like on a collar).
What should I prepare for my pageboy costume?
Attentive craftsmen will definitely notice one important detail. The page's suit is almost exactly the same as the prince's order, if the crown is replaced by a beret. However, the heirs to the throne do not always wear a tiara on their heads. And princes in carnival costumes often crown their heads with berets.
What is a page boy's or girl's costume? After all, often little flirty girls also like to dress up as courtiers close to the royal person. So, for this outfit you will need:
- beret;
- mantle (cloak);
- collar;
- great trousers;
- tight tights.
If time is very limited, you can get by with just a cape and beret.
How to make a costume for a girl
Military costumes are loved not only by boys, but also by girls. You sew a cap and tunic using the same type as for boys. And make the bottom of the suit a straight skirt or with pleats. The straight cut goes well with a tunic, and the pleated skirt looks chic with a T-shirt.
To cut a straight skirt, you will need measurements of the length of the product and waist circumference. Calculate the width of the product. To do this, multiply your waist circumference by 1.33. For example, if the waist circumference is 53 cm, then after multiplication we get the value 70.49. We round this number to a whole number and measure 71 centimeters on the fabric.
Cut two rectangles from the fabric. The first corresponds to the length of the skirt and waist circumference (in our version, 71 centimeters). The second rectangle is used for sewing a belt. To do this, measure the waist circumference along the length (in our case, 53 centimeters), and the width – 15 centimeters.
Connect both rectangles into a circle separately. Fold the belt carefully in half so that the free ends are on top.
Make a turban:
put on a hat, throw a scarf on top, positioning it so that the obtuse angle of the triangle is in the middle of the forehead. Tie a knot (Figure 1b). To give the turban its shape, place cotton wool or padding polyester, or parallon on the top and sides of the head (Fig. 1b). Tuck the ends of the scarf under the turban (Fig. 1c)
Fold the two paper parts of the feather (Fig. 1d), after stretching the wire between them and glue them together. Color the feather in bright colors. When dry, cut out the fringe along the edges and tuck the feather into the knot of the turban (Fig. 1)
Straight skirt
Also connect a thick elastic band (1.5-2 cm wide) around the waist into a circle. Insert it into the belt, connect both ends of the fabric using a machine. Now measure out 8 points on the belt and skirt with pins. To do this, fold the product in half four times in different directions, pinning the folds on both sides with pins.
Connect the belt to the skirt, begin to attach the details from one pin to another, pulling the belt to the mark on the skirt. Fold the bottom of the product and sew it with a zigzag stitch or a double needle machine stitch.
If the fabric is expensive, you can save money. Buy a T-shirt with military colors for your child (from wholesalers they cost from 70 rubles per set). Make a straight skirt out of it. To do this, use needles to cut off the bottom of the T-shirt and the armpit line. Cut along it.
Fold the fabric to form a belt and insert a wide elastic band. This model can be made from an adult shirt or T-shirt by cutting off the excess fabric on the side. The skirt is ready, and with the tunic and cap we have a real uniform (military). The costume can be made simpler with a T-shirt and a pleated skirt.
Animals
Many boys, especially small ones, aged 3–5 years, want to be the most ordinary animals. Moreover, their desires are not at all limited to bunnies and wolves.
Animals seen in cartoons, zoos or educational programs completely capture their imagination. Therefore, before the holiday, the question “Who do you want to be?” It is quite possible to hear the most unusual answers - a crocodile, a fly agaric, a mushroom or even a cancer.
Kitty
Many people love their cats and want to be like them on holiday. Creating such a costume is not at all difficult. Moreover, this can be done in several ways. Each of them will have a common detail - makeup applied to the face and consisting of a nose and mustache.
- Knitted gray kitten . A crocheted hat with small ears and the same tail, which is sewn to shorts or gray leggings, is enough. The rest can be found at home - a gray turtleneck and soft slippers.
- Black shiny cat . There's a little more work here, but not too much. The basics are the same – leggings and a turtleneck or shirt. The rest is either in the closet or very easy to sew - satin black shorts with a ponytail and a vest of the same material, trimmed with fur.
For greater authenticity, outfits can be complemented with soft mittens of the appropriate color.
Fly agaric mushroom
The main thing in this outfit is the mushroom cap. It can be made from an old wide-brimmed hat. The free space between the crown and the brim is filled with cotton wool or foam rubber. Then the entire product is covered with red fabric. White fly agaric spots are sewn on top. Don't forget to attach an elastic band to keep the hat firmly on your head. The rest is not difficult - a white turtleneck, shorts the same color as the hat, and white tights. The shorts represent the skirts of a mushroom. You can even put your baby in regular sandals, as long as they don’t stand out too much.
Crocodile
Of course, you should purchase fabric of green and yellowish-light green color. Foam rubber will also come in handy. The basis of the costume is a jumpsuit. It can be made according to any pattern, even pajamas. A mandatory detail is the hood. The front part is a light oval shirtfront, which can be simply fastened with snaps or even buttons. In order for this “green man” to become a real crocodile, you need to sew on a long tail (stuffed with foam rubber) and make a comb from light fabric that goes from the tip of the tail to the very top of the head. On the hood – the “head” – small round eyes are also sewn on top. The front of the hood can be complemented by a protruding jaw with teeth. Like the tail, this element can be made using foam rubber.
Cancer
The outfit contains four main elements - claws, head, shell and tail. It is in their creation that the main difficulty lies. Everything else is simple - a turtleneck and leggings. The color depends on what kind of crayfish is needed - boiled or live. Accordingly, the colors are red and swamp green.
- Claws . There are cardboard pads on the arms from the shoulders, and the gripping part itself is cut out of foam rubber or simply sewn.
- Head . A tight-fitting cap, on which small black eyes and a long mustache are placed, comes in handy here. The front part is elongated, slightly reminiscent of the creation of a “crocodile jaw”, but with mandibles at the end.
- The tail and shell consist of segments that can simply be cut out of fabric and sewn one under the other. The tail itself is sewn to shorts or tights, which is decorated in the same way as the shell.
Pleated skirt
This model is sewn as follows. Measure the length of the skirt on the cut, taking into account the allowances (about 3 centimeters). Calculate the width from the waist circumference and the size of the folds. If you bought fabric in a store, then make the calculation based on its footage.
The folds can be the same or opposite, pinned with needles. Make sure that the top matches your waist circumference with an increase of 2 centimeters. You sew the skirt, steam the folds, finish the bottom of the product, and sew on the belt. It can be made with an elastic band or sewn with a hidden zipper.
With a T-shirt and a cap, you'll get a nice military dance costume. The women's version is faster to sew than the men's version. If you do not have cutting experience, then try your product on your child “every minute” to avoid mistakes. Remember: only with practice comes experience.
So, I started by making a raincoat.
I folded the fabric in half along the cross thread. I cut out a neckline in the middle. The neck radius can be calculated using the following formula: R= L/2π, where R is the radius, L is the circumference, which in our case is equal to the circumference of the neck, and π is a constant value equal to 3.14.
When we cut out the neck, we cut the shelf in the middle. I made the length of the front of the cloak shorter than the length of the back. All edges were rounded. I treated the neckline and bottom edge with gold bias tape. (Such rubbish, I tell you, has no elasticity at all, and falls into creases. Therefore, I do not recommend using it in sewing lambrequins).
I also made a stencil, and used acrylic gold paint to apply the ornament on two shelves and on the back:
You can see how to make a Princess crown for a girl for the New Year using the Kanzashi technique HERE!
I sewed on a store-bought magnetic clasp:
At this point, the manufacture of the cloak is completed.