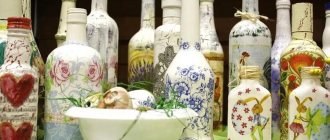
Decoration of bottles for various celebrations
Wedding table decor
The wedding tradition of decorating the newlyweds' table with two beautiful bottles of champagne has been around for many years.
After the wedding, the so-called “bulls” remain with the newlyweds and are kept in a place of honor. The first bottle is opened on the wedding anniversary, and the second - after the birth of the first child. Given such a long journey of wedding bottles, special attention is paid to their decoration. Recently, all wedding decorations have their own unique concept, based on which the color palette and decor of literally every piece of furniture, table setting and all kinds of decor are selected
But there are also universal options for designing bottles for the newlyweds’ table. The best part is that you can transform simple bottles with your own hands, in a short time and without spending much on materials. Most often, bottles are designed similar to the appearance of the bride and groom - this is what is called a “classic of the genre”, time-tested.
Bottle as a gift
The best gift is a gift made with your own hands. Such a gift not only keeps the warmth of your hands and carries positive energy, but also indicates the exclusivity of the relationship and the special care of the donor towards the hero of the occasion. A beautifully decorated bottle can become a decoration for a festive table and bring originality to the interior of your home.
New Year holidays
A bottle decorated in a winter, New Year's style can become both a decoration for a festive table and part of the decor of the room in which the holidays will be celebrated. This can be as simple as painting a bottle white and coating it with coarse salt to imitate a snowy surface, or painting the product in the manner of the patterns that frost leaves on the windows.
Not only glass, but also plastic bottles can be decorated in the form of a snowman or Father Frost and Snow Maiden. Here is an original version of decorating a plastic bottle in the shape of a penguin - the most “winter” bird.
Gift for Valentine's Day or wedding anniversary
The main theme of the Valentine's Day gift is the use of images and crafts in the form of hearts, the active use of various shades of red, and various ways of declaring love.
Bottles decorated to celebrate a wedding anniversary can be decorated in the form of the first letters of the spouses' names, the date of the wedding celebration or the number of years lived together. You can create a family coat of arms and use a stencil to apply it to the surface of the bottles.
No one will refuse a whole bottle filled with delicious sweets. Even a child can make such a gift. A funny inscription or a glued flower, beads or sparkles is enough.
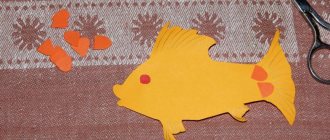
A simple way to assemble a souvenir
There is another way to make a ship in a bottle. In this case, the ship does not have a flexible mast and is a complete product.
Many people are fond of collecting such fakes. Some people are waiting for them as a gift, while others have understood how to put a ship in a bottle and are making such models on their own. Moreover, instead of a sailboat, the inside of the bottle is filled with airplanes, cars, trains and other elements of modern technology. Dexterity and special tools help in the work.
Such structures become more magnificent and complex every year. Manufacturing methods are being improved and new models appear.
Some craft makers know how to put a ship into a bottle piece by piece. They collect it directly in the container itself using long tweezers and magnets. This method is one of the most difficult. But even a master can do it.
A wonderful souvenir is an excellent gift idea. It is used for interior decoration to create an atmosphere of mysterious adventures to distant lands and romantic sea stories.
Source
Bottle decor with tights
For such an option as decorating bottles with nylon tights, you may need more than just napkins. This time we use nylon stocking instead of fabric. We saturate it with glue and put it on the bottle. We also create chaotic folds, while the cork can be covered with nylon, or you can stretch the stocking only to the neck of the bottle - after completing all stages of the work, it will seem that the bottle is in a kind of bag. We dry the glue and dry it again. Glue on a fragment of a napkin, let it dry, and paint the bottle in the main color.
We complete the decor with a ribbon, bow, braid, and sparkles. Decorating bottles with tights is a great option not to throw away a damaged item, but to use it in a new quality.
Vase made from a decorated bottle
An ordinary photo of the decor of a dead bottle is not impressive, but an unusual vase with fresh flowers is. And the whole secret is that the bottle is a vase. The main thing is to find a bottle with a wide neck.
If you don’t like ordinary vases from the store, then start decorating yourself. What inspires you? Maybe you won’t have any ideas, but once you start working, the process will begin and inspiration will appear, the main thing is to start.
If you are a seasoned designer, but have run out of ideas for a long time, take a closer look at ordinary pasta. They really do hide a secret. Come up with your own ornaments and don’t be afraid to make mistakes. Masters look for old things no one needs, trinkets, and find such uses for them, why are you worse?
Now you can not only give your master classes, but also record a video of decorating bottles.
Decor of cereals and pasta
Decorating bottles with cereals is another interesting option for decorating a vessel. Main stages of work: remove all labels and degrease the glass with alcohol. We apply glue to the bottle and create several layers with a border in the form of a wavy line - glue peas below, use rice, lentils, buckwheat and any other cereals above. From shaped pasta (bows, shells, leaves, etc.) we create an ornament or a thematic design. We fix the pasta with glue on top of the layers of cereal, and also decorate the lid with pasta. We paint the resulting creation - here it is better to use aerosol paint with a metallic effect.
Bottle painting
Having creative abilities, you can try yourself as a bottle artist. Acrylic paints work best in this case. They are bright, dry well and remain unchanged for a long time.
Painted bottles of champagne will become an original wedding or New Year's gift.
Stages of work:
- Carefully remove the label without shaking the bottle too much;
- Wipe the entire surface with degreasing alcohol;
- Cover the bottle with white acrylic or primer; It is better to use not brushes, but a sponge or a regular foam sponge;
- Paint according to a sketch or without preliminary sketches;
- Cover with varnish.
In addition to creating thematic scenes, you can paint the bottle more simply. Single-color bottles are quickly achieved with spray paints. Drinks in red or gilded containers look great on a wedding table. For the latter, you can use not only golden paint, but glitter and sparkles.
If you wrap a clean transparent bottle with masking tape or electrical tape before painting, then translucent stripes or circles will remain in the finished product. In the same way, you can make memorable inscriptions or dates on the bottles.
Decorating the mirror
The bathroom will be transformed beyond recognition if you decorate the mirror with seashells. To create the background of a composition made in a marine style, use gold or turquoise acrylic paint.
Seashells, pebbles, small, beautifully shaped beads will be an excellent decoration for mirrors.
When gluing shells, you need to take care of the strength of such fastening. The glue should be suitable for damp rooms, because water and fumes will constantly fall on the mirror.
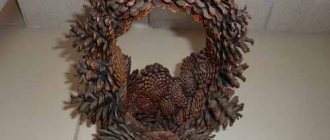
Popular articles Decorative autumn wreath
Anyone can make such an original decor on their own.
Seashells in a bedroom interior will look no less impressive, but here it is better to stick to a pastel color palette.
The decor of the mirror should be more restrained and match the style of the room.
Shell decor is a beauty that is very easy to create. To decorate the mirror you will need:
- Seashells of different shapes and sizes;
- Thermal gun for needlework;
- Double sided tape;
- Imitation pearls;
- Pebbles;
- Clear varnish.
Decorate the frame with shells of different sizes and colors.
Before starting work, wash and dry the shells. Protect the mirror surface from damage by covering it with cloth or paper.
- Choose the smallest shells. It is desirable that they be of a similar size. Glue them along the inner rim of the mirror using a glue gun or double-sided tape.
- Proceed to decorate the second row with larger shells. The distance between them should be approximately the same. For better adhesion, apply glue to both the mirror frame and the shell itself.
- Fill the space between the shells with pebbles and pearls.
- Let the glue dry, then coat the resulting composition with colorless varnish.
Enjoy the resort atmosphere from the comfort of your own apartment.
Painted bottle - the basis for decoration
You can quickly decorate an interesting-shaped bottle with your own hands using ribbons and lace. Make a small bow from ribbons, sew them onto a lace base, add a brooch, beads and put it on the neck of the vessel - an exclusive decorative item is ready!
A bright and sparkling effect is achieved using improvised materials, such as salt. Treat the outside of the prepared bottle with glue and sprinkle with salt with large crystals, carefully place on a flat surface until completely dry. Decorating an item with salt is appropriate for a winter or New Year themed interior.
If a continuous layer of salt seems boring or you need to decorate several areas with salt, then apply glue only to those places where sparkling is needed and cover with salt. A master class on this topic will help in mastering the technique.
Decorating bottles for the interior
Sea style
Decorating bottles in a marine style is one of the most popular options. And it’s not just that you can pour sea salt into a bottle and decorate the interior of your bathroom or collect a collection of sands brought from trips to various beaches. The marine theme invariably reminds us of relaxation, travel, pleasant emotions and new impressions.
To decorate bottles in a marine theme, you can use twine and pieces of fishing net, shells brought from travel and small pebbles. And, of course, no one canceled the images of waves, sea creatures, elements of ships and gear, and the use of all shades of blue.
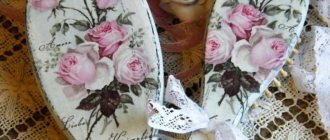
For interiors in Provence and shabby chic style
Most often, decoupage and artificial aging techniques are used to decorate rooms decorated in Provence or shabby chic style. Not only are various images applied to the bottles (most often flowers and other plants, birds, insects), but also a coating is created that has cracks and even chips.
In an interior decorated in Provence style and some other types of country style, bottles completely tied with twine or twine look great. Most often, such products are decorated with decorative elements - flowers, letters, impromptu prints.
Universal option
One of the simplest ways to decorate bottles is regular painting. You simply choose the shade you need and, after preliminary cleaning and decontamination of the surface of the bottle, paint it. Most often, various pastel shades, silver or golden colors are used. A couple of such bottles can serve as a decorative composition or simultaneously act as vases.
If artistic painting is a simple technique for you, then a simple bottle can be turned into a work of applied art:
The composition of bottles painted using the amber technique looks beautiful. It is better to use a layout of shades of the same color on all bottles (but they can be of different shapes).
You can apply a design to a painted bottle using stencils or simply “by hand”, stick on lace, create a texture using droplets of glue, stick on decorative elements - flowers, beads, rhinestones, pieces of colored glass, sparkles.
Very often, in combination with dyeing, decoration with twine, burlap and other types of fabrics (lace, hand-knitted elements, pompoms) is used.
Black bottles are convenient because they do not need to be coated with paint. Black color itself is an excellent background for any decorative elements. A composition of several black bottles, decorated in one way or another, always looks contrasting, accentuated, and advantageous.
The metallic shine on the bottles is perfect for interiors in modern and high-tech style.
And finally: some creative and practical ideas
Bottles can serve not only as a vase, but also as a flower pot, or rather, as a container. By cutting off part of the bottle in the remaining container, you can grow small plants and decorate both the interior of your home and the landscape design of your site or private yard.
From the glass parts of bottles you can make something like bells, a device for the so-called “wind chime”.
The bottle can be used as a stand for a tabletop floor lamp if you make it yourself. The bottle can also be an independent decorative element for room lighting fixtures. You can lower a garland into a fragmentarily painted bottle or cut a “window” in the stele and place a small candle inside the bottle.
Bottles filled with food-colored rice can be a great addition to your kitchen or dining room. Color variety and originality of design will be provided to the room.
A similar effect can be achieved when creating decor for kitchen and dining rooms. Colored cereals, beans and any other bulk products look great in clear bottles. without requiring any additional decor.
Popular articles Belt for dresses
To serve a holiday table (with obvious savings in tabletop space), you can use bottles as a base for high stands for plates. This way you can place a larger number of dishes and snacks on the table, not to mention the original approach to traditional serving.
Don't throw away bottle caps - they're a great material for creativity. You can use them to create stands for hot dishes, lay out entire table tops, rugs, and make the following original decorative elements:
Decorating with ribbons
- To create an unusual design, satin ribbons, cotton braid and additional decorations in the form of beads, rhinestones and sparkles are used.
- PVA glue will help fix the finishing materials.
- It is not recommended to use a heat gun in this case. The fact is that satin ribbons can become stained, which will ruin the decorative look.
- When combining several shades, it is possible to create an unusual element for decorating a decorative space.
- During operation, it is necessary to tighten the tape to prevent it from detaching.
- Satin decor is most often used to create wedding accessories.
- The shiny surface allows you to create a luxurious design.
The decor of wedding bottles should be made taking into account the color scheme of the celebration. We offer a detailed master class on creating stylish decorations for the bride and groom's table.
To work you will need:
- 2 bottles of champagne;
- Two glasses;
- Satin ribbons 1 cm wide;
- Beads with a diameter of 0.5-1 cm;
- PVA glue;
- Thin brush;
- Degreaser;
- Artificial flowers;
- Scissors;
- Acrylic paints of different shades.
Stages of work:
- First, the surface of the bottle is degreased. Next, satin ribbons are glued diagonally. The golden area of the neck will be the border.
- For work, it is recommended to use two shades of satin decor. Each subsequent layer is performed at an angle of 45 degrees.
- Liquid glue will help fix the tapes. After drying, it does not form spots or streaks on the shiny surface.
- To avoid the appearance of voids when winding bright decor, it is recommended to make a slight overlap.
- When winding the tape, it is necessary to take into account the width of each strip.
- We will decorate the second bottle with light-colored ribbons, imitating the bride’s festive dress.
- Winding up the decorations is done using the same technique in a diagonal plane.
- At the bottom we fix the lace braid in several layers. Glue artificial flowers in the neck area.
- Using acrylic paints we paint the eyes, mouth and nose of the newlyweds.
Ceremonial glasses should be made in the same theme as the bottles. The glass surface is first thoroughly degreased to improve the adhesion of the decorative parts to the base of the glass.
The satin ribbon is wound in a circle. A woman's glass is decorated with openwork braid, large rhinestones and a compact bow in the stem area.
Working with paints.
Selecting the appropriate colors, we will paint the picture. Here it is convenient to use an oval brush, or otherwise called a “cat’s eye”. This brush creates smooth transitions from one color to another. Just what we need.
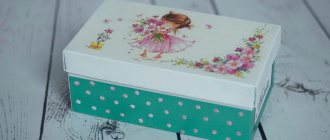
We apply contrasting colors that are present in the picture to the sides of the box, then lightly wash it with a damp cloth. The color will only remain in the recesses. If you have sharp color transitions, add white paint to the borders of the transition. This will make the colors more shaded.
We covered the inside of the box with brown acrylic paint diluted with water.
And if you want the inside to feel more comfortable, cover this part with velvet fabric. You will learn how to decorate with velvet in the following articles. We cover the finished work with acrylic varnish, then, after complete drying, we stain the ends with bitumen wax or bitumen varnish.
Decor using eggshells
The use of eggshells is used to decorate bottles in the Provence style. Miniature details create a craquelure effect. They are fixed on top of the image and covered with acrylic paints.
- The shell is first washed to remove the internal contents. The film must be carefully removed. Next, the hard shell is dried for several days at room temperature. After this, it can be broken into pieces of the desired size.
- PVA glue will help fix the pieces. The advantages of this composition lie in its good adhesion between the decorations and the base of the item. After drying, it leaves no traces and does not change the bright colors.
- The finishing touch is the use of acrylic dyes, which will help make the details more pronounced. To avoid changing the shade, you will need to use a clear varnish. This composition will extend the performance of the decorated item.
Decorating photo frames
Even the simplest photo frame can become a stylish and original accessory. Seashell decor will help you achieve this effect. In addition to sea shells, your assistants will be the same acrylic paint, as well as pebbles, sand, beads and sparkles. Details made from rope thread or starfish will also look interesting.
A frame made of shells will remind you of warm sunny days.
Arrange them on shelves, hang them on the wall or place them above the fireplace. Such frames are simply created to place photographs from the seashore in them and remember the happy moments of your vacation on cold winter evenings.
You will not see such a frame among your neighbors - it exists only in one copy and is a manifestation of your individuality.
Bottle decoupage method
This decoration method is suitable for all types of alcohol. Decoupage of a bottle of cognac is no different from decorating wine, vodka or whiskey using this technique. The only point you should pay attention to when buying alcohol is the shape and relief of the bottle. Theoretically, a surface of any shape can be decorated in decoupage style, but it is easier for a beginner to work with a smooth and even container. Volumetric patterns and inscriptions can complicate the process of decorating cognac.
If a gift for a man is expensive alcohol, the emphasis is on the elite brand, the bottle is decoupaged, only partially (with the label preserved). For simpler drinks, decorations can be used to cover the entire container.
The classic decoupage technique involves using images from colored napkins, photographs, postcards or other printed materials. A more advanced version uses decoupage with glitter, salt, paints and other materials.
For decoupage you will need:
- a bottle of alcohol;
- acrylic primer;
- a napkin with the desired image or glitter, etc.;
- acrylic paints and varnishes (it is better to take them in the form of a spray, but this is not a prerequisite);
- PVA glue;
- a set of brushes and sponges;
- additional decor (optional).
Decoupage is a very exciting process, which for many becomes a personal hobby. In order for the result to be worthy on the first try, you need to strictly follow all stages of the work process:
- Remove the label from the glass surface (if required). To do this, you can temporarily place the bottle in a container of water, or wrap it with a generously moistened towel. After removing the label, any remaining adhesive must be removed with alcohol.
- Degrease the bottle with an alcohol-containing compound. After this, it is better not to touch the glass, so the primer and paints will lie more evenly;
- Cover the surface with acrylic primer (it is more convenient to do this with a sponge rather than a brush). If the decoupage will only partially cover the bottle, the free areas of glass should first be sealed with masking tape.
- After the soil has dried, the glass surface is evenly covered with glue.
- A decorative coating (drawing from a blank, glitter, paint, etc.) is applied to the glue layer. To work, you only need the top layer of a napkin. The desired image is cut out of it and carefully glued to the bottle.
- The finished work (after drying) is opened with varnish. It is better to apply several layers, so the design will be more difficult to damage.
If the decor of a bottle of cognac is not ideal, there is no need to worry. Flaws can be hidden behind additional decorations.
The uneven edge near the neck of the bottle can be hidden behind a thematic braid (St. George's ribbon for February 23, with frosty patterns for the New Year, etc.)
Holes that appear (by negligence) in the napkin are hidden behind small decorations that match the style (wood leaves, coins, buttons, etc.).
Knights and castles. Decoupage bottles/Decoupage. Knights and Castles. HobbyMarket
Decor of bottles with salt
Decorating bottles with salt is a fairly popular option, since it does not require much money or time, but allows you to show your imagination to the maximum.
Decorating with salt - option No. 1
Pour salt into a heat-resistant bowl, add acrylic paint and mix, kneading the resulting paste with a fork. Place the mixture in the oven (100 degrees), take it out after an hour, knead it again with a fork and sift through a sieve. It turns out something similar to colored sand. We make several types of such “sands” - different colors.
Take a funnel and pour salt into the bottle, alternating colors
It is important that the bottle inside is completely dry. When the vessel is filled to the top, close the bottle with a cork and decorate it as desired.
Decorating with salt - option No. 2
Now we will decorate the outside of the bottle. We remove the labels and wrap an elastic band at least 5 mm wide around the body of the bottle - in the form of a spiral or in a random order.
We evenly cover the bottle with white paint, and after it dries, apply glue. Place a bottle coated with glue on the salt scattered on the paper and gently roll it. When the glue dries, remove the elastic band and get a bottle with patterns. You can dilute this bottle decor with sparkles and rhinestones. In this way you can decorate bottles with semolina or other, more original things.
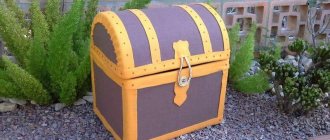
"Bottle" frigate
There are several ways to put a ship in a bottle. Let's look at the most popular ones.
The first option is quite simple. Materials you will need:
- glass or plastic bottle with a wide neck;
- folding sailboat model;
- threads, hinge;
- decorative cap or stopper.
The boat can be purchased in a store (you need to choose a model with removable parts) or you can make it yourself. An important condition is the flexibility of the mast, which can be tilted to the sides. To do this, a hinge is placed at its base, providing sufficient flexibility. The rigging threads are attached to the mast. When folded, the boat can easily pass through the neck of the bottle. For clarity, all stages of work are shown in the picture.
- First you need to install the base to which the boat is attached. Then carefully place the boat inside the container and gently pull the strings so that the mast straightens.
- When the sailboat is in the proper position, cut the threads. All that remains is to close the neck of the bottle with a lid or cork.
Imitation of an “antique” map
Almost everything is ready, all that remains is to add a small element. Let's work a little with self-hardening clay. This material provides many opportunities for our creativity, and in this master class I will show how we made a roll of an ancient map from it.
Roll out the sheet to about 3 mm thick.
We cut off the required size and wrap the edges inward, as shown in the photo.
The finished card blank must be thoroughly dried. As it dries, it takes on a lighter shade. If the card remains dark after drying (depending on the quality and type of clay), then cover it with white acrylic primer. In this case, we simply applied acrylic varnish.
Glue a napkin with a card design and after drying, coat it with varnish again.
The finished work must be shaded along the edges with bitumen varnish or wax. We glue it to the inside of the lid, install the lock and voila.
Decoupage a bottle using rice paper
Among all types of decoupage, a special place is occupied by the use of rice paper in the process. To conduct a master class, it is advisable to determine what exactly is needed for this.
- A glass bottle, if possible not very narrow, so that there is something to roam around and the decoupage turns out to be noticeable and bright.
- Sheets of rice paper come in two colors - light green and white. It will be used as a base for decoupage.
- Paper napkin with a pattern. Floral ornaments will add grace and tenderness to the decor.
- Glue and a brush with artificial bristles so that hairs do not remain on the bottle.
- A special white acrylic-based marker that leaves a line on any surface, and varnish to fix the design.
- Scissors, glass degreasing solvent, napkins or towels for applying the product, decorative tape.
So, let's try to figure out why rice paper is needed for decoupage and how to use it correctly.
The most important process is degreasing the glass surface. After all, the quality of image fixation depends on this. We will do this using any cleanser and a regular napkin or cloth.
You need to prepare rice paper.
ATTENTION!!! It cannot be cut with scissors; it just needs to be carefully torn into small fragments. Scissors will create a smooth edge, and if you tear the rice paper, the fibers will give the surface the necessary naturalness.
It’s not for nothing that the Chinese came up with the idea of making paper from rice. It is more elastic than regular one and much easier to work with. This is the opinion of everyone who happened to hold this paper in their hands.
There are two different ways to apply rice paper to glass:
- Press fragments of dry paper onto the bottle and soak the paper thoroughly with glue. Then dry and treat with acrylic varnish.
- Another option is to also attach pieces of rice paper to the bottle and thoroughly moisten them with water. After drying almost completely (you can use a hairdryer for speed), then cover the pieces of paper with acrylic varnish.
This master class shows how, using the first method, you can make a very nice and original vase from an ordinary bottle. From green rice paper, select three long pieces with pointed ends, glue them with the narrower edge up around the entire bottle, carefully stretching and straightening all folds and wrinkles.
Carefully fill all free glass fragments with white rice paper, edge to edge. It is allowed to slightly overlap the edges, but no one will see these roughnesses in the finished product. But only if the fragments were torn off and not cut off.
Having thoroughly coated all the rice paper with glue, we set the bottle aside to dry completely, and at this time we carefully cut out the ornament from the napkin prepared for decoupage.
Once again, lubricate the entire bottle with glue, carefully press the design and carefully pass over it with a brush, carefully removing air bubbles and excess glue from under the napkin.
The bottle is sent to dry again, and then the entire surface is covered with acrylic varnish. To fully protect the image, you will need to repeat this procedure 2-3 times.
After complete drying, the contours of the design are outlined with a white acrylic marker. This will give the entire product brightness and expressiveness.
Decorative tape also came in handy. The neck of the bottle, left without decoration, is very cleverly hidden under it.
Categories
Men will soon celebrate their February day. Of course, this is not a reason to give expensive gifts. But nevertheless, you can present the most banal subject in an original way. We are talking about a bottle of alcoholic drink. But we will do it specifically for a person who cannot imagine life without fishing. In addition, you can purchase the necessary accessories for this hobby. You can buy m.ua in a specialized store. You will see that a true fisherman will appreciate every item presented to him as a gift. But in addition to the necessary things, give them a bottle of good cognac. And we will tell you how you can beautifully decorate the most inconspicuous bottle.
Fishermen are different from each other. So presents can be decorated in completely different ways. If a person, in addition to fishing, loves family comfort and values family values, then a bottle suit should be made from fabric or woolen threads. In order to sew the necessary outfit, you will need a piece of military-colored fabric and an imitation vest. The cover can be made with or without a hood, depending on your ability to hold a needle in your hands. Accessories are made from polymer clay and related materials. Small fish can be bought at a fishing store.
If a man has a steely character and an iron will, then the suit can be made of metal. Of course, you can’t do without certain skills. But such bottles look not only original, but also stylish. This option can be made by a son for his father. If you show your imagination, you can get very interesting things. They will definitely take pride of place in the recipient’s home.
Don't forget about the appropriate accessories, they give the products a special charm. Pay special attention to the size of the fish, it should be simply huge. Small sizes can offend a true fisherman.
When, after another holiday, you cannot throw away the bottle because the shape of the vessel is very interesting, it means that the feeling of beauty has overcome the arguments of reason or you already have an idea for decoration.
Your soul requires a creative act - decorating bottles with your own hands.
At your service there is always a master class in the company of a master or an online version of the work process. Design ideas can be seen on forums where needlewomen share their achievements. A simple way to decorate is decoupage with photos. After processing, a picture, photograph or postcard is pasted onto the bottle. There are many techniques and master classes where bottles are decorated with twine, salt, leather, ribbons and even tights.
Vase with shells
Even a simple glass vessel filled with seafood will look interesting. Pour some sand into a vase, aquarium or wide glass, add sea pebbles and shells. This is used for table setting for a holiday or simply placed on shelves, cabinets and bedside tables.
This vase will decorate any setting.
Flower pots decorated with seashells from the inside or outside look original. Unusually shaped shells can be placed inside the pot next to the flowers. And if you have many identical shells of the correct shape, then it is better to stick them on the outer walls or rim.
Popular articles Pots made from newspaper tubes
A vase decorated with multi-colored shells will add originality to the interior
How to decorate a bottle
You can make your own bottle decor using various materials. The following is often used as a basis:
- - leg-split;
- - ropes;
- - tapes;
- - paper;
- - skin;
- - eggshells;
- - salty dough;
- - pasta;
- - cereals.
You can also use beads, decorative stones, sea salt, paint for decoration...
Bottle decor with leather
Bottle decor can be considered one of the most labor-intensive decoupage processes, which requires the greatest material costs, although if you have pieces of leather in your arsenal, the option will be economical. To work you will need a bottle, glue, scissors and leather. It is better to take thick but soft leather, then it will be convenient to work with it, and the effect will be the most luxurious. It is better to apply glue directly to the skin and place a piece against the bottle. Leather can be used to make patterns,
Bottle decor in a marine style. Master class with step-by-step photos.
Razumova Valentina Nikolaevna, teacher of the Municipal Preschool Educational Institution “Shukhobod Kindergarten”, village of Shukhobod.
Description: in this master class I offer options for decorating a bottle in a marine style.
The material can be useful to creative people who are interested in making crafts for the home with their own hands. Purpose:
the use of such exclusive bottles can be different: a gift, interior decoration in a marine style, a flower vase.
Goal:
making a vase from a glass bottle in a marine style.
Objectives:
* develop creativity and imagination; * find use for waste, natural, and any available materials; * introduce the technology of making a vase (decoupage with fabric, applique from natural and improvised materials); * develop the ability to work with various materials and tools.
Option #1
Materials for production:
Option number 2.
Materials:
For work we will need the following materials:
- bottle
- acrylic paints (colors burnt umber, ivory, gold. Or any others at your request))
- fine-grained texture paste or putty
- crystal paste
- shells, beads, coins and other “treasures”
So... let's get started!
First, the bottle needs to be cleaned of labels and degreased so that the black and white paint will adhere better. This can be done with alcohol or any other product (I use nail polish remover). Next, we prime our bottle (I have cognac) with burnt umber acrylic paint using a sponge, carefully sanding the entire surface:
We wait for the paint to dry; if the paint layer is thin, then you can cover the bottle one more time. The paint should lie tightly
The next step is to apply a texture paste, if there is none, then a regular construction putty will do. First, we apply the putty at random... we just spread it where we want it, so that later we get a relief (like silt and all that). I don’t like all kinds of designs on bottles, and therefore I cover them with putty:
We try on our “treasures” to the resulting relief. These can be various shells, pebbles, coins, beads, etc. and leave the putty to dry.
While my bottle was drying I managed to come across some beautiful shells and small dried starfish at a local store, so there have been some minor changes to my decor compared to the last photo
The next step is to apply crystal paste to the already dried putty (or texture paste with glass balls, I think with sand or just coarse-grained paste will also work), onto which we glue all our “treasures of the bottom of the sea”, pressing them into the paste. In some places we apply the paste over the “treasures”, as if they have grown into the silt and limescale growths on the bottle:
Again, we wait for the crystal paste to dry completely and begin to paint the resulting relief with the same burnt umber:
I didn't try to paint the entire relief thoroughly, because... this even creates additional volume and in any case will be covered with tinting.
Well, now we’re actually starting to tint.
Using a sponge and ivory paint we tint our bottle. To do this, put a small amount of paint on a sponge, dry the sponge on a piece of paper, and use an almost dry sponge to touch our relief:
The result was such a silted bottle, overgrown with limescale.
In principle, we could have stopped there, but I decided to decorate our old copy a little and literally gilded my bottle a little, tinted the stars, a coin and very lightly walked over the relief:
By the way... don't forget to prime and tint the bottom of the bottle
Well, that's all! We cover the whole thing with varnish, preferably matte, because... a bottle made from sea waters will hardly shine, but I didn’t have a matte one, so I had to coat it with a glossy aerosol varnish... aaaand... Here is the result
What you need for decoration
So where to start? You should choose accessories for decoration based on the size, shape and presence of inscriptions on the “experimental”. First, treat the bottle with alcohol or nail polish remover.
Afterwards you will need acrylic paints, napkins with beautiful patterns and various ribbons, beads, even cereals will do. Stock up on PVA glue in advance. To fix the work, you need acrylic varnish.
Patination and primer
Now you can start patination of the surface.
Patina gives the decorated surface an antique look. With its help, the effect of contrast of individual elements is achieved, which makes the surface more expressive. We used a white water-based patina from Sayerlack. It's okay if you don't have one. You can use white construction paint slightly diluted with water.
Apply it in a thin layer to the brushed surface. It dries within a few minutes, after which it is partially removed with a damp cloth or Scotch Brite.
Apply acrylic primer to the surface on which we will glue the decoupage napkin.
Coffee bottle made of twine
For this bottle decor you will need:
- - Glass bottle;
- - leg-split;
- - glue gun and sticks for it;
- - coffee beans.
Progress:
- 1. It is necessary to wash the bottle well and degrease it, using alcohol.
- 2. Using a glue gun, wrap the bottle from the neck to the bottom with twine.
- 3. Repeat another layer with twine, there should be no show-through, each roll of twine should be pressed tightly against each other.
- 4. Glue the coffee beans in a fairly orderly manner, with the convex side.
This bottle will fit very well into almost any interior, both in the kitchen and in the living room.
Technology for making the ocean in a bottle, various variations
If you wish, you can organize a whole ocean in a bottle. The technology of its production is not much different from the sea. You can do it like this:
- Take a beautiful glass container and fill it with water.
- The liquid should be colored with food coloring. When making an ocean, it is better to choose azure, turquoise or emerald.
- If desired, you can add decoration to the water.
Options for a harmonious combination of decor for the ocean:
| Option #1 | Option No. 2 | Option #3 | Option No. 4 |
| Undersea world: · artificial fish and other sea inhabitants; · artificial algae; · natural shells and small pebbles; · golden sand; · a small sunken ship. It is necessary for naturalness. It is better to choose an iron model, having previously coated it with colorless varnish. | Fairytale world: · Make a jellyfish from a plastic bottle; · if the bottle has a large neck, you can use a castle figurine; · artificial fish of bright and unusual colors (gold, silver, purple, pink); · scatterings of pearls and precious stones (imitation diamonds, rubies, diamonds); · sparkles and multi-colored scales. | Pirate's Bay: · scatterings of gold coins and jewelry; · ship paraphernalia (oars, anchors, chests); · if the size of the bottle allows, then an imitation of a sunken ship; · miniature bottles of alcohol; · sand, shells and pebbles; · pirate weapons in miniature (swords, sabers, pistols). | Underwater minimalism: · small pebbles, shells and sand; · algae and fish; · glitter. |
Master class on making jellyfish
A miniature jellyfish will look great among all the other decor. It won't be difficult to make it. You will need thin plastic (from a plastic bottle or container), a lighter and scissors.
Making a jellyfish is simple:
How to make a jellyfish in a bottle with glycerin
- Two rectangles are cut out of plastic. One is smaller and the other is larger;
- a circle is cut out of a smaller rectangle and a hole is made inside;
- the second rectangle is cut with fringe, but not all the way, so that the strips stay together;
- The ends of the plastic fringe are heated with a lighter to create the effect of jellyfish tentacles. Next they are rolled up in a circle;
- the base of the tentacles is heated and inserted into the hole of the circle.
Medusa is ready. You can make several and place them in the sea.