by Alexey | For Kids Crafts For Friends Gifts For Loved Ones Decor For Men For Women Workshop Cheap Accessories | Tuesday, September 06, 2016
| Follow Make-Self.net on Facebook and be the first to read our articles. |
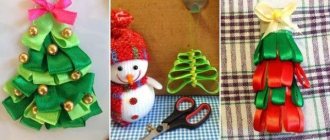
A wooden clothespin is an irreplaceable thing in the household. But its use is not limited to the ability to hold clothes on a line to dry. Today we will tell you how to make a large number of simple devices from clothespins. Did you know that using a clothespin you can make a chandelier or a simple airplane? Can you make a compact headphone holder from such a clothespin? Take a look at 38 interesting ideas, maybe they will inspire you...
Photo collages made from wooden clothespins
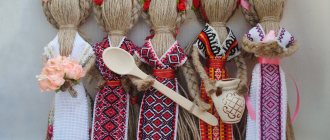
DIY goat clothespins
Since my goat-sheep production continues in full swing, I decided to share another idea for New Year's souvenirs.
Goat clothespins are made very simply, and the material required is very simple. It’s quite possible to make such souvenirs with your children. Goat clothespins will be a nice gift for the New Year or Christmas. They can be used to decorate a gift, for example, attach a greeting card to the package.
Materials and tools:
- Wooden clothespins. Maybe plastic ones will do, I haven’t tried them.
- Cardboard. A piece of not very thick cardboard, for example, from a children's art set, will do.
- The fabric for the muzzles is light in color and not very thin. I used linen fabric (size = cardboard size)
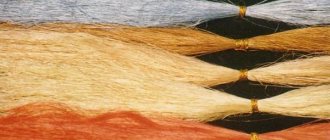
- Yarn for goat wool. You only need a little bit of it, so all kinds of leftovers and trimmings will do.
- Beads 4 pieces for legs. Beads of a suitable size from any material will do.
- Leg cord. I made the legs from twine.
- The paper is white. A regular landscape sheet will do.
- Simple pencil.
- Eraser.
- Paints. I painted everything with acrylic paints, but you can use gouache, watercolor, felt-tip pens, and gel pens. In general, what is in the house.
- Thin brush for drawing eyes.
- Wide brush for glue.
- PVA glue.
- Any universal, colorless glue. I have a Moment crystal. You can also use a glue gun.
- Scissors.
- Sewing needle or toothpick.
Let's get started.
Head
1. Let's prepare a piece of cardboard of such a size that you can cut out as many goat heads from it as you plan to make. I had a square of about 10 by 10 cm. I used only a small part of it. Take a piece of fabric of the same size.
We grease the cardboard with PVA glue, apply the fabric and smooth it from the center to the edges. Dry (can be placed under a weight).
While it dries, you can do the body
2. On the back of the dried cardboard we draw the outlines of the goats' heads. If you want to make goats with identical heads, you can cut out a template and trace it. I made heads of different shapes and sizes - it’s more interesting for me. Cut it out.
3. Cut out the ears in the shape of a leaf.
You can cut out the head with the ears right away. But I took too thick cardboard, and it was difficult to cut. That's why I made the ears separately.
4. Cut out horns from cardboard (without fabric).
5. Glue the ears and horns to the back of the head.
6. Draw eyes on white paper: Using a simple pencil, without pressing, draw the outline of the eye. Draw the pupil with black paint. When the pupil is dry, add a white dot - a highlight.
You can, before drawing the pupil, make a colored iris.
If you draw with a felt-tip pen or gel pen, leave an unpainted spot as a highlight.
Cut out the eyes. Use an eraser to remove pencil marks. Glue the eyes with universal glue.
Eye options: You can cut circles with a hole punch, stick them on and then draw the pupil. You can use ready-made eyes (eyes for gluing). Eyes with a moving pupil will look interesting. If the clothespin is tilted differently, the goat will look in different directions. You can make eyes out of plastic and paint them.
You can also make a head out of felt and sew on beads as an eye.
Well, the easiest option is to draw a head with eyes and a muzzle on cardboard (without fabric) and cut it out. Imagine!
7. We paint the horns. It's hard to see in the photo - I painted it with metallic acrylic paints. We draw the nose and the inside of the ears with diluted pink or red paint. We are waiting for it to dry.
8. Using black paint, a thin felt-tip pen or a gel pen, draw a face. I drew with a thin marker.
Try to first draw the face on a piece of cardboard with fabric - the lines should not blur.
9. Use a few pieces of yarn to create bangs and a beard for your goat.
The head is ready!
In the photo the head is already glued to the body.
Legs and fur
10. Cut the yarn into pieces 3-4 cm long. You can wind the threads onto some template and cut them.
11. For the legs, cut two pieces of cord, yarn or twine approximately 10-11 cm long.
12. We glue or attach beads with knots to the ends.
13. Glue the legs as shown in the photo
14. Let's start making a fur coat. Lubricate the bottom of the clothespin with glue and glue our pieces of yarn. Make sure that the threads are arranged in one layer, otherwise they will not stick well.
15. Apply glue above the first row of yarn and glue the second row.
16. In the same way we glue the third - last row.
17. Glue a few threads as a tail.
18. If the texture of the yarn allows, then use a needle or toothpick to fluff the threads.
19. Glue the head to the front of the clothespin.
The second goat is made using the same principle. Only we first glue the yarn onto a piece of cardboard. Then we glue the cardboard to a clothespin.
I looked and looked at the finished goats and decided to dust them a little with snow. Using thick white paint, using an almost dry brush, holding it vertically, I “poked” the tips of the horns, the nose and the top of the ears. And they seemed sad to me - I added smiles and blush to the white goat.
Ready! Next, the goats can be decorated with scarves, bows, and sparkles. You can hang a bell (I didn’t have a bell).
In this way, only by gluing the yarn not on a clothespin, but on a piece of cardboard, you can make a magnet or a toy for the Christmas tree.
Success in creative work! Your Anna
Clothespin toys
Wicker coasters
For production you will need:
- Tubes from newspapers, magazines, notebooks, etc.
- Thick cotton thread.
Instructions:
- To make 1 backing, you will need approximately 20 sheets of newspaper. Roll them thinly, then apply PVA glue to the edges of the paper and leave to dry.
- The tubes are twisted into a spiral. But tightly, without unnecessary cracks and voids, they are well lubricated with PVA glue and put aside again. The tubes can be stacked and rolled into several next to each other, so the manufacturing process will noticeably speed up.
You can also make a stand from birch bark, which has just been removed from birch chocks. This birch bark exfoliates perfectly, after which you can easily wind the tubes.
The birch bark stand emits a pleasant aroma when a hot pot or frying pan is placed on it.
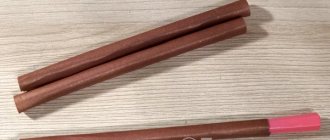
Durable homemade clothespins
I want to show how you can make strong and reliable clothespins from plywood. Ideal for stretching tarpaulins, thick fabrics and fabric awnings.
For example, a regular home blanket will do.
How to do
To do this, you will need a strip of plywood from which I will make four pieces. In my case, plywood is 16 mm thick, 30 mm wide.
One is already ready, three future clothespins are marked on the blank. The places where you need to drill holes are marked in red. On the edge with a diameter of 6 mm, and on the front part with a diameter of 10 mm.
Drilled, now you can cut it into parts. I got them 50 mm long. Then you need to cut them with a hacksaw from the end down to a 6 mm hole.
The cut and the hole should connect. But the thickness of the cut will not be enough; to increase it, I compress it with a clamp so that there is no gap left and cut again.
In this case, the cut will increase, you need at least 2.5-3 mm.
And of course sticks, you can’t do without them
. You can cut it from a birch branch; the stick should fit into the hole quite freely, given the thickness of the fabric. Length 40 mm.
The principle of operation of such a clothespin is as follows
. The fabric is taken, folded in the place where the clothespin will be, inserted into the slot, and the entire stick is inserted into the hole inside the folded fabric.
Here I showed the example of a windproof membrane that I just had on hand.
Practical use
Using a homemade blanket as an example, I will show how you can build a sun canopy.
Brick well: masonry features
If there is a well on the site and it needs to be decorated, then the best solution would be to lay the well out of brick. This process is more labor-intensive and expensive than making a wooden ring, and it also requires certain skills.
A brick well will last for many years
The work will require:
- level, tape measure;
- hammer, spatula, chisel;
- brick, cement mortar.
According to the technical characteristics, the brick for making a well should be simple ceramic, not silicate.
Bricklaying process:
- A thick solution is prepared: cement is mixed with sand in a ratio of 1:2 and diluted with water to the required consistency.
- Cement mortar 10 mm thick is applied to the compacted earth and the first row of bricks is laid. It is important to remember that to lay the first row, the bricks must be moistened with water.
- To ensure that the masonry is of the correct shape, a template is made, which rises as rows are added.
- Two rows are laid using the bonding method, and the voids are filled with cement mortar.
- Next, 2-3 rows are laid out using the spoon method and reinforced wire is laid on the 5th row of brickwork for additional strength.
- Each row is checked for height using a level.
With spoon masonry, the brick is displaced by half, and with bonded masonry, the brick is turned with the short side towards the facade.
Video: laying a brick well
Master class for children “Matchshooter”
Shooting a match from a clothespin will take you back to your childhood for a moment; in addition, this toy will be a great distraction for children in the age of gadgets and the Internet.
The clothespin toy is ready.
Important! You should be careful with this device. Do not aim at animals or people. The flight range after the shot is 3-5 meters.
Why do you need a decorative well?
Practical people do not quite understand why a decorative well is needed for a garden, because the real purpose of the presented system is the maximum and convenient use of water resources.
Based on these goals, it becomes clear that the decorative structure will not stand for a long time. Therefore, it is not recommended to use decorative elements for autonomous water supply.
Decorative structures are used only as a decorative element.
The most popular is the storage of household items - buckets and other containers. If you carefully place them in a constructed well and cover it with a lid, you will get an excellent chest. True, for such storage it is better to make the lid waterproof - cover the inside of the lid with polyethylene.
However, you should not use a decorative design to decorate an autonomous water supply - the decor will quickly lose its original appearance.
Decorative well made of wood. Video:
Convenient family calendar
Clothespins in the interior can form a beautiful and effective calendar of family affairs. You will need:
The manufacturing master class is as follows:
Now you can write down the things you want to do this week on small pieces of paper and attach them to the desired clip.
Curtain ties for the kitchen
The kitchen often lacks coziness. To make the room more comfortable, curtains and barrettes help. These clips are made by hand from textile fabric. Cut a rectangle 20 cm long and 15 cm wide. This cut will be used for the loop. Then visually mark the middle of the fabric and fold it in two parts inward. Then fold the piece so that the edges are on the inside. The product is stitched along the edge. There are enough loops to make enough for hooks. Afterwards, half a meter of textile 40-50 cm wide is cut off. It is folded and stitched in the same way.
The edges are folded inward, and a loop folded in half is inserted into one end. The second loop is also inserted into the other edge. Then the ends of the product are stitched and decorated. For decoration, use buttons, flowers, and beads. Secure the grab onto a hook screwed into the wall.
Wooden stand
To complete this craft, you need dried tree branches with a diameter of 5-8 cm. You can saw the washers with a miter saw or a hand saw. Seven-millimeter cuts are thoroughly sanded with sandpaper from the front side. All parts are connected into a pyramid with PVA glue.
Then it goes to press drying - the glue should completely dry in 12 hours. If there is no PVA glue, then titanium glue can be used, only drying should be carried out in a ventilated area.
Titanium is capable of maintaining temperatures up to +150° Celsius without deteriorating.
Using the same technology, you can make a hot stand from plywood.
Note! Do-it-yourself wood-based stands will, over time, take moisture from the environment, and therefore you will begin to notice a slow deformation of the substrate. To prevent this, all wooden elements of the product should be varnished.
Polymorphus “Orchid” clip
The curtain clip is made from a new material that hardens. This material is called polymorphus. It is easy to work with, so the process will be fun. You can use this material to make a clip-on orchid. To do this, boil water and pour it into a container. Then polymorphus granules are poured there. They quickly become transparent, like plastic. A flower is sculpted from this plastic. First the core is made, and then the petals. Roll it out in your palms. This material is similar to plasticine; they work with it in the same way. The made flower quickly hardens, and after that it is painted with acrylic. The base of the orchid is glued to the holder and the decoration is covered with transparent nail polish.
You can make clothespins for curtains with your own hands even without drawing or sewing skills. If you can’t make a clamp yourself, find different master classes on the Internet and follow the step-by-step descriptions. Several unsuccessful attempts are not a reason to abandon the idea. They make grabs from different materials. The choice of fabric depends on the curtains, the pattern on them, and density. You can select a suitable clip for any curtains and make it in accordance with detailed instructions.
How do you like the article?
Photo gallery: interesting water wells on the site
Gone are the days when a well was only a source of life-giving moisture in the garden. Its use and application in garden decoration has different purposes, but talented amateur gardeners have no limits to their imagination. With a little work, you can create this piece of garden decor with your own hands.
True lovers of summer cottages and gardening cannot imagine their brainchild without the introduction of decorative structures or at least flower beds. But real gardeners go very far - they make decorative wells, which can be used both functionally and for growing flowers.
Marvelous? Doubts will quickly be dispelled as soon as the question of how to make a decorative well in the country with your own hands is studied. As it turns out, it is easy and simple.
The main thing is just to show your imagination and make the most of extra parts and other unnecessary items that you are so sorry to part with (and there is no more space in the garage).
Felt coasters
Materials and tools:
- felt (white, yellow);
- floss threads (similar colors);
- sharp scissors;
- needles (for securing workpieces).
Detailed instructions:
- Cut 2 circles Ø 9 cm from white felt material, one circle Ø 12 cm and another 2 circles Ø 8 cm from yellow felt. The last 2 circles should be cut into 8 pieces each.
- Place slices on the white elements and secure.
- Connect white circles with multi-colored ones between them. Sew with a similar seam, but with light threads.
Using a similar scheme, a hot stand is made from jute.
Ideas for using clothespins in decoration
You will be surprised, but home decor made from clothespins can be very diverse. For you the best ideas for using this clamp:
Making from matches
Let's look at step by step how you can make a well from ordinary matches.
- You should take only straight and even matches from the box. The sulfur is cut off from them and polished. The foundation is made from 4 elements.
- Another row of matches is glued on top of the completed foundation of the future well. The lower joints will definitely need to be covered. At this stage, you should not rush, since drying will take a lot of time.
- Make 9 more rows up. The result will be a log house of crafts. All edges on the sides will need to be sanded thoroughly.
- Next, a post part is glued together from 3 rods to further strengthen the gate. One match should be shortened. The procedure should be repeated.
- One of the beam posts is glued on the inside exactly in the middle of the well.
- The remaining post should be glued to the second wall on the back side of the frame.
- A couple of matches are glued on the outside. They will be needed to install the roof.
- A collar is made from a toothpick. The part is broken at two points and bent into the shape of a handle. Glue is applied to the center of the collar and the part is wound with thread.
- The gate is installed between the fastening rods for the roof. The part is lowered onto the racks.
- Using glue, the racks inside are connected, as well as the transverse beams of the rods allocated for the roof.
- Insert a cross beam between the fastener rods to strengthen the roof. This part is glued at the height of the cuts from above.
- 4 beams are glued to the edges of all supports and to the top of the crossbar at an angle.
- Between the inclined beams, a whole match is attached on top, and only a piece of the rod is attached below.
Finally, the roof slopes are glued on.
How to make a fabric clip pattern
You can make fabric curtain clips yourself; it’s not difficult and you don’t have to use store-bought products. For this, a pattern is prepared. To ensure everything works out right the first time, you need to follow the instructions:
- Cut a piece of material so that it is 25-30 cm wide. The resulting piece is folded in half lengthwise.
- Measure the width of the product from the fold line and mark the area with a piece of soap or chalk. Exactly half of this length is allocated.
- A segment is marked from the edge, which is 2-3 cm less than the width. A section of fabric equal to 27-28 cm is laid at the bottom of the product. This pattern is cut out and then unfolded. To strengthen the product, they hem oilcloth or other dense material, which is cut according to the same pattern.
Wine cork stand
This is probably the easiest and most practical way to make a substrate. Wine corks are ideal for making a heat-resistant stand, due to the fact that they have low thermal conductivity.
The corks can be laid lying down on a dense fabric base, and they can even be secured with hot glue, since the corks will not warm up to the base, and the glue will definitely not melt.
You can also remove the plugs into small washers, and then assemble a stand of any shape from them. Be it a circle, square, triangle or bee cell.
The washers are fastened using a construction stapler, the staples fit perfectly into the base, so the stand will hold its shape perfectly. It is important to staple the stand on both sides.
Important! To make a hot stand from corks, only cork oak corks are suitable. In no case should you use silicone or polyethylene for this homemade product, as they can simply ignite if the pan is too hot.