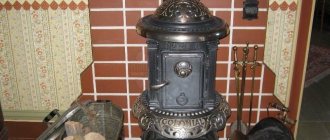
A potbelly stove is a simple heating device with more than a century of history. And if at the dawn of its appearance it was made from scraps of pipes and metal barrels, today a stove made from a gas cylinder is becoming an increasingly popular option for heating garages and baths. We figure out how to choose a cylinder for work, what kind of stove can be made from it, and in what order the work is performed.
Potbelly stove - a compact and efficient heating device Source ytimg.com
Methods of use and varieties
In our native land, a homemade stove made from a gas cylinder is a common source of heat in the winter. Most units are designed quite simply. According to the principle of operation, they are similar to a metal wood-burning stove: heat is released into the surrounding space through a body that is heated due to the combustion of wood (or other fuel). Homemade designs are used in the following situations:
- In the summer at the dacha for cooking food for people and animals.
- In winter for heating a garage, workshop, utility rooms.
- In residential areas for cooking and heating (enough for one or two small rooms).
- For heating the bath.
- A backup option in case of emergency failure of the main heating system.
Stoves converted from a gas cylinder do not have a single standard, but nevertheless, they can be classified according to the following parameters:
- According to the location of the cylinder. There are vertical and horizontal stoves; There are combined and double options. A vertical stove can often be found in a garage or utility room; horizontal ones are used for cooking and heating baths and living quarters.
Potbelly stove with hob Source termopaneli59.ru
- By design. A standard stove has a rather low efficiency; a significant part of the energy literally flies down the drain. There is an improved option: pyrolysis furnaces, which include the bubafonya furnace and the rocket furnace. They are designed to maintain long-lasting combustion.
- By choice of fuel. Mostly, potbelly stoves run on natural fuel - wood, but there are models that use coal, waste (diesel), peat, and pellets (pressed sawdust).
Pros and cons of the design
Every car enthusiast knows how uncomfortable it is in a garage without heating during the cold season. But excellent thermal conductivity and quick heat generation are not the only benefits of using a potbelly stove from a gas cylinder. Owners of garages, cottages and bathhouses are aware of other advantages of the heating device:
- Saving. Manufacturing requires standard, inexpensive parts. You get a unit at minimal cost, which is pleasantly different from the price tag of a finished metal stove. Available fuel is used for combustion.
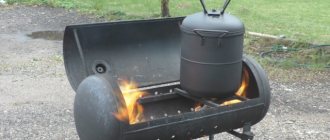
Furnace in operation, operating mode Source ytimg.com
- Ease of manufacture. The work can be done on your own, without the involvement of specialists. There are a lot of videos collected online that can help you learn the technology for assembling a potbelly stove of any design.
- Convenient dimensions. You can make a device to fit the size of a bathhouse or garage.
- Easy operation and maintenance. The cylinder produces a stove suitable for heating baths, residential and utility rooms.
It is important to know about the following disadvantages of the device:
- To work, you need to choose reliable, proven drawings; The efficiency of a random unit may be low.
- Due to its design and material, the structure does not retain heat: as soon as the fire goes out, it immediately cools down.
- It is strictly forbidden to heat a potbelly stove with waste (used lubricants) in a residential area. This is not only harmful to health, but also a potential explosion and fire hazard. The place for installing any stove is finished with fire-resistant materials.
Diagram and dimensions of a country potbelly stove Source technicalservice59.rf
Stoves operating on exhaust have a separate drawback: due to the specifics of the fuel, more soot is formed, and the chimney has to be cleaned more often. In any case, when using liquid fuel, good air circulation is necessary, and this is possible with an established ventilation system.
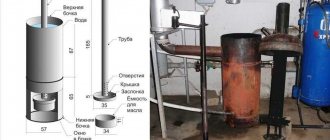
Operating principle of air heat exchanger
The main purpose of the heat exchanger is to transfer energy from the combustion products in the chimney to the coolant, which is water or air. Heat exchangers installed in chimneys (this applies to water modifications) are often called economizers.
These devices collect and transmit heat into the room, which simply goes into the atmosphere, so that the thermal energy generated by the furnace is used to the maximum. In addition to ordinary tap water, other liquids are sometimes used - oil or anti-freeze.
In this regard, all devices are divided into two large categories:
- air;
- liquid (water).
The choice of one type or another depends on several factors. The most important of them are the configuration and material of the chimney, as well as the characteristics of the device itself.
Air heat exchanger diagram. It is considered less efficient than its liquid counterpart, but has a simple design, making it suitable for DIY
Let's look at how the aerial model works. The design of the device is simple: a durable case with a partitioned internal space. The role of partitions is played by plates or tubes, the main function of which is to slow down the movement of heated gases and direct heat in the right direction.
Some partitions (dampers) are not soldered, but made movable. By sliding the metal plates in/out, you can adjust the traction force, thereby reducing or increasing the performance of the heating device.
Air heat exchangers are called convectors, since their operation is based on the principle of convection. Cold air from the room enters the device, where its temperature rises due to the influence of hot flue gases. When heated, it moves further through another hole - back into the room or into the heating system.
Selection and preparation of the cylinder
The first thing you need to decide is the size of the metal container. The size is chosen based on the area of the room in which the cylinder stove is supposed to be installed. You can choose from the following options:
- 5 l cylinder. A five-liter container can heat a small room. Little fuel fits into it, and only in the form of chips or briquettes.
- For 12 l. The furnace will be able to provide small (up to 3 kW) thermal power. The heat is enough to warm a small workshop, utility room or gatehouse.
- For 27-30 l. You will receive up to 7 kW, which will be enough to heat a garage, garden house or greenhouse.
- For 40 l. Industrial cylinders have a small diameter and thick walls, therefore, the fuel load will be small. It is better to shorten such a container and make a small stove that will hold heat longer and last longer.
Potbelly stove with heater for a bath Source s-proms.ru
See also: Catalog of companies that specialize in the design and installation of fireplaces and stoves
- For 50 l. A propane cylinder is considered the best option for making a potbelly stove; Such dimensions are capable of providing heat to the cottage.
The cylinder needs preparation: removal of gas residues. If cleaning is neglected, an explosion may occur when cutting metal. The cylinder will become safe after the following measures:
- Unscrew the valve to get rid of any remaining gas. You need to set aside a day, so the container is left to vent the gas in the open air or in a non-residential area with good ventilation.
- Then the container is turned over to drain the condensate (any unnecessary container with a lid will do - condensation has a pungent odor).
- At the end, the container is filled with water to the very top for several hours to displace residual vapors. After draining the water, the cylinder can be cut without danger.
Installing a gas burner in a solid fuel boiler
After sound reflection and a real assessment of their capabilities, most home craftsmen still give preference to the modernization of solid fuel boilers that previously processed firewood or coal. A factory-made gas burner is simply placed in their firebox.
To equip your country property, you can purchase a solid fuel unit, which can be converted into a gas one. For example, a Teplodar stove in which a gas burner is mounted
Let's consider the stages of installing a Teplodar AGG burner device:
- Dismantling the firebox door, the ashpan damper (or the ashpan itself, if it is made in the form of a drawer with a solid door), the bumper and the grate. In short, you need to remove all structural parts located within the firebox and ash pan.
- Fixing the burner device. A burner block is mounted in the firebox channel freed from the above elements. If the Teplodar stove is designed for changing fuel, then the burner module is fixed in the channel through standard ears with screws and nuts threaded into them.
- Connecting automation to the remote control. The devices included in the design of the burner block that ensure automatic operation of the boiler are connected to the control panel.
- Thermostat sensor mount. It is installed on the supply pipe, wrapped in insulation to protect against external mechanical and temperature influences, and on top with ties.
- Putting it into operation. It is carried out after checking the draft and burst ventilation of the room with a modernized boiler. Using a simple handle, you select the most suitable mode.
We remind you that in accordance with the requirements outlined in the “Safety Rules for Gas Distribution and Gas Consumption Systems”, all work on installing equipment, replacing burners, servicing equipment and connecting to the network supplying blue fuel must be carried out by gas workers.
The technical documentation attached to the Teplodar stove contains a detailed description of the process of installing a gas burner for converting a solid fuel unit into a gas one
In accordance with federal regulations and standards, it is necessary to conclude an agreement with representatives of gas services for the supply of gas and related services. It is clear that not all remote settlements will be able to be served by employees of gas organizations. However, it is advisable to adhere to the requirements in order to avoid catastrophic consequences.
When it decreases and suddenly goes out, the current coming from the electrical element is weakened, as a result of which the gas supply channel is blocked. Overheating of water in the boiler is detected by a temperature sensor, which transmits a signal to open the contact pair blocking the burner
Should you take risks or value and protect your health with the well-being of your loved ones? It's up to you to decide. It is wiser to refuse threatening measures, but knowing about the process of their implementation is very useful in order to monitor how efficiently and honestly the gas workers work.
What materials and tools are needed
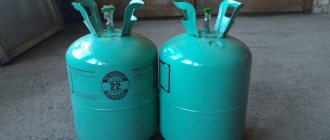
To make a garage or sauna stove from a gas cylinder, choose a steel, seamless propane (household) cylinder with the following dimensions:
- Case length: 1660-1755 mm. Diameter: 219 mm.
- Wall thickness: 5.2-8.9 mm.
The gas must be removed from the container Source f12.pmo.ee
Dimensions may vary, but maximum deviations (especially in thickness) must comply with GOST 949-73 standards. The tools you need to prepare are:
- Welding machine (200 A). Protective equipment (welding mask with light filter, gloves). Electrodes for welding structural steels (diameter 3-4 mm).
- Grinding machine (grinder). It requires cutting and cleaning discs for metal (diameter from 180 mm).
- Workbench with a vice.
- Drill and set of drills.
- To clean up welding slag: metal brush (with metal bristles), sandpaper.
- Tools: pliers, chisel, hammer.
- For marking: tape measure or folding meter, chalk (marker).
The range of materials depends on the size, shape and purpose of the structure. The middle list includes the following items:
- Pipe for chimney. Approximate dimensions: cross-section 120-150 mm, length 400 mm.
- Sheet of steel (thickness minimum 3 mm). The oven door is made of steel.
Stove with a horizontal heating device Source usamodelkina.ru
- Steel reinforcement or rod. Suitable for making a grate, you can make a handle for a door or a heater (if the stove is intended for a bathhouse).
- Metal corner or profile pipe. The materials will be useful for making legs.
If you plan to use a gas cylinder sauna stove, you will need a brick - this is used to build the foundation for the sauna structure. Diabase is ideal for filling the heater. Granite is not recommended; under the influence of high temperature it will quickly collapse.
If you do not have the opportunity to make a grate or other parts, you can purchase them ready-made. At this stage, you need to decide on the type of potbelly stove in shape. Taking into account the orientation of the housing (whether it will be located vertically or horizontally), all working operations are carried out.
Slow burning pyrolysis furnace “Bubafonya”
It is impossible to describe or simply list all the designs of stoves that can be made from cylinders, but it is advisable to consider in detail the “bubafonya” design. This model can be made at home with your own hands.
Safety
Before describing the design of the furnace and its manufacturing technology, let us pay attention to safety issues. We will talk about preparing the cylinder itself for processing. Despite its dense structure, the inner surface of the metal is riddled with a network of microscopic cracks. During long-term operation of the container for its intended purpose, a considerable amount of gas condensate and its sediment accumulates inside these defects. Such a substance may be explosive and is in no way beneficial to health. Before you start working with the cylinder, you need to fill it with water and let it sit for 2-3 days. It is better to perform the operation away from home. When the liquid is drained, the reasons for this recommendation will become clear - it has an extremely unpleasant and strong odor.
Video: how to safely disassemble a gas cylinder
Tools and materials for making the Bubafonya stove
To make such a heating unit with your own hands, you will need:
Table: required materials and tools
| Name | Purpose | Notes |
| Cylinder for furnace body | Manufacturing of the main product | boo |
| Steel rod with a diameter of 10 mm | Making handles for the oven lid and body | From waste |
| Angles 45x45, any profile, pipe cuttings | For support legs | From waste |
| Bulgarian | Cutting blank parts, cutting the cylinder during the manufacture of the body | |
| Steel sheet 6–10 millimeters thick | Making a pancake | |
| Steel strip 40x4 millimeters | Manufacturing of support ribs | |
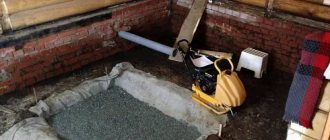
| Cement, sand, gravel and fireclay bricks | Making the furnace support base | |
| Reinforcing bars | Foundation reinforcement | |
| Trowel, shovel, container for mixing the solution | Pouring the foundation | |
| Welding machine for working with ferrous metals and electrodes for it | Making welded joints when assembling the furnace | Possible to rent |
| Electric drill no less than 0.7 kW, set of metal drills | Drilling holes | |
| Measuring tool | Taking measurements and marking | |
| Locksmith's corner | Positioning of parts during assembly, quality control | |
| Kerner | Hole marking | |
| Files flat and semicircular | Removing sharp edges and burrs, adjusting dimensions | |
| Marker black | Marking production | |
| Individual protection means | Goggles, welder's mask, face shield, mittens, gloves, special shoes, rags. |
Manufacturing procedure
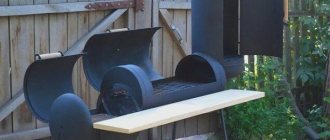
The orientation of the housing is chosen depending on the location and purpose of use. The horizontally positioned design is more convenient for cooking or bathing. The vertical version is often used for heating; They place it in garages: it takes up little space, and the traction in it is stronger.
Potbelly stove made from two cylinders in the garage Source ad-cd.net
Installation of a horizontal stove
The stove-stove is assembled in the following sequence:
- A square hole is marked and cut at the end to install the loading door (sometimes the end is cut off entirely).
- At the opposite end, according to the markings, a round hole is cut out for the chimney pipe.
- A hole for the grate is marked and cut out at the bottom. A box for collecting ash is welded under it (it is made of sheet metal).
- The ash chamber simultaneously plays the role of a blower, so it is supplemented with a door for adjusting the draft. To make the door, a fragment cut from the body is suitable, but you can supply a purchased part. The finished door makes the task easier, as it is equipped with a frame and a latch.
- To make a grate, thick reinforcing (knitting) wire is suitable; a lattice of the required size is cooked from it.
- For safe operation, reliable support is needed. Legs from a corner or runners from a profile are suitable as a stand. The supports are fixed to the body using spot welding; as a result, they must support the weight of the structure along with the loaded fuel.
Grate option Source ytimg.com
- A pipe - an adapter - is welded to the rear round hole, through which the chimney pipe is connected. The pipe needs a thick wall, otherwise it will quickly burn out under the influence of hot combustion products.
Making a drip heater
Most often, craftsmen use old oxygen and propane cylinders with a diameter of 220 and 300 mm, respectively, to assemble droppers. The former are preferable because of their powerful thick walls that can last a long time and not burn out. A pipe made of low-carbon steel (St 3-10) with a wall thickness of 5 mm or more is also suitable.
Advice. The ideal option for a durable housing is a pipe made of heat-resistant stainless steel alloyed with chromium, molybdenum or nickel (for example, 15X1MF or 12X18H12T) with a wall no more than 3 mm. Perhaps you or a neighbor has one in your garage. There is no need to buy it specially - it will be too expensive.
Select rolled metal for other parts according to the drawing of the furnace with top feed of waste into the combustion zone. The blower fan is a “snail” from a VAZ 2108 cabin heater or its Chinese equivalent, the fuel line is a stainless tube with a diameter of 8-10 mm.
The manufacturing technology is as follows:
- Make a fire bowl from a piece of pipe or take a ready-made steel container. It must be removed through the inspection hatch, so do not make the tray too large.
- Cut openings in the body for the chimney pipe and cleanout hatch. In the latter, make a frame and install the door (possibly bolted).
- Make an afterburner. Take your time to drill all the holes indicated on the drawing; do the bottom 2 rows first. You will complete the rest while setting up the oven.
- Weld a cover and an air duct with a flange for mounting the fan to the afterburner. Attach the fuel supply device as shown in the photo.
- Assemble the heating unit and connect it to the chimney.
Advice. For greater stability to the body, it would not hurt to weld a frame from a steel profile or angle according to the example shown in the photo.
The afterburner in the photo is a close-up - side and end views
. To regulate the heating power, you need to provide a fan speed control and a device for dosing the fuel supply (as a rule, an auto-drinker with a jet break is used). According to reviews from craftsmen on a popular forum where heat extraction issues are discussed, fuel consumption in the furnace can be monitored visually. The trend is this: if the oil flows in drops at the break in the stream, then less than 1 liter per hour burns, and when a thin stream flows, more than 1 liter per hour.
Recommendation. Control the fan performance using a cheap Chinese PWM controller (price is about 8 USD).
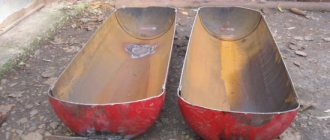
Different designs of drip bowls
After igniting and warming up the heater, it is necessary to set the optimal operating mode. The procedure is carried out according to the same scheme as with the miracle stove: you need to achieve the most transparent smoke from the chimney by drilling additional holes in the afterburner. The ideal flame color is blue, normal is yellow, and reddish is unsatisfactory. In the latter case, low heat transfer, high consumption and soot formation are observed. For details about the design and assembly of the furnace, see the video:
Video description
About making a stove from a cylinder for heating a garage in the following video:
Installation of a vertical potbelly stove
A vertical stove for a bath from a gas cylinder is made in the following order:
- The cylinder is fixed in a vertical position, the upper part is cut off with a grinder (where the fittings are), future holes for the firebox and ash pan are marked below (through which the potbelly stove will be cleaned of ash).
- Two holes are cut out on the front of the body using a grinder. The upper, large hole is for the firebox, the lower, smaller one is for the ash pan. You can use a gas or plasma cutter.
- A grate is installed between the furnace chamber and the ash pan. It is difficult to find it ready-made, of the required size and shape, so the lattice is made independently from reinforcing bars. The reinforcement is cut into pieces of the required size and welded inside the cylinder to the walls along a pre-marked mark.
Location of the firebox and blower Source vsaunu777.ru
Subtleties of operation
Like any potentially dangerous structure, a homemade sauna stove from a gas cylinder is made taking into account fire safety standards. To ensure its operation is correct, safe and economical, the following rules have been developed:
- A minimum gap of 20-30 cm should be maintained between the stove and concrete (brick) walls. There should be at least half a meter to other surfaces, while adjacent surfaces are finished with metal.
- For fire safety purposes, the stove is installed on a metal or concrete (brick) base.
- It is recommended to equip the chimney with a view (damper). This will help regulate draft and save firewood.
- Caring for a potbelly stove includes cleaning the chimney. It is carried out twice, before and after the heating season.
Two-story potbelly stove with increased heat transfer Source aviarydecor.com
Briefly about the main thing
A potbelly stove, converted from a gas cylinder, has remained a popular heating device for decades. It confidently copes with heating small rooms, has convenient dimensions, and can be done by a home craftsman with basic skills in welding and plumbing.
Large household gas cylinders are best suited for production. By design, horizontal and vertical models are distinguished; the former are convenient for cooking, the latter often serve as a source of heat in the garage, bathhouse or country house. The finished stove is installed in a prepared room and operated in compliance with fire safety rules.